
Summer Starts Here - Save up to 70%
To see if this custom-fit item will work for you please tell us what vehicle you'll use it with.
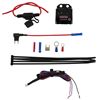
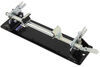
Quickly and easily install a 4-way trailer connector on your vehicle with this custom wiring harness. T-One connector plugs directly into existing wiring. Powered ModuLite reduces strain on wiring system.
Features:
Specs:
Installation
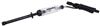
This custom-fit T-One connector plugs into your vehicle's wiring harness, which is located inside your rear cargo area, on both the driver's and passenger's sides. You will need to remove the rear threshold and some interior trim to access the harness. Once you've plugged in the T-connector, run the hot lead up to your car battery. Connect the lead to the included fuse holder, and then connect the fuse holder to the positive terminal on your battery and insert the provided fuse.
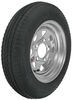
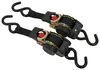
Once installation is complete, the 4-way flat connector will be stowed in an out-of-the-way location in your rear cargo area.
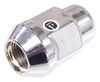
It is recommended that you use a small amount of grease on all electrical connections - the plugs on your automobile and the 4-pole connector itself - to help prevent corrosion.
A ModuLite power module is built into this T-One connector. Because most trailers run on a two-wire system - wherein the brake and turn signals are carried on one wire - the separate brake and turn signals from your vehicle's three-wire system need to be combined so they are compatible with the wiring system of your trailer. This power module functions as a tail light converter to combine the brake and turn signal functions of your automobile so that they run on one wire to properly activate your trailer's tail lights. Note: This will not affect how the tail lights on your vehicle operate.
With a ModuLite, your trailer's lights will be powered without overloading your vehicle's electrical system. Because the module draws power directly from your car's battery and bypasses the electrical routes that are used by a basic wiring harness, there is virtually no draw on your tail light circuits.

California residents: click here
Videos are provided as a guide only. Refer to manufacturer installation instructions and specs for complete information.
Hey everybody, Ryan here at etrailer. Today on our 2022 Lincoln Aviator, we're gonna be showing you how to install the Tekonsha T-One Vehicle Wiring Harness Kit. But before we get into that, why don't we just check this out and make sure it's what you're looking for. So with the Lincoln Aviator, you know, that's a pretty capable SUV, relatively big, makes good power, and things along those lines. And so you get people out here that wanna use some towing with them, right Like, I wanna pull small boat around or camper, utility trailer, whatever the case may be. And if that's what you plan on doing, you're gonna need a way to light up the trailer lights that way, not only safe but, you know, it keeps you legal as well.
And that's where wiring kit like the Tekonsha Wiring Harness is gonna come into play. One of the cool things about this setup is you can mount up your wiring or store your wiring couple of different ways. So, I'm sure everyone's seen before, you know, you pull up to the back of a car and you see that trailer connector hanging down there by the hitch. You can set this one up like this, if you want to, but personally, a really good looking car, if I could not have that down there, that's how I'd want it. And that's how we actually set ours up today.
But if you tow a lot, you can always set it up like that. But let's check out what we got going on here. If whenever you're ready to hook up to your trailer, you can open up your hatch. And then the wiring is actually stored inside. So right here.
So, it keeps it out of the weather, you know, it keeps in better condition, and so on. It gives you plenty of length here and what you would do, and this might seem kind of odd, but the wiring is designed to be able to do this, just drape it over your threshold, you know, stay away from the latch mechanism. Obviously you don't wanna get hung up in that, but you simply just close your hatch, and, you know, when that's done, now you're ready to be able to plug into your trailer. It's like I said, plenty of length, no issues there. And this is going to be a four way flat type connector.
So really common type of connector there. You know, it works with the majority of the small, medisize trailers, ones that you're probably gonna be pulling with your Aviator. So yeah, it will, it'll get the job done, you know. It has nice dust cover there just to kind of go the extra mile to keep things clean. And when it comes to the construction quality, I've always been a big fan of Tekonsha. I've actually ran 'em on my own personal vehicles, on my family's vehicles, and never really run into any issues, you know. They're well built, they feel good in your hand, and get the job done. Other than that, though, you know, at the end of the day, wiring kits are gonna get everything powered up and give you that peace of mind knowing that all your lights are working. As far as the installation goes, to be honest with you, I thought it was gonna be way worse than what it really was. Usually on these more luxury type vehicles, it's kind of a pain. Really wasn't the case with this one. I mean, there's still some work involved, you know, running the wires and everything. Everything's kind of tight, but it's definitely doable. So hopefully I can help you along the way with that, make it a little easier for you. And if you'd like to see how that's done, feel free to stick around. We'll go ahead and wire everything up together now. To begin our installation, we're gonna be here at the back for our Lincoln and we're gonna be working inside a little bit here at the back. So first things first, we're gonna open up our hatch and then we need to remove some of our floor coverings and stuff. So, I'll get that out of the way. You want to fold your third row down as well, which seats are already like that. And we can pull out our cover. And just any of these panels that are sitting in here can easily be removed. You're also gonna want to remove this tray, I guess you could call it, just pull out on it in it, get it up and out of the way. And then this threshold, this piece that runs along through here, that's gonna be popped out as well. And it doesn't look like there's any fasteners. We should just be able to kind of grab it. And trying to get this worked out here. Just like that we are gonna have, what is that Looks like some type of sensor. We'll go ahead and disconnect that. Push down on the tab, separate it, and we'll set this off to the side. We're also gonna remove this side piece here, which these essentially just kind of unsnap. Get that out of the way, And then we're gonna have to get kind of behind this panel. So we're gonna have to peel this back. This hook here is probably bolting the panel to the vehicle though. So it'll probably be easier to remove that. If you take a pick like this or a small screwdriver, get in from the top of it, pop that piece off, that will expose, I believe it is a seven millimeter head screw. You don't have to pull this whole thing off if you don't want to, just make sure the screw is completely loose. And I wanna mention, from this point on, anything we do to one side of the vehicle, we're else gonna do to the other side. 'cause it'll be set up the same way. So it feels like it's loose. It's just kind of free spinning. Then once we're there, we can grab our panel and it might help too, if you kind of peel this weather stripping back a little bit. We're just gonna kind of start to work our way around here and get all the clips released. So you got your panel kind of peeled back some, it's about as far as you need to go, right there is our taillight connector plug and we're gonna disconnect it. So it's pretty tight in here, but kinda like that other connector plug we undid a minute ago, you're gonna push down on the center of it, that piece there, and disconnect it. So what we can do now is grab our new wiring harness and T connector side that has the yellow, brown, and white wires. One end is this gonna plug right in to the factory connector, and same deal on the other end here. So now we can take the red and green T connector wire coming out of our module and run this over to the passenger side. And I just have it running across our threshold. You know, at some point, once we get everything working and kind of towards the end, we'll zip tie this up and secure it and everything. And we'll show you that once it's all buttoned up, but this just runs behind our panel. Same thing as the driver's side. Connector is in the same spot, separate it and then simply just plug the T connector in. Moving back over here to the driver's side, we can get our ground wire hooked up, which is this white one with the pre-attached ring terminal. Turns out there's actually a factory ground right there. So we're just gonna utilize that. We're gonna pull the bolt out with an eight millimeter socket. Take the ring terminal, put the bolt through it and just simply get this started again and tighten it back on. Now we can get our power wire hooked up, so that's the black wire coming out of the module box and on these ends I already stripped back, so you can take the butt connector, place it over the bare end of the wire, and crimp it down. And then you can take the bundle of black wire that comes in the kit and you're gonna strip back ventilation, give those wires a good twist just to keep 'em tight. And then, I like to kinda hold the butt connector there with my tool, put the wire into it and crimp it down. And I'm using a heat shrink and a butt connector, so you can take your heat gun and seal up the ends. So I went ahead and secured up our module box, and might be a little tricky to see, I just kind of tucked it in behind this factory wiring harness, and then just zip tied it to it. And it's solid. It's not gonna go anywhere. And then what we're gonna do is begin to route our power wire towards the front of our vehicle. But since we're right here in this area, I do wanna touch base on something real quick, and that is our four way flat. But since we're right here, I do just wanna touch base on our four way flat trailer connector. So a couple things you can do. You can leave this stored inside and then when you're ready to use it, drape it over to the outside of your vehicle, and that's what I'm gonna do. I just feel like for this type of car, it would probably look best. So I'm gonna leave it right here, if you did wanna route this outside to your hitch, if you towed a lot or something along them lines, if we look right here, there is a big grommet. And I would assume if you took this out, you could get to the outside of the vehicle. You know, you'd cut a slice in it, run your wire through there, seal it up, and then run your four way over. So you got a couple options there, you know, do which one you see fit. But, with that said, I started to route our power wire and I also kind of zip tied everything up like we talked about earlier. Just ran it along this factory harness. All the way over. And then the power wire goes in right through here and in through this pocket. So that wire runs through that pocket. It's kind of tricky to see, but somewhat easy to get to. If you take the wire, there's a vent there. It's almost like a, it's almost grated, if that makes sense. And you just push the wire right through it and that'll feed down to the bottom side of our vehicle where we can get to the wire and run it up towards the front. I'm down underneath again, it's gonna be kind of hard to see but, you know, once the wire's down here, you can start to route it, but it dropped down through here and I just ran it up and over. So we kind of see a piece of the wire there. And I know everything's tight, but, you know, do your best to avoid any hot or moving parts, use some zip ties they give you to keep it secured. Just goes up and over our sub frame there. Just right up and through there. And then wire comes out, and I kind of shot it over towards the outside of our car along the pinch weld there. So like I said, comes out through that panel kind of by our pinch weld. And I literally just ran the wire right through there. It kind of worked out, there's some spots you can secure it, it's kind of halfway hidden and protected by this panel. So I just would feed it all the way through. And then once it kind of gets into this point, what you're able to do, so the wire, it's again, it's gonna be kind of tricky to see, but it goes up kind of behind our wheel well liner up into the engine compartment. And what I did, once we get up there, I'll show you, you can drop a piece of wire or coat hanger or something like that down from the top and then tape your wire to it and pull it right up into position there. So now in the engine compartment, so through this little pocket here, kind of where our washer fluid tank is stored, that's where our wire comes up. All right. And then if you take this panel off, just pops off, that's how we get to the battery. And I ran our wire underneath it into our compartment. And then I took the fuse holder and connected it to the power wire. So just used the butt connector, just like we did at the back, connected it. Then on the other end, I just crimped on a ring terminal. And you strip the wires back, obviously crimp it on. Make sure the fuse is not in it just yet. What we're gonna have to do is hook up our ring terminal to the positive side of the battery. So I got the ring terminal hooked up to the positive side of the battery. There's a nut there on the post, you can take off with a 10 millimeter socket, and then simply just put the ring terminal over the stud and tighten the nut back down. At this point, we can take the fuse, put that into the holder, and then before we put all of our panels and stuff back in the inside, we'll test the wiring to make sure that it's working properly. To test the wiring, I'm using a small tester, which I suggest doing. You can always plug into your trailer too, but your trailer has any issues, you know, it could lead you in the wrong direction thinking something's wrong with the wiring on the vehicle side. But with that side, we'll turn on our taillights. And we'll try our left turn, our right turn, and our brake lights. And that'll finish up a look at and our installation of the Tekonsha T-One Vehicle Wiring Harness on our 2022 Lincoln Aviator..
Average Customer Rating: 5.0 out of 5 stars (6 Customer Reviews)
Quickly and easily install a 4-way trailer connector on your vehicle with this custom wiring harness. T-One connector plugs directly into existing wiring. Powered ModuLite reduces strain on wiring system.Excellent customer service and product. Fast shipping and clear instructions, no need to shop anywhere else!!


Do you have a question about this Custom Fit Vehicle Wiring?
Info for this part was:
At etrailer.com we provide the best information available about the products we sell. We take the quality of our information seriously so that you can get the right part the first time. Let us know if anything is missing or if you have any questions.


Thank you! Your comment has been submitted successfully. You should be able to view your question/comment here within a few days.
Error submitting comment. Please try again momentarily.