
Summer Starts Here - Save up to 70%
To see if this custom-fit item will work for you please tell us what vehicle you'll use it with.
Thank you! Your comment has been submitted successfully. You should be able to view your question/comment here within a few days.
Error submitting comment. Please try again momentarily.
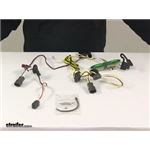
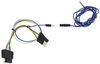
Quickly and easily install a 4-way trailer connector on your vehicle with this custom wiring harness. T-One connector plugs directly into existing wiring - no cutting, splicing or tapping required. Circuit-protected converter guards against shorts.
Features:
Specs:
Installation
This custom-fit T-One connector plugs into your vehicle's wiring harness, which is located behind the driver's-side and passenger's-side tail lights. You will have to remove some interior trim and the tail light assemblies to access this harness.
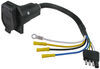
Once installation is complete, the 4-way flat connector will be stowed in the spare tire compartment of your rear cargo area.
It is recommended that you use a small amount of grease on all electrical connections - the plugs on your automobile and the 4-pole connector itself - to help prevent corrosion.
Circuit-Protected Tail Light Converter
A tail light converter is built into this T-One connector. Because most trailers run on a two-wire system - wherein the brake and turn signals are carried on one wire - the separate brake and turn signals from your vehicle's three-wire system need to be combined so they are compatible with the wiring system of your trailer. The tail light converter combines the brake and turn signal functions of your automobile so that they run on one wire to properly activate your trailer's tail lights. Note: This will not affect how the tail lights on your vehicle operate.
This converter safeguards itself and your vehicle against possible electrical shorts and overloads with integrated short circuit protection. Just install the connector as indicated and rest assured that the wiring system of your vehicle will remain feedback-free.

California residents: click here
Average Customer Rating: 4.8 out of 5 stars (50 Customer Reviews)
Quickly and easily install a 4-way trailer connector on your vehicle with this custom wiring harness. T-One connector plugs directly into existing wiring - no cutting, splicing or tapping required. Circuit-protected converter guards against shorts.This is the second time I have purchased from e-trailer and they provide a wonderful service before and after the sale. The ordering is very easy on their site due to the great search engine for finding the correct items for an individual vehicle.
As for the products- well installing the wiring harness too me about 45 minutes and most of that time was spent in removing/re-installing the trim panels and tail lit assemblies. As a computer professional I only wish some of the software could be as much "plug&play as these wiring harnesses are. Every this is provided in the package and instructions are very clear and concise.
I recommend e-trailer and the T-One wiring harness to everyone needing to do a new install.
This,by far,was the easiest time I've ever had wiring a vehicle for a trailer.The harness for a 2005 Hyundai Tucson fit perfectly-no worries
about anything not fitting,or not enough wire to reach both sides.I was
finished in about 20 minutes and was honestly stunned.
The harness arrived faster than I thought it would,and was well pack-
aged.Thanks for the great service,and I am extremely happy with the
product.
Perfect fit & plug n play

I purchased a hitch receiver kit for a Hyundai Tucson about a year ago. Since I am not super car savvy, I had my local shop install the hitch for a very reasonable price. Everything turned out great and I pull my boat behind the truck fairly regularly. The product works just as it is supposed to. It was shipped out in a timely fashion, also. In addition to the hitch kit, I also purchased a lighting harness to run from the truck to the trailer. I installed that myself in about 20-30 minutes. The instructions were easy to follow and I have had zero problems with the lights. Great products and great service. I would highly recommend!
With the help from your [online] video it was easy to install it took only 30 minutes. The only difference between the video and the item I received was that I had to secure the transformer box there was no double-sided tape on it but it was easy to do thank you

Durwood

12/8/2020
Awesome
Great video online on how to install the kit. Worked perfectly.

John
3/19/2019
Still going strong! No issues! Great product.
Was easy to install & works perfect. Price was for harness was reasonable & no cutting wires everything plugs in.5 stars. Also the trailer hitch,was easy to install bolts line up perfectly took my husband about 1 & half hours to harness & hitch & he took his time.
All the way from Purchase to shipping and installation went great. I've wired a couple trailers in my day but this was the first time I traced the problem to the vehicle's connections. Once I found the part on ETrailer.com I found their installation video for my vehicle. I compared that to the existing wiring and found the manufacturer had used a similar wiring adapter when we originally purchased the car. That unit had failed. No power was coming out the adapter plug causing all the trailer lights to fail. Again using Etrailer.com's video I was able to easily unhook the bad unit and install Etrailer.com's wiring to fix the problem.
Even how to remove the vehicle panel's and rear lights came in very helpful.
If you've never removed a rear tail light on some vehicles it can be a very trying thing not trying to break connectors or other parts of the vehicle. All in all once the wiring and module was connected and hooked to the trailer I was so relieved to see the tail lights do their job again. No more towing and waiting for a ticket :)
Hi Carla M., The Curt Trailor Hitch Receiver that you recommended for my 2005 Hyundai Tucson fit like a glove. The directions were great and it took less than an hour to install especially since my good friend has a lift in his garage. Basically all you see is the 2" receiver end. It's awesome. The Wiring Harness was a little more challenging to install and fortunately my good friend had all the right tools,and as a former autoshop teacher, the knowledge to go along with them. Don't know if I could have hooked the harness up by myself.
I was hesitant about buying this harness as I thought it was a little pricey, and figured I could splice the wires myself. Not to mention I wasn't sure how well it would "ACTUALLY" fit with the factory wiring. It could not have been a more perfect fit. Wires were plenty long enough, all connectors fit perfectly, wire seems to be a good gauge for the application. Installation took me about 20 minutes from start to finish. It was a breeze. I would buy this product again and recommend it to anyone. Thank you etrailer.... well done!
Works as advertised, shipping was fast and instructions were super simple. Great customer service too!

Phil S.
3/28/2018
Fantastic, no problems!
The harness itself was easy enough to connect. The operation was hindered by the poor resolution of the pictures on the instruction sheet in the box–the .pdf file available online is a much better source. (http://www.etrailer.com/instructions.aspx?pn=118397)
The directions for loosening the tail lights and (especially) the interior panels lacked detail. Anyone who is not familiar with the fastening (and unfastening) of the lights and panels is prone to damaging them. There is only one picture illustrating the loosening of side panels, and it shows only the most trivial action. I’ve included here the procedure that I worked out. (There may easily be a better method–and it would be a wonderful thing if etrailer would document this operation in a video.)
To start, the motion to remove the tail light is a slide straight out to the side, anything more than a very gentle pull means you're going in the wrong direction–there is no twist or turn when removing the light assembly. There are two, plastic alignment pins that are part of the tail light assembly. They sit on the outside edge of the back of the light assembly and point straight in toward the truck interior. Take a careful look at picture "D" in the online .pdf. It does look as if part of the motion is a pull or turning motion to the rear, but there is no rearward or turning motion.
The instructions for the interior panels simply say "be careful not to damage clips" without any directions on how one is supposed to manage that, yet getting these things loose or off without breaking them is key to the operation.
The threshold plate, once the two screws are removed, must be gently worked up--there are insertion-type fasteners clipped on the bottom which will free if one starts from one end, prying only an eighth of an inch or so and working along the whole length, and then repeating the operation until the unit comes completely free. A thin plastic spatula or a wood shim work should well for this.
The side panels are more complex. The fasteners will break and the whole panel can be cracked if too much force is applied. Carefully examine picture “G of the online .pdf. Note how far away the panel must be pulled to do the installation. There must be room for hands and a drill on the passenger side. The driver side need not be opened so extremely–only a hand is required. This means that several clips of two different varieties must be unfastened, especially on the passenger side.
At the upper left of picture “G,” the two different “clips” can just be made out. At the very top is a plastic tongue or tenon with a catch at the bottom of the outer end. There are several of these tongues along the inside, top edge of the panel, each about 8-12 inches from the last. Below the tongue in the picture can be seen the tip of a white insert. This insert came from the hole in the body panel that is visible in the upper, center right of the picture. There are three of these white inserts, and they are themselves held by fragile mounting sockets on the back of the panel. The socket is not visible in the picture, being just hidden by the lip of the panel. The insert’s panel socket does open to the bottom, and the white insert’s head slides in and out of the socket from the bottom.
The proper motion to loosen the panel seems to be a gentle push up and slight pull out–perhaps no more than a quarter inch outward. The pull up has to be a half-inch or so, and this requires that the quarter-inch pull out clear a lip where this lower panel meets the next panel from above. The white inserts may stay in their holes, sliding out from their panel sockets, or they may stay in the panel socket, coming out of the hole, either is ok at the moment. They key is that the upward motion directs the pressure toward the open bottom of the panel sockets, and at the same time, the motion helps to lift the first tongue on the upper edge past its catch. It might also be possible to slip a small screw driver behind the panel to push and lever against the inserts to get them out. I didn’t try that, and you’d need to be careful to not scratch the paint. A shim might also work for this. I’d start from the bottom and work up if I tried this technique. It’s worth a try, especially if the pull up and out isn’t doing it for you.
Once the panel is free enough, work your hand in behind the top of the panel, locate the end of the next tongue’s clip protruding inside the receiving sockets and push the tongue up and out.. You’ll need to do at least two of these on the passenger side. Three is certainly better if you can get your fingers back that far–but that was farther than I could squeeze. In retrospect, I might have been able to reach that third one with something thin, perhaps a screwdriver, to push it up and out.
Follow the directions on the sheet for hooking up the wiring. Examine the T-connectors on the harness before trying to disconnect the ones on the vehicle, and maybe do a sample plug and unplug there–they disconnect easily if one is doing the right thing (an easy push in on the small retaining lever on the side)–and break easily of one does it wrong. Don’t pull on the wires, ever.
Be very careful at the point where you must drill a hole behind the passenger side panel to attach the grommet. It is all to easy at that point to pull the panel too far away and crack the plastic. If the installation did not require drilling a hole behind the passenger panel, it would be much safer and easier operation. Also beware of dropping the screw to hold the grommet–there are places nearby and below where a screw can disappear forever.
When reattaching the side panels, the simplest method seems to be to have the white-plastic inserts in the panel sockets–not in their holes on the truck body. This allows you to guide the panel into place, directing the tongues and inserts into their receiving sockets and holes.
The harness wires from the driver side must run across the spare tire compartment to the passenger side. Rightly or wrongly, I routed them beneath the plastic threshold so that they would not dangle.
That was by far the easiest install I've ever done. Thanks etrailer for the great install instructions and expediting my order so quickly. I hated to pay overnight shipping but couldn't find this harness anywhere in town and was on a time crunch. All lights functioned after installing. Now off to buy my trailer! If I had any negative feedback, my kit didn't come with the double sided tape for converter. I improvised and secured it with a screw. Probably a better way to install converter anyway. Can't go wrong ordering from etrailer!
If you can follow instructions, and have a little bit of patience and understanding, then you will have no problems putting this harness in. Took me just around 1 hour, and that includes cleaning everything that I removed. Instruction were good and accurate. Will buy all my trailer wire harness's from etrailer.com from here out!
Very easy to install, hardest part was drilling in the ground to the vehicle. Have yet to tow anything, but the lights still work so that is always a good sign.
The installation video makes installing this on your vehicle a breeze- takes 30 minutes tops, very helpful operator when ordering, all in all, etrailer makes picking out the parts you need very easy, and their service is great- I'm very pleased!
This wiring harness makes hooking up wiring a breeze. I had it done in no time. I would highly stress being careful removing the tail lights. There are a couple of clips that are super thin and easy to break.
Great price...easy install

Bruce I.
11/27/2022
Working exactly as promised. Easy to install per instructions
SOooo easy to install, cleanSo quick, harder to read the instructions than do the job. Took about 35 minutes. This is the only way to go. I've installed brand X, which is cheaper, but always end up trying to figure out which wires to spice into and always end up doing it wrong the first time. Brand X is always a 3 hour or more job. This system is so slick, nothing to mess up and worked right first time. This "T" connector system is terrific.
Good instructions and it worked just fine! Like that entire harness is inside the vehicle and won't get wet when not in use. Only issue is that to connect to trailer, I have to close the cargo door on the 4-wire cable. I don't want to sharply bend the cable. Must be a better way.
Great product
So easy to install, I installed the wiring myself. It was so easy! Took less than an hour to install hitch and wiring. It really surprised me how easy it was and it works!
Wiring was straight forward and direct plug in. I couldn't have asked for an easier install.
we ordered the trailer reciever for hyundai tuson , arrived in good shape & earlier than expected . was very simple to install, evey thing was as they said it would be, every thing lined up, like it was made to order. I am 75 years old and if I can put it on in 30 minutes any body can . thanks for a great product
After having afriend try to hook up the harness I bought at the auto parts store he shorted out the whole right side of my SUV. The repairs cost me over six hundred dollars in Memphis Tenn., and six hours of travel time. Your kit hooked up without a problem I will be useing your products from know on. An no more good ole boys to work on any of my cars.
Thank You
Do you have a question about this Custom Fit Vehicle Wiring?
Info for this part was:
At etrailer.com we provide the best information available about the products we sell. We take the quality of our information seriously so that you can get the right part the first time. Let us know if anything is missing or if you have any questions.


Jeff G.
6/9/2014
Still consider it the easiest tow wiring Ive ever done.