
Summer Starts Here - Save up to 70%
To see if this custom-fit item will work for you please tell us what vehicle you'll use it with.
Thank you! Your comment has been submitted successfully. You should be able to view your question/comment here within a few days.
Error submitting comment. Please try again momentarily.
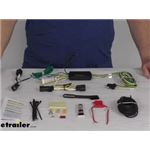
Quickly and easily install a 4-way trailer connector on your vehicle with this custom harness. T-connector plugs directly into existing wiring. Powered converter reduces strain on wiring system and is made using SMT to ensure superior performance.
Features:
Specs:
Installation
This custom-fit T-connector plugs into your vehicle's wiring harness, which is located behind the driver's-side and passenger's-side tail lights. You will have to remove the tail light assemblies to access this harness. Once you've plugged in the T-connector, run the hot lead up to your car battery. Connect the lead to the included fuse holder, and then connect the fuse holder to the positive terminal on your battery.
Once installation is complete, the 4-way connector will be stowed in an out-of-the-way location within your trunk.
It is recommended that you use a small amount of grease on all electrical connections - the plugs on your automobile and the 4-pole connector itself - to help prevent corrosion.
A tail light converter is built into this T-connector. This converter is a circuit-protected, battery-powered unit that bypasses the electrical routes that are used by a basic wiring harness. As a result, there is virtually no draw on your tail light circuits.
Because most trailers run on a two-wire system - wherein the brake and turn signals are carried on one wire - the separate brake and turn signals from your vehicle's three-wire system need to be combined so they are compatible with the wiring system of the trailer. This converter combines the brake and turn signal functions of your automobile so that they run on one wire to properly activate your trailer's tail lights. Note: This will not affect how the tail lights on your vehicle operate.
Curt builds each tail light converter using surface-mount technology (SMT). This method of construction involves soldering electronic components directly to the surface of a printed circuit board. SMT eliminates the need for leads, which are used in older through-hole technology. The result is a circuit board that is smaller yet provides more routing area and that offers superior performance, reliability and durability.
Circuit boards constructed using SMT have been shown to perform better under rough conditions with excessive vibration than those made using the through-hole method. And where would vibration be more likely to occur than in towing applications? Curt converters also produce less heat, leading to increased durability and longer life. In addition, lower levels of resistance ensure better performance, especially for parts that operate at higher frequencies.
Each Curt circuit board is made using high-quality components that are pieced together in the most technologically savvy fashion, leading to greater predictability and reliability in functioning.

Videos are provided as a guide only. Refer to manufacturer installation instructions and specs for complete information.
Hey everybody, how's it going Today we're gonna be going over and showing you how to install the CURT T-Connector trailer wiring harness here on a 2019 Ford Escape. So this trailer wiring harness is gonna allow you to tow a trailer here with your Escape because it is one of the few required things that we need in order to tow a trailer. Now in addition to this, we're gonna need a trailer hitch and a ball mount/hitch ball. All of which we offer here at etrailer. Now the trailer wiring harness is simply put is gonna transfer those signals from the vehicle to our trailer so we can let other motors down the road know what signals we're gonna be making. A lot of the time your trailer is actually gonna block the taillights on your vehicle.
So we still need a safe way to communicate those signals to other. This is not only a state requirement, it's also a legal requirement in every state. Now this kit is gonna provide us with a four-way flat also known as a four-pole trailer connector. This is gonna carry over all of your basic lighting signals, such as the stop and turn signal circuits for either side, as well as the running light circuit. Now, nine times outta 10, this is gonna be what you need here for the Escape.
Now if you have a larger trailer with electric brakes, you'll actually have to adapt this to a seven-way and we have some kits for that here at etrailer as well. But again, nine times outta 10, you're just gonna need the standard four-way for all your basic lighting functions. So this kit is actually going to be completely plug and play. Therefore, you don't have to do any splicing into the vehicle which everyone likes. I mean, it's obviously nice.
We don't wanna potentially damage the vehicle or avoid our warranty. Now this does actually require a power wire to be ran to the front of the vehicle to the battery. We get a lot of people to ask us if they could hook this up to something inside at the rear. No, you cannot. You do have to run it to the front.
But having this powered modular light box is really actually gonna help us because it's gonna protect everything. It's gonna protect the vehicle from the trailer and vice versa. It's also not gonna be pulling power from your vehicle's taillight so you don't have to worry about overloading those circuits. Now the rest of the installation is pretty simple. The bulk of it, as we said, is routing the wire from the front to the rear. But aside from that, again, it is very straightforward. This is definitely someone with little to no mechanical experience can do by themselves at home in just a few hours. You will need some wire crimper and wire strippers, but that's about it as far as tools goes. Everything else is pretty basic. Let's go ahead and walk you through the entire process step by step now. So the first step for installation today we need to open up the hatch on our vehicle here. And inside next to our taillight pocket, we're gonna have these two little circular plastic covers. We'll take a small flathead screwdriver and pop those out. Now once we do that, we're gonna take an eight millimeter socket and remove those two screws that we just revealed. Next, we're gonna pull the taillight out and away from the vehicle, making sure we're careful to pull straight out so we don't damage any of the alignment tabs. Now once we have the taillight out and away from the vehicle, we're gonna go ahead and remove this electrical connector here. So this is usually held into place with a tab. So if we press down on that tab and pull out, you should be able to remove the taillight. So we've got this side out, we're just gonna repeat those same few steps over on the other side. Now at this point, we're gonna be removing everything from the cargo area here because we actually need to remove the floor panel. So everything you have in your trunk, go ahead and get out now. So our floor covering is just gonna pull straight up and out. Now that we have all the other stuff out here, we've got our floor covering off. We need to look in the back corner here. Now you may have one or multiple electrical boxes. Depending on how many you have, you wanna go ahead and remove the connectors for all of them. So we just have the single black one back here. Just go ahead and pull these connectors off. There's a little tab you press, pull straight out. Pretty simple and straightforward. Now we need to go ahead and remove these storage trays. So this is done by removing these two little push pin fasteners with a trim panel tool. So let's go ahead and pry those out. And again, we have two of them, two on either side there. And once we get those out, these are just gonna lift up. Next will be removing our threshold panel here. So on the inside we're gonna have a torque screw on either side, which we'll remove with a T25 torx bit. And now we have a couple more fasteners before the threshold panel comes out. We have some push pin fasteners here on the inside. So one on either side. You're gonna use a flathead screwdriver to pry that up. And I'm just gonna use the flathead screwdriver to pry it up and then I can come back with my trim panel tool. Get a little bit more grip on there. And now we're just gonna pull up on our threshold panel here. There are still some clips holding it in place, but those are just gonna pull straight up and out. You don't have to worry about releasing those. Next we're gonna be prying our panels outwards. So we're gonna take a trim panel tool. I'm gonna get it underneath the panel there, lift up, and I'm gonna sneak my trim panel tool back behind the panel here and release the fasteners. Now we're gonna continue doing this all the way up until we get to about this point here and then the panel separate. We only need to do this lower section, about like that. And then now we're gonna go ahead and press this grommet in here. Just remove it from this body molding. So next I'm gonna go ahead and take a pair of scissors or heavy duty shears. And I'm gonna be very careful not to cut the wires, but I am gonna be cutting this grommet. So I'm just gonna cut all the way up to about here. Now I'm gonna take our wiring harness here that comes in your kit. I'm gonna be taking the end with the yellow connectors. I'm going to pull back this panel here, reach inside here. We're gonna be reaching in there until we feel for that hole that the grommet for our taillights came through. And then on the outside here, you should be able to just push your connectors through just like so. So now once I have my connectors through there, we're gonna place these wires, pull it out a little bit more. We're gonna place those wires through the slit in the grommet. And then I'm actually just gonna resit that grommet. Now it's a little hard to do with just on the outside so I'm gonna have my fingers come through the inside there and get us some assistance. There we go. Just like that. And now I'm gonna take the silicone that comes in my kit and I'm gonna fill that remaining gap. So here's that silicone. I'm just gonna put a nice thick bead there where we cut our grommet. Now we're just gonna go ahead and make all of our connections here. So they're only gonna plug in one way. This one goes to the factory connector. This other one goes to the taillight, which we'll go ahead and reinstall now. Next we're gonna be using our double sided tape that comes in your kit here to secure our converter box. So just peel one side back, stick it on the back of the converter, peel the other side back and then we're just gonna find a nice flat surface inside the body of the vehicle here to attach it to. I'm gonna hold it there for a couple seconds so we get good adhesion. Next I'm gonna take the self tapper that comes in our kit and this white ground wire with the ring terminal on there. And I'm actually just gonna ground it to the body in here. Now I'm just gonna be going directly above the converter box. You wanna make extra careful that you're actually not drilling into the exterior panels on the vehicle. Next, I'm gonna take our two connectors here with the green wire and we're gonna be routing this behind where that threshold panel was all the way over here to the other side of the vehicle. And then we're gonna pop this panel off, cut the grommet, and attach the wiring harness just as we showed you over on the other side. It is the exact same. So we're gonna go ahead and knock that out now and then we'll pick back up with our installation over on this side with our power wire. So now on the driver's side, we're gonna come back here and look on the floor for this grommet here. Now it's pretty easy to identify. We're gonna take our trim panel tool and we're gonna pry it out. Now whether you get it out the front or it pops out the bottom, either way we do need to remove it. So once we have this grommet, what I'm gonna do is I'm gonna take a razor knife. You guys can take a pair of scissors or just a knife and gonna cut a nice large slit in that. And the reason I'm doing that is I'm actually gonna sneak my power wire down through that hole so we can route it underneath the vehicle and up to the battery. Now something else I'm gonna be doing that it's not required for you guys is gonna be in regards to the actual trailer connector. So normally as our instructions put, our trailer connector is actually designed to just sit inside the vehicle, meaning you're gonna ravel it up like so, tuck it in here and then when you need to use it, you're gonna drape it out the hatch and it's actually gonna be closed by this hatch here. It's gonna be secured by the hatch. There's some weather stripping there so it's not gonna pinch it or anything. Now that works fine, but it honestly doesn't look the best. You're gonna have this wire dangling down on your bumper, which a lot of people don't like. And if you're one of those people, we're gonna show you how to get around that 'cause we're actually gonna be routing our trailer connector underneath the vehicle and securing it to our hitch. So if you guys wanna do that, great. Go ahead and follow along. If not, then you'll just pay attention to the power wire part of this installation for these next few steps. But since we are gonna be routing it outside the vehicle, what I'm gonna do now is you actually need to go ahead and cut this somewhere. So you have to cut these four wires and splice them back in. So we're gonna cut it preferably. So our connections are gonna be inside the vehicle. So probably closer to the converter is where I'm gonna cut it. And then I'm gonna route our wire down through the grommet and then we'll reconnect everything underneath. So let's go ahead and take care of the power wire real quick here. So we're gonna take the primary wire that comes in your kit, splice off some of the jacket and crimp on a yellow butt connector, just like that. And then the other end of this butt connector is gonna go to the wire coming from our converter box. So this is actually already pre-stripped for us. Let's go ahead and crimp that on. Now what we're gonna do is I'm going to take the other end. I'm gonna have to unravel this, but I'm gonna take the other end of this and I'm gonna be routing it through that hole in the grommet in the top. So just like that. Let's go ahead and get this pulled all the way through. So what I did is I went ahead and separated each of the wires in this four-way. I just took a razor knife and I carefully cut in between them and then separated them out. And then I'm gonna go ahead and cut these. And again, you guys don't have to do this step. You guys can just skip forward a little bit further in the video if you're just gonna be leaving this inside the vehicle. So now I'm gonna take those wires that we cut. The end with a trailer connector, I'm gonna reach underneath the bumper and I'm gonna fish these through that grommet that we removed. So now that we have our wires up into the cab here, we're gonna go ahead and stick them through the grommet. And then once we do that, we're just gonna attach them to the wires coming from our converter box that we cut earlier, which are these here. Now again, you'll need four blue butt connectors to do this, which are not included with your kit, but, again, this is only needed if you wanna route that trailer connector outside the vehicle. So we're gonna go ahead and button this out now and then we'll finish up with the power wire. So now I'm gonna tuck the other end of my power wire down through that opening there. I'm gonna grab it from underneath to pull the rest of the slack through and then we're gonna resit our grommet. Now once we do get the grommet reseated there, we're gonna come back with our black silicone. And similar to we did earlier with the taillight connectors, we're just gonna make sure there isn't any gaps there where we cut it. So now that everything's pretty much wrapped up inside the vehicle, all we have to do is come underneath and route our power wire and then secure our trailer connector depending on if you routed it outside. So for the rest of the steps now, we're just gonna be securing some stuff inside the vehicle there and then we'll pick back up underneath. So now we're underneath the vehicle, we're gonna take our power wire here and I'm gonna route it all the way up to the front of the vehicle and into the engine bay where our battery is. We're gonna go ahead and do that now and then we'll show you the path that we took. So we've got everything routed here, so we're gonna go ahead and follow from the grommet to the front of the vehicle. Now on this first section here we have the heat shield, which is pretty sharp. So I went ahead and use some wire loom that way it doesn't pierce our wire. And then I went up and over the rear subframe here all the way over to this point and you're gonna see our first zip tie there, pulling tension on that to keep it from falling down. And then we're gonna go up and above this panel here. And at this point you're gonna take a 10 millimeter socket and remove these three nuts here. That way you can pull the panel down and you can sneak your power wire above that. And then we're gonna go all the way to the front and here's where our wires are gonna come out at. And from this point, we're gonna go up into the engine bay. So there's a little pocket here beside the lower control arm mount, that's gonna allow you to fish the wire up into the engine bay and our battery's gonna be right up in there. If you're not sure how to get your wire up there, use some sort of fish wire device. I like to use a piece of airline tubing and basically go from the top, stick it down through the engine bay. Then once you pull it down here, you can tape your wire to it and then pull your wire up into the engine bay. Now your wire's gonna come up around this area here, you can see the black wire. And what I did is I went ahead and attached it to the fuse holder that comes in your kit here. So on one end you're gonna crimp on a butt connector, connect that to your power wire, and the other end is gonna have a ring terminal. Now you wanna be careful when you're tightening down this ring terminal here because this nut actually does not come all the way off. You'll take a 10 millimeter socket and you'll loosen it up and then you're actually gonna cut the end of your ring terminal so it makes a little opening. Then you can slide it over that stud there and pinch it together as best you can. Then re-secure that nut so you get a nice tight and secure connection. Then all the thing left to do is to go ahead and reinstall your fuse here, that 10 amp fuse. Now we're ready to test the system out to make sure it's working properly. Now real quick before we do our testing, here you can see we have our trailer connector mounted. So we mentioned there being a couple different options for this. Now if you did choose to route it outside the vehicle, you're pretty much just gonna go over behind the bumper there once we go through the grommet. And then you could either secure it to the safety chain loops on the trailer hitch with the dust cap it comes with or you can purchase a combo of brackets here that we offer at etrailer for a little bit of a cleaner install look. But now we're just gonna go ahead and plug in our little four-pole tester here. Now if you guys don't have one of these, you can just use your trailer. Keep in mind, if there's any issues on the trailer, it will carry over to our testing on the vehicle. Let's go ahead and jump inside our vehicle now and run through our signals. So there we go. Now we know everything is hooked up and working correctly. And that's gonna do it today for our look and installation of the CURT T-Connector trailer wiring harness here on a 2019 Ford Escape..
Average Customer Rating: 4.9 out of 5 stars (24 Customer Reviews)
Quickly and easily install a 4-way trailer connector on your vehicle with this custom harness. T-connector plugs directly into existing wiring. Powered converter reduces strain on wiring system and is made using SMT to ensure superior performance.Arrived 2 days early. Installation video was spot on and made the task very doable. Only change I made was to run the power line totally in cable loom.

Not too difficult to install, but I would recommend using a car lift so you don't have to work from your back (review includes Brake Controller and 4-7 Pole Adapter)
Fit perfectly! Very easy to install and like it actually came on the vehicle when purchased. Video on your site was extremely informative and helpful!
Was here when you said it was
Looks great! fast delivery awesome com munication!!!@
This was the Firt time I've used your services. Fantastic website, easy-to-use, great product information and installation videos, good prices, amazing order tracking information. I haven't done the installation yet - will see how that goes. So far this has been a very good experience.
Order service was great. The hitch and wiring harness arrived sooner than I expected. Love the matte finish on the hitch. Very happy with both the hitch and the supplier.
Everything easily assembled. Access to videos masses assemble easy.
Service and delivery was fast, accurate. Everything arrived intact and not beat up with nothing missing. Getting installed today. I'm a 70 year old woman so someone other than me is doing the install. They do it every day and the cost is still going to be $100 less combined than others hitches alone. Very nice.
All was great, EXCEPT! It was delivered to the wrong address, it was plain on the shipping label, but the delivery guy could not read, a neighbor delivered it to me.
arrive quickly in great shape
Fit and works as it should
It took same time to get in but it looks good
This place is the best!!!!
Much easier than anticipated, works just as expected, very happy with it. Crisp and clean.
Super easy to install, I'm very happy with it.

Do you have a question about this Custom Fit Vehicle Wiring?
Info for this part was:
At etrailer.com we provide the best information available about the products we sell. We take the quality of our information seriously so that you can get the right part the first time. Let us know if anything is missing or if you have any questions.


Jeff
4/13/2024
After my wiring harness that has been in service for a year, it is still performing as if it was just installed.