
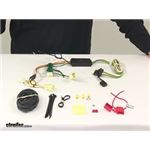
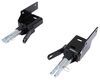
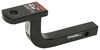
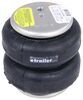
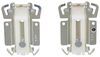
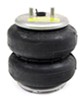
Curt T-Connector Vehicle Wiring Harness with 4-Pole Flat Trailer Connector
(72 reviews)
Price: $51.75
In Stock
Curt T-Connector Vehicle Wiring Harness with 4-Pole Flat Trailer Connector
Item # C56035
Retail:$88.79
Our Price: $51.75
You Save: 42%
Will this fit?
To see if this custom-fit item will work for you please tell us what vehicle you'll use it with.
In Stock
Thank you! Your comment has been submitted successfully. You should be able to view your question/comment here within a few days.
Error submitting comment. Please try again momentarily.


- All Info
- Reviews (72)
- Q & A (0)
- Videos (4)
- Photos
CURT Custom Fit Vehicle Wiring - C56035
- Custom Fit
- Trailer Hitch Wiring
- 4 Flat
- Powered Converter
- CURT
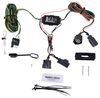
Quickly and easily install a 4-way trailer connector on your vehicle with this custom harness. T-connector plugs directly into existing wiring. Powered converter reduces strain on wiring system and is made using SMT to ensure superior performance.
Features:
- Provides a 4-way flat trailer connector at the back of your vehicle to power your trailer's signal lights
- Compatible with 5-pole, 6-pole and 7-pole adapters (sold separately)
- Connects quickly and easily
- Locate connection points in rear cargo area
- Plug in T-connector
- Run hot lead to car battery
- Includes a tail light converter to ensure that your vehicle's wiring matches that of your trailer
- Powered module connects directly to battery to avoid overloading vehicle's electrical system
- Constructed using surface-mount technology (SMT) for consistent, reliable performance
- Maximizes trailer light yield and intensity while producing minimal heat
- Ensures superior operation in rough road conditions
- Comes with dust cap for 4-way flat connector
Specs:
- Maximum amperage:
- Stop/turn lights: 3 amps per circuit
- Tail lights: 6 amps per circuit
- Limited 1-year warranty
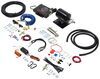
Installation
This custom-fit T-connector plugs into your vehicle's wiring harness, which is located behind the driver's-side and passenger's-side interior trim panels in your rear cargo area. Once you've plugged in the T-connector, run the hot lead up to your car battery. Connect the lead to the included fuse holder, and then connect the fuse holder to the positive terminal on your battery.
Once installation is complete, the 4-way connector will be stowed in an out-of-the-way location within your cargo area.
It is recommended that you use a small amount of grease on all electrical connections - the plugs on your automobile and the 4-pole connector itself - to help prevent corrosion.
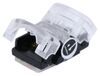
Powered Tail Light Converter with Surface-Mount Technology
A tail light converter is built into this T-connector. This converter is a circuit-protected, battery-powered unit that bypasses the electrical routes that are used by a basic wiring harness. As a result, there is virtually no draw on your tail light circuits.
Because most trailers run on a two-wire system - wherein the brake and turn signals are carried on one wire - the separate brake and turn signals from your vehicle's three-wire system need to be combined so they are compatible with the wiring system of the trailer. This converter combines the brake and turn signal functions of your automobile so that they run on one wire to properly activate your trailer's tail lights. Note: This will not affect how the tail lights on your vehicle operate.
Curt builds each tail light converter using surface-mount technology (SMT). This method of construction involves soldering electronic components directly to the surface of a printed circuit board. SMT eliminates the need for leads, which are used in older through-hole technology. The result is a circuit board that is smaller yet provides more routing area and that offers superior performance, reliability and durability.

Circuit boards constructed using SMT have been shown to perform better under rough conditions with excessive vibration than those made using the through-hole method. And where would vibration be more likely to occur than in towing applications? Curt converters also produce less heat, leading to increased durability and longer life. In addition, lower levels of resistance ensure better performance, especially for parts that operate at higher frequencies.
Each Curt circuit board is made using high-quality components that are pieced together in the most technologically savvy fashion, leading to greater predictability and reliability in functioning.
56035 CURT T-Connector - Surface Mount Technology - 4 Wire
Installation Details
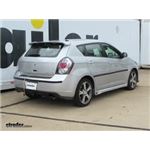
This Product Fits The Following Vehicles
- 2009 - 2013 Toyota Matrix
- 2009 - 2013 Toyota Matrix
- 2009 - 2010 Pontiac Vibe
- 2009 - 2010 Pontiac Vibe excluding GT
- 2009 - 2010 Pontiac Vibe GT models
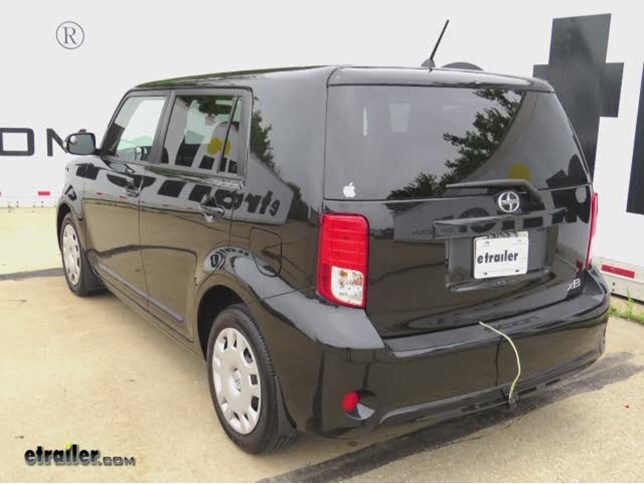
- 2012 - 2015 Scion xB
- 2011 - 2015 Scion xB
- 2011 - 2011 Scion xB excluding Release Series
California residents: click here


Video of Curt T-Connector Vehicle Wiring Harness with 4-Pole Flat Trailer Connector

Videos are provided as a guide only. Refer to manufacturer installation instructions and specs for complete information.


Video Transcript for Trailer Wiring Harness Installation - 2014 Scion xB
All right, on this 2014 Scion XB, we're going to show you the Curt T-connector vehicle wiring harness with a 4-pull slack trailer connector, part number #C56035. I'm going to go ahead and show you how to use it, when it's not being used it can stay in a compartment here or here, and when you do need to use it, just simply pull it out and shut the door hatch on it. The door seals thick is thick enough it won't hurt anything, you've got more than enough wire to go down to your trailer, and when you shut the hatch, stay away from the latch here or else you'll damage the wire and you'll be starting all over.At this point you're ready to hook up your trailer. We'll go ahead and cover the components that come with the kit, first off this is a t-part of the connector, you've got 2 of them, the one with the yellow wire goes to your driver side, and the green wire goes over to the passenger side. These wires send signals to the module right here, this module actually copies the signal and uses battery power from this black wire here to power the trailer, that way your vehicles' wiring harness is insulated from the trailer. We have a white wire here for ground, that'll go to the sheetmetal on the body of the vehicle, then It comes out to the 4-pull slack trailer connector with a cover for it as well.
You get batter power, it does come with a length of wire to run to the front of your vehicle, once you get up to the battery, it does come with a fuse and a fuse holder, then we have a small parts package here with some zip-ties, ring terminals, Butt connectors to make your connections.One other thing I suggest is to maybe get some extra zip-ties because I typically run out of zip-ties before the install. Firstly you're going to get your vehicle ready to install a wire harness. We need to loosen up and remove some panels, first off, we need to remove our floor coverings. Next up is the tray over the spare tire, next up is this tray, we have to remove it, there's a fastener here, and here you have to remove using a 10mm socket. While still inside let's go ahead and remove this panel, that will give us access behind the tail-light, you just need a flat-head screwdriver to pop it loose.
Do the same thing over on the passenger side, now we can go ahead and start making our first connections. Our T-Connector is going to install to this connection point right here behind the tail-light, we push down the small tab right here and can pull it apart. We'll take the T-Connector for the yellow wire, we're going to route it up underneath the plastic, then we'll simply put the T-Connector in-between the 2 halves.Next, we're gonna take our T-Connector with the green wire and we're gonna run that over to the other side, do the same thing over on the passenger side. You can actually run it behind the plastic here and up into here as well, if you need to take out this tray, same 2 fasteners as before, but pretty easy to route it underneath there. All right, let's go ahead and work for the black wire here for our module, let's go ahead and add the Butt connector, let's go ahead and cramp it down in place.
We'll take our long length of black wire and go ahead and add it to it. Now like we stated earlier, this needs to be ran into the front, so to get out of inside the vehicle we're going to go ahead and run it through this grommet right here. To run the wire through the grommet, we're going to use the old classic poke of a screwdriver, let's go ahead and run a wire through. We'll need enough slack in the wire so we can copy the length of this wire here so it will be out of the way.The last wire on the inside of the vehicle will be our ground wire here, we can simply attach it to the sheet-metal right here, we'll use the provided self tapping screw for that and a 1/4in nut driver with it. Go ahead and install the screw first then I'll add my wire, let's go ahead and find a place to attach our module, I'm going to clean off some sheet-metal right in this area right here.
Not 100% flat but the adhesive should grip enough of it, take the adhesive, 1/2 on the module and we'll go ahead and attach it to the sheet-metal. Now we'll go ahead and take a few moments to zip-tie our wires to make sure they're safely and securely out of the way. Once we're done with our zip-ties, we'll go ahead and cut off the tails.Let's go ahead and simply work our way over to the other side and attach our green wire to this pre-existing wire here, let's bundle up the last of it. Let's go ahead and take a few moment's to go ahead and put our cover onto our 4-pull, protect the one that's not being used. At this point we can go ahead and re-install the in-chair components, as we do that we're gonna make sure we have full access to our wire harness. Now go ahead and route our wire towards the front of the vehicle, when we do this make sure to stay away from anything moving, like suspension components or anything hot like the exhaust. When you get up to the front of the vehicle, you want to make sure you stay away from the steering components as well.Everyone is going to wonder why this is a little bit different, this is how we did ours, he's a grommet we ran a wire through, over these components and thread it through some lines. Just make very loose wraps around it to help hold it in shape and zip-tie it in a few different places, it was actually able to come around this side here and pull it over the tank here and come out in front of the tank. We just want to ran along with these lines going up toward the front, they actually fit in the brackets that holds the line in place. We use that to help support a wire, again, follow these lines up to the front and now we're up to our firewall. Next we'll go ahead and install a pull-wire, now I'm using an old piece of airline tubing, this can be also any wire that's flexible and can still hold it's shape as you guide it down there.Now, here's our pull out the bottom, we'll go ahead a connect our wire to our pull-wire, then we're going towards the top. Make sure to take up all of our slack, then we'll make any alterations we need to to routing our wire, then we'll zip-tie it to hold it in place. Let's go ahead and route our wire over to the positive side of our battery, then we'll cut off our excess. Let's go ahead and get this wire ready, another provided Butt connector, then add our fuse holder. The other end will get a ring terminal, let's take this and add this to the positive side of our battery.Take the lid off, then loosen up this nut right here, go ahead and take our ring terminal, add it to our post and re-install the nut. Since our Butt connector is sitting outside this time, we'll go ahead and wrap it up with some electric tape. We can go ahead and put our provided fuse into the fuse holder, at this point we can ahead and tuck the wires away, one more zip-tie to take up the slack. Everything's hooked up, let's go ahead and give it a try, now it's always a good idea to test out your floor pull, or inaudible 00:10:53 connection before you try with the trailer to verify it's still working.We'll take the ground from our tester, connect to our white wire, we'll check our brown wire for a running light circuit, test our yellow wire for a left turn signal, and then green for our right turn signal. We'll hit the brake and make sure for we look for a constant signal on the yellow and green wires. With that, it looks like everything's working, with that, that'll finish it for a Curt T-Connector Vehicle Wiring Harness With a 4-pull Slack Trailer Connector, part #C56035 on our 2014 Scion XB. .
Customer Satisfaction Score:
98% were satisfied with this product
2% of customers were not satisfied
- Wrong item was ordered
- etrailer mistake
Customer Reviews
Curt T-Connector Vehicle Wiring Harness with 4-Pole Flat Trailer Connector - C56035
Average Customer Rating: 4.8 out of 5 stars (72 Customer Reviews)
Quickly and easily install a 4-way trailer connector on your vehicle with this custom harness. T-connector plugs directly into existing wiring. Powered converter reduces strain on wiring system and is made using SMT to ensure superior performance.by: James 09/22/2023
2009 Toyota Matrix
The Wiring Harness is working great! I was able to attach the wiring harness to my 2009 Toyota Matrix and have the trailer lights work on my 4ft x 6ft Trailer. Installation took about 45 Minutes. I ran the red power feed wire up the passenger side of the car, under the trimm panels for the doors. Connected to Battery with supplied fuse holder. Using the cable plug-ins on the harness, I disconnected the car harness and plugged in the trailer harness with no problems. Only thin I did extra was used zip ties to hold the "black box" to the car. (I am not a big fan of double sided tape to hold something to the car body/frame.) Again, Install was easy enough for anyone with a little car know-how. I recommend this trailer harness for anyone needing trailer lights for their 2009 (or Similar) Toyota Matrix.
by: Peter 02/10/2024
Works exactly as advertised. Easy installation. Just followed the video and was done in 15 minutes.
by: Isabelle04/21/2024
Very easy to install. The battery hookup was just a smidge complicated because there were no directions on how to connect the smaller wiring prices together. However. Even though I had never done anything like that before, I was able to get it done. Everything worked and I was able to connect to a trailer without any issues. Worked perfectly. Total time to install was about 1 hour.
by: Mike 04/09/2024
2015 Scion xB
Easy install
by: James 04/20/2024
Quick ship
by: Tom04/09/2022
As I said the wiring worked perfect it was well engineered. You must be careful attaching the power wire as there are under carriage components
by: James 08/20/2022
Perfect fit. Easy for the novice to ins tall.

James

8/21/2023
This wiring harness has worked perfect from day one. It was simple to install and no splicing into the factory wiring. Perfect.
by: Edward02/02/2019
2013 Scion xB
Hi, i finally hooked up the wiring harness and it does not work. I have verified and reverified all connections and it does not supply power to the 4 pin connector. I can return but it would be more convenient to just mail put a new one soon as I need this working next week.

Mike L.
2/2/2019
Please check that the black wire from the taillight converter is connected to the positive battery terminal and the 10A fuse is installed in the red fuse holder. This is the most common problem folks experience with this type of wiring harness. If you click the provided link, you can see a help article about troubleshooting trailer wiring that you might find of assistance.
Helpful Links
by: Bruce M.11/05/2018
This wiring harness was easy to install and has worked without problem. One note: I ran the wire to the battery inside the car and under the door trim until I could thread the wire into the driver's side quarter panel then to the battery. I covered the wire with a piece of duct tape (same color as the car) where the wire passed through the door opening.
I would purchase this kit again.
by: Jesse 06/27/2023
Easy install and works great
by: Ryan05/23/2016
2014 Scion xB
The hitch fit perfectly and the wiring kit was easy to install. I used a class II hitch on a 2014 Scion xB with a Curt T-Connector 4-Pole wiring kit. I use this setup to haul an 4' x 8' harbor freight trailer and can easily make runs to home depot with loads nearing 1000 lbs. I don't miss my truck at all now.
by: Eric06/12/2018
2012 Kia Rio
Easy to install. Did not work properly with trailer lights. After some research by e-trailer and myself found that the kit is wired incorrectly from the factory. E-trailer resolved the issue by testing another manufacturer’s, Tekonsha 118570. The replacement kit had no issues. A little more timely to install but still easy.
by: 2011 Scion xb05/17/2021
Excellent kit. Step by step install video on etrailer very helpful.

2011 X.
5/18/2022
Works well. No problems after one year
by: Brian S04/15/2014
Hitch went in with in a few minutes. The wiring Harness took a good bit longer, but did find a way to run the battery feed along thru the thresholds of the doors following the other wires and then punch thru the rubber grommet in the fire wall. there are 2 prongs sticking out you cut the tip off and thread the wire thru one of them.
by: Charles F07/07/2016
2015 Scion xB
Great instructions. Simple to install. E trailer does a great job on providing clear instruction. The paint quality is great. The electrical vidio was easy to view s and follow. I have purchased 5 different hitches over the past 10 years and have never been dissapointed. Good job e- trailer. Still no complaints from me.
by: thejoshua05/03/2018
2012 Scion xB
Worked perfectly. Plug and play design other then one wire you must run to the positive post on the battery and a ground wire. Curt again supplies all needed for this install including screw for ground, fused power wire, crimp connectors, and plenty of zip ties to secure it. Hardest part is routing that wire up front and through the firewall. Other then that pretty straight forward install and again etrailer came through with a good price. Lights on the trailer worked the first time and no issues.
by: Huy07/10/2022
2010 Toyota Matrix
Easy to install, Would be nice to have an extra foot of hot lead to the car battery. Would make the install a bit easier to fish the cable. I passed the hot lead via a rubber gasket behind the glove box, It is there specifically for that or other cable like high power audio amp.
by: Nate12/01/2014
This is a great kit. It works, as expected and that's the important part! Both Curt and Etrailer have instructional videos for installing it. They differ only very slightly. I ended up following Curt's video for what its worth. Warning: Curt says it takes 15-45 minutes to install. Hehehehe. RIIIIIGHT! It took me a couple of hours.
by: Harry G.10/03/2014
Curt T-Connector installed perfectly just as the instructions showed.
The lights on my trailer work correctly.
by: Ken 08/06/2018
Works well. Installation was a little tricky, not because of this kit but because the tail light wires were a bit difficult to access.
by: Marlin03/14/2020
2012 Scion xB
I am very happy with the Hitch. I thought it was great that I could find the right fit for my car very easy and you had the wiring and any other accessories needed to do the job. Also great videos to explain installation. I put it on my Scion xB as easy as the video.
Marlin
by: James H.09/24/2015
Easier to route power through the firewall, kick plates and to the driver side rear. Removed the jack pans to access the tail-lights.
by: Paul08/13/2019
Hooking up the lights was no problem. Running a wire from the battery was a problem. I did not bring tools to crimp the wire, so I used wire nuts on a temporary basis. Maybe I'll crimp them later. The double sided sticky tape stayed stuck to the metal for 5 or 10 minutes, then separated. It is now hanging. In any event, it's working, and I'm pleased.
by: Mark03/10/2017
2015 Scion xB
Still performing as expected. Excellent service and support from the vendor. Installation video was a plus. Believe that has aided in the successful outcome.
25
72
Show More Reviews
See what our Experts say about this CURT Custom Fit Vehicle Wiring
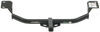
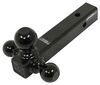
- Recommended Trailer Hitch for a 2011 Scion xBThe trailer hitch that I recommend using for your 2011 Scion xB is the Curt # C12490. This is a Class II trailer hitch with a 1-1/4" receiver. It has a 350 lb tongue weight rating and a 3,500 lb gross trailer weight rating. But your vehicle may not be rated for this much. You will need to confirm the weight rating of your Scion in your owner's manual. You will also need wiring, like the recommended T-Connector # C56035, and a ball mount kit like part # C45147. Check out the linked ball...
view full answer...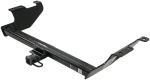
- Recommended Trailer Wiring Harness for a 2009 Pontiac VibeThere are 2 options for wiring harnesses on the 2009 Pontiac Vibe. The Curt vehicle wiring harness # C56035 will have a higher capacity, which is desirable if your trailer has more lights than the bare basics. The 2nd option is the Tow Ready wiring harness # 118460 which I have found to be more reliable. It is recommended that you use a small amount of dielectric grease # 11755 on all electrical connections - the plugs on your automobile and the 4-pole connector itself - to help prevent...
view full answer... - Trailer Wiring Harness on 2009 Toyota Matrix is Not Working, No Trailer LightsThe first thing to check on trailer wiring harness # C56035 for your 2009 Toyota Matrix is the fuse for the power wire that connects to the vehicle battery. This harness gets power for the trailer lights from the vehicle battery so if the power wire is not connected to the battery or the fuse is missing or blown then the trailer lights will not work. Also make sure the white ground wire is attached to a clean, bare metal surface; preferably by itself. There can be no paint or coating at...
view full answer... - Trailer Hitch and Wiring Recommendation for 2013 Scion xBFor a trailer hitch confirmed as a fit for your 2013 Scion xB we have the Curt part # C12490 which would fit and work well. It has the highest capacities of all of the trailer hitches we offer for your vehicle so it's a great option. I attached an install video for this for you to check out as well. For trailer wiring you'd then want the Curt harness part # C56035 which I attached an install video for as well. For a ball mount you'd then want the part # C45521, for a hitch ball # A-82...
view full answer... - Recommended Hitch for Carrying Up to 4 Bikes and Light Duty Towing for 2012 Scion xBA Class I and Class II hitch is offered for your xB. I'd avoid the Class I, as it would limit you to carrying only two bikes due to its limited weight capacity. The Curt Class II hitch, part # C12490 would allow you to carry up to 4 bikes. Curt's warranty requires that a # 18050 support strap be used by all non-trailer loads like a bike rack. I'll link you to a video showing how the strap is used. For a bike rack that would allow you to carry up to 4 bikes, I'd recommend the Thule Hitching...
view full answer...
Do you have a question about this Custom Fit Vehicle Wiring?
Info for this part was:

Test Fit:
Joe V

Test Fit:
Jared G

Test Fit:
Shane H

Video by:
Andrew K

Video by:
Kathleen M

Expert Research:
Michael H

Video Edited:
Joshua S

Video Edited:
Jacob T

Installed by:
Cole B

Updated by:
Wilson B

Updated by:
Kristina F

Updated by:
Isabelle B
At etrailer.com we provide the best information available about the products we sell. We take the quality of our information seriously so that you can get the right part the first time. Let us know if anything is missing or if you have any questions.
Tom
4/10/2023
No problems!