
Summer Starts Here - Save up to 70%
To see if this custom-fit item will work for you please tell us what vehicle you'll use it with.
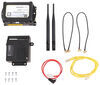
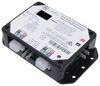
Quickly and easily install a 4-way trailer connector on your vehicle with this custom harness. T-connector plugs directly into existing wiring. Powered converter reduces strain on wiring system and is made using SMT to ensure superior performance.
Features:
Specs:
Installation
This custom-fit T-connector plugs into your vehicle's wiring harness, which is located in your rear cargo area. You will have to remove the taillights to access this harness. Once you've plugged in the T-connector, run the hot lead up to your car battery. Connect the lead to the included fuse holder, and then connect the fuse holder to the positive terminal on your battery.
Once installation is complete, the 4-way connector will be stowed in an out-of-the-way location within your rear cargo area.
It is recommended that you use a small amount of grease on all electrical connections - the plugs on your automobile and the 4-pole connector itself - to help prevent corrosion.
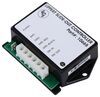
A tail light converter is built into this T-connector. This converter is a circuit-protected, battery-powered unit that bypasses the electrical routes that are used by a basic wiring harness. As a result, there is virtually no draw on your tail light circuits.
Because most trailers run on a two-wire system - wherein the brake and turn signals are carried on one wire - the separate brake and turn signals from your vehicle's three-wire system need to be combined so they are compatible with the wiring system of the trailer. This converter combines the brake and turn signal functions of your automobile so that they run on one wire to properly activate your trailer's tail lights. Note: This will not affect how the tail lights on your vehicle operate.
Curt builds each tail light converter using surface-mount technology (SMT). This method of construction involves soldering electronic components directly to the surface of a printed circuit board. SMT eliminates the need for leads, which are used in older through-hole technology. The result is a circuit board that is smaller yet provides more routing area and that offers superior performance, reliability and durability.
Circuit boards constructed using SMT have been shown to perform better under rough conditions with excessive vibration than those made using the through-hole method. And where would vibration be more likely to occur than in towing applications? Curt converters also produce less heat, leading to increased durability and longer life. In addition, lower levels of resistance ensure better performance, especially for parts that operate at higher frequencies.
Each Curt circuit board is made using high-quality components that are pieced together in the most technologically savvy fashion, leading to greater predictability and reliability in functioning.

Videos are provided as a guide only. Refer to manufacturer installation instructions and specs for complete information.
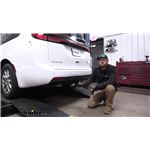
Hey everyone, Ryan here at etrailer. Today under 2023 Chrysler Pacifica we're gonna be showing you how to install the CURT Custom Fit Wiring Kit. But before we get into that, let's take a few minutes, check this out and make sure it's gonna work for you. So with these Pacifica's, you know, people use 'em to do a lot of different things. They're pretty capable vehicles and you'll see people using 'em to pull their trailers around and if you plan on doing that, you're gonna need a way to illuminate all the lights on that trailer. That way you're not only safe but it's a legal requirement as well.
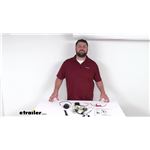
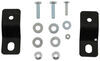
And so a kit like this, it's going to allow you to plug your trailer in and get everything going. This is going to have a 4-way flat connector. And when it comes to actually mounting this up, you can do it like we did just use the dust cover around your hitch and I used maybe about a 8 inch piece of wire loom to put over the wire just to help kind of clean up the look of it and help it blend in. Or if you want, you can always pick up a no drill bracket and a 4-way flat connector and actually clamp this to your hitch. It's entirely up to you.
Either way is fine. So like I said, this is a style of connector which is really common for those smaller and medium-sized trailers. And it's going to provide us with our turn signals, our taillights and our brake lights. So we'll have all of our bases covered. And nowadays too, light up accessories are getting popular, cargo carriers, bike racks things like that.
And this will power up the vast majority of those as well. When it comes to actually picking out wiring for your vehicle, with these Pacifica's, you really have to pay attention to the particular submodel 'cause this kit here will fit some but not others. I'm not really sure what the difference is, but there is one. This particular kit will work with the Touring L, which is what we have today, the Limited's and the Pinnacles. And if you're unsure if the vehicle's not clearly marked exactly what sub model, you can reference we have a tech tip section that tells you a letter that you need to look for in your VIN number to identify that exact model.
So definitely check that out just to be on the safe side and make sure you get wiring that's compatible with your particular vehicle. If this turns out it's not gonna work with your vehicle, good news is there's other kits available that will allow you to hook up wiring and still get the job done. Other than that, there's really not a whole lot to trailer wiring. You know, it's pretty straightforward. Nice thing with this kit is it's custom fit for your vehicle so you don't have to splice into your factory wires or anything along those lines. So you really can't go wrong. As far as the installation goes, not gonna lie it's not complicated per se. It's definitely time consuming and trying to get the wires routed through everything. Everything's just really tight. You know, you got a lot of underbody panels that you have to deal with and whatnot when you're running the power wire from the back to the front. But thankfully it's something that you only have to do one time and then you're good to go from then on out, right So take your time, stay focused. Hopefully we can give you a couple pointers along the way to make it a little bit easier on you if you are doing this yourself. So why don't we go ahead and get started on it now. To begin our installation we're gonna be here at the back of our Pacifica and you can open up your hatch and that'll allow us to gain access to the fasteners holding our tail lights in that we'll need to remove. So inside of this little pocket there you'll have two screws. (drill grinding) Can pull them out using a T30 Torx bit. (drill grinding) And we should be able to kind of grab our taillight, pull straight back on it to release it. And then we will undo the electrical connector. So there's that little red tab there, you can push it back like that and then push down on the center of that connector to release it. We'll set our light off to the side and do the same thing to get the passenger one removed. Our wiring here is a push pin fastener kind of holding that in and you can just pry up on that with a trim toll or flathead screwdriver. Don't pry too hard though 'cause this plastic's kind of brittle. You don't wanna crack it. And while we're right here we're gonna pull this one out as well and then kind of just unsnap this a little bit and that's just going to give us more room to get our wiring and stuff down in there. I'm gonna do the same thing on the other side of our vehicle as well. What we're gonna do is kinda prep something here to make it easier to get our wiring up into place 'cause we're gonna have to go from the bottom up here. So I have a fish wire, it's just a piece of tubing. You can use a thick piece of wire or even a metal coat hanger if you straighten it out. But I'm just gonna drop this down our taillight pocket and push it down as far as we can go. I'll do the same thing on the passenger side and we'll have to get underneath of our vehicle and get the panel removed down there. Along the edge you're gonna have several 8 millimeter head screws. (drill grinding) So we'll just work our way across here. (drill grinding) Until we get all of them out. Now if you move just behind your driver's back tire there's gonna be three more 8 millimeter head screws as well. So those will all need to get removed. (drill grinding) We are gonna have a handful of 10 millimeter head fasteners as well. We'll pull these two out and that'll expose two more. (drill grinding) There's gonna be a handful just like those kind of just scattered throughout of our underbody panels here. Gonna be two more fasteners now, which are like this, you can just use a big screwdriver and don't really put upward pressure when you're loosening these 'cause they stay attached to the panel. Essentially you're just removing it from the stud that's dropped down and that here in the middle loosen that one up and now we should be able to drop our panel down and get it out of the way for now. With that panel out of the way I was able to just kind of reach up there and grab our pull wire and what you can do is take the T-connector that has a yellow and brown wire on it and try to make it as thin as possible 'cause you don't have a ton of room to pull this up into place but just tape it up and you know we'll be able to go up top and get it into position here. So I was able to pull our connector up into position and sometimes you get lucky just dropping it down through here. Like I said, it's tight and you're able to work it up. If it wants to fight you and just really not cooperate something that you can do you have this little rubber bump stop here that's bolted in. Can unbolt that with a T30. So the same tool that we use for our taillight and then you'll have another fastener right there and whenever you do that it lets you kind of peel this back and you have a gap, you know you can kind of shoot, gives you a bigger opening, you kind of shoot the pull wire through here trying to feed your wire up in the position like that. So just if you do it this way, make sure the wire's not gonna be pinched or anything along those lines when you go to re-secure everything. Got all that tape off and then just pushed our fasteners back in here since we're done, you know, working behind here and one of the T connectors is get a line up with your factory wiring, just plug that right on in, lock that tab back down and then you can grab your taillight and plug the other connector into it. Trying to get the taillight back in it's super tight and I think that's just 'cause there's not a lot of room and we have the extra connectors here. So what you can do that is just snapped onto that piece of the taillight and I think we can just take all the extra wires and connectors that we have now, kind of tuck 'em down like that. And now this should gonna give us that little bit extra room that we need to get the light back in place here. Although it is tight, you can find that sweet spot eventually get this into position. Just don't force it and end up breaking anything. And now we'll just snug it back down. (drill grinding) Back underneath the vehicle we can start to route some more of our wires. So we have our green T connector wire and our 4-way flat wiring and with that I just kind of pushed in behind here, right And the 4-way flat, I just dropped it down. Use the dust cover to attach it to our safety chain opening and eventually we'll come back and zipped everything up. I just like to get everything loosely routed and hooked up before we do that. That way we kind of know what we have to work with. And the green one just continues along and goes up into the taillight pocket. And I use that same technique that we used on the driver's side to get that one up in position. With our T connector that just pulls up, gets plugged in the same way that we did the driver's side. So this one into the factory harness, this one into the back of our taillight and we'll get this reinstalled. Everything's just so tight under here. I was able to secure our converter box. There's a big bundle of factory wiring that runs along through here. So I just used some of these zip ties and attached it to that. We're gonna have a white wire with a pre-attached ring terminal and that's gonna be a ground wire. And these Pacifica's are gonna have a ground stud right here. And if you didn't have any factory grounds there when you did the hitch, you remove this nut. I'm just gonna use this, but when you did your hitch, if you had to move the grounds over to one of these holes or whatever, you can always use those or you can always take a self-tapping screw and secure it to clean metal portion of the vehicle. But we'll utilize what's here, put that over the stud, take your 10 millimeter and tighten it down. (drill grinding) We'll get our power wires hooked up now. So you got the black wire coming off of your converter box and that's pre-stripped and you'll have a big bundle of this thick power wire here and you can take one end of it and strip the insulation back like that and give it a twist. And then you can take a butt connector and I upgraded to heat shrink style, the ends seal up and help protect against corrosion a little bit better. But the ones that come in the kit will work just fine and they'll work the same way essentially. Just with those, once you make the connection, make sure you tape 'em up good with some electrical tape but that goes over the end and crimps down. And this is how we're gonna make all of our connections, whether it be a butt connector or a ring terminal, crimp that down good. Other end of the wire there, gets crimped into the other side and with the heat shrink ends I'll come back with my heat source and seal 'em up. (heat gun whirling) So I taped up our butt connection that we made for a little extra protection and then you're gonna need to route the power wire up to the front of your vehicle onto the engine of your compartment. So I've done that and we can, I'll show you the path that I took, just kind of ran our wire along through here. And when you're doing this, you know do your best to avoid any hot or moving parts. Use zip ties along the way to keep it secure. It goes over our subframe Kind of through this area here and along these lines and underneath the van you're gonna have these panels kind of covering this stuff up and they share the same fasteners as the one at the very back did. So take a look at 'em. A lot of times you don't have to take 'em all out, just enough so you can bend this out of the way. But it follows essentially our factory lines all the way up to the front there. That wire just runs along through here and usually following factory lines are pretty safe bet when doing this type of thing. So goes up and then kind of just through this opening here and it just goes up into the engine compartment. If you're having a hard time pushing it up there you can always do like what we did at the taillights and use a pull wire, drop it down from the top, tape the wire to it and pull it up that way. So once you get that wiring ran and since we're already underneath of our vehicle here, might as well reinstall our underbody panels. In the engine compartment this is where our power wire comes up and I cut it to length 'cause this is gonna have to get hooked up to battery power. And I connected the included fuse holder to the power wire using a butt connector. On the other end I crimped on the included ring terminal. Nothing really to it there. Make sure your fuse is not installed just yet. We'll install that at the very end and to make things a little bit easier you have this air duct here, we'll remove that, it just pops up essentially and out from the air box and we'll have access to our battery. And taking a look at it I don't really wanna mess with any of these big fuses or anything. I think we're just gonna go right here on this stud. That's to jumpstart the vehicle if you ever need to. So you know it should be good. So I have a 10 millimeter, we'll get this removed. Gonna take the ring terminal there, put that over the stud and then we'll just tighten the nut back down. So with that hooked up, then grab our included fuse, place that into the holder and close up. Tape your wiring up out of the way, get it secured and then put this right back into position here. Now it is a good idea to test your wiring and make sure that it's working properly. I like to use a tester like this one here as opposed to just hooking up to your trailer. And I say because if your trailer has any issues it might mislead you into thinking it's something you did on the vehicle side. But with that in mind we'll try out our left turn signal, Our right turn signal, we'll hit our brakes and turn on our taillights. And with all that wrapped up, that'll finish up our look at and our installation of the CURT Wiring Kit on our 2023 Chrysler Pacifica.
Average Customer Rating: 4.7 out of 5 stars (10 Customer Reviews)
Quickly and easily install a 4-way trailer connector on your vehicle with this custom harness. T-connector plugs directly into existing wiring. Powered converter reduces strain on wiring system and is made using SMT to ensure superior performance.Easy to install with a little patience and a LIFT.
Sent me the wrong part to start with but their manager made it right
Do you have a question about this Custom Fit Vehicle Wiring?
Info for this part was:
At etrailer.com we provide the best information available about the products we sell. We take the quality of our information seriously so that you can get the right part the first time. Let us know if anything is missing or if you have any questions.


Thank you! Your comment has been submitted successfully. You should be able to view your question/comment here within a few days.
Error submitting comment. Please try again momentarily.