
To see if this custom-fit item will work for you please tell us what vehicle you'll use it with.
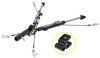
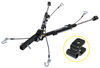
Roadmaster's crossbar-style brackets are virtually invisible, easy to mount, and simple to remove. Brackets install on your vehicle's frame to provide attachment points for your tow bar.
Features:
The drawbars, or front arms, on the crossbar-style series base plate kit are supremely easy to mount and remove. Just insert them into the brackets and twist to lock them in place. To remove, simply twist the arms back and pull them out. Once the drawbars have been removed, the remaining brackets are virtually invisible. On most automobiles, the brackets are mounted within the grille - where they remain not only unseen, but protected from scrapes and scuffs as well.

Videos are provided as a guide only. Refer to manufacturer installation instructions and specs for complete information.
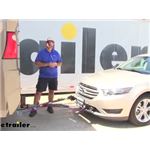
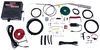
Shane: Hi, I'm Shane with etrailer.com. Today, I'm going to walk you through how to install Roadmaster's Crossbar-Style Base Plate on your 2017 Ford Taurus. Adding the base plate to your vehicle, is going to allow you to flat tow your vehicle behind your motorhome. It's going to make it a lot easier when you get to your campsite, because you can leave your RV set up. You're going to have another vehicle to go exploring or go to the store. It's going to be one of six components required to flat tow the vehicle.Our base plate is going to attach to the chassis of the vehicle to give us a solid attachment point for our tow bar.
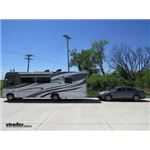
Our tow bar is going to give us that solid connection point between our base plate on our vehicle and our motorhome. Our safety cables are going to be a secondary safety device in case our tow bar fails. Our braking system is going to allow our vehicle to not only slow but stop itself, so we don't have to rely on motorhome's brakes to stop and slow both vehicles. Our wiring, that's going to allow our vehicle, while it's being flat towed, to receive light functions from the motorhome, so that not only we're safe, but other motorists are safe, because they're going to be able to see what we're doing, whether that's breaking, turning, or driving at night.There is one more component that may or may not be needed depending on the height of the back of your RV, and that's a high-low adapter. Our base plate on our Ford Taurus sits at 14-1/4".
What you're going to need to do is you're going to need to go out to your motorhome, and you're going to measure from the ground to the center of your hitch. If those two numbers are within 3", you're good. If they're not, and they're over 3", you're going to need a high-low adapter to make up that difference. The reason you need a high-low adapter or that angle to be within 3" is because we want our tow bar to be as straight as possible when we're flat towing our vehicle.Our Roadmaster Crossbar-Style Base Plate is really going to work well for flat towing your Ford Taurus behind your motorhome. It's going to hold up well.
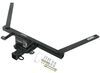
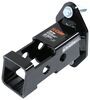
It's going to be steel construction, black-powder-coat finish. It's also going to have removable arms to help maintain a really nice, clean look on the vehicle To take them off, you simply twist them and slide them out. You can see there's not a whole lot sticking out. Again, maintains a nice, clean look on the front of the vehicle. Insert it, you have a tab here that's going to fit on the bottom side of this tab on the base plate itself, so you simply slide it in and rotate it.This bracket here on the front, this doesn't actually come with the base plate.
It actually comes with the tow bar. But if you notice this plate on here, this bracket is flat, and it requires a tow bar that has the quick-disconnect bar, which is part of this plate here. What that is is when you mount these on, it's a bar that connects onto your tow bar, and you just slide it into place and pin it at the top.The plates that are mounted on here are for a cross bar like this. It's for an easy disconnect. It slides on just like this onto the base plate, and it's going to have a pin that slides in the top to hold it on. Then when you put your tow bar on, your tow bar is actually going to hook in right here. Once you get that connected, you can just take out these pins and slide this whole bar off, and it'll stay right on your tow bar. Keep in mind with doing that, if you plan on storing your tow bar on the back of your motorhome, this bar is going to spread those arms out about this far, so just keep that in mind. You will have to find somewhere to store this if you decided to take it off the tow bar itself.A great tow bar to work well with this base plate is going to be Roadmaster's Falcon All Terrain. It's going to come with the quick-disconnect bar. It's going to come with the brackets to mount on the removal arms. You can find that tow bar here at etrailer.com.Now when comparing this base plate to other options for the Taurus, I think this is going to be the best option. The connection between your tow bar and the base plate itself, I think it's really solid. I think the arms that go inside the base plate give it a really solid foundation for the tow bar. Some of the other ones, they have smaller arms on them, and the tow bars, the way they connect on there, they're just really loose, and I don't think it's a real good connection between the two. I think this is going to be the best option here.To start our installation, we're going to remove our fascia. We're going to start underneath our hood. We're going to have four, 10mm-head bolts and two push-pin fasteners we need to remove. For the push-pin fasteners, you want to get to under . See where that little opening is, top of the center and then the base.And then each wheel well, we're going to take a 5.5mm socket. You're going to have one, two, three bolts to remove. Take an 8mm socket. This bolt right here, we need to remove. Right up here in the corner, there's going to be a plastic fastener. This one can be a little bit of a pain to get out. Take a Phillips screwdriver, and you just want to turn the center. You don't have to put any pressure on it, and hopefully the center comes out. If it doesn't, take a pick or something like this, and what you're going to do is you're going to put a little bit of pressure. Get underneath the head, kind of like that, put a little bit of downward pressure on it. Then take your Phillips screwdriver. Then just turn the center. Just like that. And then we need to get up, and we need to pull the base out. You can do the same thing. If you don't have a pick like this, you can use a little, flathead screwdriver. Just like that. We're going to do that same thing to the other side.Then we're going to have five of the same fasteners attaching the splash shield to the sub-frame. They're right down here underneath. This one looks like it's loose. Then we're going to have a fastener like this or a plug on each side for our fog lights, if you have them. You want to make sure that you unplug those.Now we want to start on the outside and work our way to the center. It's a good idea, if you have a second person that can help you, go ahead and do it. Even though the fascia's not hard, it's a little awkward to go from here over to one side. We're just going to pull out. The top of this is going to be kind of clipped into place. We just want to lift as we're pulling it off. You want to make sure that you don't just pull your fascia off. Check for any wiring that may still be hooked up, and you want to make sure you unhook that so you don't damage the fasteners. Now we'll take this and set it aside somewhere safe.If you have louvers, on the backside you're going to have a louver alignment bar that has three fasteners on it. What we're going to do is we're going to squeeze the tips together and pop it loose. inaudible 00:08:44 together. We want to do all three.Now if you notice on our shield here, I've got it marked. This is going to have to be cut out, but if you notice that our bumper beam is in place. We're going to end up taking this off, so I just marked this so I remember to cut this after I get this out. The other side is just going to be a square. This is a solid piece. It's not going to have this to cut.Right here in the bottom corner of the part we're going to be trimming on our louvered housing, we're going to pop this fastener out. We're going to do the same thing on the other side. We're going to have our ambient temperature sensor. We're going to pop it loose, and you can use a flathead screwdriver or trim-panel tool. We're going to have two 8mm-head bolts to remove. And then we're going to have two squeeze fasteners at the top. Go ahead and squeeze those. Make sure you check for any other wiring. It looks like we have a wire that comes around up here at the top. Let me put that. Then we have some other fasteners here. We got another one over here on the side. We'll go ahead and pull this off and set it aside.Here, we're going to have two tack welds. We're going to do that on both sides. We're going to take, and we need to drill them out. I'm going to start with a small drill bit to give me a pilot hole first, and then I'm going to go with a bigger one so I can get the whole thing out. We're going to do that same thing on the other side. We'll take a 13mm socket. We're going to have four bolts on each side of the bumper core that need to remove: these two and then two inside the holes. Then remove your bumper core. This is not going to be re-installed, but if you ever plan on putting it back on, you may want to hold onto this and the hardware you just took off.Now we're going to set our base plate in place. We're going to line it up with the four holes on our frame rail. We're going to use the existing hardware that we took out of the bumper beam. We want to make sure we add Loctite on all of our hardware that we're installing on the base plate. We're not going to tighten these down all the way. We're just going to loosely install them for now.Next, we're going to have two brackets that look like this. This, you notice how the bracket has one side that has a welded-on piece. This piece is going to go towards the outside. This is going to sit on the sub-frame. These two holes line up with two holes on the base plate. Take our short, hex bolt, Loctite. We're going to have two of them on each side. We're going to line them up with the holes from the bottom. Put on a lock washer and then a nut.Next, we'll take our long hex bolt. We're going to slide on a flat washer. You're going to have a pipe spacer. It looks like this. There's a large hole that goes all the way through and then through the bracket. We're going to take our bolt. We're going to come up from the bottom. We're going to slide our pipe spacer in between. We want our bolt to go through it and then up through the bracket. inaudible 00:14:11. We'll put on a lock washer and our nut. A 3/4" socket and wrench. We're going to tighten and torque all of our hardware to the specification in the instructions.On the back of our louver housing, the lower four louvers, we've got to remove. If you flip it over on the backside, you're going to have this little bracket. We're going to pop it loose. We're going to pop our louvers from the center just like that. Then we're going to remove them. Now we need to cut out our areas that we have marked on our louvered housing. Once we get it cut, we'll do a test fit, make sure everything's fitting correctly. Then we're going to reinstall it in reverse order from the way we took it off. For these, where there we're screws, we actually have bolts, two flat washers, and a lock nut.On your passenger side, you're going to have our ambient temperature sensor that we need to re-install. Once you have your hardware tightened and torqued to the specification in the instructions, it's a good idea, before you put your fascia back in place, go ahead and add any additional wiring like your diode wiring kit or braking system that you want to add. It's going to be a lot easier to run all your wires to the front of the vehicle.Once you put your fascia back in place, you're going to have to do some trimming or some modifications. Be sure, when you put this back in place, you hook up to any wiring that you disconnected. You have the plug on the top for your louvers. You also have your fog lights. Also, another thing I want to mention is when you're putting this back in place, it's a good idea to tape your edges. Tape the edge of your fascia. Tape the edge of your fender, so that when you're putting this back in place, when these two sides meet, they're not scratching each other.Again, I'm Shane with etrailer.com. I hope this video has helped you, whether you're still deciding or installing the Roadmaster Crossbar-Style Base Plate on your 2017 Ford Taurus.
Average Customer Rating: 4.8 out of 5 stars (157 Customer Reviews)
Roadmaster's crossbar-style brackets are virtually invisible, easy to mount, and simple to remove. Brackets install on your vehicle's frame to provide attachment points for your tow bar.
The baseplate fit perfectly. The instructions and video on the the etriler site made the install relatively easy for me being a DIYer. I am pleased with the no-obtrusive aspect of the the Roadmaster base plate. Wouldn't know it was there just by looking at the front end of my 2018 Ford Taurus.
Received sooner than expected. Haven’t installed on 18 taurus yet but video looks pretty straight forward. I’ve had the bumper cover off before so hopefully everything will go smoothly.
This baseplate worked out fine. While at first glance the installation might look intimidating to some, I found it was not that difficult. I believe a person with average mechanical skills/experience can install this. Since it was a first for me, I took my time and no doubt took more time than a pro, but I know it was "done right". I learned something new, and I saved a bunch of money! The job was made easier by the excellent directions. Probably the most intimidating thing was removing the front bumper cover, but it was actually easy, just follow the step by step directions. This install was on a 2011 Kia Soul. I like the fact that it is nearly hidden, a clean look.
After comparing Demco, RoadMaster, and Blue Ox base plate costs, mounting procedures, etc for my 2012 Fiat Sport, I decided to go with RoadMaster (Kit #522013-1A) for two main reasons: 1) I had the tow bar and mount adapters from another product that were the same specs as the RoadMaster tow bar and adapters to attach to the base plate, and 2) no drilling or other modifications required to mount the base plates. Blue Ox (Kit #BX2800) required I buy their tow bar and other unique configuration adapters PLUS drill two half-inch holes on either side where the base plate mounted AND hammering flat the tips on the corners of the bumper bracket the frame where the base plate mounted. Blue Ox did provide better details on the removal of the facia and bolt removal and torquing actions required for the Fiat. My biggest challenge was the removal of the facia without damaging the clips or other damage to it. Once it was off, the action of removing the bumper core from the end of the frame rails and bolting on the base plate was slick! I took a little over 4 hours to do this, but it was because I wanted to do it right, without damage, and have the confidence I could tow without issues. (Not sure how sequence will show, but labeled the pictures as "Before," "Removal," "Installation," "Finished," and "Ready to Tow.")
This was the second base plate kit from etrailer that I have installed, the first being on our ‘03 Outback and this one on our new to us 2015 Subaru CrossTrek. As usual the response, shipping and delivery from etrailer was prompt and curious. They are my go to place for anything towing related.
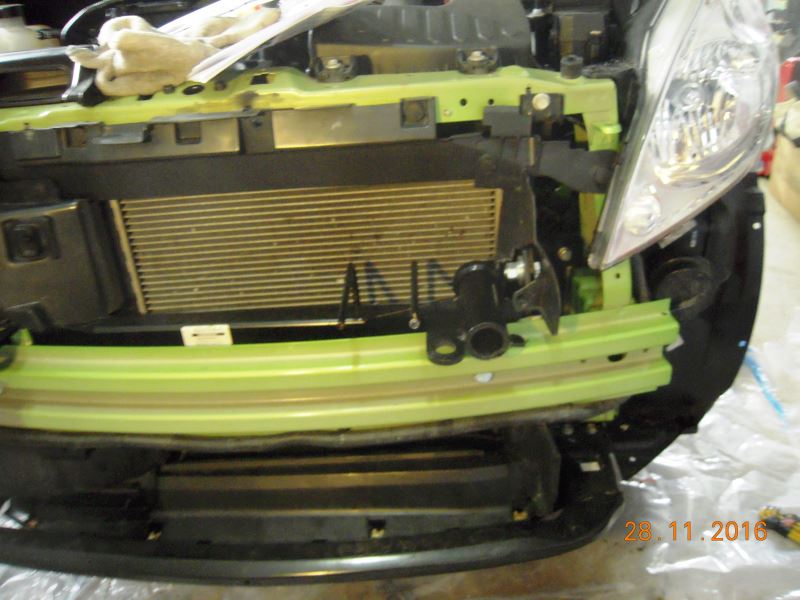
Installation of this kit went well with only a few issues, most of which were related to our vehicle not the kit. I knew the car had been hit lightly on the LF corner, but could find nothing of concern body or frame wise when I looked the car over before buying it. Turns out the front bumper reinforcement had been tweaked a tad which made lining the bolt holes up with the holes in the base plates a tad challenging. This made the small angle brackets that go inside the frame heads tough to line up, but in the end it all fit. I did find that it was unnecessary to pull the washer reservoir or the left headlight to access the nut and washer for the long 1/2” bolt. You can easily reach and see the place from underneath after pulling the plastic encapsulation panel. When drilling that 1/2” hole be sure to angle the drill bit UP a tad otherwise you may end up having to grind a flat on the side of the large, thick washer as you can see in my picture from underneath. I used shrink wrap over the nut and bolt since there’s a wiring harness right against it. The picture of the baseplate differs a bit from the pictures so I guess they made some changes. All in all a great kit!
2018 Fiat Abarth install - Videos of install from etrailer helped a bunch. My 2018 fog lights on the Abarth required some trimming on the inside of the bumper cover. Photos in the instructions did not accurately depict my 2018 Abarth, but taking the grill and fog light assemblies off of the bumper cover allowed me to see what needed trimming. Basically a 1 inch notch with the dremel did the trick. I also got the rock guardian and falcon all terrain tow bar. super quick to assemble and disconnect. CLEAN LOOKING INSTALL WHEN EVERYTHING IS REMOVED.
Received the base plate within 3 days of ordering. Very fast and efficient service! Within 15 minutes of receiving the base plate and wiring kit I received an email from Carol at etrailer saying she got notification that it was received and to make sure everything was O.K. Excellent customer service!! The installation was pretty straight forward. The installation tutorial video posted by etrailer was very good and helpful. Will order from etrailer again when the need arises. Highly recommend them.
The Ez4 was went on while watching Video during each step. Used the 2012 Sonic Video. We were able to trim just enough without having to remove the ambient temp sensor. We are happy with the way it looks on the Sonic.
Super fast shipping, nice product and complete installation instructions.
Fairly easy to install however it requires removing the front (nose) of the car. I was amazed at how much plastic goes into making these cars. It took about 3-4 hours to take off the front remove the factory 'bumper' that the RoadMaster Base Plate replaces and reinstall everything. I had problems because someone had removed the front of the car previously and had not put it back together properly. It all worked out and I'm loving how easy it is to hookup and unhook. I had a dolly previously and this is so much better. When I sell the Mini I'll restore the front end (replacing the grille) unless the new buyer wants to tow it. The etrailer and Roadmaster teams are great to work with.
Installed on a 2011 Mini Cooper S hatchback turbo. Previous reviews were pretty spot on. Lots of plastic goes into these cars! My install (including brake light wiring), was 7 hours start to finish. Hardest part was removing the bumper facia to get at the metal bumper underneath. Be patient, take your time so you dont break any plastic clips!
The base plate itself is VERY robust compared to the oem bumper! Adds about 20#. I did have to trim away some plastic flashing behind the facia where the air scoops go. Easy to do with a Dremel tool.
When done, it is an extremely clean look!
Very impressed with the fit and finish. Very easy to hook up. Went with Falcon 2 bar. Tows very well!
Thanks etrailer!!
First of all, thank you etrailer for getting the Baseplate Kit for my Chevy Spark to me in time for my trip. Everything I needed was in the box. The step by step instructions were very easy to follow. I would definitely take their suggestion to read and understand the instructions before beginning the job. That step allowed me to always know what was coming next. Several holes need to be drilled, no problem with location, it is all in the instructions. Be sure to have good sharp bits. The whole process is an easy bolt on. I work slowly and got it done in one afternoon. At the end, after installing the baseplate, when you put the front facia back on the car, they suggest leaving off the Styrofoam inner bumper but I found no need to do that as it still fit right back on no problem. It would be up to you to leave it off or not. I thought it would be safer with it on there as was the original. In the end I added a light kit with a 4 round plug on the front. Very well thought out for Roadmaster to supply a place to mount the receptacle. Thanks again, I can now leave on time and take my car with me.
Everything we have purchased from etrailer has been excellent. We have this installed on our 2014 Fiat for towing, and it's worked out great. We've gone a few thousand miles with it, no problem. Love etrailers service, website, videos etc.
Just what I needed for my toad.
I bought and installed base plate and wiring on a 2018 Ford C-Max hybrid car. The wiring was a little complicated due to the hybrid setup on the car, however, everything worked out well. I have done this on several other cars I have towed behind my motorhomes. All products and help from etrailer.com was excellent. The video presentation was very helpful.
I installed it on a 2012 mini Cooper S. The video was of a slightly different model than mine, but was very helpful. One thing to note is that the model S has a turbo charger so it has two plastic air intakes in the lower bumper area. That was not mentioned in the instructions or the video. The fit of the towbar bracket was perfect! Very little of it shows from the outside.
Hope it fits
I will let you know
installation instructions were clear and very helpful, took me about 4 hours to install, would have been faster if i had attempted anything like this before.. removing front fascia and trimming the openings. Easy to use.
Very well made. Other than a couple of holes not lining up very well, which I have never seen anything line up perfectly, it was fairly simple to install. With the instructions that came with the base plate, that were very easy to follow, we were able to install with very little problems, and we are not all that mechanically incline. Lol
The package was shipped from your warehouse 1/4/2012 at 2:09 PM and arrived at my house in Colorado Springs 1/6/2012 at 1:08 PM, that was great service and a great product.
I finished the installation of the kit on my new 2012 Ford Fiesta at about 8:00 PM on the same day I received the kit (1/6/2012.)
Thanks for the GREAT service
Great product and installation went very smoothly. Installed myself in about 2 hours. Fit perfectly and mounted easily to the car. My Stowmaster tow bar mounted right up to it. I deliver motor homes for a living and can already see how this setup is going to save me lots of time and aggravation over old fixed tow bar set-up I had previously.
Ordered the Roadmaster Cross-Style Base Plate with Removable Arms Kit after reviewing the information on the etrailer web site. Nice video showing the product installed on our model of vehicle (Fiat 500). Ordering online was easy and shipping was fast with excellent communication through email and tracking.
After receiving my order, I then discovered the Quick Disconnect Tow Bar Assembly is not included in this model of base plate kit and has to be ordered in addition. I was able to determine after a phone call and email exchange with customer service. Interesting it is listed in the online catalogue as a replacement item.
I installed this plate with the help of my friend very easy to install..
.very good installation diagram ....easy to follow.........
excellent product
Luc
Wow, this thing was super easy to install. Just watch the 8 1/2 min video and your good to go. Worked on it an hr a day for 3 days before going to work. 3 hrs total. Be sure to get an alignment tool to help line up the holes.
Info for this part was:
At etrailer.com we provide the best information available about the products we sell. We take the quality of our information seriously so that you can get the right part the first time. Let us know if anything is missing or if you have any questions.


Thank you! Your comment has been submitted successfully. You should be able to view your question/comment here within a few days.
Error submitting comment. Please try again momentarily.