
Summer Starts Here - Save up to 70%

To see if this custom-fit item will work for you please tell us what vehicle you'll use it with.


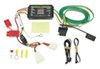
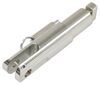
This custom-fit base plate kit lets you hook up your tow bar to your vehicle. The main body remains hidden for a clean, unobtrusive look when your vehicle is not being towed. Simple, bolt-on installation with included hardware.
Features:
Specs:

Videos are provided as a guide only. Refer to manufacturer installation instructions and specs for complete information.
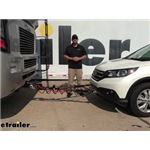
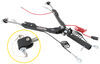
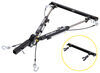
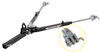
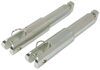
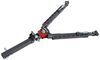
Hey everybody, Ryan here at etrailer. Today on our 2014 Honda CRV, we're going to be taking a look at and showing you how to install the curt base plate kit with removable arms. There's going to be a total of five main components needed to flat tow your CRV down the road. The first one's going to be your base plate. So the base plate is going to provide us with a solid and reliable connection point to hook up our tow bar to. The tow bar is going to be that second component, this is going to be the physical link that connects the front of your Honda to the back of your motor home.
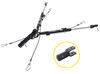
The third component is going to be safety cables, so these safety cables are going to be there more or less for a backup device.In the event of a catastrophic disconnect, the safety cables are going to keep your Honda connected to your motor home. The fourth component is going to be tow bar wiring. So the tow bar wiring is going to transfer the lighting signals from the back of your motor home to the back of your Honda, keeping you safe and legal. And last but not least, we're going to have a braking system. So what the braking system is going to do is apply the brakes in your Honda whenever you apply the brakes in your motor home, and that's going to help bring you to a safe and predictable stop.So here's what the base plate is going to look like whenever you're not hooked up to your motor home, and there's a few things I really like about it.
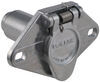
And primarily it has to do with the appearance. You're really hardly even going to notice it on the front of your CRV and that's because it's going to utilize the factory openings at the bottom of your fascia there.So it's nice as you're not going to have to modify your front bumper to allow your base plate to work. Now, even though you can't really notice it all that much, it's still going to be really easy to get to and use, so that's always nice. It is going to come with these little caps too, which really help maintain that clean look and they're really going to help protect any dirt and debris and other foreign material from getting inside of the base plate, that way it will work smoothly for years to come.Now, something I do want to mention is that it's not going to come with any brackets to mount up your wiring or braking system, for example. So that is something you'll have to pick up separately to mount up your bracket or your iron plug and you can find plenty of different types of brackets available here at etrailer.
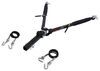
Now, whenever you are ready to hook up to your motor home, it's going to be super convenient and that's because it has easier moveable arms. So the way these are going to work is you just slide the arm into the base plate and rotate it about a quarter turn until that pin locks in. And then it's going to be the same for the other side as well.So once you're connected to your motor home, this is the way it's going to look and it's pretty clean actually. Everything's spaced apart, nice and even so it's going to be really easy to get to. Now the curt base plate is going to be compatible with many different types of tow bars.
Today, we have a Blue Ox Avail, which is a great choice. However, if you have a different brand of tow bar, chances are really good that there's an adapter available for it, that'll allow it to work with the curt base plate and you can find those here at etrailer.Now to hook your tow bar up to your base plate is extremely straightforward. Really, nothing too crazy about it. All you're simply going to have to do is take your tow bar, line it up with the holes and your removable arms. Slide it into place, take your pin, push it through and put your clip on the other side. Even the safety chain loops are in a really good position, easy to get to and even with these relatively large hooks, we're going to have more than enough space to quickly put them around the loop.So at the end of the day, a base plate, you really can't go wrong with your CRV. It's going to look great whenever you're not hooked up. And whenever you are ready to hook up, it's going to be super easy and shouldn't take you a whole lot of time. Now, as far as the installation goes, it's really not too bad compared to a lot of other base plates I've done. You do have to remove the front fascia, but everything is relatively straight forward. Speaking of which let's go ahead and do that together now.To begin our install, we're going to go ahead and pop the hood on our CRV and we're going to need to get our fascia removed. So the first thing that we're going to do is feel it right here it could have four plastic push pin style fasteners along this edge. So to get those out, take a flathead screwdriver, and a pry underneath the head of them, and you're able to hold the whole thing out. Go ahead and do that for these last few and that'll release this top portion of our fascia here.Now, if we moved to the bottom side of our CRV, we're going to have four plastic push pin style fasteners here in center. We do have one missing here, but it would be the same as the other three. So we'll take these out and just using a flathead screwdriver like we did the other ones. Then if you look here in front of our front tire, we're going to have a 10 millimeter bolt pull out and another push pin style fastener. Once I get this fastener out the over on the other side in front of the other front tire, I'll take these same two fasteners out.So not if he come to our wheel well. Here on the liner, we're going to have a few fasteners we need to take out. We're going to have two plastic push pin style ones, one kind of back here and one along this edge, I'm going to use a trim panel tool to get them out, but a flat head will work. Here to do is just kind of pry underneath the head of it there, pop it out. Same thing for this one up here and if you move down a little bit, we're going to have that Phillips head screw.Once we have this out, we're going to be able to kind of pull off this little trim piece here. So what you need to do is kind of pull down on this part and up on this one. You have to kind of work that tab out, kind of carefully just work that liner full about this area here and kind of pull it back. We're going to have a Phillips head screw that we're also going to need to remove. So once I get this one out, I'm going to repeat the same process over on the other side.At this point, we can pop our center grill off. So the way we're going to do this is kind of just gently pull out on it, kind of freeing the clips that's holding it in place. So we'll start up top at the corner and kind of work our way to the center. So we'll take a little bit of effort to release the clips. So just take your time and be patient. Eventually it will pop out, kind of have to find that sweet spot to release everything. Kind of like to just go from the sides and work my way in. Once we have it released, we can just set it off to the side. So now we can get our fascia removed, and I do suggest getting another set of hands to help you, but on each corner, I just put some painter's tape here just to help protect our panels from getting scratched up. But we're going to work from the side and these are going to pull out, these little clips will get released.We'll kind of just work our way to the headlight. Underneath, you'll see some tabs there and sometimes these pop out, sometimes they don't, you may need to take a little plastic trim tool or something like that, they kind of help get it released. So we'll get it to this point on each side, and then we can work here at the center. So once we get right here, we're going to have one more yellow connector and I'm just going to take a flathead and kind of push down on it, that will release it.We'll carefully pull it back and we may have some electrical connectors here. Our model has fog lights, so we'll need to unplug each side, do that, you just push down on the center the tab and release it. And we can set our fascia off the side, somewhere safe, with the fascia out of the way, we're going to need to remove our bumper beam, but we do have some small things attached to it. So we need to free them first, we're here on the passenger side we're just going to have this little shroud, some pushpin fasteners, so we have one top here, use a trim tool to get it, same deal here on the bottom side and if we work our way over to the driver's side, we're going to have another pushpin here for the shroud and on the bottom side, we're going to have a sensor and a couple more of them tabs.So pry all them off, that way we don't have to try to worry about doing this while bumper's removed, looks like we'll just have one more here on the side. To get our bumper beam off, it's going to be set up the same on each side, we're going to have four 12 millimeter bolts, three on the front, and then one up here at the top. Go ahead and pull all them out. So I went ahead and removed the other side already. So you kind of just lift up on the bumper beam, pull it out and set it to the side.Now we can trim some of this plastic shroud, according to the diagram and the instructions. So I'll make a few different cuts here. So this is pretty thin, I'm just going to use a pair of sheers to do this. You could also use maybe a sharp knife or regular pair of snips. So mark those areas out, and we'll just get them cut out. Get this little section cut out first, that way we can have a little bit easier access to the rest of it that we need to cut. So we'll just keep going up a little bit and get this part removed as well.Now on the passenger side, we got pretty much the same deal here. So I marked those areas out and we'll get them trimmed. If you look inside of our frame rails here on the top side, we're going to have a weld nut and we're going to have to remove that. So this is just kind of tack welded to the inside of our frame rail. So I'm going to use a punch and coming from the top, kind of get on the lip of that weld nut, we're going to take a hammer and tap it until that weld nut pops off. I'm going to have to reposition it a few different areas. So once it pops off like that, I'm just going to do the same thing on the other side.We're going to grab our base plate and put it into position. So this is going to slide inside of the frame rails. This line's in the way, you kind of just carefully bend it around our base plate will fit. So once we have it in, what we're going to do is just get some of the bolts started hand tight. So these three, we're going to use these smaller bolts and conical tooth washers, make sure the teeth on the washers face that way towards the base plate, and you want to be sure to use some Loctite on the threads as well.You can find that Loctite here at etrailer and all the hardware that we're going to use to secure the base plate from now on, it's going to get a droplet of Loctite there. We'll just get these started hand tight, three over here and the same setup over on the other side, since all of our hardware is now hand tight, we use a 13 millimeter socket and we're just going to snug it down. We're not going to fully tighten it. Just want to run it down a little bit, to help draw everything together.So if we kind of follow our base plate, where it goes in the frame rail, right to here. We're going to have a factory hole and we're going to take a half inch bolt and conical tooth washer and put it through there. What it's going to thread into is called a handle nut. So the way this could work, let's take the handle nut, put it inside of the base plate, run it back and you can kind of see it line up with that hole there. So you're going to hold it in place and then just carefully get that bolt started. Works a little bit better if you just use very light pressure, but they're relatively easy to thread in at least in this situation, you have quite a bit of room.Then on the bottom side of our frame rail, we're going to have another factory hole. This will work the same, we'll take our half inch bolt conical tooth washer, handle nut will go inside of the base plate, push it back, line it up and get this hand tight. Once I have this tightened down, I'll simply repeat the same process over on the other side, we can come back and snug those bolts down just using a 19 millimeter socket, and then we can grab our torque wrench and tighten all of our hardware down to the amount specified in the instructions.So once you have all the bolts torqued down, there's a couple of things you need to do. That ambient air temperature sensor. I just put it on our base plate and just use the included zip tie to secure it there. Then you're going to take your safety cables and loop them around the frame and connect the ends here to the quick link on the base plate, which is this tab using the included D-ring. So I did that on each side and what I like to do is just take some extra zip ties and just kind of zip tie everything together to keep it nice and tight, that way they're not going to bounce or rattle around when we're driving down the road.Now at this point, it would be a great opportunity to install other flat tow components, such as wiring or a braking system. And that's what I'm going to do. It's a good time because we're going to have all this room with the fascia removed to install them components and get everything mounted up how we want it. If you're not going to install them components or already have, you'd simply just refer to your instructions to trim out a little bit of the bumper cover and re-install bumper cover the same way that we removed it.Now that we have our other flat tow components installed, we'll go ahead and free install our fascia the opposite way that we removed it, don't want to forget to plug in any electrical connectors that we may have removed, like our fog lights here. We'll simply just line our bumper back up and clip it into position. As far as our grill goes, we'll just line this back up, and this will more or less just kind of snap back into position and that'll finish up our look at and our installation of the curt base plate kit with removable arms on our 2014 Honda CRV.
Average Customer Rating: 4.9 out of 5 stars (14 Customer Reviews)
This custom-fit base plate kit lets you hook up your tow bar to your vehicle. The main body remains hidden for a clean, unobtrusive look when your vehicle is not being towed. Simple, bolt-on installation with included hardware.Alex was a great help. Etrailer is first class, knowledgeable. Will definitely use them again!

Owned a year and over 10,000 miles with no issue. Instructions were right on.
This is the second base plate kit I have purchased from etrailer. Both of them have been great! The step by step video instruction supplied by etrailer made the installation a breeze! I highly recommend etrailer and their products!
I had previously installed tow bars from other manufacturers, and found the instructions for Curt to be easier to understand and easier to follow. Product has worked great.
Well built. Had a question as to installation and Jesse was quick to offer help. Packaging took a beating in transit was all parts where there.
right part, right fit, easy to use.
Do you have a question about this Base Plate?
Info for this part was:
At etrailer.com we provide the best information available about the products we sell. We take the quality of our information seriously so that you can get the right part the first time. Let us know if anything is missing or if you have any questions.


Thank you! Your comment has been submitted successfully. You should be able to view your question/comment here within a few days.
Error submitting comment. Please try again momentarily.