


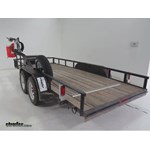
Designed for use on your open, flatbed trailer, this all-inclusive rack holds 1 backpack blower; (1) 3- to 5-gallon, round cooler; and 1 trimmer line spool. Pre-drilled towers ease installation.
Features:
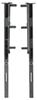
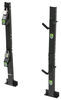
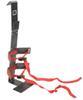
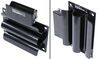
Backpack Blower Holder
The backpack blower holder is designed to securely grip your blower at its grab handle. Simply hang your blower from the hook and then fold down the integrated steel arm. Once the arm is properly positioned over the hook, you can lock it in place with a padlock (sold separately).
If you have a STIHL 420 backpack blower, you will need to use Pack'Em adapter RA-STIHL420 (sold separately). A different adapter, RA-STIHL (sold separately), is required if you have a STIHL 550, STIHL 600, ECHO or RedMax blower.
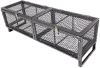
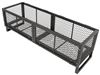
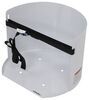
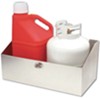
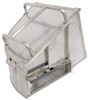
Cooler Holder
The beverage cooler rack consists of a steel frame that supports the weight of a cooler and two adjustable straps to hold it in place. This rack is designed to hold a three- to five-gallon, round cooler or pesticide sprayer.
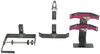
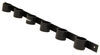
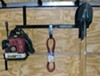
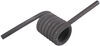
Trimmer Line Holder
The line holder can hold a three- or five-pound spool of trimmer line. Just slide the spool onto the center rod of the holder and then hook the rod back in place. Now your trimmer line is securely stored and easily accessible for quick, painless unwinding directly from the spool.
Videos are provided as a guide only. Refer to manufacturer installation instructions and specs for complete information.
Today on our utility trailer, we're going to review and install the Pack'Em trailer cargo control, part number P-K dash B-M dash O-P-one. Now here is what out kit is going to look like once it's installed. Our blower is mounted to a two-piece kit. The top is a simple hook design that will allow the handle to go down over the hook and even lock into place with the pre-drilled holes that a padlock can go all the way through. As we can see here, it's a fully wielded steel construction with a really nice hammer powder-coated finish. Supplied with the install kit is all the necessary hardware for securing our mount to the rail.
While our top hook is providing the the security for keeping our blower in place, the bottom mount has pre-drilled holes on each side that will allow you to use a securing fastener, whether it's a ratchet strap, pull strap or even a bungee cord so that it holds the bottom of the blower tight to the upright rail and the mount so it doesn't swing around when traveling down a road. Now to remove our blower, no matter what fastening style we use, we'll simply just take it off by unhooking it out of the bottom mount, set it aside out of the way. Now if you have a lock in, you'll want to remove it from the top mount. We can simply take our backpack blower, lift it up and off of top mount and we're ready to use or put it up for storage at the end of the year. Now here we have the trimmer spool rack. It will accept up to three, and even five pound spools. It is spring loaded to help hold our spool in place so it doesn't spin and come free, allowing extra string to come out when traveling down the road. Really nice feature out about our upright rails is it allows the versatility of the kit because of all the pre-drilled holes that match up with the mounting brackets. Now our water cooler mount not only gives us a nice, easy place to mount our water cooler that's easily accessible, but it has two convenient pull straps for quick and easy mounting and removal. Now to begin our install, we'll start with our rails.
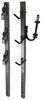
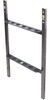
These are the rails, or the upright that will secure to the trailer. We mount it with the flat side facing out or the channel side facing out, depending on which way your want your accessory to face. For this application, or this trailer, it's already got some pre-drilled holes in the top and bottom rail so we can match our rail up with the pre-drilled holes in the trailer. Here at the bottom it's already got a pre-drilled hole, so we match it up with the pre-drilled hole in the trailer then all we have to do is drill out the top hole in the Pack'Em rail. Note. The hardware for installing onto the trailer is not included, so you'll need to supply your own hardware or fasteners.
We're going to go ahead and take a bolt and a flat washer, going all the way through the trailer and through the rail and put a nut on the other side. Now I'm using a nylon lock nut, so it's a further I can tighten down by hand. Next, we'll go ahead and make sure the rail is straight up an down and then tighten down our hardware. Make it easier on myself, I've got a level here that's magnetic so we can attach it directly to our steel upright. Level it up, and then tighten down our hardware.
Now keep in mind as we tighten it down that what we're just getting it nice and snug to hold our rail in place so that we can drill out our second attachment point. A little off as we tighten it down, get it back in place, snug it up, and now we can drill out our second attachment point. Now to drill out our hole, we'll use the pre-drilled hole in the trailer as a pilot hole and go all the way through our upright. Now this is a nice, solid steel rail so I'm going to use a step bit process starting with a smaller pilot bit, then opening up to my final size, as needed, to get my fasteners in place. Now with my pilot hole made, go ahead and step up in my drill bit size. Now once we have our hole drilled out, we'll go head and install our second set of fastener. And just like that, we've got our first rail installed. And you can see how nice and secure it is to the side rail here of our trailer. We'll go ahead and repeat the process with our second rail and attaching it a little far forward up the trailer. All right just like that, we've got both rails installed. We're ready to install the O-P-one kit. This is a three piece kit and we're going to start with the water cooler bracket. Now our water cooler bracket will come with the necessary hardware for attaching to our rails. We'll go ahead and take the nut off and remove the two bolts. And line up our pre-drilled holes here with the pre-drilled holes in the upright rails. Then go ahead and reinstall our fasteners. Once I have both bolts in place, we'll just reinstall the nylon lock nuts. Next, let's move to the trimmer spring spool holder. Now our spool holder, we turn it around, also has two nuts and two bolts for securing the fasteners to the rails. Now when choosing to install your kit, the order or location in which you choose is solely up to the user. As the pre-drilled holes in the rail will allow us to put it in any order that fits our needs. All right, now we've got the fasteners loosely installed, let's move to our second upright rail. On our second upright rail, we're going to install our backpack blower mount. I'm going to start with the top first. Here in the top, we've only got one bolt and nut for securing but there are two pre-drilled holes. That second pre-drilled hole could be used for a padlock for securing your backpack blower to your rail. Now my bolt and nut in place that holds our top mount, let's go ahead and secure the bottom mount. The bottom mount is going to have two bolts and nuts just like our other attachment points on the other rail so we'll go ahead and remove our hardware, line it up and secure it. Work. All right. Now with all of our hardware in place, let's go ahead and tighten it down. And just like that, you're now ready to install your equipment. Let's go ahead and start with our cooler. We can go ahead and slide the securing straps over the outside of the cooler. Now once we have it in place, take our strap and pull it tight. That will really hold that cooler nice and tightly. We don't have to worry about it going anywhere while we travel down the road. And just like that, our two pull straps hold it nice and tight to our upright and our mount. Now let's go ahead and mount our trimmer spool. To start, we'll remove the wingnut here on the end and the split lock washer. We have the securing arm. We'll simply slide the rod through the outer bracket so that we can tilt it away. We're going to remove the metal washer and rubber washer, bring in our string or spool, slide it onto the rod, re-installing the rubber and metal washer. Then go ahead and line it back up, pushing the rod back through the outer bracket, installing our L bracket, split lock washer, and then our wingnut. Now our string can go through the bracket where it will help hold it in place while we travel down the road. Now our backpack blower has another real simple install. We'll open up the top hook, hook it around the top handle, and let it set in place. Now, to secure the bottom so it's not swinging while we're traveling down the road, use can use a bungee cord or we're going to use a pull strap that will simply hook into the bottom mount, go around the bottom of our blower, and hook in on the other side, just like we did the first side. Then we can just pull it tight. There we go! Now our backpack blower is secured to the blower mounting system. Now with everything installed, we're ready to hit the road! And that will do it for the review and install of the Pack'Em trailer cargo control, part number P-K dash B-M dash O-P-one on our utility trailer. .
Average Customer Rating: 5.0 out of 5 stars (3 Customer Reviews)
Designed for use on your open, flatbed trailer, this all-inclusive rack holds 1 backpack blower; (1) 3- to 5-gallon, round cooler; and 1 trimmer line spool. Pre-drilled towers ease installation.Great product! Has cleaned up the storage box and floor of trailer.Fast shipping, simple install, perfect design!
Good products. Glad I bought them
Good product
Do you have a question about this Backpack Blower Rack?
Info for this part was:
At etrailer.com we provide the best information available about the products we sell. We take the quality of our information seriously so that you can get the right part the first time. Let us know if anything is missing or if you have any questions.


Thank you! Your comment has been submitted successfully. You should be able to view your question/comment here within a few days.
Error submitting comment. Please try again momentarily.