


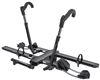
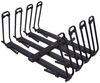
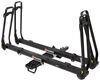
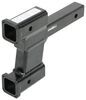
This 2-bike add-on lets you convert your Yakima StageTwo 2-bike carrier for 2" hitches into a 4-bike rack. The add-on bolts to the base rack with included hardware. Integrated cable locks secure bikes to rack.
Features:
Specs:

Videos are provided as a guide only. Refer to manufacturer installation instructions and specs for complete information.
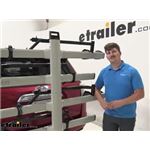
Hi everyone, Aidan here with etrailer.com. Today we're gonna be taking a look at the two bike add-on for your StageTwo bike racks. It's basically going to take your existing two bike StageTwo platform rack and put an extension on it to allow you to carry two more bikes, allowing it to carry a total of four. This is available in the gray color like we have here today. Or if you've got the black version, you can get that color extension as well. And it's gonna add the extra functionality of more capacity, but have a few other things to keep in mind that will touch on in this video.
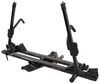
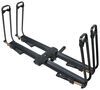
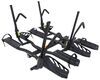
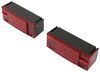
Let's check it out. So most importantly, you've got all the same functions as you would before. You've got the sliding cradles, the stadium design, to have all the bikes rise up as they go to the back. Integrated cable locks with Yakima's same key system and no frame contact for our bikes. So everything's gonna function just like it does for your existing bike rack.
No new features or anything that you've got to learn or keep in mind. With this extension, we don't get the exact same weight capacity. Since we're adding more weight even further out from the hitch, these outer two cradles can only hold 40 pounds per bike and that's on road. If you plan on taking this off road, it's gonna be 24 pounds per bike. So just make sure you're hauling your bike safely and you don't overload these last two cradles.
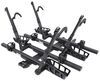
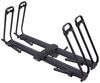
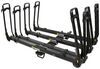
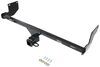
The other thing here is that it is going to stick out a fair bit more than your original two bike rack. From the center of the hitchpin hole to the new outer point of the bike rack, it is gonna be 65 inches which does add a considerable amount. It's a lot more than some other bike racks might offer. So just be mindful of that when you are picking this up, that it is going to extend the length quite a bit. And with that added length comes added weight.
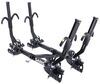
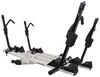
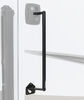
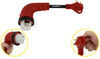
This is going to be a considerable amount heavier than your original two bike. And right now it's just folded flat. So for me to get that up, I felt like I had to really readjust my grip and kind of heave it up to fold it against the vehicle. That's just something to be mindful of. It's gonna add more weight and it's gonna be pretty heavy. Now if you have any other questions or concerns about how this is gonna function as a four bike rack rather than the two, be sure to check out our full demo on the four bike rack. That's gonna go into more detail about how you're gonna live with this and how it's gonna work for you and your vehicle. For now though, we're gonna actually go into how you can install this two bike add-on to your existing two bike rack. Check it out. Starting up the installation, we want to remove these three rubber plugs near the end cap, as well as these two screws, one on either side. I'm just using a flat bladed screwdriver to get these rubber plugs. You can also use a trim removal tool, if you have one of those on hand. And then for the screws, it comes with the tool you need. So we're just gonna use that to remove those screws. Then we can remove this outer cap. And down here, in this slotted hole, we're gonna have a screw. We're gonna just take our included tool to loosen that up and remove it. It's gonna be hard to see but once it's out I can show you. Right there, you can see it kind of popping up. It's a pretty long screw. Once that's removed, we can take our extension piece and put it in the slotted hole on the end right here. So we want that U-shape facing down and it can slot into that hole there. And we can align the two holes and reinsert this screw. Then we can take our extensions spine and insert it with the threaded holes towards the rest of the bike rack, and feeding that extension piece in the middle through the middle. So this will just slot in place here. Then to get this extension spine secured we've got four screws. These shorter spine screws that will secure two on each side with that included tool from earlier. Once those screws are done, we can grab that grommet from earlier and just pop that back into place since we don't need access to that screw anymore. With all that done, we can move on to the trays. They come in two sections like this that we'll just slot together, and we'll have those threaded holes line up with the open ones. And we've already got our third tray installed here. I'll just slide that back. But for the final tray, the outside one, we've got the Yakima logo, you want that facing outward. And we'll just line that up here. And two of those holes, the two outside sets, they'll line up with holes on the extension spine here. And we're just gonna loosely secure that in place by taking one of our longer screws with the washer and threading that in on either side. We'll do four in total. Two on the front, two on the back. Right now I'm just doing this to kind of hold it in place while I go and grab those other two screws. Once all four screws are in place and the tray is somewhat secure hand tight, we can just go back through and tighten them down fully with the tool. And the final piece of the puzzle here is the wheel hook. We'll come to the end where we've got our mount for it here, and just remove this foam cover that's going to expose a sort of flat section right there. And on this plastic piece here we've got three notches plus a more smooth side. Basically those will all line up with portions on our arm. So here we have our three notches. Those will line up with the ones we just showed you earlier. So I'll do that right now. Now we won't go all the way on. There's a fair bit of friction. And basically we just want it to get lined up by running down a screw. Coming to the end here. We can look in there and we see that portion with the flat top, that will line up with this plastic piece. It has a flat top right there. So we'll line that up and then add in our screw with a large washer right there. Thread it in by hand, and it'll feel like it's beginning to stop out. But just keep running it down until those notches at the front end begin to align. So as I'm tightening this down with the included tool, you'll see right over here, those notches start to align. And then, you're done with the install. Your two bike rack is now a four bike rack. You can test out the handle, make sure everything's working. As heavy as this bike rack is now, it still does work and you're able to carry four bikes. Remember, if you've got the black version of this do get the correct color extension, but it's gonna increase the capacity of your bike rack here and get you on the road with all your bikes. Thanks for watching..

Do you have a question about this Accessories and Part?
Info for this part was:
At etrailer.com we provide the best information available about the products we sell. We take the quality of our information seriously so that you can get the right part the first time. Let us know if anything is missing or if you have any questions.


Thank you! Your comment has been submitted successfully. You should be able to view your question/comment here within a few days.
Error submitting comment. Please try again momentarily.