
To see if this custom-fit item will work for you please tell us what vehicle you'll use it with.


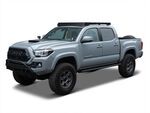
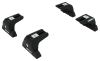
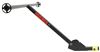
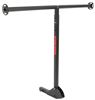
These brackets install in the ditches of your vehicle's naked roof. Ditch brackets provide permanent fixed mounting points for Rhino-Rack RLT600 Quick Mount legs so you can create an aftermarket roof rack. Includes 4 brackets and hardware.
Features:
Specs:

Videos are provided as a guide only. Refer to manufacturer installation instructions and specs for complete information.
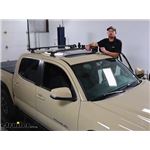
Hey everybody, Ryan here at etrailer. Today on our 2017 Toyota Tacoma, we're gonna be showing you how to install the Rhino Rack Roof Rack System. But before we get into that, let's just take a couple of minutes, check this out and make sure it's gonna work for you. So this particular system is going to be designed for the Tacomas that have a naked roof or you know no factory rails installed at all. If yours has something like that, be sure to use our fit guide and there's definitely gonna be an option or a solution for you. But with that said, what our neighbor did here today, he was looking for something a little more permanent in terms of having a roof rack.
So prior to these, he had a different style that would actually kinda clamp to the sides there and just wasn't really too crazy about it, you know. A lot of people that end up putting roof racks on tend to just leave them on and it makes sense. And that's what he was looking to do. And and with this setup, it's just a little more cleaner and more of a factory type option, at least in my opinion. I think that's kind of the look it puts off.
But with that said too, you know, since it's not just, you know, since the system isn't just clamped on, it's actually bolted to the roof this thing is gonna be really secure. Having a roof rack system up here though is really gonna help to open up your opportunities on what you're gonna be able to do with your Tacoma. You know, these aren't a full size truck so they don't have a ton of space to work with and these are really popular. You know, people go out and you know, have fun with them and do a lot of different things with them. So you know, whether you're trying to use a kayak carrier, a roof box, a roof basket, maybe a bike rack set up up here, skis, snowboards, all types of different things, this is gonna allow you to do that.
And even, you know, I see a lot of these Tacomas being used as work trucks. And so what you can use in conjunction with this is let's say a ladder rack, right You got a ladder rack on the back, you know, like I said they're not very big trucks, they're not super long, a lot of times you can set them ladder racks up to where you know you can have a longer ladder come up and support it, you know, using the roof rack. So the possibilities are endless. One of the things as well with this, with these crossbars at least, is the shape of 'em. So they're relatively low profile and what that's gonna help with is helping to reduce that wind noise, you know, a little more aerodynamic, cut through that air a little bit better and you won't hear 'em as much as some of the other types, you know, the round or square ones whenever you're driving down the road.
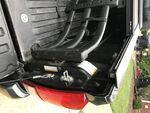
So our Tacoma is equipped with the sunroof and I know I was kind of curious if it would be able to just kind of go up into that vented position without hitting the rack and the answer is yes. So that's it all the way opened as far up as it'll go. And doesn't have any clearance issues. It is kind of close though like I could get my hand underneath there. So just something to think about. I know some type of roof mounted accessories use clamp on style. So like I said, just think about that. If you have a clamp on style and that clamp's pretty thick, you might just wanna be careful and pay attention if you do decide to vent your sunroof whenever you have that accessory on. Now as far as opening the sunroof, let me hop down here, there's no issues at all with that because it kind of just slides right into the roof almost. So definitely no interference. And even if you have a clamp on style accessory, more than likely you should be able to completely open it up like we did just now. As far as how high these are gonna sit above the roof, they're actually pretty low profile. So I'll just go right in the middle here, at least on the front. Push that down. It's gonna be about 3 1/8 of an inch. So not really taking up a whole lot of space. And you know, that can be useful if let's say maybe you're putting a roof basket or a a roof box up here and you wanna load it all up before you hit the road and be able to pull into your garage at night or something. You know, you can use that in conjunction with the the height of that box or basket or whatever to help figure out, you know is this gonna clear my garage or or have any clearance issues. With these being fixed, you know, they're directly bolted down to your vehicle you're not gonna be able to adjust the crossbar spread and so you kind of get what you get and that can matter sometimes depending on you know what type of accessories you end up wanting to put up here. Some of 'em want 'em to be a certain width or within a certain parameter, something like that. So just kinda give you something to work with. If you go from the center to the center that's gonna be right at 28 inches. So honestly that's usually right in the money for just about all the types of accessories. You know, it's a pretty good number there. And I mentioned those clamp on style ones which you can use but this also has a T track in it, so you peel these little guys out here that's where you can put your T track accessories. So if it's something that you know you're gonna keep up here or use a lot or it's only one and you can put them up there get 'em positioned how you want and then you can always trim these pieces and you know trim around 'em and pop 'em back in there just to help keep everything kinda sealed up and help keep that wind noise down a little bit. These are gonna be available in a couple of different colors as well. So we have the black ones here today which I personally like. I think they would match just about any vehicle on the road, but there's some silver ones too. So you know, if that's what you're looking for, they're definitely available. But you know, aside from that, at the end of the day a roof rack system that I actually like. You know, it's super solid, it's not going anywhere. You don't have to deal with trying to set up these temporary brackets and all this stuff. And although the initial install is a little more time consuming, it's worth it, you know, especially if you plan on using this a lot 'cause you won't have to deal with any of that stuff in the future. But kind of speaking of the installation, definitely time consuming. It's not so much that it's really complicated per se. The part that I probably had the most trouble with is just trying to figure out what to do at the very beginning, you know. So once you kind of figure out how to set one of 'em up, the rest are much easier. You know, it gets easier as you go on. So hopefully you know, our install video can get you going in the right direction and give you a little guidance, make it easier on you. If I had to give one pointer though, make sure you got sharp drill bits. 'Cause where you drill into, this channel here, the metal is is really solid so drill slow and you know try not to burn up your bits. But if you plan on putting this on yourself, feel free to hang around. We'll go ahead and get started on it now. To begin your installation not a bad idea just to kinda lay out all your parts and pieces, make sure you got everything, kinda organize 'em, you know. But what we're gonna have to do on the roof there's gonna be a piece of channel that we can pull out and that's because these are gonna have to get mounted to the roof of our vehicle and those will provide us with attachment points. That way we can mount eventually these pieces to it followed by these. So just wanted to kind of give you a visual here and what we're gonna be dealing with. We're gonna be working right on top of our Tacoma. I like to put painter's tape kind of around it that way we don't actually scratch paint or anything like that while we're working. but could have our rubber piece that we need to pull out. Our weather stripping, really nothing to it, just at the end here, carefully take a screwdriver. Sometimes you can even grab it with your hand and this is just gonna peel up completely. And we'll work it all the way off and get it out of our way. And set it to the side. In this ditch, this opening where weather stripping was, that's where our ditch brackets are gonna sit and eventually get secured down into there. So I referenced our instructions on the measurements that we need to take. So you'll measure from the top of the windshield glass, you know, back put a mark and then you know continue on to that second measurement and put a mark. Really helps if you have a metric tape measure. It just makes it a little easier, but it can be done with the standard one. Just you'll have to pay a little bit more attention there to get it spot on. But you know, find 'em, put the reference marks and then we can kind of go from there. With our marks made, you know, the center hole there in the ditch bracket that's going to be centered on that mark. and just to try to help keep everything constant, I have a 13/64 force drill bit. It's just over a quarter inch size that I'm gonna lay here and kind of but it up to it. That way we can have a constant. You know, if you do this for every one, it's pretty much splitting the difference and getting the centered exactly. If you do this for every one, we know that they'll all be the same, you know, so I think that'll help out a little bit. But I'll get that centered up and you can mark out the three holes there. Get our drill bit and if you have one of these stopper collars, you can put that on, you know, that way you don't drill completely through. Just be careful if you don't. But we're gonna drill out our holes here. So I like to start with the one in the middle and kind of go from there. And this is a really hard steel so drill slow and apply some good pressure to it and just take your time. (drill motor revving) Once you get that middle hole drilled out, what I like to do is just take one of the Huck rivets that they give you and just kind of put that in there. 'Cause sometimes when you're drilling, you know, it might get knocked off course just a little bit. And so I just like to use it as a reference here. So it looks like we're still in pretty good shape. So I'll go ahead and get this one drilled out. Do the same thing, check it, and finally this last one. Let's get all three of them drilled on out. You know, you want to put some type of protective paint or something over that bare metal. So I got a little primer stick thing here that I will push in there, get a layer on it. And you know, once I get this done we'll give it a few minutes to dry and then we can come back and get ready to secure our bracket. So I'll give that a few minutes to dry and now we can put on this butyl tape here. And what I like to do the center of it, just take one of the rivets that they give you, push that through, clear out that hole and then peel off one side and just simply stick this lining up the hole in the butyl tape with the holes that we drilled. And this will just kind of help keep everything sealed up and prevent water seeping in and and stuff like that. Go ahead, grab your ditch bracket again and take the Huck rivets and I'd just like to, you know, push all three of 'em into place. That way it kind of holds where it needs to. And you're gonna wanna use a rivet gun. I have a pneumatic one. I'd assume you could use a regular handheld one too. Wouldn't see why not. What you're gonna do is go ahead get all these rivets hooked. At this point you can take the mounts here and I like to use this little rubber gasket. I don't think you absolutely have to, but I don't really see why you wouldn't, because it will kind of help, one look better, especially once you get the rest of the weather stripping back on and help kinda keep everything sealed up. So pop that on. And then you're gonna have two bolts that are gonna secure this. I have this type of bolt here and you will put on a split lock washer and a flat washer. And they even give you the special tool that you'll need. So what I like to do is kind of get it crushed through there and get 'em started. Sometimes they're kind of hard to find, you know, so make sure when you're turning this you're not cross running it. Don't force it. If you feel it start, you know, get it going a turn or two. And then go to the, start the other one there. So I got this completely secure, nice and tight. In the center there you can take this nice little rubber stopper and that just kind of pushes into place. And then you can grab this part and if you unlock it, you now have these two red handles and when you squeeze them in, you can see these end pieces kinda come in with them. So hold that in. Actually looks like, squeeze 'em in, you can kind of push forward actually and it holds it in like that. But you'll line that up (plastic snapping) (plastic snapping) (plastic snapping) and that will snap into place like so. We'll just put the cover back on. With this one done, what you're gonna do is repeat, you know, that exact same process, not only for the one in the back, but for the two on the other side of our truck as well. So we'll have, you know, all four corners completed before we worry about getting our crossbars on. Once we get all the corners set up where we're gonna attach our crossbars, we can get these going. So pull the end cap off. There'll be a little key stashed in there and these pieces which will eventually go on the bottom. In that case you're wondering this is the top side where it's labeled. This will be facing up towards the sky. And then inside of here there should be (metal clanking) some strips. And with these you're just going to place 'em into the tracks and kind of fill 'em all the way. And so what, kind of a trick I figured out if you take some soapy water, spray them down real good, you can kinda get this started. About like, let's say about halfway here. And then I kind of peel up maybe an inch or two on that end. Gives you something to grab onto and you can just work that, you know, all the way down to the other end there. So it's at the edge, and I'm just gonna do that same thing until these will be completely full. They usually give you extra. So you might have to trim one to length to fit at the very end there, but you know really nothing to it. Got that, you know, rubber strip ran all the way down there and take off the other end cap and we should be ready to actually get this in place now. So the way this is gonna work, you can see on these parts here, there's gonna be this square nut, I guess you'd call it with a bolt coming through. And then there's kind of this guide or this track. So if you look at our crossbar you know, those divvies there are gonna kinda ride in that groove and then this square piece is gonna sit inside of here and that way when you tighten it up it's gonna draw the crossbar down to this. So just to kind of make this easier to see what's going on, I'm gonna remove this just so we can show you. Can definitely do it, you can get to the bolt from down here, but like I said we'll just show you what's going on. That's the bolt that you're gonna be working with. So just loosen it up. You don't have to do it all the way. you just want it enough to where, you know, the crossbar could be able to slide in there. So we'll just do it like this. Actually you can definitely do this with this on still, but why not So it'll slide in like that. All right and then put this back on. All right, just like that. We're not gonna tighten that nut or that bolt just yet. We want to do the same thing on the other side of our vehicle. And that's so we can still have this adjustability you know, we can work from side to side. So I'll get that one done same exact way and we can go from there. If you have both of the sides started, I showed you could slide it. You're gonna want to find the proper amount of overhang, you know, how far is this piece gonna overhang from this And not really much to it there. You just wanna split the difference and have it be the same on each side. So I like to find, you know, find that point and then if you have a a square like this, find it really useful. You know, you can kind of just quickly check, like that, lock it down, then check the other side and you'll never really lose that spot. So it kind of, you know, makes it easier on you. So I got it squared away and then that Holland key that was under here, just tighten it down and that's what's going to lock that in place and prevent it from moving. And from there, if you remember those pieces that we had removed and held onto, you're just gonna cut those length to slide into the bottom tracks, you know, so everyone, you know, it's just something you'll just kind of have to do by feel, at least that's how I do it. And these ones are actually a little bit easier to go in than the ones on the top, little different material. And we get that covered up flat. Obviously do the same thing the other end of it. And then if you did take this stuff apart, go ahead and put it back together. And finally the end caps here. And so with our front one done gonna do this exact same process for the rear crossbar. So once you're all put together, what you can do is take your original weather stripping and cut at the length. You know, I just hold it up and kind of eyeball a length and my thought is trim it longer than you need, a little bit longer and you can always trim it down to kinda fit perfect. But with this stuff it just kinda snaps, snaps right back into place. And that'll finish up our look at and our installation of the Rhino Rack Roof Rack System on our 2017 to Toyota Tacoma.
Average Customer Rating: 4.5 out of 5 stars (4 Customer Reviews)
These brackets install in the ditches of your vehicle's naked roof. Ditch brackets provide permanent fixed mounting points for Rhino-Rack RLT600 Quick Mount legs so you can create an aftermarket roof rack. Includes 4 brackets and hardware.
I wish the description had mentioned that you had to drill holes and put rivets in the roof. I didn't want to do this for the first time myself and went to 3 shops that all refused to do so because they didn't want to be responsible for any leaks. I'm sure they are fine if you are willing to install them yourself. I ended up ordering the OEM rack and installing that myself. It used the pre-existing threaded mounts.
couldn't be more pleased with the Rhino vortex rack for my 2018 toyota tacoma. Fit/finish excellent and not hard to install. Install video and directions made it easy. The etrailer customer service rep who helped me was outstanding and ensured i had the right rack, feet and mounts for my truck. The package arrived quicker than i expected.
Do you have a question about this Accessories and Part?
Info for this part was:
At etrailer.com we provide the best information available about the products we sell. We take the quality of our information seriously so that you can get the right part the first time. Let us know if anything is missing or if you have any questions.


Thank you! Your comment has been submitted successfully. You should be able to view your question/comment here within a few days.
Error submitting comment. Please try again momentarily.