
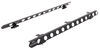
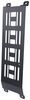
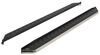
This steel mounting plate lets you use your existing RotopaX fuel or water cans on your Front Runner platform rack. Plate attaches to the top of your platform rack. Holds (1) 4 gallon, (1) 4.5 gallon, or (2) 2 gallon cans.
Features:
Specs:
Note: Review installation guide to verify if your tent is compatible

Videos are provided as a guide only. Refer to manufacturer installation instructions and specs for complete information.
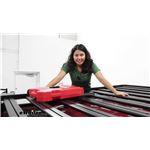
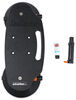
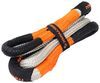
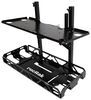
Hey everyone, it's Evangeline here at etrailer and today we have the RotopaX Mounting Plate for your Front Runner racks. We'll take a look at how this installs as well as how this fits on your rack right here at etrailer. This is going to be just RotopaX Mounting Plate. It's designed to be used with your RotopaX mounts. They're not included with this kit. You can carry up to two, 2 gallon canisters like what we have here, or a single 4 gallon canister.
You can also use this plate with the FuelpaX mount, which will look slightly different compared to this. The hardware to actually install the FuelpaX mount is included, although make sure that if you already have hardware with your RotopaX mount to use that as well. This is gonna fit onto your Front Runner either slim sport or slim line racks because the hardware included for the plate itself will fit into your crossbar slats. For the dimensions of the mounting plate it's going to be 18-7/8 inch long. And then for width it's gonna be 9-13/16 of an inch wide.
Now what actually matters though is the dimensions of your RotopaX container. So these are gonna be 18 inches long. If you're doing the 4 gallon one, that will be 36 inches long and then the width is 13-1/2 inches wide. So if you have other accessories on here, whether it's a kayak, whether it's a box or something else, consider the canister space. Just like your Front Runner rack, the mounting plate is very durable, so this is made of steel, but you also have this black powder coat finish to resist corrosion.
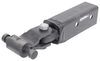
Your hardware is also going to be a stainless steel and you have these nut caps on top of the hardware so that water and the elements don't pool up and affect it. So if you like the mounting plate but you're curious about how to get it all set up on your rack, let's take a look at that install process. So the first thing you need to do is you need to set up your RotopaX or your FuelpaX mounts, and these are not included with your plate. You already have them with your can and the hardware that's included with that can fit on the plate. So for example, I have one RotopaX mount and I use 13 millimeter or a 1/2 inch wrenches to tighten those down.
And this is gonna be the same wrench that you can use for the rest of the setup. So with this in place, let's get this onto our Front Runner rack. We are going to be sliding six of these hex bolts through our crossbar slats. And then on top we will have these six washers, these six nyloc nuts, and then then that covers. So double check that that hardware was included with your kit before continuing. So find a spot on your Front Runner rack and plan out where you wanna put your mount. I like to put the canisters on first, just loosely so I know exactly how much space I have, especially if you have other accessories. Now earlier in this video I did mention the side brackets and that's something worth considering in case you run outta space here on top of your rack. But with that in mind, we're gonna take this canister off. We're gonna look at the three slats so that the holes line up for our bracket. And then we're gonna start by sliding the bolts in. Hex bolts, go in through the opening and then slide on through. You're gonna want two per slat for a total of six. Fits the plates over the bolts. And notice how I have the canister onto this side just as a reference for where I need to put that plate. That looks good. Secure bolts with your flat washer, your nyloc nut, and tighten down with your 13 millimeter wrench. And top it off with the nut caps. This is just gonna make it nice and neat and just prevent extra scratching of your RotopaX canisters. We're then you gonna place the canister over our RotopaX mount and secure it. All in all very simple to set up, especially compared to other Front Runner accessories that might require some different bolts and different tracks and some planning out. This was super easy to do and tighten down. One thing I would like to reiterate though is the amount of space this gonna take up on top of your rack. That's where your side and top channel brackets can come in handy, especially once you consider that the canisters will take up even more space than the mounting plate. But hopefully this video helped you out and helped you see how to install this, how much space this mounting plate will take up, and how to use your Front Runner rack for your best adventures. My name's Evangeline, and I hope this helped you out.
Info for this part was:
At etrailer.com we provide the best information available about the products we sell. We take the quality of our information seriously so that you can get the right part the first time. Let us know if anything is missing or if you have any questions.


Thank you! Your comment has been submitted successfully. You should be able to view your question/comment here within a few days.
Error submitting comment. Please try again momentarily.