


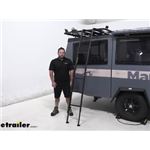
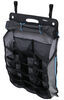
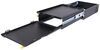
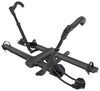
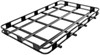
Easily access cargo on top of your Rhino-Rack Pioneer platform with this lightweight, aluminum folding ladder. Mounting brackets install to the side of the platform so you can transport the ladder without sacrificing space on top of the platform.
Features:
Specs:
Videos are provided as a guide only. Refer to manufacturer installation instructions and specs for complete information.
What's up everybody it's Aj with etrailer.com. Today we're checking out the rhino rack, folding ladder and storage brackets. So this is going to go on your pioneer rack you see we got them set up today. We got the two brackets here on the end, that you attach the ladder to, and over here on this side, when we're done using ladder, we can pull it up and put it away. Let's check it out. It's a really good option.
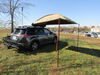
It's going to help you get that access to the pioneer rack, whether it's on a pop-up camper like this, or a vehicle. For instance, on our pop-up camper today, it's going to be way higher up than it normally would be on your vehicle. So that means it's gonna be harder to access when you want to go throw something up there. Now with the attached to the side here, these brackets go on the side of the pioneer rack. So they're out of the way, and it doesn't sacrifice any space you want to use.
So if I was using this, I could bring my bike up here, set in the place with this ladder rather than trying to reach or there's really no way with this problem camper, you can't climb up on anything, the ladder is on the other corner, on the opposite side over there, so that's not going to help you get to this bike part. So, I really liked that, that helps you access this side of it, and then you can use the ladder on the pilot camper to access the backside. That way you can pretty much access the whole thing up top. Now it's still going to help you out with your vehicle too. If you're mounted up there, it's better than standing on the wheel because that can move back and forth while up there, or even the door jam standing up in there can be uncomfortable for a long amount of time and kind of like try and lift up one foot while you're doing that.
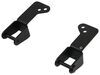
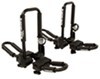
This just gives you better footing that way you can focus on loading up your pioneer rack. How this works is we have these two brackets that install here, they go into the T-track, so they drop down in there, and come and I tighten them down so they can't move anymore, so they are not going to shift, but like I said before, I liked it there. Here and kind of out of the way. It's using this space that wasn't being used on the platform rack, and right here is where the ladder hooks in so these drop into place. I'll show you in a second.
I'll just climb down and do it. Latter just hooks in right there. So that's what it looks like when the ladder is not around. And when you go to put the ladder in, slide this back, just like that, they drop into place. The latter is totally usable. Now I like this in comparison to other options. Sure, you could get one of those ladders that go in your camper. So I wanted to tell us that A-frame ones, the one I'm thinking would be a good option to reach the roof, but two things; Stability is going to be a little different. It's not going to quite be as sturdy as this. This hooks down in here. So it's tightened here. So it's not moving. There's no shifting side to side or anything like that. It's not going to move on you, and down at the bottom, the feet touch the ground. So it just seems more sturdy to me than those A-frame ones were. Also storage is another issue that A-frame ladder is awesome, but it does take up some space, and if you have a smaller pop-up camper like this, you want to keep all the space you can, and that isn't going to have to grow inside, or you're going to put it up on the rack. This one stores on its own rack on the side, just like this. Not taking up any of the usable space in the middle. Now the adjustable feet work independently. One's already in place, so can adjust this to wherever I need to. Another thing I like about it is it's got the foot that can move, so it's always going to find even ground. That was really helpful with these ladders cause you want to spend time trying to make sure it's nice and straight when you go to step on it. So with that in a place, you see if the hole doesn't line up, so like right here, it doesn't quite line up Like it's supposed to. You just got to pull it out just a little bit more away from the camper and you see it lines up just fine. So it's really easy to use. These pens are easy to put in and pull back out with that in place. Now you're ready to climb that ladder. It's made out of black powder coat aluminum, which means the light is going to be lightweight, easy to carry wherever you need it to go. And also has a weight capacity of 275 pounds. So I weigh about 178 and me walking on it, no problems. It moves a little bit, but I fully trust it I don't think it's sketchy or anything as I'm walking up at to put something up there, so I know it would be able to handle it. If I was carrying something to put up on the roof too. Now when you're not using a ladder, it's really easy to fold up and store. So we're just going to start going through that process. What we'll do first is raise up the feet on the ladder. Let's make sure we line those up Right there, like that. Same thing on this side. Then we can bring it in towards and unhook it from the brackets there. Then in the middle, there's going to be two more pins. We'll pull those and then that's gonna allow you to fold it down. Well, then folded down and on to itself. We're going to replace those pens Just right back there. And those open holes, that way they're just not hanging around and being in the way. So now in this state, we walk around in the back and put it in its storage. So just kind of go like this, lift it up, push it up into the hooks at the top and bring in the bottom, let it rest there. So then we'll want to position it, so that these brackets go on the outermost step. So we'll have a little bit closer, get it in position right there, and then we can use the hand-knob, start to tighten it down and hold it in place. We'll do that on both of these over here, or this one over here, and this one over here. Up top we can take a better look at it, how it holds that ladder. I can check the whole camper back and forth and you see there's no rattling or movement and a ladder. So, you know, it's not there. Nice and secure. Those hand-knobs are nice and big to get your hands on to actually tighten it down really well, really easy. It was a little bit of a reach for me just cause I'm a little bit shorter, but so it could get up there and tighten those down no problem. Now the thing I like about it and much like the brackets on that side is they're kind of off to the ends of the rack that we weren't using anyway. So it is kind of out of the way so that you could still put something up here that you could even extend all the way to here, instill the ladders out of the way. If you're thinking about security as well, if you don't want to leave the ladder up there with not locking it down at all running rack does have a cable lock that runs into the T track. And then that can help lock up that ladder. That way no one can mess with it when you're not around overall. I think this is a great addition to your pioneer rack. It's much easier to have this ladder to get to the top, whether it's on a pop-up camera like this, or even your vehicle. I like having that sure. Footing of climbing up there, especially if I'm loading other stuff on there. And the fact that it stores on here and not on the inside of your vehicle, your camper really helps out. It doesn't take up any little space you have on either of those And this is also nice and tight as well. So it's not going anywhere. I'm fully confident in it. The other thing is the parts that it does use on that pioneer rack. You don't sacrifice any of that space for your storage. Like the stuff you want to throw out there, like your bike or other stuff. You're stripping out. Maybe some bags, you have some duffle bag or something going to throw up there. It doesn't sacrifice that space to add that ladder to it. It all kind of stays out of the way and still keeps the whole top of it usable for whatever you need. Now, it's really easy to get all these accessories installed, check out how we did it. First step of this process, we're going to take our holding bracket here. This is where we're going to store the ladder in. This is how it's going to sit on your platform, rack like this and make sure the running rack logo is facing the right way. It's going to help, you know how to add this bracket on. And I got a few different sets of holes here is going to be adjusting on the clearance of your roof today, we're gonna be using these two holes here, because that seems to work just fine with our application. So let's get that set up. So we're going to do, is we're going to take one bolt add a lock washer and use both hands lock washer and a regular washer. We're gonna drop it down through our bracket right here and do that again for the other bolt. When that's set up. Now we can add our plate on the other side and we're not going to tighten down all the way. We're just going to get it started. So I'm going to try and hold it so you can see it. And I can get this started just threads in. Once again, you don't get super tight cause you want to have the hang down so that'll slide into the track with one of them on there. It'll be easier to get that second one now. next thing we we're gonna add is this bolt. So it's going to go up and in there like that. We'll add our lock washer and then we're going to put a nut and run it all the way down. So we're going to run this all the way down to here. Something to look out for though, is there is some compound on there for the second nut we add. So it's going to get a little tough when you get close to that one So I recommend using a wrench and a socket to get past there. So I'm going to do it by hand until we get there, just to kind of show you starts to fight you there. I can still get a little turn on it, but yeah, now at this point I can't get much further. So I'll come back with our wrench and our socket. I'll hold this place like that. Then I can just start tying it down. Now we're past that part. Go back to the hand tighten. Until we get down to the bottom. There we go. Now we're going to go ahead and slide it in the track. So just drop it down here in this gap where that plate fits in and just slides along the track. Now they say to have a spacing of 24 inches about, so I think that's about there. So we can come back now with our tool and tighten it down. Now we're going to add our second nut. And what we're going to want to do is run it down by hand all the way through that compound again, we're going to stop right there in the middle of the compound. So I get it right there. Get a couple extra turns, come back with a wrench. I'm trying to move my hand out at way so you can see. we want that compound, that blue compound on both sides of the nuts. And we're trying to aim for it to be in the middle but that's going to act as our stopper. Let's go to right there. Now we're ready to add our ladder. So we're going to set it up into place. Now, make sure you kind of tilt it in there and push it up into the hooks at the top. And then the bottom slides into place there. Just like that. Now we're going to have to do a little bit of adjustment because the brackets we're adding to hold the ladder in place, I'm going to show you from here. So it's going to go like that. it looks like I actually got it that time. So it lines up right there. that's why they had- they're required the 24 inches of spacing. Cause it's got to line up with those brackets so we can see that one's in place. Add our hand-knob and start to tighten it down. I'm gonna repeat the same thing on the other bracket. Now we're going to add our attaching brackets here on the side. This is where we're going to attach the ladder to on these areas here. So how we do that is we're going to drop our block here that we're going to thread into to the bigger side of the track slide up here towards the end, put our bracket up there. We're gonna use the furthest out hole, I'm gonna get this situated. So I'm out of the way. actually have to step up one more to, There we go. So we're gonna line this up right there. You're gonna want 11 inches of space in between both of these brackets. Cause that's where the ladder hooks again we're gonna go up in there. It's going to run this on my hand real quick into that block. Get it about hand tight, and then come back with the tool and fully tighten it down. So we're good there, overall, really not that bad to get it installed I really liked the T-track system. They have going where you just dropped the blocks in there, slide into place. The hand knobs are nice and big too. So you get a good grip on them to tighten it down. I can shake this whole thing up and down. You see that ladder's not wrapping or moving. I'm moving the whole camper. Same can be said over here with the attach and deploy crow ladder. Now we're all set up to whenever we want to use it you just hook it up here, climb on up and grab whatever you need. And when you're done with the ladder, you can put it right back and you know, everything's nice and stored up here. You're not wasting any space on the inside. Well, I think that does it. Thanks for hanging out. I hope this helped..
Average Customer Rating: 5.0 out of 5 stars (5 Customer Reviews)
Easily access cargo on top of your Rhino-Rack Pioneer platform with this lightweight, aluminum folding ladder. Mounting brackets install to the side of the platform so you can transport the ladder without sacrificing space on top of the platform.Packaged very well. Shipped fast. Install vary easy. Well built. Very pleased with trailer.
Nice quality…quick service…i’m happy!!
Do you have a question about this Accessories and Part?
Info for this part was:
At etrailer.com we provide the best information available about the products we sell. We take the quality of our information seriously so that you can get the right part the first time. Let us know if anything is missing or if you have any questions.


Thank you! Your comment has been submitted successfully. You should be able to view your question/comment here within a few days.
Error submitting comment. Please try again momentarily.