
Summer Starts Here - Save up to 70%


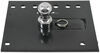
Gooseneck Hitch Installation Template for Fold-A-Goose Hitch #8339 by Draw-Tite and Reese
Note: Hitch # 8339 is no longer available, but this template is essential for those of you who have the 8339 hitch already installed on your old truck and want to move it to your new truck
Videos are provided as a guide only. Refer to manufacturer installation instructions and specs for complete information.
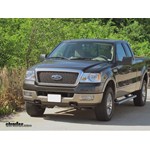
Today on our 2005 Ford F150, we're going to be installing the Reese gooseneck fold-down trailer hitch, part number 8339-4437. To start, we've already gone ahead and lowered and remove the spare tire and rear wheels. Wellbeing also removed the exhaust muffler and tail pipe to gain easier access up underneath the truck bed. Now our first step is going to be flattening the head channel just forward of the rear axle. There are two areas where the sheet metal is doubled up and will need to be flattened in order for us to put our frame rails in place. Quick tech tip: If you have an air hammer available, it can be very useful in smashing the sheet metal to allow for the frame rail to sit in its proper location.
Next we'll go ahead and put the frame rails in place. However, before we can do that, we'll need to go ahead and remove the vent tube that's attached to the forward hat channels. To do this, we'll simply get underneath it with a flat-bladed screwdriver and pop it out of place. This will get relocated, as it sits in the same position as the forward frame rail. Now we're ready to go ahead and put the forward frame rail in place.
We now this is the forward rail, as it has two additional holes inside the elongated slots on the top of the frame channel. With the forward rail in place, we'll now go ahead and put the rear rail in place. It will sit against the head channel where we just smashed the corrugations in the head channel. Now with both rails in place, we're going to go ahead and remove the jounce bumper. To do this, we'll simply remove the bolt that secures it in position to the frame.
We'll repeat the same process on the passenger side. Now with the jounce bumper removed, it opens up access hole in the bottom of the frame. We'll use this to take our pull wire, 1/2" carriage bolt, and block, and feed them into position so that we can secure the side bracket to the frame. Now with the front in position, we'll go ahead and leave the bolt leader on, as it will assist us when installing a side bracket not to push our hardware back up into the frame. Now we'll go ahead and repeat the same process for the rear attachment point.
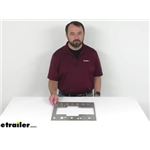
Now we can go ahead and install the side bracket. The side bracket will fit up over the frame rails and be secured with a 5/8 flat washer, 5/8 lock washer, and 5/8 nut. We'll go ahead and thread them on finger tight at this time. Now we'll move to the frame fasteners for our side plates. We'll remove the bolt leader and secure them with a 1/2" flat washer, 1/2" lock washer, and a 1/2" nut. Now with all our hardware installed, we can go ahead and tighten it down, and then torque to specifications. Now we'll go ahead and repeat the same process on the passenger side. Now with all our hardware installed, we can go ahead and reinstall the jounce bumper. Now with the side plates torqued to specification, we're going to move to the rear rail and drill out for our head unit. We'll be using the oblong holes and being on the outermost edge, drilling out to a 5/8 hole. We'll do this for both rear rail oblong holes. Now with it drilled out, we're going to get in the truck bed and use our template, part number 6425, which is the metal template not supplied with this install kit, and match it up with the holes that we just drilled out. Then we can utilize the template and take our paint marker to trace out the area that we'll need to cut out. Now with our outline done, we'll go ahead and take a drill bit and drill pilot holes at each of the corners, making it easier for us to cut out the outline with our jigsaw. With our pilot holes drilled, we'll no go ahead and step up to a larger bit so that we can fit the jigsaw blade into the holes. With that done, we'll go ahead and take our jigsaw and cut it out. Now with the template cut out, we can go ahead and take the head unit and drop it into place. Make sure it lines up with the pre-drilled attachment holes. Now with it lining up, to use the hitch as a template, we'll go ahead and drop in the rear attachment points using the 5/8 carriage bolt and U-shaped spacers. The U-shaped spacers will go between the bed and the hitch. The reason we install these is to make sure that you don't smash the corrugation in the bed when you tighten it down. Now we'll go ahead and get underneath. Our attachment hardware will be a flat washer, lock washer, and nut. We'll go ahead and tighten them down hand tight. This will assist us in securing the head assembly so that we can use it as a template to drill out the front row of holes. This will be the two forward attachment points, and the four holes necessary for the U bolt chain hold-down. Now lets go ahead and drill those out also. Now with all our holes drilled out, we'll go ahead and install our forward two attachment bolts. Again, this will be the 5/8 bolts along with the U-shaped spacers in the valley of the bed corrugation, and then we'll drop in the two U bolts. With that done, we can get underneath the vehicle, installing the attachment hardware. Again for the 5/8 head bolts, we'll be using a flat washer, lock washer, and 5/8 nut. And then for our U bolts we'll install a spring, flat washer, and lock nut. Now with all our hardware installed, we can go ahead and tighten it down, and torque to specifications for our attachment hardware. For the U bolt, we'll tighten it down just enough so that we have one thread hanging out the bottom of the U bolt. With everything torqued to specifications, this will complete the install of our Reese Hide-A-Goose gooseneck hitch, part number 8339-4437, on our 2005 Ford F150.
Average Customer Rating: 5.0 out of 5 stars (2 Customer Reviews)
Perfect template will last for years to come
good service, everything shipped as sta ted
Do you have a question about this Accessories and Part?
Info for this part was:
At etrailer.com we provide the best information available about the products we sell. We take the quality of our information seriously so that you can get the right part the first time. Let us know if anything is missing or if you have any questions.


Thank you! Your comment has been submitted successfully. You should be able to view your question/comment here within a few days.
Error submitting comment. Please try again momentarily.