
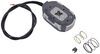
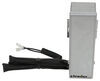
Digital Multimeter with 42" Long Test Leads - LED Display
(2 reviews)
Price: $20.10
In Stock
Digital Multimeter with 42" Long Test Leads - LED Display
Item # PT89ZR
Retail:$49.66
Our Price: $20.10
You Save: 60%
In Stock


Need help with installation?
Locate installers near me- All Info
- Reviews (2)
- Q & A (0)
- Videos (1)
- Photos
Performance Tool Electrical Tools - PT89ZR
- Testers
- Multimeter
- Performance Tool
- Yellow
- Safely troubleshoot a variety of automotive, household, and shop electrical circuits
- Test electrical components for faulty wiring and voltage
- Verify voltage on engine sensors, ignition, fuel systems, and charging systems
- Large digital LED display with UL-listed leads and probes
- Test leads are 42" long
W2969 Performance Tool Digital Automotive Multimeter
Installation Details


Video of Digital Multimeter with 42" Long Test Leads - LED Display


Videos are provided as a guide only. Refer to manufacturer installation instructions and specs for complete information.

Video Transcript for Review of Performance Tool Tools for Wiring - Digital Multimeter - PT89ZR
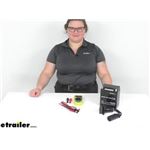
Ellen: Hey, everybody. I'm Ellen here at etrailer.com, and we're going to take a quick look at the Performance Tools digital multimeter. This is something that's really handy to have any time you're doing any kind of electrical job, or you're trying to test out any wiring, maybe do some troubleshooting with some wiring that's gone bad, you want to test out your battery, really anything along those lines. So a lot of times these are just something that's handy to have in your toolbox for any of those sort of instances.inaudible 00:00:25 about this is that it does give you a pretty big digital display that makes it easy to see what's going on. You get the leads that are about 42 inches long, so should be plenty of space, or plenty of length to get connected to whatever you want. And then there's also the included attachments that have a little alligator clamp, so that makes it easy, especially for testing out a battery without having to hold the little prongs over it the whole time.
So let's take a closer look and kind of run through some of those basic tests that you might end up doing.So here's our little guy, we've got a little kickstand at the back, makes it easy to just set this on a surface, set it on your trailer, on the floor, and we'll still be able to see what's going on. I'm going to hook up my leads here, they are color-coded so it makes it easy to remember what goes where. Got a couple little ends going over the prongs here. You'd probably end up losing these, honestly, but they do kind of help protect these. They are a little bit sharp, so if you've got these in a toolbox, it's kind of nice to have the caps just to keep them from ending up in your hand.There's also a couple of caps going over these ends, which I doubt you'll ever use, unless you're pretty meticulous about taking things apart and putting them away.
I'm just going to connect this up here. Most folks like to just keep the leads attached, makes it a little easier, so you're not having to take things apart every time. I'm going to put my alligator clamps over so we can test out our battery first. You don't have to, of course, you can just put the prongs over and it's not really too hard. You just want to make sure if you are going to use these, the inside there, this might be kind of hard to see, there's a little sleeve that that prong needs to fit into.
So just want to line that up to make sure it makes good contact all the way around.To turn this on, you just need to turn the dial away from the off position. So I'm going to turn it around to the 12 volt DC portion so I can test out my battery here. Swing those guys over and then set up my little kickstand there, and then just want to match the leads to my battery. We got red going to positive, black going a negative. And you can see our display showing what's going on there, so about 12 volts, that's what we should expect to get out of this.
Now there is a hold button, it's going to be that yellow one kind of on the left-hand side, to freeze the display at whatever it's reading out. Sometimes on other multimeters, if you press that, it'll freeze it at whatever the highest rating is. But this, it's just going to freeze it at whatever it is at the time on the screen, so that's something to keep in mind.To reset it, just press it again. I've run into this, though. I'm not a huge fan of the way this functions on these multimeters, because if you don't have it connected, maybe you don't realize that you have the hold button pressed, so if you try to go and use it, it's still at zero, and it could be a little confusing. It might make you think that there's something wrong with the multimeter, but it's just that that hold is on. So as soon as we press it again, it's going to give us our true reading, but that's just something to keep in mind there.There is another multimeter available from Performance Tools that has a little bit bigger screen, and that at least does have a little indicator to let you know when the hold is on, which I kind of like, just so that you can, if something's going on and you don't realize the hold is active, it gives you a visual cue. But again, if something's going on wrong or you're just not getting a readout, or it's not changing, press that hold button and see what happens, and that should make it pretty easy.Another common way to use this is to test out wiring functions, so if you we're to plug this in and then you want to test what each port is to make sure you get things wired up, this would be another way to do that. So you'd have current going through, and then I think usually this guy is the ground, and then you'd want to run through all the functions and test out what goes where, so that's a pretty common way to do it. It does give you pretty long lead, so it makes it easy to fit that into any kind of wiring plug and get connected to make sure that you can test things out, do your troubleshooting and what have you.So all in all, this is a pretty standard multi-meter. As I mentioned, there are other couple available here at etrailer.com. I'd say this is kind of the middle of the road one we have. Here's continuity, it does give you an audible alert. So if you want to test a fuse or something like that to make sure that there's continuity, you can use that function. It does come with instructions so that you know what all those functions are and kind of give you the tutorial of how to use it. But all in all, this one is probably the nicest, just because it is still a digital display so that makes it easy to see what's going on. But it's also pretty compact, so if you want something just a little bit smaller than the other ones, this is a pretty good option. And it does still give you those alligator clamp attachments if you want to use those to make it a little bit easier to test out something like a battery.That's pretty much all there is to it for our quick look at this digital multimeter. I hope that this has been helpful in deciding if this is the right one for you. We do have a lot of other wiring, trailer and RV accessories available here at etrailer.com, so be sure to check them out. Thanks for watching.
Customer Reviews
Digital Multimeter with 42" Long Test Leads - LED Display - PT89ZR
Average Customer Rating: 5.0 out of 5 stars (2 Customer Reviews)
by: Neil 09/11/2022
by: Judith 10/02/2021
2
2
See what our Experts say about this Performance Tool Electrical Tools
- Trailer Breakaway Kit Operation and Installation InformationThere are several components to a breakaway system. The pin should be attached to a metal cable that is plugged into a small switch usually located on the frame near the coupler. I attached an FAQ article that details everything about these systems for you to check out. Typically the battery is enclosed in a case that will have a tester that will tell you the condition of the battery. Check out the Engager Trailer BreakAway Kit # 20099 to see one like this. This one also has a built in...
view full answer... - Recommendations for a Circuit TesterYou are halfway there since you know the part number, # PTW2993. This is a basic circuit tester linked below. And you can purchase this beauty right here at etrailer. It basically looks like a screwdriver with a hook and/or point at the end and a wire with an alligator clamp to attach to a ground point. The handle will be clear because there is a light inside that lights up when there is power on the wire being tester. You could also use a multimeter such as # PT89ZR if you need to...
view full answer... - Potential Causes for Overheating Trailer Brake DrumsTrailer breakaway batteries are usually rated for 5-amp-hours and are designed to keep your four brake assemblies engaged for 15-minutes in the event of an accidental disconnect. The only way the breakaway battery could heat up your drums is if it kept the brakes engaged as you drove. In the same way, if there were a short in the vehicle or trailer wiring that somehow let your 12V power feed reach the brake circuit, which would also keep the brakes engaged. Either way you would probably...
view full answer... - Troubleshooting Trailer Brakes Locking UpThe first thing I would check would be the voltage coming out of the brake output circuit on the 7-way of your tow vehicle. I would use a multimeter like our # PT89ZR to test for voltage on this circuit when you have the brakes applied on a low setting. You should see a number that is much less than 12 volts as 12 volts that should be the max output of the brake controller. If you see 12 volts there then you know something is not wired up right on the vehicle side of the equation. You...
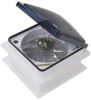
view full answer... - Troubleshooting A MaxxAir MaxxFan Deluxe That Isn't Responding To Temperature Settings If your MaxxFan Deluxe Roof Vent w/ 12V Fan and Thermostat # MA00-06200K isn't properly responding to commands then the first thing to check is your power and ground. Make sure that you have a secure ground connection and check the voltage with a multimeter # PT89ZR to ensure the unit is getting a full 12 volts to properly operate. If the power and ground are both fine then it's most likely the circuit board malfunctioning and would need to be replaced with part # MA10A21276K. I would also...
view full answer... - Hopkins Agility Brake Controller Shows SC Error Code on a 2003 Chevy Silverado 2500HDAn SC error message would indicate a short circuit situation. This could be a problem with the brake controller, the wiring on the vehicle or trailer, or the brake magnets. To test the brake controller, sever the blue wire behind the controller leaving enough length to reconnect it later. Then, use a circuit tester like # PTW2993 if needed on the blue wire. Apply the manual override on full. It should show a full, constant signal. If it does not, then there is a problem with the brake...
view full answer... - Possible Causes for Dim Trailer LightsMost often the root cause for issues with trailer lighting is a weak ground. Strange as it may sound, a loose or rusty/corroded ground can cause a vehicle's trailer wiring harness to badly misbehave and shut down some functions. It may also just limit the amount of current that can flow to the lights and this will result in dim illumination. The easiest way to check the trailer ground is to disconnect it from the vehicle and apply 12V power (from a well-charged 12V battery) directly to...
view full answer... - Troubleshooting An LR Error Code On A Lippert Ground Control 3.0 Leveling System An LR error code would indicate an electrical error with the left rear jack. You'll want to start by checking the fuses on your controller to ensure that it hasn't blown. You can use a circuit tester # PTW2993 and touch it to both contacts on the top of the fuse to check for power. From there you would need to trace the wires back to the jack to see if there's any damage, loose connections, or corrosion. If you find no damage then I would test the power at the jack using a multimeter...
view full answer...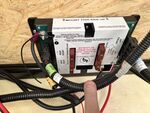
- Troubleshooting Air Lift WirelessONE Compressor Will Not DeflateOne possible reason for this issue with your WirelessONE like the # AL25980 is the manifold. If it gets too hot or cold this can cause the problem you're experiencing. If it is too hot you need to let it cool down and vice versa. The other potential issue is the voltage coming from your vehicle battery. Using a multimeter like # PT89ZR check the voltage. It needs to be at least 9 volts and no more than 18 or it can cause the problem you are describing.
view full answer... - Troubleshooting An RV Water Pump That Continues To Run After A Faucet Turns OffAn RV water pump should only turn on as the faucet calls for water. If the pump keeps running you either have a leak or issue with the pressure switch of your water pump. The first thing to check is the voltage to the pump before and during use with a multimeter # PT89ZR. If the pump is getting the required voltage (12v or 120v depending on model) to properly function it can cause a false reading for the pressure switch. The pressure switch could also need an adjustment if the psi level...
view full answer... - Troubleshooting Furrion RV Tankless Water Heater Wall Controller Not Powering OnYou will want to check for power going into your Wall Controller # FR48NR by removing it from the wall and testing the wires with a Circuit Tester # PTW2992 that shows you battery voltage or by using a Multimeter # PT89ZR. Both wires will be blue and polarity doesn't matter you just need to identify if you are getting 12 volts of power to the controller and have a good ground. Be sure that the power switch on the outside portion of the water heater is switched on. If you have power at the...
view full answer... - How to Check Brake Switch Wire to See if it Goes to Ground When Installing Curt Brake ControllerI spoke with my contact over at Curt about how you can test to see if the wire goes to ground when the pedal is up. You will need a multimeter, such as # PT89ZR, and set it to test for resistance (ohms). With the pedal up the correct wire will have a few ohms of resistance (he said 5 or 6 usually). If it shows zero then that means it goes to ground when the pedal is up and it is not the correct wire. He also added that it probably is not going to be an issue on your 1999 Olds Bravada but...
view full answer... - Manual Override Will Not Work Twice in a Row with an EOH ActuatorThe issue you are experiencing with your trailer brakes could be attributed to either a fault in the brake controller wiring or a fault in the electric over hydraulic actuator wiring. I recommend starting with the brake controller wiring. In order to test this you will need to use a multimeter like part # PT89ZR. Once you obtain the multimeter I recommend turning the settings on the brake controller up to their max output. You can then have someone engage the manual override while you are...
view full answer... - Testing the Curt Triflex Brake Controller for PowerI recommend putting a tester on the 5 o'clock pin of your 7 way connector on your FJ Cruiser. This is the brake controller pin. Hit the manual override and see what your readings are. The Curt TriFlex Trailer Brake Controller - 1 to 4 Axles - Proportional # C24VV is a proportional controller so only the manual override can be tested accurately when still using a multimeter like # PT89ZR. I've attached a troubleshooting article to assist.
view full answer... - Troubleshooting Factory Brake Controller On 2009 Ford F-350You can use a multimeter like part # PT89ZR and do some troubleshooting. Disconnect the trailer from the truck first. Then sever the brake output wire(usually Blue) a few inches from the back of the controller. Use the multimeter on that wire and move the manual override to see what the voltage is. If you only show a couple volts then there is an issue with the brake controller. If it checks out okay then you can reattach the brake wire and move to the trailer connector and check it out....
view full answer... - Troubleshooting Intermittent Blinking Of L.8 or L.9 On Curt TriflexIn this case there maybe a loose connection somewhere that is causing the # C24VV to intermittently blink L.8 or L.9 or another possibility is that this unit needs to be reset. To start that process disconnect power from the unit for up to 10 minutes, that will allow the controller to reset its self. After 10 minutes, plug it back in and see if that worked. If none of the above steps seem to fix your problem then please let me know and I would be happy to help further troubleshoot the...
view full answer... - Rear Trailer Brakes are Weaker than Front Trailer Brakes on a 2007 Horse TrailerChances are that the smaller gauge wiring is not causing the problem especially since it is not so long as to offer much resistance. But, you can certainly try a larger gauge. I would still check those grounds because a weak ground can cause all sorts of problems. Just make sure that they are attached to clean and corrosion free metal surfaces that are not painted. Having a short ground wire would be beneficial. You can test to see how much voltage is getting to the magnets with a multimeter...
view full answer... - How to Test Brake Magnet Amperage With MultimeterYou are correct, the PT89ZR is only designed to measure up to 10A which will not allow you to measure for 4 or 6 brake magnets on a trailer. In this case I would recommend using a multimeter with a higher amperage rating or testing the magnets separately. At this time we do not carry a multimeter capable of testing more than 10A. The next section of our brake magnet testing article details how to test each magnet separately to determine if one or more of the brake magnets on your trailer...
view full answer... - Electric Trailer Brakes not WorkingThere are a number of reasons why the brakes on your trailer may not be working. Lets start with the easiest things to check. First, check the vehicle and trailer connectors for corrosion. This can cause a short inside the connector and the brake feed circuit and ground are at the bottom of the connector so moisture affects these connections first. Next, check the ground wire on the vehicle and trailer connectors, trailer brake magnets and the brake controller itself. If there is a bad...
view full answer... - Troubleshooting an SC error code on Journey HD controllerIt sounds like you have an intermittent short circuit that is being caused a loose wire somewhere that sometimes makes good contact which explains why it works sometimes, and then when the contact is not good you see the SC code. To eliminate the brake controller from the short circuit equation you will need to sever the blue brake output circuit wire and using a circuit tester like a # PT89ZR test for voltage on the circuit from the brake controller using the manual override lever. If...
view full answer... - Hopkins Impulse Trailer Brake Controller Draws Too Much Power and Drains Battery on 2004 Dodge RamIt sounds like there is a short somewhere in the system that is drawing power and draining the battery. The brake controller you have should only draw a few milliamps of power when not in use. The most likely shorts are a short to ground and a short to the blue wire. Start at the brake controller and sever the blue wire leaving enough length to reconnect when finished testing. If everything is shut off, test the blue wire to determine if there is voltage coming through. You can use a...
view full answer... - Troubleshooting Brakes not Working with at a Trailer With Electric Over Hydraulic BrakingTo properly operate the actuator # K71-651, the brake controller you are using needs to be compatible with electric over hydraulic braking systems. We offer the Tekonsha Prodigy P2, part # 90885 that would work great for you. If the brake controller is turned up to maximum gain, you should be getting 12 volts on the blue wire feeding the actuator (when the controller is activated). The black wire feeding the actuator should show a constant 12 volts. If you do not have a multimeter, we...
view full answer...
- Troubleshooting OL and SH Error Codes on Tekonsha Primus IQ Trailer Brake Controller # TK90160Both the OL (overload) and SH (short) error messages on your Tekonsha Primus IQ Trailer Brake Controller # TK90160 tend to suggest that either your trailer has too many brakes for the controller (6 are the maximum) or that there is a problem in your trailer's brake circuit wiring. You can start by inspecting both the vehicle and trailer connectors for any signs of corrosion or trapped dirt that could cause two circuits to become bridged together. Check both sides of each connector and clean/replace...
view full answer... - Troubleshooting Loss Of Power When Retracting An RV Awning If you're losing power throughout the trailer then you likely have blown circuit breakers/fuses and would need to check each one with a multimeter # PT89ZR to see if they're powered. On the fuses you'll touch the negative test lead to the ground bus bar in your panel and the positive test lead to each side of the fuse to ensure power is passing through. If not then we know that the fuse needs to be replaced. For the circuit breakers you can flip them all off and then back on again. From...
view full answer...
Do you have a question about this Electrical Tool?
Info for this part was:

Installed by:
Kathleen M

Updated by:
Wilson B

Written by:
Matthew S

Edited by:
Daron K
At etrailer.com we provide the best information available about the products we sell. We take the quality of our information seriously so that you can get the right part the first time. Let us know if anything is missing or if you have any questions.
Thank you! Your comment has been submitted successfully. You should be able to view your question/comment here within a few days.
Error submitting comment. Please try again momentarily.