
Custom Fit Roof Rack Kit With DK174 | RRRLKVA | RRVA137B
(1845 reviews)
Price: $541.94
In Stock
Custom Fit Roof Rack Kit With DK174 | RRRLKVA | RRVA137B
Item # RR63VE
Our Price: $541.94
Will this fit?
To see if this custom-fit item will work for you please tell us what vehicle you'll use it with.
In Stock


- All Info
- Reviews (1845)
- Q & A (0)
- Videos (134)
- Photos
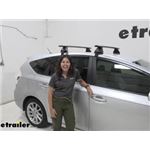
Rhino Rack Roof Rack - RR63VE
- Crossbars
- Aero Bars
- 2 Bars
- 54 Inch Bar Space
- Rhino Rack
- Black
- Overhang
Aerodynamic, aluminum crossbar lets you build an aftermarket roof rack for your vehicle. Full-length bar provides plenty of space for carriers and accessories. Vortex strips in C-channels reduce wind noise. Includes theft-deterring plastic locks.
Features:
Rhino-Rack Vortex Aero Crossbar - 54" - Black - Qty 1:- Sleek, low-profile crossbar lets you build an aftermarket roof rack for your vehicle
- Requires Rhino-Rack legs and custom fit kit (sold separately)
- Slim, elliptical crossbar shape helps to create an extremely aerodynamic system
- Full-length bar extends past roof rack legs to maximize space for carriers and accessories
- Top channel lets you add channel-mounted carriers and accessories
- Clamp-on accessories mount conveniently around bars
- Rubberized Vortex strips in top channel dramatically reduce drag and wind noise
- Keep dirt and grime out of crossbars
- Provide cushioning and slip resistance for your cargo
- Bottom channels allow easy installation to Rhino-Rack roof rack legs
- Rulers in channels help to center crossbar on your roof
- Lightweight, structural-grade anodized aluminum bar is rustproof
- Internal H-shaped extrusion provides exceptional bar strength
- Plastic lock cores with universal keys deter theft of channel-mounted accessories
- Can be upgraded to all-metal locks (RRVA-LEC2 - sold separately) for added security
- Matte black finish
DK Fit Kit for Rhino Rack 2500 Series Legs - Naked - Qty 4:
- Custom fit kit lets you mount 4 Rhino-Rack 2500 series legs (sold separately) on your vehicle with a naked roof
- Padded, metal clamps provide secure grip on your door jambs
- Bolt onto leg assemblies and tighten for secure fit
- Protect door jambs from scratches and abrasions
- Powder coated for durability and rust resistance
- Molded-rubber pads are custom designed to fit the contours of your roof
- Clip onto the bottoms of your roof rack legs
- Protect your roof from scratches and abrasions
Rhino-Rack 2500 Leg Kit for Vortex Aero Crossbars - Qty 4:
- 4 Legs help to mount Rhino-Rack Vortex Aero crossbars to your vehicle's naked roof or fixed mounting points
- Pair with 2 crossbars and a custom fit kit (sold separately) to create a complete roof rack
- Leg bases pivot to ensure the crossbars are level on your roof
- Locks secure system to your roof
- UV-stabilized, glass-reinforced nylon is durable and weather resistant
- Allen key included to ensure legs are securely mounted to your roof
DK174 Custom DK Fit Kit for Rhino-Rack 2500 Series Roof Rack Legs - Naked Roof
RLKVA Rhino Rack 2500 Series Legs for Vortex Aero Cross Bars - Qty 4
VA137B Rhino Rack Vortex Aero Aluminum Cross Bar - Black - 54" Long
Video of Custom Fit Roof Rack Kit With DK174 | RRRLKVA | RRVA137B

Videos are provided as a guide only. Refer to manufacturer installation instructions and specs for complete information.


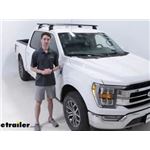
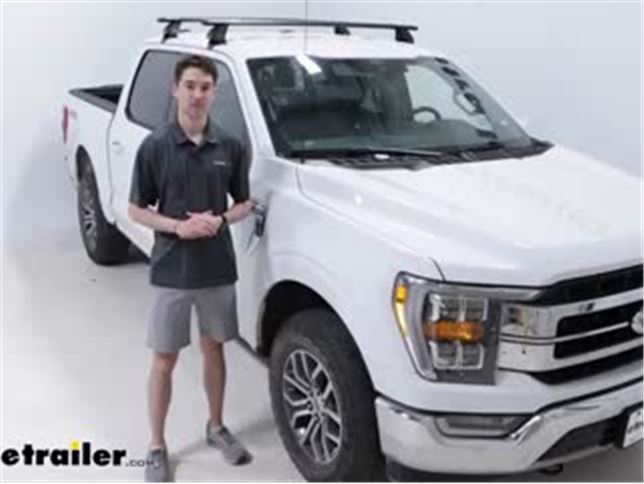
Video Transcript for Rhino Rack Vortex Aero Crossbar Installation - 2021 Ford F-150
How's it going everybody, it's Ethan here at etrailer. Today we're gonna be taking a look at and showing you how to install the Rhino-Rack Vortex Aero Roof Rack System on our 2021 Ford F-150. So with the F-150, obviously we have a good amount of bed space, but if you wanna get something longer or larger up there and maybe couple this with like a ladder rack to give some longer loads like a ladder or a lumber or on the sports and rec side, maybe you have a larger kayak you wanna get where you need it to go, a roof rack system like this one is gonna be a great solution for you. So let's take a closer look. The roof rack is going to have a weight capacity of 165 pounds. It's going to fit on our roof with the fit kit that we'll show you in the installed portion.
But 165 is gonna be a pretty solid or pretty common number that you see with roof racks like this, which is gonna be fine for most of the things you wanna get up there. You just wanna double check and make sure that your roof weight rating is in that same ballpark. Make sure you know what each of those are and go by the lowest ready component just to be safe. The crossbars we have on our system right now are gonna be 59", which is a solid length. We stay pretty much well within the width of our vehicle overall.
They're going to be elliptical so they taper on both ends to cut down on some of that wind noise and drag. But anytime you put something up on the roof, you're gonna deal with that. Luckily, we also do have a vortex strip on the top which is how the bars get their name. So that's going to help again cut down on some of that wind noise, otherwise we just have that open channel up here. Speaking of that channel though, that's gonna be great for your T-track accessories.
If you have those, you can slide those in. But with the strip you are going to have to trim it up if you wanna leave this strip in with those accessories on. So it's not a horrible idea to just grab another strip if you want to, in the event that you do end up doing some trimming. On our end cap here, we do have a plastic lock which we can use to unlock or lock our end cap but you can upgrade those to metal if you'd like. On the underside, you do have the option to use a measurement strip that you are gonna trim up and put wherever your towers are not.
In our case, this is just for demonstration and we'll talk a little bit more about that in the install portion as well, but that'll cut down on that whistling noise underneath as well. And using the provided key, we can take our end cap off and just show you how that works. So it's just a metal lock core there that will expose our fit kit hardware. So as long as our end cap is on and it's also locked up, no one is going to be able to access your fit kit hardware and remove the rack from your roof. From here I'm just gonna get a quick measurement to give you an idea of how much height you're going to be adding to your roof with the system. So from here in the middle, you're going to be looking at adding about 4-1/4" from the highest point. So if you're thinking about storing this in your garage, especially if you have something on there, add about 4-1/4" to whatever that's gonna be to find out whether or not it will fit in your garage or if you'll go anywhere where there might be some clearance issues. The roof rack system is gonna be made out of an anodized aluminum so it's gonna be really lightweight, easy to work with, but also very durable and rustproof at that point. It's got a nice matte black finish so it looks good. I think it fits the aesthetic of our F-150 really well. Overall, the install portion isn't too terribly difficult. It can be a little bit tricky, but you just need to be patient. Use the measurements that the instructions give you and make sure that you know where everything is gonna go. But if you need a little bit of help with that process, we'll walk you through it right now. To get started, the first thing we'd like to do is to slay everything out so that we know where and what it is. So we have our crossbars, we have towers, our fit kit, the clamps, and the hardware. We've got the pads and the bases for our towers. We have the tools and I would recommend picking up some kind of fabric tape measure as well as a regular tape measure. And then we have this measurement strip that comes included that we'll have to trim up according to our needs and definitely keep the instructions close by 'cause we will have to reference those often. But we'll begin by removing the end caps on our crossbars. We are going to use this plastic key to fit into the end cap. Just turn it and pull it out as long as we have it rotated fully, and we need to remove that in order to get our towers on. So we're going to line up this metal plate here with the underside, with the channel underneath our crossbars and just slide those on. And now is when you're gonna use that measurement strip. So for our case, ours has already been trimmed up so we can't use it effectively but you're gonna basically line it up with your tower, find the measurement on your instructions. In our case, we're looking for 169, so I'll get that roughly to where it needs to be. In your case, you could actually use the full measurement strip and trim it up if you need to. We repeated that process on the other side. We just slid our tower under this channel here and line it up according to the measurement, removed our end caps and now we just need to replace those real quick. Again, just put 'em on and tighten 'em down with the key. From here, since we're doing our front crossbar, just be sure to reference the instructions but we're going to attach one of our base pads to the rest of the base, and we wanna make sure you can see this arrow on here. We wanna make sure that ends up facing forward, so in our case, we're going to get these on and then we'll line it up with the tower. With the pad connected to the base, you can see where these openings are, and where they'll fit on our towers. So from here, again, we just wanna make sure that that arrow is facing forward, and we can snap this on into place. And then we're gonna repeat this process again on the other side. Once our towers are roughly in place, we're going to get a measurement. In your case, you could use the measurement strip. In our case, we would've to trim that up, and this is just for demonstration, so I'm gonna use our fabric tape measure to find that 169 millimeter mark in our case. And now I'm going to use the Allen key provided to tighten this down. As we tighten down, something important to note is that this tool does have a built-in torque spec, so just the way it's designed. Once we start turning, as soon as we see that line straightened out, that's about as tight as we want to go. Once we have our towers all set up, our measurements where we need 'em to be and both bases in place, now we can place our crossbars roughly on our roof, whereabout we think they're going to go. Just a matter of getting them roughly in place for now. And then we're gonna come back and get the measurement to make sure that they're in the right place. From here, again, since this is the front crossbar, I'm going to be using the measurement A in our case, which is 280 millimeters or 28 centimeters from the center of our door jam to the center of the tower. So in our case, I need to slide forward quite a bit. It's gonna be kind of hard to tell for now until I move the other one forward as well. So I'm gonna go to the other side and get that measurement now. Once we have everything in place and all our measurements are good, if your end caps are on, make sure we get those out of the way. If they're locked, go ahead and just use the provided key to unlock it. But now we're going to fit the bolt through this hole here on our clamp and make sure that it threads into that opening there inside our tower. Once you get the bolt here to start threading, it's probably gonna be easier just to use the tool to get it most of the way in. In our case, I'm gonna go to about 70, 75% here. I'm not gonna tighten it down all the way 'cause it might start pulling the whole system towards me, rather I'm gonna tighten this one down, and then I'm gonna go back to the other side, tighten that one down, come back and finish this one up, and then finish the other side up as well just to make sure everything's even as possible. Now that we've gone back to the other side and tighten that one down, I'm gonna finish tightening this bolt here. Again, just using this tool. Once it gets to the point where it straightens out, that's how you know we're at the desired torque. So I'm right about there now. All that's left to do is to replace our end caps and lock those up. So overall, if you're looking for a really effective way to extend your load space, whether that's getting some larger or longer items up on your roof, the Rhino-Rack Vortex Aero Roof Rack System is gonna be a great option for you. We just took a look at how to install it and how it fits on our 2021 Ford F-150.
Customer Reviews
Custom Fit Roof Rack Kit With DK174 | RRRLKVA | RRVA137B - RR63VE
Average Customer Rating: 4.7 out of 5 stars (1845 Customer Reviews)
Aerodynamic, aluminum crossbar lets you build an aftermarket roof rack for your vehicle. Full-length bar provides plenty of space for carriers and accessories. Vortex strips in C-channels reduce wind noise. Includes theft-deterring plastic locks.by: Collin05/03/2024
I put 3 stars because its a useful functional non-harmful roof rack solution for my WRX sedan. This review lost 2 stars because the rubber top pieces get damaged upon any accessory removal or install like(bike, snowboard rails etc). Additionally, these accessories also look to be weathering quickly because of build quality. Hopefully this helps your decision! Thanks

by: Chug04/11/2024
I liked doing business with you. I like the products I ordered. I did have trouble with part of the shipping. It was not your fault, but the part of the shipping you used The USPS did not work. I neverrnecieved the item from them and you had to ship me another via UPS. Over the last 10 years I have had a number of problems with the USPS with packages and mail. They are especially difficult to get information from when something seems to be lost. I would recommend not using the USPS for your shipping needs. Again, I am very happy with you and the products I bought from you.
by: E.Stone06/11/2023
2019 Dodge Ram Pickup
The selection process that etrailer uses is top-notch. This really helped narrow down the choices for my 2019 RAM Quad cab. I bought this all kitted together. The assembly process is very straightforward and well-documented. I would highly recommend etrailer as a source for vehicle accessories. I have Yakima bike racks on our Subaru and this is as good if not better.


by: Josh M01/27/2024
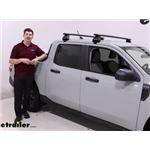
Toyota Tacoma
Not too hard of an install and it looks great! Highly recommend for a basic utility roof rack for your 23 Tacoma.


by: Josh M01/27/2024
Toyota Tacoma
Not too hard of an install and it looks great! Highly recommend for a basic utility roof rack for your 23 Tacoma.


by: Veronica05/12/2023
Hello, I am having a problem with a part of the legs for my crossbars. The Bolt and its rectangular metal plate that holds the leg onto the crossbar is stripped. I used this product last year during the summer. The crossbars were taken off during the winter and stored. I went to replace them on the car yesterday and found these parts to be stripped. I can't use the crossbar without an new piece. I need customer service to ship me out a new bolt and plate.


by: Joseph02/11/2024
The order was delivered yesterday, and I got it installed today. The product quality is very good and I am pleased with the fit and sturdiness. Installation went fine. I am slow and methodical with these types of installations. It took me a little less than 2 hours. Many people could do this in around an hour or so with no problems.
by: Tod 05/08/2024
The fit was perfect and hauls my two touring kayaks with no problems
by: Rex05/01/2024
Fits the truck perfectly and holds canoe tight. Feels very solid and trustworthy.
by: Randy05/02/2024
Works great for carrying my kayak. Installation was pretty easy too
by: Andrew03/26/2024
Great rack for a great price. I tried an Amazon knock off, and that was a piece of junk. The Rhino rack is relatively easy to install, is very secure, and has lots of accessories.
by: David04/06/2024
Used on cab roof of my truck to securely haul canoe
Excellent results! Excellent instructions and quality rack!
by: J03/06/2024
The installed rack has done the job well and after installing and breaking down after one ski season and then reinstalling for the next season, no issues or problems to report. Everything has worked out great.
by: Zachary03/27/2024
The bars were great. The mounts I did not like. The bars themselves were quiet, solid, and aerodynamic.
by: Carlos05/03/2024
Great!!!! Fits Perfectly
by: Robert06/17/2023
Good price. Came quickly. Although one of the cross bar boxes was open when delivered, everything was complete and undamaged. Be sure to check inside the cross bars for the rubber strips!!


by: Marc B08/15/2023
This roof rack is well built and less expensive than other makes of rack. This is my second Rhino rack and I have been satisfied with my first one. The reason why I'm buying another Rhino rack.
by: Matthew 05/02/2024
Fit well with the other components.
by: Mike01/27/2024
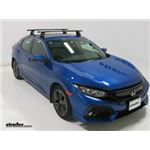
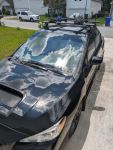
2012 Toyota Camry
I shopped online retailers namely Amazon and EBAY looking for the cross bar setup I would need for my 2012 Toyota Camry LE. My Camry has a naked roof. The whole experience was confusing. None of the needed components were combined together. I found each component listed separately but nothing to indicate they were the correct components for my car. Then ETRAILER.COM popped up in my search. I simply entered my car’s year, make, and model, and answered the question about the car roof (being naked with no factory installed cargo bars) and suddenly I had a list of the available cross bars for my vehicle with all the necessary components to install them. One or two clicks put the whole thing in my cart for purchase. ETRAILER .COM is your one stop shop. As a side note I purchased Yakima ski racks on sale to install on these cross bars. Another customer asked if these ski racks would fit his car and I explained yes they will with the appropriate cross bars. I sent him to “ETRAILER.COM” so he could get the correct setup. Pictures forthcoming.
by: Tracy02/27/2024
Had the rack on the truck for a year
No issues bat all
Holds the bikes great, never bhad an issue with the bikes up on top
by: JoAnne01/03/2024
There are some plastic parts that failed when I installed this. I installed it per the instructions and hadn't quite gotten to the "click" that the wrench does when it's tight enough and suddenly I heard a POP and something went flying past my face. It was a piece of plastic within the plastic foot. As you tighten down everything it puts shear pressure on the plastic tabs that provide internal support and it just snapped. However, it is still structurally sound and hasn't budged in a year, so I'm fine with it and not touching it!
by: Brian10/04/2023
Great product, fast delivery, great service. Worked great when installed.


by: Scott 02/21/2024
Fast shipping and great quality products. Communication from start to finish of delivery is always top notch from etrailer
25
1845
Show More Reviews
See what our Experts say about this Rhino Rack Roof Rack
Info for this part was:

Edited by:
Daron K

Written by:
Bethann B
At etrailer.com we provide the best information available about the products we sell. We take the quality of our information seriously so that you can get the right part the first time. Let us know if anything is missing or if you have any questions.
Thank you! Your comment has been submitted successfully. You should be able to view your question/comment here within a few days.
Error submitting comment. Please try again momentarily.