
Draw-Tite Max-Frame Trailer Hitch Receiver - Custom Fit - Class III - 2"
(973 reviews)
Price: $200.21
In Stock
Draw-Tite Max-Frame Trailer Hitch Receiver - Custom Fit - Class III - 2"
Item # 75673
Retail:$345.91
Our Price: $200.21
You Save: $145.70
Will this fit?
To see if this custom-fit item will work for you please tell us what vehicle you'll use it with.
In Stock
Thank you! Your comment has been submitted successfully. You should be able to view your question/comment here within a few days.
Error submitting comment. Please try again momentarily.


- All Info
- Reviews (973)
- Q & A (0)
- Photos
Draw-Tite Trailer Hitch - 75673
- Class III
- 2 Inch Hitch
- 4000 lbs GTW
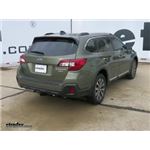
- Visible Cross Tube
- Draw-Tite
- 600 lbs TW
- Custom Fit Hitch
Fully welded vehicle trailer hitch is strong and durable. Draw-Tite's Tested Tough guarantee ensures that this hitch exceeds industry standards. The combination of an e-coat base and a powder coat finish provides excellent rust protection.
Features:
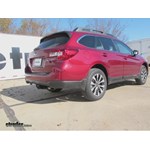
- Custom-fit trailer hitch lets you tow a trailer or carry a bike rack or cargo carrier with your vehicle
- Computer-aided, fully welded steel construction ensures strength and durability
- Tested Tough - safety and reliability criteria exceed industry standards
- Easy, bolt-on installation - no welding required
- Complete hardware kit and installation instructions included
- Lifetime technical support from the experts at etrailer.com
- Black powder coat finish covers e-coat base for superior rust protection
- Sturdy, square-tube design
- Ball mount, pin and clip sold separately
Specs:
- Receiver opening: 2" x 2"
- Rating: Class III
- Maximum gross trailer weight: 4,000 lbs
- Maximum tongue weight: 600 lbs
- Not rated for use with weight-distribution systems
- Limited lifetime warranty

Draw-Tite Tested Tough
Draw-Tite's Tested Tough program provides testing standards far superior to those outlined by the Society of Automotive Engineers (SAE), the go-to source for engineering professionals.
Each Draw-Tite trailer hitch receiver undergoes extensive fatigue testing and static testing with the ball mount that is either supplied or recommended for use with that particular hitch, thus ensuring results that are applicable to real life use. Fatigue testing is also conducted on hitches rated for use with weight-distribution systems.
In addition, Draw-Tite performs static testing on a simulated automobile, as opposed to the rigid fixture used for SAE testing, resulting in a more true-to-life scenario.
etrailer.com Technical Support
At etrailer.com we're committed to the products we sell, and to our customers. Our experienced and knowledgeable staff are available via both phone and email to address your questions and concerns for the lifetime of your hitch. The technicians at etrailer perform hitch installations on a daily basis, making them a valuable resource for do-it-yourselfers. The one-on-one, personal service you'll receive comes straight from an expert in the towing and automotive field. We've installed it, we've wired it and we've towed with it, so whatever your question, we can answer it.
75673 Draw-Tite Class 3 Trailer Hitch Receiver - Max-Frame
87568 Hidden Hitch Class 3 Trailer Hitch Receiver
Installation Details
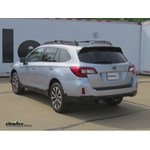
This Product Fits The Following Vehicles
- 2010 - 2019 Subaru Legacy
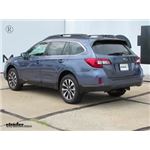
- 2013 - 2019 Subaru Outback Wagon
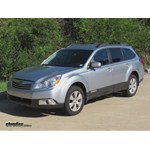
- 2010 - 2012 Subaru Outback Wagon excluding Sport
California residents: click here


Customer Satisfaction Score:
97% were satisfied with this product
3% of customers were not satisfied
- Wrong item was ordered
- Arrived Damaged
- Product did not meet expectations
Customer Reviews
Draw-Tite Max-Frame Trailer Hitch Receiver - Custom Fit - Class III - 2" - 75673
Average Customer Rating: 4.8 out of 5 stars (972 Customer Reviews)
Fully welded vehicle trailer hitch is strong and durable. Draw-Tite's Tested Tough guarantee ensures that this hitch exceeds industry standards. The combination of an e-coat base and a powder coat finish provides excellent rust protection.by: steven10/30/2021
Easy to install and sturdy. It would be five star if the 2 inch receiver wasn't so far under the bumper. It's difficult to reach the hole where the pin holds the hitch in place.


by: David in Massachusetts08/15/2021
2012 Subaru Outback Wagon
Though hesitant to order this for a 10 year old car, I did so upon realizing that the cost of this hitch was not that much more than just a single day of bike rentals for my family. Initially I will be using my receiver bike carrier on a family vacation. I previously was very satisfied with Draw-Tite receivers, so went ahead and ordered this hitch on a Sunday and was pleasantly surprised to receive it on the following Thursday. Also to my surprise was that it was packaged nicely in a double-wall box, so it arrived at my doorstep in pristine condition! Installation was quite straight-forward, and though this Draw-Tite is more visible than some other hitches, it really isn't very noticeable. One reason I chose this over the other brands was that it appears to distribute the load over a greater contact area. Thanks etrailer.com!


by: Jim H.05/15/2014
2014 Subaru Outback Wagon
I finished the hitch install on my 2014 Subaru Outback today. It went without a "hitch" so to speak. I did the job alone (age 69) and managed it well because of some hints from previous writers.
First, I drilled access holes from inside the trunk area as suggested. Remove the black adhesive dots over each hole and drill them out to 1 1/8" using a step drill (see photos 1.jpg, 2.jpg, 3.jpg). I didn't have a vacuum cleaner handy so I used a small magnet to collect all the metal cuttings. (see photo 4.jpg)
I then raised the rear of the car with ramps to get easier access underneath.
I took off the muffler which was not too difficult once the rubber shock-absorbers were liberally doused with WD-40. Getting it back on later was another story. That thing is heavy and it took quite a few "bench-presses" to get it up and slid onto the outboard rubber shock-absorber. After that, the inner one and the final bolt-down was a lot easier.
I also removed and drilled out the heat shield to clear the hitch bolt. The step-drill was perfect for this as well.
I removed the small rubber plugs from the four hitch holes under the car. The holes could then be clearly seen from above so guiding the bolts and plates into the holes using the included guide-wires turned out to be extremely easy.
I used my 3 ton hydraulic jack to suspend and position the hitch. I clamped it to the jack pad using two small c-clamps. Once in position an raised up, I could easily finger-tighten the rear nuts (rear of the hitch/front of the car). Then I took off the c-clamps in order to push the front of the hitch up into place with the jack.
Tightening everything down to 50 ft/lbs. finished the job.
I also found some plastic snap-in covers that perfectly fit the drilled holes in the trunk. I used these to seal the holes from dirt and to give it a finished appearance. (see photo 5.jpg).
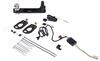
Next was the wiring harness. That turned out to be a bit tricky. I searched the wheel well housing on the drivers side but couldn't feel any wires. Then I found a YouTube video from a 2011 Outback that made it clear that the carpeting behind the rear seats had to be removed as well as the long foam strip adjacent to it. It is held down with three snaps...one in the front (fixed) and two loose plugs in the back. Once this was removed I was able to find and pull out the connector. The rest was easy. Plug in the connector, thread the wire back a bit, hide the black box under the wheel well housing and continue the wire around the outside edge of the trunk and into the spare-tire area.
Everything went back together nicely. I brought the hitch cable up into the foam tray where it would be easier to get when needed. I plan to run it out the tailgate and I don't at all think it will be damaged by the rubber weatherseal.


Jim H.
7/24/2014
Joe, I found the gray snap-in covers at my local hardware store in the nuts and bolts section. There are cabinets with pull-out drawers and I found them there. The ones I got said 1 but they fit the slightly larger holes just fine. I liked the idea that the holes were covered to keep stuff from falling in, especially liquid spills. If you cant find the plastic covers, just use some heavy-duty duct tape.
Jeff S.
4/21/2015
I followed Jim Hs instructions on my new 2015 Outback and it was really easy. The hitch looks great and was on in under an hour.
Jim H.

5/15/2015
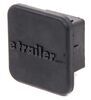
I still absolutely love the hitch. I dont even realize its there except when I need it. I also like that it doesnt compromise the road height of my Subaru. It was easy to install and looks good too. Besides, I think it adds to the overall value of my car.It would have been perfect if it came with a rubber hitch cover-plug I bought one later. I would have liked one with eTrailer written on it!
by: Randall G07/08/2018
Pretty good fit
Install time, start to finish: 2.5 hours
Purpose of hitch: Mount our existing bike rack. It’s never intended to tow anything
My skill level: Moderately competent. I’ll do the more strait forward work on the vehicles such as oil changes and brake work.
Tools used: 2.5 ton floor jack, 4 jack stands, various drills and wrenches, straps & WD-40
My first recommendation is to watch the video before starting the install. Lots of good tips and it’s nice to see the job done completely before attempting it yourself. Pay attention to the great tips about the WD-40 and strap with the exhaust system.
One small point of variance between the video and my installation was how large to drill the hole. The mechanic in the video sized it to the bolts. However, the blocks in my parts bag were slightly larger than the bolts – I had to drill to that size.
I don’t have a professional garage with a lift, so I put the vehicle up on jack stands.
Make sure you have a GREAT setting on the jack stands, not just “good enough”. There will be a lot of pushing and pulling on the vehicle you don’t want it falling off the stands with you underneath. I spent about 20 minutes getting it up on the stands and solid before I was happy.
Another tip is to use the floor jack as an extra hand when installing the hitch. I did this job alone so there was no one else there to help hold the hitch in place while I did the first bolts. I placed the receiver on the floor jack and used that to hold the weight while I adjusted and put in the first bolts.
Oh, and for the love of whatever deity you hold dear: wear safety goggles! Mandatory when drilling the frame above your head. The flying metal debris hurt when it was hitting my exposed arms, I can’t imagine that stuff hitting my eyes.
Make sure you have a torque wrench so you know those bolts are tight enough. I also used thread-locker since I never want this thing loosening up.
The installed hitch is very solid on the frame. It feels like a factory installed part. My wife is happy because it’s not very noticeable (her car).


Randall G.
7/8/2019
Its been a year. The hitch worked without issue. Several trips local and cross-country with the bike rack attached to the hitch. My Wife liked it because she retained access to the rear hatch without having to pull off the entire bike rack system if it was one of those strapped to the back window. Outside of that, shes never mentioned it, which is good: low visibility but nice utility.
by: Scott H06/06/2017
2017 Subaru Outback Wagon
Hesitant about installing this hitch by myself was on my mind so often between ordering it and receiving it, that I watched the EXCELLENT installation video 10 ten times to be sure I would do it correctly. I must say that anyone could do this without really any experience as long as they followed the video! WELL DONE, etrailer!
I also must say that alternative ideas by other customers led me to alter some of the methods for installation. Thanks and KUDOS to those who suggested drilling from the inside top of the cargo area---much easier and safer all around! The individuals who used the idea of raising the hitch into place via a car jack also need to be commended---being the only one around on the day of installing it I thought would be a challenge, but those ingenious people with their carjack idea and picture submissions made this job a breeze! Thank you!
All-in-all, not only was the price right for the hitch but the website, service, pictures, videos, AND customer submissions with their GREAT IDEAS made this event a pleasant and self-satisfying experience.
Thank you, George, for emailing me with updates, etc. And, thank you, etrailer, for the positive experience!


Scott H.
6/8/2018
So far, I’ve had this hitch a year and all is well as can be expected. When I find that I need something for trailering, hauling, etc., I turn to etrailer first to search for options. The full array of information available for any project is tremendous. Customer reviews and tips make this site a valuable tool for those who are interested in DIY endeavors.
by: Suman C.02/01/2014
etrailer is amazing. I ordered on a Saturday night late in West coast timezone and within a hour my order was processed and a shipping label was created. Daniel upgraded my order to 3-5 business days shipping at no additional cost and it arrived promptly. No damage to the box or the hitch. Followed all the great reviews here and took the trunk approach. Removed the muffler completely is the way to go. Widened the holes in the trunk and once the screws are snaked in, rest of the installation was easy. I used two jacks to lift the hitch in place and it made it was so much easier. With the help of my 13 year old son, we were able to finish the installation in under 2 hours.
Now it's time to shop for a good bike rack to hold our 4 bikes :-)


Suman C.
2/1/2015
Yes, I am still enjoying the hitch. No issues whatsoever.
by: Brett H.05/25/2013
Subaru Outback
I was a little intimidated by the prospect of installing this hitch, but it turned out very well in the end. Many thanks to the excellent videos at etrailer and the comments from my awesome fellow-customers. Looks great, works great, and total install time was only about 2 hours. I'm reasonably good with tools in general, but little to no auto mechanic experience.
Here are a few tips I found very helpful (many of them from the other reviews). Some would have helped me decide sooner to take the plunge:
1) The hitch actually installs on four bolt holes already provided in the frame by Subaru for installing a trailer hitch. The only reason the instructions have you drilling new holes under the car is to provide a way to fish the bolts through from the top, which takes us to our next point...
2) I highly recommend drilling down from the trunk area, rather than drilling up from under the car (thanks to the other reviews for this tip!). It's not only easier, but also means your holes aren't exposed to the weather. In fact, your new holes will be entirely covered by the snap-in panels in the trunk. Other reviewers have talked about removing the bumper -- in that case you don't have to drill any holes and I'm sure it's the best approach if you're comfortable doing that.
3) You must fully remove the rubber bumper hanger that is closest to the rear of the car. It wasn't clear to me initially, and I just took the bumper off the hanger, leaving the rubber hanger attached to the car. The hitch won't fit over the rubber hanger, and you'll be in no position to deal with it once you start trying to lift the hitch into place.
4) As others have said, removing the muffler entirely is probably the best way to go. I was a little concerned about doing that, but it was easy to get off and back on. If your car is very old, it might be tougher.
5) I had a second person assist me in lifting the hitch assembly into place, and cannot imagine trying to do that by myself. Definitely get a helper!


Brett H.
6/2/2013
Oops - when I said bumper hanger I meant muffler hanger. Whether you remove the muffler or just it down, youll need to fully remove the rubber hanger that is closest to the back of the car.

Bruce V.
9/30/2013
Wow, you did an excellent job of explaining everything you did. I agree, it sounds like drilling down instead of drilling up from the bottom of the carframe is the way to go. Once again thanks for the great job, Im ordering the hitch for our 2013 Outback today!
by: Steve C.05/16/2014
Online ordering was a cinch and shipping was lightning fast. I had my usual mechanic install it for me for $135 which was well worth the expense. It looks great and is barely noticeable. I am only going to use it for my bike rack and possibly a cargo carrier. Will definitely get the cargo carrier from etrailer. I am a highly satisfied customer.


Steve C.
5/18/2015
I couldnt be happier with this purchase. The hitch is heavy duty and still looks great.
by: John04/24/2022
I installed this hitch receiver on a Subaru Outback. My car had dual exhaust, so the prep to get the receiver installed took a little longer than I had expected when reading other reviews and watching videos. But, besides that, the installation went smoothly. The bolt guide wires and using a helper were definitely the 2 big things that I would recommend to someone else. The only reason for not rating this Excellent is due to the way the part was packaged and shipped (from Missouri to Connecticut). The box arrived damaged, as the mounting surfaces had broken thru in 2 places, allowing the coating to be chipped off in several areas. Overall I'm happy with the receiver and have already used a cargo tray with it. The packaging could be better in my opinion.


Brooke M.
4/28/2022
Thank you for reaching out to us. I have sent your information along to our customer service team.
by: Paul11/06/2023
2018 Ford Transit Connect
Hitch looks great. Will be installed soon. All hardware present. Packaging leaves something to be desired. Hitch was was placed loose in the box with nothing to restrain movement in transit. Hitch broke through box in several places.
by: Benny T.01/05/2014
2014 Subaru Outback Wagon
Excellent fit on my 2014 Subaru Outback. I did not drill a hole underneath because the 2014 Outback has 4 observation holes in the trunk directly above the hits mounting holes covered with tape. All I need to do was enlarge them to insert the rectangular washer. Also instead of cutting the heat sheild I just drilled a hole where the bolt needs to pass..Easy installation. Took me less than 45 minutes.


Mark W.
12/22/2014
Are the observation holes located under the styrofoam side floor panels on either side of the trunk? If so they are secured with two plastic retaining clips - do they just pop off if you pull on them?
by: Mark L02/16/2015
Installation went smooth. Just a described in the video. I used a Ratching Tie down attached to the hatchback latch loop on one end and then passed it through the center hole of the receiver and attached the other end to a hole in the frame along the midline. This made the installation easy as a one person install. The Tie down held the weight of the receiver while I aligned the bolts. The pictures attached are a recreation of what I did. Thanks.


Matt A.
10/2/2015
Awesome idea! Im going to do this also!!
by: Mark05/12/2024
2010 Subaru Outback Wagon
It took me 3 hours by myself on the ground to install. A rather messy job, but in the end, everything went together perfectly. I especially like how sits back under the car so as not to knock your shins when walking past.


by: Eric M.04/09/2012
Subaru Outback Wagon
The hitch shipped and arrived promptly. I don't have a lift, but I put my Outback up on car ramps and instllalled the hitch that way. I had it installed in under 3 hours. I am very satified, and my wife is excited to be able to haul her bike!


Joe
5/20/2013
I have a 2011 Outback. Thanks for the picture with the bike rack. I plan on doing the same thing. Do you find the hitch sturdy enough for the rack 2 bikes and enough clearance between the bumper and the point on the rack? May I ask what type of rack you have? Were going from roof mount to hitch mount. Not getting any younger.Thank you,Joe
by: Joe10/02/2023
2012 Subaru Outback Wagon
Easy install; rapid delivery; reasonable cost. The instruction sheet and the online video were very clear and allowed me to easily install this hitch. Have used it once so far- perfect
by: Cole05/22/2019
Ford
The receiver went on with pretty minimal effort. Two hours total including time to drink beer and bs with my neighbor. I've used it extensively since then to tow multiple trailers. Worked great every time. Also got rear-ended by an idiot in a Ford van, having the hitch/ball installed saved my bumper. 10/10, would buy again.
One thing I did notice, not a problem with the receiver, but rather the height of an Outback: Install the ball upside down on the hitch, else it'll generally be too low for many trailers and you'll scrape the jack on uneven ground. Pic is from the side of the road right after being hit. Took it like a champ.


by: Chris C04/28/2020
This was my second etrailer.com hitch, I sold the first car and bought a 2015 Suburu Outback. I looked around at other options but decided to go with this one because the instructions and support are excellent. As an avid cyclist I have a nice, heavy duty bike rack I leave on the car and use virtually every week. Installation of this hitch was a little involved as I needed to lower the muffler and drill a hole in the frame on each side. The instructions and video made the work clear and successful. The quality of the hitch is excellent, the pictures are after one year of use. I did have a concern after receiving the shipment, but the quick tech support cleared my issue and you can see the results are awesome! If you enjoy a DIY project and like to save hundreds of dollars, you can't go wrong with etrailer.com .


by: Glenn11/30/2019
The product in of itself was excellent and fit my 2015 Outback 3.6L with dual exhaust perfectly. I was a little apprehensive about doing the installation myself, however after reading through most of the reviews and hints and tips I figured I would give it a go.
I can't really give pros / cons on any of the installation options other than the option I choose and how it went.
The highlights:
1) I went through top and used a step drill to enlarge the existing holes. Worked great.
2) The 3.6L has dual exhaust and I just removed both mufflers to get them out of the way. To get the mufflers free from the rubber hangers some reviewers suggested applying oil to where the rubber connects to the body hanger and muffler. I used a squirt glass cleaner and the rubber hangers slid right off. You will need a long piece of wire to hold the exhaust pipe up off the ground after the mufflers are removed. Get that wire ready BEFORE you remove the mufflers.
3) Fortunately I have a hydraulic floor jack. As shown in the pictures I pulled the saddle off and with a couple of pieces of wood, a nut, washers and bolt made an adapter that slid into the hitch receiver tube. This allowed me to mate the hitch to the underside of the car by myself and I could maneuver the hitch until secured with the bolts. The best part is the jack could hold the hitch forever so I was under no time constraint.
Thanks etrailer for providing a forum for sharing installation techniques.


by: Jesse02/19/2021
I ordered this trailer hitch a year ago just before COVID started up. Ended up not getting it installed until later that year due to lockdowns and many plans changing. Fast-forward a year later and we just so happen to be in the middle of a cross country move using the trailer hitch. Almost to our destination and the hitch is staying strong. Its very secure and sturdy. We're pulling a 4x8 Uhaul trailer for its maiden voyage.


by: John S08/14/2012
2012 Subaru Outback Wagon
Just installed this hitch this weekend on my 2012 Outback. Certainly the most-intrusive thing I've ever done to an automobile and apart from a bloody knuckle and sliced thumb, all went pretty smoothly.
I opted to go through the observation holes as recommended by other reviewers. Seemed making two existing holes larger would be better than creating two new ones. I opened up the two holes nearest the front of the hatch area which made threading the guide wire to the back holes a bit tricky. I solved it by running a fish wire of my own up through the rear hole then attaching the provided wires to that and pulling the whole shebang back through.
I installed this so I could use a hitch-mounted bike rack. I purchased the Softride Dura Parallelogram and had read on this site that it was necessary to also purchase the extender bar for that rack, so I did. Turns out this was an unnecessary purchase as it fit fine with the standard bar. So if you're planning on going that route, hold off on the extender bar until you find out if it's really needed.
Oh yeah, have help. Although I'm certain I could have done this alone with some cleverness, having a couple extra hands made it far easier.


by: Declan M06/30/2019
After 1 year the hitch still looks great and does the job. I use it for the bike hitch which supports 4 bikes on an Outback 2012. I was able to install it myself by watching an install video saving me hundreds. I highly recommend etrailer. I had also purchased a Thule bike rack from them. I am very happy with all their products


by: Alan03/29/2021
No problems after receiving the correct hitch. The install with the correct hitch was simple, no drilling, 15 to 20 minutes to install. The hitch sits a little low on a 2020 Subaru Legacy (less ground clearance than the Subaru Outback) an can scrape on some driveway and entrance ramps. A better alternative is the hitch that is accessed through the bumper, but that is 3 times as expensive and 5 times the work involved. So, this hitch works fine.


by: Richard Oja03/31/2015
2012 Subaru Outback Wagon
I needed a hitch for my wife 2012 Subaru Outback for hauling sport bikes to track days and occasional utility hauling. A google search brought me to the etrailer site. The biggest advantage of the trailer site is the access of instructional videos and the additional resources from their previous customers experiences and advise; I found this to be most useful for installing the hitch. The quality of the products is good, the hitch had numerous chips in the paint which may be problematic for corrosion in the future, but for the price I have no complaint. The hitch appears to be the same one offered by Uhaul. The overall costs when a complete package is ordered are about the same. Regardless of the price I would and will purchase all my future trailer need from etrailer, and will recommend etrailer to future customers.
Regarding installation; (read all the the customer reviews) I would recommend drilling four holes from inside the trunk area instead of two holes from the bottom up. Additionally I recommend a $10.00 hole saw instead of the $50.00 conical shaped "step drill". The hole saw worked well, even without a pilot bit. It took about 5 minutes to drill the four holes.
If you have access to floor jack, use it, it made positioning the hitch into place a one person job.
Use liberal amounts of lubricant to remove the three rubber muffler mounts and remove them completely from the vehicle, it makes reinstallation easier.


by: Jeff06/07/2021
I purchased this trailer so I could mount a Kuat Sherpa 2.0 bike rack to the back of my Subaru outback. I know there are cheaper hitch receivers out there, but I wanted something that would look sleek and tucked away. This did all those things and performs great. Very happy with my purchase


by: Scott M06/13/2017
Excellent product and easy to install if you do your homework. Arrived in 2 days with free shipping. Watched the videos on this site and read through the reviews for hints. I decided to take the remove the muffler route. The night before I hit the nuts and the isolators with some WD-40 and then did it again in the morning right before the project. I also also decided to go through the trunk to access the frame. It was a little nerve racking to remove the side trunk foam panels that are attached to the floor via some black clips. I couldn't find mention of these anywhere...not even on youtube. Anyway I went ahead and stuck a screwdriver underneath and carefully pried up until the clips released like projectiles. Not sure if this was the best way but no damage was done (I think). Took the muffler off. The nuts on the exhaust system were tough and had to pull out the 1/2 inch driver to get enough leverage. I had a much easier time removing the muffler off the rubber isolators than folks on this page seemed to have. It wasn't even that heavy and I have birdie arms. :) I then took off the heat shield. Now let's go top side. Ok the foam flooring has been removed and I take the black tape off the holes and then go under to take out the black plugs out of the frame holes. Now I can go top side and look down through the trunk holes and see the frame holes. Sweet. Ok now I get my handy dandy 1 1/8" step drill and start drilling. Rip zip and there goes my step drill bit right into the hole and into the frame. Good grief. The step drill bit wouldn't fit in my small drill (3/8") so I used a socket attachment for the bit. Well I didn't think ahead and when I drilled through all the way (metal is thin and the drill bit cut quickly) it fell right off into the frame. After a little panic I managed to get it back to the hole and use some needle nose pliers to grab a hold of it and fish it out. The remainder of the holes I stopped before loosing the bit again. Vacuumed out the shavings. Now I used the fish wire and installed the block and the bolt and then taped the washer to the underside on the frontward bolts. Using info gleaned from these reviews I placed the hitch on a jack and moved it into position. I wrangled it into position and hand tightened the rearward bolts first. When I went to do the front bolts the hitch wouldn't cooperate. It was getting hung up on the rearward muffler isolator which needed to be completely removed. After that it was a breeze to hand tightened the frontward bolts. Tightened everything with a torque wrench. Used the step drill to drill out a hole for the nut in the heat shield instead of cutting it. This worked great. Reinstalled the heat shield and reinstalled the rearward muffler isolator. Installed the muffler and the key here is lots of WD-40. Put some duct tape over the access holes in the trunk and reinstalled the foam panels. Start to finish in under 2 hours. Relaxed pace.


25
998
Show More Reviews
See what our Experts say about this Draw-Tite Trailer Hitch
- Recommended Trailer Hitch For A 2015 Subaru Outback WagonWhen it comes to installing a trailer hitch on your 2015 Subaru Outback Wagon The Curt Trailer Hitch Receiver - Custom Fit - Class III - 2 inch # C13144 that you currently have will not fit your vehicle. The etrailer Trailer Hitch Receiver - Custom Fit - Matte Black Finish - Class III - 2 inch # e98847 is confirmed to fit your 2015 Subaru Outback Wagon. The hitch has a bolt-on installation with no welding required. The hitch has a matte black powder coat finish that is over a protective...
view full answer... - Can I Install the Draw-Tite Max Class III Trailer Hitch on a 2015 Subaru Outback Without DrillingYes, the Draw-Tite Max-Frame Class III # 75673 can be installed without drilling by removing the bumper on your 2015 Subaru Outback. Our installation video, which I've attached for you, shows the process with drilling but it can be done either way and the rest of the steps are very much the same. You may also be interested in the Ball Mount Kit # 989900 and T-One Vehicle Wiring Harness # 118467 which are both compatible with your Outback. I have attached a video of that Wiring Harness...
view full answer... - Recommendations to Tow a Trailer and 2 Bikes with a 2018 Subaru Outback Wagon 2.5i LimitedThe Draw-Tite Max-Frame Trailer Hitch Receiver # 75673 is what I recommend for you to install on your 2018 Subaru Outback Wagon as it can easily tow a 1,500-lb trailer and hold 2 bikes. You will want to check your owner's manual though about the max Tongue Weight (TW) of your Outback Wagon. From what I found online it looks like it has a TW capacity of 200 lbs which, since a trailer's TW should be 10-15% of the loaded trailer weight, could be an issue if you are wanting to carry bikes as...
view full answer... - Differneces Between Class II Hitches Offered for 2010 Subaru OutbackHidden Hitch no longer manufactures the hitch for your 2010 Subaru Outback, but I will do a comparison for you. Draw-Tite and Hidden Hitch were essentially identical in style and capacity. The price of the Hidden Hitch model was higher because the hitch included the manufacturer recommended ball mount and the pin and clip used to secure the ball mount into the receiver.The Draw-Tite hitch is a quality hitch and is available in a Class II, # 36493, or Class III option, # 75673. The Curt...
view full answer... - Best Hitch Receiver for Towing a Jet Ski w/ a 2017 Subaru Legacy I would be happy to help you! The best hitch for your 2017 Subaru Legacy is going to be the Draw-Tite Max-Frame Trailer Hitch Receiver item # 75673. This hitch is custom fit and bolts directly to your Legacy with included hardware. This hitch has the highest capacity for both towing weight 4,000 lbs and tongue weight 600 lbs out of the available hitches for your car. You will want to verify what your Subaru's towing capacity is and go off of that number. You should have no problem towing...
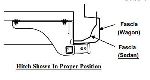
view full answer... - Trailer Hitch and Custom Vehicle Wiring Recommendations for a 2010 Subaru Outback WagonWhile some of the capacities are pretty close, the bottom line is that on the Class III hitches available for your 2010 Subaru Outback Wagon have a higher tongue weight capacity, even if the gross trailer weight capacity on some is the same. As far as looks, on all of the available hitches, the tubes will be visible below the bumper fascia. I recommend going with the highest capacity hitch available because you never know what you might be towing or carrying in the future. The higher the...
view full answer... - Trailer Hitch Availability for 2016 Subaru Outback Wagon All aftermarket hitches made for the 2016 Subaru Outback Wagon do require drilling. This is true for both the 1-1/4-inch Class II hitches and the 2-inch Class III hitches like Draw-Tite # 75673. Drilling into a new vehicle can seem a bit scary but once you compare the price for one of these aftermarket hitches to the cost for the factory hitch you may find it less scary. We have help resources to make hitch installation easier for the first-time installer. I linked the written instructions,...
view full answer... - Trailer Hitch Compatibility Between 2012 and 2017 Model Year Subaru Outback WagonSometimes a hitch from one vehicle will fit a newer model year. The hitch you purchased in 2012 was a Hidden Hitch model that is now discontinued, but sister-brand Draw-Tite's identical 2-inch hitch # 75673 is still an active item and is compatible with both model years. All you need to do to install your hitch on the 2017 Outback is to order a replacement hardware kit # RHK. This kit includes all new hardware components; hitch hardware cannot be re-used. Just enter RHK into our search...
view full answer... - Upgrading 4-Way to 7-Way Trailer Wiring on 2014 Subaru Outback with No Brake ControllerIt sounds like you are on the right track with everything here. You can use the Hopkins part # 37185 to convert your 4-pole connector to a 7-pin connector, but this is just the adapter. We've built a complete kit for this exact situation and it includes everything you need to have a fully functioning 7-pin trailer connector minus the in-cab brake controller, part # ETBC7L. This is what I recommend for you and it comes with a better 4-pin to 7-pin adapter. You will want to run the 12 volt...
view full answer... - Is it Necessary to Plug Holes of Frame After Hitch Install on a 2014 Subaru OutbackYou would not need to plug up the install holes used to install a hitch like the part # 75673 on your 2014 Subaru Outback Wagon. It would be extremely difficult to get water up in the vehicle frame with the plugs removed as the hitch hardware will be in its place. We have sold a ton of this hitch and have not had any feedback that mentioned water getting trapped in the frame and creating rust issues. Check out the install video I attached for more info.
view full answer... - Will Thule T2 Platform-Style Bike Carrier, # TH96XT Fold Up on a 2011 Subaru Outback WagonI can tell you that with the Draw-Tite Trailer Hitch, # 75673 installed, it will measure 7 inches from the center of the hitch pin hole out to the distance required to clear the rear bumper on a wagon model of the 2011 Outback. On Curt Trailer Hitch, # 13390, it is potentially less at 4 inches (the measurement was taken on a 2010 model) so it would offer more clearance. On the Thule T2 Platform-Style Bike Carrier, # TH69TX, when in the down position, the rack measures 7" inches from...
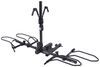
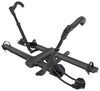
view full answer... - Swagman G10 Fit on 2018 Subaru OutbackThe Swagman G10 2-Bike Platform Rack S64682 will absolutely fit on a 2018 Subaru Outback. The distance from the center of the G10's hitch pin hole to the closest part of the rack when it is folded down is 18-1/2" while the closest part when it is folded up is 13". The Draw-Tite # 75673 hitch that fits your '18 Outback is only 5-1/2" from the center of the hitch pin hole to the edge of the bumper so there is plenty of room to use the Swagman and this hitch together.
view full answer... - Replacement Hardware Kit for Hidden Hitch Trailer Hitch # 75673 for a 2010 Subaru Outback WagonYou will need the replacement hardware kit, # RHK. Enter in the hitch number and hitch manufacturer where indicated on the page and click add to cart and the correct kit will be assembled. I have also included a link to the installation instructions and a link to a video showing a typical installation. For wiring you can use # 118467 if your Outback is not a Sport model or # C56111 if it is a Sport model with single exhaust. For a ball mount, I recommend the etrailer ball mount kit #...
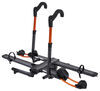
view full answer... - Will the Swagman # S63400 Bike Rack Fit a 2010 Subaru Outback Wagon and Gary Fisher Utopia BikeThe Swagman 2 Bike Hitch Mounted Tilting Rack for 1-1/4 or 2 inch Hitch, item # S63400, will work with both bikes you have mentioned. You may need a frame adapter like the Swagman Easy-Out Women and Alternative Frame Bike Adapter for Hitch Bike Racks, item # 64005, for the Trek bike but your Gary Fisher Utopia frame will go right on to the arms of the Rola TX-102 Rack. As long as you have a 2 inch receiver hitch on your 2010 Subaru Outback Wagon the Swagman Titan # S63400, 2 Bike Rack,...
view full answer... - Trailer Hitch Recommendation for 2018 Subaru LegacyFor your 2018 Subaru Legacy we have the Draw Tite hitch part # 75673 which is a confirmed fit and would work well. I attached an install video for this hitch for you to check out as well. This is a 2 inch hitch which is the preferred size hitch as it has great capacities and the most accessories made for it.
view full answer... - Can Factory Trailer Hitch on 2013 Subaru Outback be Replaced With Larger Aftermarket Hitch?You can certainly replace your 2013 Subaru Outback's factory hitch with a larger 2 inch hitch like the Draw-Tite # 75673 so long as your Outback is not a Sport model. I reached out to the manufacturer to try and find out if the Draw-Tite would fit directly into the space where the factory hitch sits but they could not confirm it would fit in the exact same spot because they had not tested it with a Subaru that had an OEM hitch. So it is a possibility that your new, larger hitch is going...
view full answer...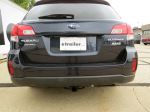
- E-Bike Rack Compatibility With A 2013 Subaru Outback Wagon And A Draw-Tite Max-Frame Hitch ReceiverThe Draw-Tite Max-Frame Trailer Hitch Receiver - Custom Fit - Class III - 2", part # 75673, is compatible with your 2013 Subaru Outback Wagon. However, the Yakima OnRamp Bike Rack for 2 Electric Bikes - 2" Hitches - Frame Mount, part # Y36F, will not work with this hitch receiver because it cannot be folded up due to the space constraints. My hitch bike rack recommendation is the Thule EasyFold XT Bike Rack for 2 Electric Bikes - 1-1/4" and 2" Hitches - Frame Mount, part # TH903202. This...
view full answer... - Recommended Trailer Hitch For 2015 Subaru LegacyI see the vehicle you entered is a 2015 Subaru Legacy. The Curt hitch part # C12108. This hitch is designed to fit Toyota Rav4 for 2006 through 2018. That hitch weighs in at about 26-lbs. If you are looking at the trailer hitch for a 2015 Legacy I recommend the Draw-Tite, part # 75673. This is a Class lll hitch and it has a 2-inch receiver opening. I recommend the Class lll hitch because it is much more versatile than the Class ll hitch, part # 36493. A 2-inch receiver has many more...
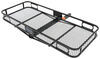
view full answer... - How to Get Curt Cargo Carrier to Fold Up when there Isnt Enough Clearance Behind RVAbout the only thing that you can do is to use a hitch extender such as # HE06. This will give you about 7 inches more clearance. But only use this extender when storing the carrier folded up. Do not use it with the carrier folded down and loaded. The reason for this is that the use of an extension reduces the tongue weight capacity of the hitch by 50 percent. It is not a problem with an empty carrier, especially when folded up, but would be a problem if the carrier was loaded.
view full answer...
- Installing Draw-Tite Trailer Hitch and Pro-Series Cargo Carrier for 2012 Subaru Legacy Dual ExhaustThe Draw-Tite 1-1/4 inch Class II receiver hitch # 36493 will fit your 2012 Subaru Legacy with dual exhaust and can handle a Pro Series cargo carrier # 63155. Lowering the dual exhaust is necessary to install the trailer hitch as well as trimming the heat shield a bit. Those are the only two things necessary as you install the Draw-Tite trailer hitch # 36493. If you don't have your mind set on the trailer hitch and cargo carrier above, another option to consider is going with a Class-III...
view full answer...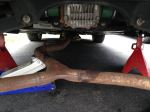

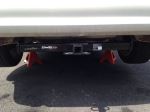
- Does Draw Tite Trailer Hitch 75673 Touch Exhaust When InstalledMuffler clearance is pretty tight, but when the # 75673 is installed properly it's not going to hit the exhaust and cause any type of rattle. I attached a couple pictures that show that the brackets do have clearance to not touch the exhaust. That being said, we have seen a few hitches cause exhaust rattle. This typically isn't the fault of the hitch so much as the variances in the way vehicle manufacturers hang their exhaust. I attached a help article that covers how to handle rattle...
view full answer...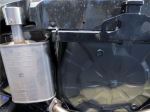

- Trailer Hitch and Wiring for a 2016 Subaru LegacyFor your 2016 Subaru Legacy a popular hitch option is Draw-Tite Class III trailer hitch # 75673. This hitch has a 2 inch receiver and is rated for 600 pounds tongue weight and 4,000 pounds gross trailer weight. Consult the vehicle owner's manual for the towing capacity of the vehicle and go by the lower of the 2 ratings. I have linked a video showing an example installation for you. For trailer wiring you can use Tow Ready harness # 118671. This connector plugs in line with the vehicle...
view full answer... - Recommended Trailer Hitch and Hitch Bike Rack for 2012 Subaru Outback WagonAs our teachers used to tell us "there are no bad questions". It's still true! A 2-inch Class III hitch is definitely the way to go, both for capacity and compatibility. You'll simply be able to get more uses from a 2-inch hitch than a 1-1/4-inch since more products are available for the 2-inch size. For example, a cargo carrier designed for a 2-inch hitch will have much more weight capacity than one made for a smaller 1-1/4-inch Class II hitch. All hitches use the same mounting points...
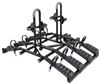
view full answer... - How to Use 4-Bike Rack on 2016 Subaru Outback WagonThe 1-1/4-inch factory hitch on your 2016 Subaru Outback Wagon is a light-duty type that is not really suited to handle the weight of a 4-bike rack. For transporting 4 bikes on your Subaru you'll need to install a 2-inch Class III hitch like Draw-Tite # 75673. The hitch bolts on using included hardware as shown in the linked video and it will provide a substantial 600-lb TW rating, plenty for the weight of a rack plus that of your 4 loaded bikes. When we installed this hitch on your car...
view full answer...
Do you have a question about this Trailer Hitch?
Info for this part was:

Video by:
Joe V

Video by:
Andrew K

Video by:
Andrew L

Video by:
Alan C

Video by:
Jonathan Y

Expert Research:
Jackie C

Expert Research:
Mike L

Expert Research:
Michael H

Expert Research:
Jameson C

Expert Research:
Adam R

Expert Research:
Jeffrey L

Video Edited:
Zack K

Video Edited:
Joshua S

Video Edited:
Jacob T

Video Edited:
Dustin K

Video Edited:
Chris R

Video Edited:
Zach D

Written by:
Lindsey S

Test Fit:
Nicholas E

Test Fit:
Randy B

Test Fit:
Brent H

Test Fit:
Shane H

Test Fit:
Robert C

Updated by:
Kathleen M

Updated by:
Laura H

Updated by:
Leah S

Updated by:
Wilson B

Updated by:
Alexander C

Updated by:
Amanda M

Updated by:
Isabelle B
At etrailer.com we provide the best information available about the products we sell. We take the quality of our information seriously so that you can get the right part the first time. Let us know if anything is missing or if you have any questions.
Product Experts Available Now!
Call 1-800-940-8924
Joe B.
7/23/2014
I did my install the same way your did. Thanks for the instructions. Helped me out A LOT.Where did find the plastic snap-in covers for the drilled holes? Would love to cover mine up as I left them open. Thanks,Joe