
Thank you! Your comment has been submitted successfully. You should be able to view your question/comment here within a few days.
Error submitting comment. Please try again momentarily.
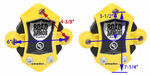
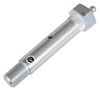
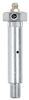
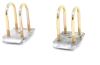
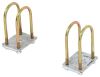
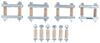
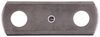
Bronze bushings are designed for use with trailer suspension systems. Insert into the eye of a leaf spring or equalizer to ensure proper sizing for suspension bolts.
Features:
Videos are provided as a guide only. Refer to manufacturer installation instructions and specs for complete information.
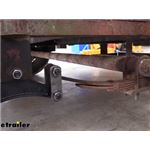
Hi there, Grand Design owners. Today in your 2022 Grand Design Imagine trailer. We're gonna be taking a look at and showing you how to install bronze bushings from Dexter. Bronze bushings from Dexter here are gonna be a great accessory for upgrading your trailer from its factory suspension system. Here we've got our factory equalizer. And you can see in the equalizer, it has plastic never fail bushings.
And these are self lubricating bushings. But this is a 22 trailer and we're still in 22. And you can see how worn out they already are. I mean, they're pretty bad on this top one especially and not too hard on some of the one on the spring eye there. If your bushings fail to where they are completely worn out, you now have play between the bolt that's connecting your equalizer or suspension together.
And every time you hit a bump or something, that bolt's gonna go up and down inside that play and it's just gonna slam, slam, slam and it's gonna oblong these holes. Well, once they become oblong, if you put a new bushing in it, your bushing is just gonna fail prematurely because of the space around it. So, it is important to check these. If your bushing completely fails, you have an oblong hole, you'll need to replace your component. So, by going with the bronze bushing set, we can extend the life of our suspension components by being able to lubricate our bushings which will extend the life of them.
These never fail ones, again, there are self lubricating, but if you maintain your bronze bushings with wet bolts and keep them greased, they're gonna outlast this never fail style. Now, if you're somebody that doesn't want to maintain their trailer, just wants to use it, that's it, kind of forget it. Then I would recommend staying with the plastic never fail style bushings because if you don't grease them, if you don't grease your bronze bushings, the plastic ones will outlive an ungreased bronze bushing. But if you're gonna maintain them, you can usually get significantly longer life out of properly greased bushings over the plastic style here. Again, these didn't even make it a year and they're already looking in pretty rough shape.
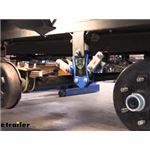
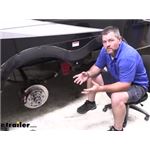
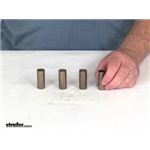
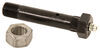
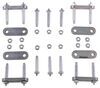
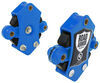
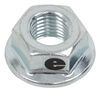
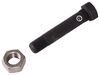
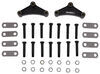
These ones should give them plenty of years of service as long as they maintain keeping grease in them. Now with the bronze bushings, it's a great upgrade. But some other things I would recommend when you go with the bronze bushing, you do need to put a wet bolt in it. Your factory bolts with these plastic styles are not gonna be wet bolts so they won't have any zerk fitting in it. So, I would recommend getting a wet bolt kit so that way you can lubricate those bushings. Now, you do not wanna put a wet bolt kit though in with these plastic bushings, the grease can actually deteriorate the plastic bushing and cause those to fail prematurely, they're supposed to be self lubricated. So, you don't wanna mix and match. But going with bronze and a wet bolt is gonna give us a a setup that we can maintain and extend the life. And you can also go with upgraded equalizes as well to help ease out your bushings and stuff here by absorbing some of those road impacts. Lippert's Road Armor is one of the options that we have here at etrailer that can work to help absorb those road impacts and extend the life of your suspension and smooth out the ride of your trailer. So, we went ahead and used a wet bolt kit as well as our equalizer in addition to our bronze bushings here to give a heavier duty repaired suspension on our Grand Design here. We'll begin our installation by jacking up our trailer. And you wanna make sure you support it under the frame with jack stands, we've got some at the front and we're using our lift here in the back to support the rear end that we lifted it up with. At home, you can just use your floor jack and jack stands. Now, if you don't have a really powerful impact, you might want to crack each one of the lug nuts loose before you lift it up while the weight's still on the tire. 'Cause if you try to use a wrench with it now, it's just gonna spin. You're gonna have a really hard time. If you have a powerful impact, you should be able to zip them off. I went ahead and already cracked them all loose so that way they're gonna be easier to take off now that we've got it up in the air. We'll then remove our wheels, the lug nuts size can vary. Ours is going to be a 19 millimeter. But typical sizes are usually a 19 or a 21 and it's the most common size. So, we already cracked ours loose, they come off pretty easy. And we're gonna be removing both our wheels. So, once you get this one loose, right and take it off, set it to the side and then we'll remove our other one. Once our wheels are out of the way, we want to make sure that we support our axles 'cause when we take our hardware loose here, they can drop down some and we're gonna have to lift them up with a jack or something to make them line up so we can get our hardware back installed. So, I placed jack stands underneath each one, close to this side. Now I did leave a gap on the jack stand, so they're just there for emergency to catch it if it goes too low, 'cause we're gonna need to move them up and down just a little bit to install it. So, the majority of the work's gonna be done with your floor jack. You'll wanna place one underneath each axle. If you only have one floor jack, then on the other axle, you would wanna make sure your jack stand is fully touching the axle so that way you can just move one at a time and you can move your jack back and forth as necessary. We're also gonna set up another one under this axle though 'cause we do have two jacks. If you have to, it'll make your life a lot easier. And we're just bumping it right underneath the U bolt, just so it touches a little bit of support there, and that's really where we wanna stay. We're underneath, we're looking at the backside of the equalizer here. To remove the equalizer, you'll have to take out all these bolts. And boy, look at that movement there. You can tell that the bushings are a little worn out on that one and they're a little bit worn out on this one too. So, to assist us in this install, since our new equalizer comes with bronze bushings preinstalled, those bronze bushings are designed to take grease and use wet bolts. This old style that we've got here is a dry bolt set up with never failed bushings. They're a plastic type self lubricating bushings and you don't want to grease those. The grease can actually damage the bushing, but I mean, they call them never fail. But in my opinion, they don't last as long as the bronze bushings. Now, if you never grease your setup, the never fails will last longer than a bronze bushing. But if you grease your bronze bushings, they typically have a much longer life than the never fail plastic style. Again, as long as you're maintaining grease on them when you take it out. So, we're gonna use an 11/16th socket to remove these nuts. You may or may not need a 13/16th to hold it. They are spline so they shouldn't spin. I'm gonna put it on there anyway to prevent it from spinning. Just makes it help come out a little bit easier, and we'll zip these off. So, I've got a 13/16th to hold the other side 'cause it is bigger, the nuts are smaller at 11/16th. So, we'll take out all the nuts. You do wanna save your nuts 'cause we're gonna be using those. There may be some instances where your impact is just not gonna be able to pull it out. So, we do have a wrench down here or a ratchet to be able to help us. We're just gonna move on for a minute. Continue getting these outta here. Now, in the wet bolt kit that we're gonna be using, we're also gonna be replacing all the never fail bushings with bronze bushings. So, I would recommend doing that too so that way you can lubricate all your setup here and have a nice working suspension system. All right, we'll just switch to our ratchet for those if the gun can't take it out. It's not uncommon for an impact to struggle with these 'cause there's so much play, saw how much play was there. That play really absorbs a lot of the impact. Now when you take these off by hand, it's also not uncommon that your axles might wanna move on you a little bit. So, we just need to crack it loose, see how it's gonna lift up a little. That's pretty normal, don't worry about that. Usually once you crack it loose, the gun can usually take care of the rest of it from there. I'll put our wrench on the other side just to make sure. Okay, and we are going to be taking out the spring eyes on the end as well and replacing those with wet bolts and bronze bushings. So, we'll be doing that as well. I recommend you do that at home also while you're doing this. So, once you've got these loose though, we should be able to take these off of there. They should be fairly easy since our axles are being supported. So, it's kind of supported in a neutral state where our hardware should slide out of there pretty darn easy like that. Now the upper bolt here is pressed into the hanger here so you'll have to drive it out. These are pressed into the shackles so they come out when you just pull the shackle out. We are gonna be replacing these as well, these are 2-1/4 inch shackles. For our Road Armor, we're gonna be using 3-1/8 inch shackles that are a little bit longer to compensate for the slightly different dimensions of the equalizer. They also have heavier duty shackles so they're thicker, better shackles too. So, we'll get this bolt out next. We're gonna take one of the nuts that we just took off and we're gonna thread it on there a couple of turns. This is gonna do a few things for us. One, if you're planning on reusing these bolts, this is gonna save your threads from getting damaged. We're gonna try a different nut though, I don't like the way that one feels. The other thing this is also gonna do beyond saving the thread so you can reuse the bolt. This is also gonna prevent you from mushrooming the end of the bolt here 'cause if you hit it and it starts to spread out in mushroom, it might get so wide that you can't get it to slide out and then you're just gonna be fighting it. So, this'll make your life a lot easier. And now we're just gonna strike it and drive it on out. One good whack there and it brings it down to the end of our bolt or the nut here to the face. So, we'll just unthread that now. And most of the time, you can just pull it out from there. If you need to, you can tap it out with your hammer. But usually once you get that initial drive, she comes out pretty easy. So, you can see, there's that plastic never fail bushings in there, our new one's gonna have all bronze, so we're gonna update these as well. So, while we're down here, we might as well do that. So, we're gonna go ahead and just take the bolt that we just used there and we're gonna use that to drive out these bushings. You could also use a similar size socket, one that's close to this size but ever so slightly smaller so it'll drive through. But I actually just prefer the bolt. You got it right here, you just took it out, it works great. If you look at the bolt, it's got a shoulder on it, so that shoulder fits on the lip of your bushing pretty well. And we're just gonna use this to drive this out of there. We'll drive this one out as well. Now you do wanna keep in mind that the bushings and the wet bolts and stuff don't come with your equalizers. You will have to purchase those separately. Sometimes these plastic bushings do kind of fold in on you. So, you just gotta fold it in a couple of times and then it'll finally grab and start to drive out. Now we're gonna drive in our new bushings. Again, these didn't come in the kit. You can buy a pack of four bushings like this. They're 9/16th for the inner diameter there, 11/16th, outer diameter, I always like to check them. If this pushes in there super easy, then the leaf spring is damaged, and it's close, it has worn a little bit but I'm still gonna have to drive it in there. So, I always check them, as you push your thing, if this just slides, boom, just shoots straight through, the bushing has already worn out to a point where it has damaged the spring eye and you'll need to replace the entire spring at that point. Or else you're still gonna get a bunch of slamming and you're just gonna repeatedly destroy new bushings because of the out roundness there or the expanded, not longer a tight fit. But that is still pretty snug, It's just a little bit right there, so we'll be okay. I'm gonna use a little bit of silicone spray just to make the bushing drive in the hair easier. And then we're gonna drive it in. Now to drive it in, you can use a similar size socket like we talked about. But again, I like to use the bolts. The bolts work out well, it fits in there, slides right in like that. We've got a nice head to drive on. So, we're just gonna put that in there and we're gonna drive it on in. When you're driving in, you do wanna make sure the bolt is flush against the head. If you hit it like this, it has that momentum and you'll end up mushroom in the outside a little. So, make sure the bolt is all the way flush when you strike. And yeah, that one pushed in pretty darn easy. Usually it's a little bit more difficult than that. This one is on the edge of this leaf spring eye being worn out, but we should be okay. It was tight enough to where it's taken up most of the outside so that should be fine. We've kind of caught it right there at the end before further damage was gonna require replacement. So now, we'll drive in this one, we're gonna do it the same way, slide it in our bolt, get it lined up and then tap it in. And that's closer to what it should feel like if you have a nice good eye layer. All right. And now we've got that one drove in, it needs to go just a hair more. All right, there we go, that feels good. So, we've got those taken care of. We'll now take our Road Armor, this is the Road Armor. This side's gonna be the outward facing edge but you can see here that it has bronze bushings preinstalled for us. So, that's why we want to use wet bolts. And that's also why we're updating the rest of our system to accept wet bolts and bronze bushing so that way you can grease everything and that usually makes a big difference in the length of your suspension components lasting 'cause you can keep those lubricated. So now, we're gonna go ahead and slide this up. We do have new bolts that we're gonna be using up there, new wet bolts. So, I'm gonna grab those now and we'll get that up there in place. All right, so we've got our new wet bolt here. This is the Lippert Road Armor aftermarket parts kit. So, this kit is designed to work with the Road Armor to update with the correct shackle lengths and the correct bolt length, all wet bolts. The wet bolts kit though does not come with the bronze bushing so you will have to purchase those separate. So, this is just gonna slide up in here. Our bolt will slide through. And then we're gonna place a nut on the other side. But we're not gonna fully tighten this down just yet 'cause the bolt is serrated on the one edge so it's not pushing in all the way. We're gonna have to come out here on the outside and we're gonna have to drive it in. So, this is just another one of the bolts here that you get in the kit. You can see, it's exactly like this one and there's that serrated edge so the bolt will push in until it hits that and then it fits tightly in there to prevent it from being able to rotate. So, we're gonna drive it in, but we've got a grease zerk fitting there. So, we're gonna use a socket, you can take the square end and fit over your zerk fitting, and we can drive the socket to push our bolt in. All right, we've got it most of the way drove in. Looks like there might be a small gap but at this point we should be able to tighten up the nut. If we still see a small gap, we'll come back out here and tap it a little bit and then re-tighten the nut. Back here on the backside, I pulled the nut off just to look at it. You wanna make sure the shoulder, the flat part of the bolt is inside the hole here 'cause if you got the threads just sitting on that when you tighten this down, you're actually gonna be pinching this hanger between the shoulder and the nuts. So, ours is resting in there, good. So, we're ready to just put this on and send it on home. It's gonna be the same size hardware, our same size socket and wrench for our new bolt. And again, I am gonna hold it just to prevent it from spinning. All right, now we've got it cinched down. We're gonna head back out there, tap it and we'll come back in here and finalize tightening it down. So, I'm just gonna hit it once or twice there just to make sure it is fully seated. 'Cause this second time that we're hitting it here, we've now got a little bit of bolt pressure from us clamping it to help it drive in. And we're now plenty solid, so we're just gonna tap it real quick. These don't have a real high torque spec so we're not gonna go crazy with it. We're just gonna hit it just to drive it in. And that'll be good enough for there. We'll come back with our torque wrench at the end and finalize torquing up. So, at this point now, if you're not gonna change out your spring eyes, you can go ahead and go back together with the new hardware that comes with the Lippert hardware kit for your Road Armor. Again, that is a separate part. But we are replacing the bushings across 'cause in your Lippert kit here, the wet bolts kit for the Road Armor, you do get new wet bolts for your spring eyes and if you don't change out the bushing, you don't wanna put them in there because again, those never fail as a plastic bushing. The grease will deteriorate that bushing and you're gonna have premature failure because of it. So, you wanna make sure you're changing out the bushing to a bronze one if you're gonna use the wet bolt. So, we're gonna go ahead and do that now. I'm gonna go ahead and get those replaced before we hook up this 'cause we'll have a little bit more axle movement to be able to drop down and do our spring eyes before we put our shackles in. So, to do our spring eyes, if you're following along and you also purchase the same wet bolt kit and enough bronze bushings, we'll just head over here and we're gonna remove this just like we did the center one for our equalizer. So, we're taking the nut off, threading the nut back on there, few turns, drive it out. And it's not uncommon for these ones to be pretty tight. You might have to raise or lower your jack a little bit to get it out of there. So, we need to go down just a hair. There we go, we we're almost at the sweet spot, right there. And you can tell the sweet spot if your bolt's sticking straight out. If it's angled down a little bit, you need to jack it up some. If it's angled up, you need to let it down some. So, we got that one out of there. Now, we got this jack here and we got a nice little gap there 'cause we want to lower this down now. But what I wanna try to do is when I'm lowering this, I want the spring eye to be down enough where I can drive my bushing out, but up just high up to where the top of the leaf spring is still between these two pieces. That'll give you a little more support when you're driving and make it drive out a whole lot easier. So, we're coming down, so now we've got it down here, just like our other ones, we're gonna drive this out with the bolt. So now, we're taking our bushing, we're just sliding it over that bolt. That'll be a good piece to drive in. Again, we're checking that tube fitment, it can't push straight through. So, our spring eye seems okay and we just drive it on in. All right, that feels good. So now, we'll just raise this one back up. May have to position it just a little bit differently. And then we can insert our new bolt. And you may need to go up or down slightly as necessary to get this to line up. We're pretty close there. There we go, and just like with our other bolt, the serrated edge does need to be driven into the hanger. So, we're gonna do that with our socket here on the outside again. All right, and this looks good, same is with our middle one. We wanna make sure that shoulder is inside the hole, which we are lined up. So, now we'll put on our new nut and snug it on down. All right and then as soon as that hits there, we're just gonna stop and we'll finalize torquing it. You may or may not need again to tap it from the outside after snugging it up some to fully seated if it's not fully seated. We're now gonna head over to the other spring eye on the other side at the front of the trailer on the front axle. And then we'll head back to our equalizer in the middle once we get that one done. All right, we got our spring eyes on the ends installed and back together, bronze bushings throughout. We can head back to our equalizer now. These are the heavy duty shackles. They have the lead bolts preinstalled in them. This is for the Lippert Road Armor hardware kit. Again, it doesn't come with the Road Armors. So, to install these now, we've got everything on jack stand so we can make it easy on ourself by lifting it up and down. The first one's really easy 'cause you can rotate this back and forth to get it to line up. And get your bolts pushed through there. We'll then place our other shackle on the other side, making sure you get it over the shoulder of the bolts. And then we'll install our nuts on there. And we can just leave them loose here for a minute while we go to put the other one on. All right, now when we go to install the other one here, if you take it up there and hold it up, it's not quite perfect on the way it's lining up. We need to raise this axle just a little bit. So, just pump that up a couple pumps and look at there, slides right in, nice and easy now just by lifting that up just a little bit. Place our shackle on the other side. Now this is where usually you find a little bit of trouble but actually that's lining up pretty good. It's on the shoulder of each one. Sometimes if you can't get this inner piece to go over the shoulders while you're pushing it together, you can just take your hammer and just tap downwards on this a little bit. And usually you can get it to walk on there. Now, we'll put those on there and then we can go ahead and snug them down. Again, it's all the same size hardware as before. Our same size socket and wrenches before. So, our 11/16th for the nut, 13/16th for the bolt. All right, we'll now go back and torque all of our hardware to the manufacturer's specifications. We can now go back and grease all of our wet bolts. And we're gonna put a little extra in this one 'cause it's coming out this side. We wanna try and see some come out on the other side as well. We might have to grab a rag, there we go. I see it coming out on the other side now. We'll clean up any mess we make. But it is important you get grease all the way to the other side of the bushing, you can just wipe that mess away. So, we'll just continue that moving on down and greasing the rest of our bolts. Now that we've got this side completed with all of our bushings replaced, our new Road Armor and everything greased, we can now go ahead and move over to the other side, move all your jacks and everything over to that side and you can perform the same installation over there. Once you've got both sides installed, we can go back and put our wheels in place. Lift those in there, reinstall your lug nuts. Once we snug down our lug nuts and get our trailer back on the ground, we wanna make sure we torque our lug nuts to the manufacturer's specification. Once you've completed both of your equalizers and everything, we can go back and put our wheels on. After we get the wheels on and tightened down, don't forget to torque them once you get it back on the ground. When tightening down your bolts, you'll want to do it in a star pattern to draw it in equally against the hub face. And that completes our installation of Dexter's bronze bushings on our 2022 Grand Design Imagine..
Average Customer Rating: 4.8 out of 5 stars (360 Customer Reviews)
Bronze bushings are designed for use with trailer suspension systems. Insert into the eye of a leaf spring or equalizer to ensure proper sizing for suspension bolts.
Installed these with the Lippert AP wet bolt kit and Road Armor Shock Absorbing Equalizers. No more clanking and banging from the trailer going down the road and especially making tight turns.
I think Dexter, and by association, etrailer is selling junk parts. These are supposed to be "bronze" bushing. Even the Dexter packaging states "BRONZE". They ARE NOT bronze. They're cheap'azz steel bushings. Well I take that back they certainly aren't cheap.
You can see in the first photo the old bronze bushing(these are Dexter original bushings that came with the HD wet bolt set-up several years ago) compared to the steel bushing now included in the HD shackle kit. Still doubting? The next photo shows the Dexter "BRONZE" bushing firmly held by a magnet. Still have doubts? How about a picture of the "BRONZE" bushings still in the Dexter packaging firmly attached to a magnet?

Katrina B.
3/14/2023
We have checked our stock and they are indeed steel, instead of bronze like advertised. We are working on getting this information updated on our site to prevent any of this confusion in the future.
The bushings are not bronze as the package states. They will work but it is misleading.

Heather A.
5/24/2023
We have contacted Dexter about the material of these bushings and they are made of an iron graphite bronze material. Dexter did wear testing and determined that this was an acceptable material to use for these bushings. This new material does have elements of iron in them and are a darker metallic color but are not made of steel. I can see why the title is misleading and will work on getting that fixed.
Changed out cheap nylon bushings on new springs with the bronze bushings I ordered.
I don’t understand why the springs aren’t fitted with bronze bushings from the supplier instead of cheap plastic that Will fail in a year.
Good product.
Bronze bushings were great, not issues. Glad ad showed the use of "wet bolts" to go with them, I didn't know about them!
These bronze bushings when installed and maintained, (greased regularly through the wet bolts) offer a quieter, better ride, and increased lifespan when compared with the nylon bushings.
Had a leaf spring break on my off-road trailer in Mexico. Left it at a boat yard until I received the parts from trailer & returned to replace. Only took 2 hrs to replace both leafsprinhs, shackles, bolts etc. And we were back on the road.
E-Trailer always provides good service! Very knowledgeable about product.
Installed bushings and heavy duty shackle straps and wet bolts. Don’t yet know how they will be, but logically should be better and definitely stronger.
Bolts are great quality and nicely made. I hope they hold up much better than stock. It would serve etrailer well in the future to wrap each bolt in bubble wrap. A few in the box arrived with messed up threads. So yeah, that was a bummer. I will have to try and fix the threads if at all possible. Rather than that It will be fun to install it all next month.
These spring bushings fit the spring eye perfectly and installed easily yet securely.
Perfect fit, great improvement over my worn out bushings. No more clanking and squeaking. Nice and tight hinge points. Perfect.
I purchased this set in order to replace a new bushing that was deformed by an under-sized eye on the OEM spring. I also bought a set of replacement springs at the same time. All went together as it should have.
Parts r good quality fit good would order from trailer again
Easy install, dimentions matched the cheap plastic factory originals, but I expect they will hold up much longer.
As always, etrailer does a great job from ease of online search to speed of shipping and delivery.
While this is exactly what I needed, I believe I should be refunded a portion of the shipping costs. When I placed the order Monday August 29th I needed and paid for next day air. Kimberly said I had ordered too late on Monday and that it would not ship until Tuesday. George or whoever processed the order fooled around and did not ship the order until Wednesday August 31st. The order did not arrive until Thursday September 1st at 9:15PM, at the same time as the equalizer shipped by ground. Please look into this matter and figure out what went wrong. Again, the problem was not UPS nor Kim but whoever failed to process the order in a timely manner.

Jenny N.
9/19/2022
I am sorry the order did not arrive on the day that it was expected to. Customer Service will reach out.
Good product, worked as expected.
good stuff---better than plastic

Janet L.

12/3/2023
working great no problems
Appear to be excellent quality. Much better than the 20 year old springs they replaced. Had to do a lot of measuring as this was a custom made trailer from a local welder but everything from etrailer has fit well. Definitely sits a bit higher with new springs but that’s fine with me.
I got everything I needed. Quick and ea sy
Great products, fast delivery
The Dexter bushings were a direct replacement for my Morryde wet bolt system on the leaf springs of my 2019 Montana 5th wheel. They were just what I needed and Christina who took my order sail she would try to get them to my in Pennsylvania a day earlier. Low and behold they arrived a day earlier and the install was easy. My camper is ready to leave for Acadia in Maine tomorrow. Thanks so much Christina and etrailer for helping me get my camper road ready.
Exact replacement for my 2019 Grand Design Solitude 310GK
The brass bushings were excellent. They were fine. The instructions for the kit were not complete. I had to use a wheel puller to get the greasable bolt properly seated.
Ned
5/16/2020
Great
Do you have a question about this Trailer Suspension Part?
Info for this part was:
At etrailer.com we provide the best information available about the products we sell. We take the quality of our information seriously so that you can get the right part the first time. Let us know if anything is missing or if you have any questions.


Dan
4/19/2024
Still working great!