
To see if this custom-fit item will work for you please tell us what vehicle you'll use it with.
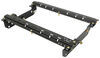
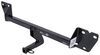
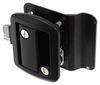
Designed for use with motor-home-mounted tow bars, the direct-connect brackets are virtually invisible, easy to mount and remove, and they eliminate the need for a quick-disconnect crossbar on your tow bar. Installs on your vehicle's frame.
Features:
Note: Roadmaster direct-connect base plates will only work with Roadmaster tow bars that slide into a trailer hitch, such as the Nighthawk, Sterling, Blackhawk, Blackhawk 2, Falcon, or Falcon 2. These base plates will not work with tow bars that require a hitch ball.
The drawbars, or front arms, on this base plate kit are supremely easy to mount and remove. Just insert them into the brackets and twist to lock them in place. To remove each arm, simply tug the built-in pull pin to disengage the lock, twist the arm back and pull it out of the bracket. Once the drawbars have been removed, the remaining brackets are virtually invisible. On most automobiles, the brackets are mounted within the grille, where they remain not only unseen, but protected from scrapes and scuffs as well.

Videos are provided as a guide only. Refer to manufacturer installation instructions and specs for complete information.
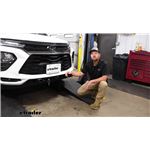
Hey, everybody. Ryan here at etrailer. Today on our 2023 Chevrolet TrailBlazer RS, we're gonna be showing you how to install the Roadmaster Base Plate Kit with Removable Arms. Before we do that though, let's take a minute, check this out, and make sure it's gonna work for you. Before we jump right in, I figured it'd be a good idea to touch base on the main parts that we're gonna need to flat tow our Chevy down the road in the first place. And usually we like to be hooked up to the motor home, and really give you a good visual, but it's thunder storming outside today, so bear with us, but there's gonna be five main parts.
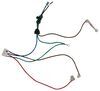
First one is your base plate, all right And that's going to give us a attachment point. That way, we can hook our tow bar up to it. So the tow bar, we'll plug into the ends here, and that'll be the actual link that connects the front of your Chevy to the back of your motor home. The third thing that you're gonna need is tow bar wiring. And you're gonna have a cable that'll plug into the front of your Chevy and go to the back of your motor home.
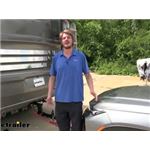
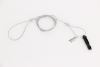
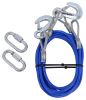
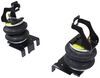
That's gonna transfer all the lighting functions from the back of your RV to the back of your TrailBlazer. The fourth main part will be safety cables. And so those are gonna attach to the base plate, and then attach to your motor home's hitch. And in the event of an unlikely disconnect, they're gonna keep everything paired together. And last but not least, the fifth main part for the Chevy will be a supplemental braking system.
And what this is gonna do is apply the brakes in your Chevy whenever you hit the brakes in your motor home, helping to bring you to a more complete and controlled stop. But with that out of the way, let's talk about the base plate. So I think this one turned out really good actually, in terms of appearance and functionality. So everything is going to kind of be evenly spaced apart, really easy to get to, and looks good. You know, everything comes out of this small opening down here below the grill.
And you really don't have to chop apart at the front of your car, which in some cases that is necessary, so it worked out pretty good. You know, where you put your safety cables are wide open, easy to get to. The base plate is gonna have a bracket on it that'll allow you to kind of mount up some of your braking system parts really easily, as well as a bracket on it to allow you to mount up your wiring connectors. So it just makes everything so much more straightforward when all that's there for you already. And the kit is gonna have these removable arms, all right And as far as what tow bars are gonna work with these, the Roadmaster Direct Connect Tow Bars will fall into here and you pin them, and that's how it locks in. And a lot of other tow bars are compatible as well. That's because nowadays there's adapter ends. So let's say if you have a Blue Ox tow bar, for example, you already have it, but you really want this base plate, you can pick up adaptor ends to change on the tow bar side, that'll allow you to pair these together. Whenever you're not flat towing behind your motor home, you can actually pull out these removable arms, just so you don't have these things sticking out and being super obvious here. And the way they work, you have these pins you can pull out, rotate them about a quarter turn, and then they just pop out of place. So really helps kind of clean things up. And being that they're so easy to install and remove, that'll really help kind of speed up the flat tow process, as far as getting everything set up. Compared to the Blue Ox base plate that's available. You know, they're both gonna work and get the job done, and look pretty similar. Honestly, I'd lean a little more towards this one, really because there's less cutting involved. You know, Blue Ox ones will sit further over, you have to kind of chop more of your fascia off, but you know, not a huge deal at the end of the day. So it's entirely up to you. I do wanna mention, this base plate is designed to work with the RS model. If you have a different submodel, there's base plates available that are fit for those models. So check our fit guide if that's your situation. But other than that, at the end of the day, you know, good fit, looks good. Easy to hook up, so you can't ask for too much more. As far as the installation goes, this one wasn't too bad. I definitely done some that are more difficult, and some that are easier. So it kind of fell right in the middle, but nothing really too crazy as far as base plates go. So with that said, why don't we go ahead and get started on it now. To begin our installation, we're gonna be here at the front of our TrailBlazer, and we need to remove our front fascia. And so we're gonna have these hood stops. And to get these out, you just kind of rotate them by hand and pull up on them at the same time. So we'll have two on each side. And I wanna mention, from this point on, whatever we do to one side of the vehicle, we'll also do it to the other side because it'll be set up the same way. Now we can switch out to a T15 Torx Bit, and we're gonna have three screws on each side. And then one in the center. We can now move to our wheel wells, and along this front edge here, we're gonna have some fasteners we can pull out. There's gonna be four T15 Torx Bit screws, and it helps if you turn your wheels in one way or the other, gives you a little more space to work with. (screwdriver whirls) And then, if you move kind of continuing up, almost in the center, there's gonna be a push pin fastener. So the plastic one. And to get these out, you can take a flat head screwdriver, just pry underneath the head, and then pull the base out. We can now move underneath the front of our vehicle. And on each side here we're gonna have three seven millimeter head screws. We'll run those out. And then we can switch out to our T15 Sports Bit. And in this corner here, we're gonna have two fasteners. So this one here, and this one right here. I do wanna mention too, on some models right here, you might have a push pin fastener, like we did in our wheel well liner. Ours doesn't have these so we don't need to worry about them. But if yours does, you would use your flathead and pry those out of position as well. So what I've done now is put some painter's tape along the seams here where we're gonna be working, just so we don't scratch the paint up. And this plastic trim piece, we're gonna have to pop this off about halfway. And so it's a little tricky to see, but I'll get a couple of them going here. I'll give you an idea. If you kind of come in from the back here, there's some plastic fasteners that you can kind of squeeze on to get this piece popped off here. I just kinda work my way up, and get a better idea what I'm doing. It's just so hard to see inside of there. But these fasteners, I'm just coming in with my fingers, and while I'm pulling out on this, I'm kind of pinching them down. And that'll let these pass through. If you need to get a pair of pliers or something back in there, you can do that too. But I'm just going to work this up, like I said, about halfway. To get this pulled back, what I like to do is kind of put some tape around it so the fasteners don't wanna snap back in. And then I actually took some of this foam packing material, pried it in there, just so everything don't wanna reconnect. But in this very top corner here, there's a screw. So take a seven millimeter socket and get it removed. (screwdriver whirls) So now, with a little bit of help here, we can get our fascia removed. And so you wanna start at the corners. And what you're doing is simply just taking the corner piece from where we removed that screw from, and kind of just pulling back on it. And this thing's actually unsnapping pretty easy. The clip's releasing. So you just work your way around. Once you get to out here, you know, you wanna kind of lift up on that centerpiece. So unsnap. And you may or may not have some wiring to disconnect. Looks like, in our case, we do over here on the passenger side. So can you pull down on that red retaining clip, and push down in the center, and that'll release it so we can get our fascia out of the way now. With the fascia out of the way, this air dam where it kind of connects, we want to cut and separate these two. So I just have a pair of snips, and kind of cut through there. Then to get it removed on the bottom side, there's these tabs you can kind of push up on. And while you're pushing on it, pull it out. So I got the other side out already. We can get the air dam, set it to the side, as we will not be reinstalling it. Just over here on the passenger side, we see where our intercooler is. There's gonna be this piece that kind of protrudes out, and you need to cut that flush. It's just plastic. And be really careful when you're doing this, you know, you don't want to dig into the actual intercooler and open that up, 'cause then you'll create essentially a boost leak. But that said, to help kind of slow things down, give me a little more control, I'm gonna use a multi-tool to trim this off. (saw whirls) Moving to where our bumper beam is attached, we're gonna have four fasteners. We're gonna remove these three, all right We're going to pull them all out, with the exception of that top outside corner. We're gonna have a 15 millimeter socket. We're going to go ahead and get them removed. (screwdriver whirls) What you can do now is grab these pipe spacers, and you want the (indistinct) and five eights ones. So make sure you got the right ones, 'cause there are a couple different sizes. And these are going to go into these holes. And one thing I think I'm gonna try to do, 'cause I can see this kind of being a pain to get your hardware lined up, and everything lined up and whatnot, I'm gonna take some packing tape, and kind of roughly hold this in position where it's lined up. I can almost tape it. And I think this'll make getting our hardware and our base plate up a little bit easier, with those kind of held at least roughly in position. Get them in there and then, you know, come back and cut out the center, so we can pass our bolts through. We're able to grab our base plate now, and you can take the M10 bolts, put on an M10 flat washer and a split lock washer. And then all the hardware that you use to secure the base plate, you're gonna put some red Loctite on the threads, which you will have to get separately, but you can grab a tube right here at etrailer. But these holes are gonna line up with those, and we can get our hardware started hand tight. For this attachment point, you can take the shorter pipe spacers that they give you, same hardware as the other two that we did, and get that started hand tight as well. You can refer to your instructions to find your side specific brace now. And there's two holes in it here that are actually gonna line up with two threaded holes in our frame. And if you need to, you can spray out, spray them with penetrating oil, and you know, clean them out a little bit. The hardware that you're gonna use for these will be these M8 bolts. You know, the split lock washer and a flat washer, and again, your Loctite. And so this is just going to line right up. And we'll get both of those bolts started hand tight. You are gonna have some holes on the bracket that'll line up with the holes in the base plate. And so you can take these bolts and just a flat washer and your Loctite, and those are gonna go through there. Where they come out on the other side, we can get the rest of the hardware in place. Where that bolt comes through, you then take flat washer, split lock washer, and your nut. You can get both of them hands tight here. You can now come back with a 17 millimeter socket, and you want to push up on the base plate. And while you're holding that, go ahead and snug these down. (screwdriver whirls) Move to your side plate now. You know, make sure these are positioned correctly. It's kind of a radius air on the back of the base plate and our bracket. I'm just gonna try to make sure that's gonna line up. And when we have that in position, you can take a nine 16ths wrench, and hold the backside of the nut, and then tighten this bolt down to the nine 16ths. (screwdriver whirls) We'll go ahead and get these snugged up as well. And I'm using a 13 millimeter socket. (screwdriver whirls) Now, you wanna make sure and come back with a torque wrench and tighten down all the hardware in that same order to the amount specified in the instructions. Moving to our fascia now, you look on the backside of it, there's gonna be this shock pad, this big piece of foam, and we can get that out of our way. So essentially, kind of just lifts out of place, and this will help make room for our new base plate. That pad out of the way, we're gonna move to our lower tabs here that we're holding in place, and we're gonna cut these off. (saw whirls) You can trim out our openings now. So this piece will get cut completely out. So I just got a pair of snips here. It's pretty thin plastic. And then, on the driver's side, so we're working on the driver's side. The driver's side middle, I guess you could say. This piece will have to come out too. So leave a little bit, about a half inch of plastic on each. And cut out. At this point, it'd be a great opportunity to work on some of your other flat towing components, like your braking system, and your tow bar wiring, and things like that while the fascia is off, 'cause you have a lot more room to work. And that's exactly what I'm gonna do. So once I have them components back on, or if you're not gonna be installing them at this time, you'd simply take your fascia and reinstall it the opposite way that we removed it. So now that I have our other components installed on the front of our vehicle, we can get our fascia back on. So essentially, we'll just take our time. This will go back on the opposite way that we removed it. Get everything lined up. Make sure everything is coming through. And we'll just work it back into a position here. So I was able to get our fascia reattached without any issues. It was kind of a tight fit, so just take your time working it around everything. I did have to cut out, you know, a smaller little opening here to allow our airline fitting to pass through. But you'll probably only run into this if that's the type of braking system you're gonna use. If you just have a standard breakaway switch without a fitting, you probably won't need to cut that, because it'll pass through on the bottom. And then something I noticed too on our base plate, where the little brackets come through to bolt up your connector, they we're up too high, so our plug was wanting to hit. So if that happens, what you can do is just take a socket, a small socket and extension, put it over those little bars, and you can kind of bend them down to angle and lower the connector plug to get that back on without any interference. And that'll finish up our look at and our installation of the Roadmaster Base Plate Kit on our 2023 Chevy TrailBlazer RS.
Average Customer Rating: 4.8 out of 5 stars (2029 Customer Reviews)
Designed for use with motor-home-mounted tow bars, the direct-connect brackets are virtually invisible, easy to mount and remove, and they eliminate the need for a quick-disconnect crossbar on your tow bar. Installs on your vehicle's frame.Shipment arrived quickly as scheduled. Manufacturer’s install instructions were easy to follow and complete. Extremely satisfied.

I bought and self installed this on my 2021 GMC Sierra Duramax 1 year ago. Install took about 5 hours and wasn't difficult...I could problty install it in 2-3 hours after leaening the tricks. Weve towed the truck all over the USA since then (over 10,0000 miles) and it works great! I've used other brands and highly recommend Roadmaster tow systems over the competition.
Good product. If you are reasonably handy and have some tools, you can install this yourself in a few hours. I'm a mechanic, it took me a little over 2 hours to install on my own toad. The fit is good, there are 4 holes you have to drill, otherwise it is plug and play. When you insert and twist lock the tow bar mounts into their sockets they feel a little sloppy but they are secure, and i never noticed any rattle when towing. Overall i give it a 4 out of 5 for easy install and clean look after install. Pic included of installed base plate.
The Roadmaster direct connect base was a perfect fit for my 2013 focus S to flat tow. We had it installed in about 3 hrs following the complete direction and pictures. I highly recommend using etrailer.
Installed on my 2020 Jeep Cherokee for flat towing behind our motorhome . I wanted a tow bar connection that integrated with the front end of the Jeep and the removable arms did the trick . I had one issue with the driver side receiver bracket not lining up with the upper mount bolt hole on the Jeep, image 0547. Had to make a slight adjustment to the receiver bracket so the holes would line up, image 0551 and image 0559. The rest of the install went smoothly
I also installed the Demco braking Stay n Play Duo system , image 0565 which went in without any issues, image 6028. 7 thousand miles of towing later, couldn't be happier with the products
This is a rock solid baseplate. Installed on a 2023 Equinox LT (AWD). I followed etrailer's videos for installation and they are spot on. We connect with a Roadmaster Nighthawk tow bar, charge line kit, smart diode lighting kit, and a Demco Stay-in-Play supplimental braking system. It is fairly well hidden when not in-use. This setup is great!
I installed them on my new RAM 1500. Works great, very heavy duty. I also modified and attached a push bumper and used the Roadmaster base plates.
Installing on 2020 Jeep Trailhawk :
Pic #0557 : Roadmaster Base Plate Kit , Demco Supplemental Braking System , Diode Wiring Kit , Demco Battery Charge Wire Kit
Pic # 0548 ,0551 , 0559 Had to adjust the bracket plate to line up with the upper bolt holes
Pic #6028 finished install , mounted the operating unit to the top fuse box cover using automotive Velcro . Air cylinder , controller and LED light installed . Aside from the base plate bracket not lining up with the upper bolt holes I would give it 4 stars . My son in law is a master at solving mechanical issues .
Installed on my 2020 jeep jl sport s with factory plastic bumper and plastic rock guard. Shane’s video was very helpful but I did not like how the metal plate behind the rock guard was cut away and how the rock guard had two big cut outs so I did some modifications. I cut two slots in the metal bracket and added angle brackets for extra support. As a result i did not use the supplied brackets for the rock guard. I created a template for the rock guard which resulted in two small cut outs. A lot of extra time but i am retired so time is relative. I think it looks great.
Exactly what I needed. Written jbstructuons were spot on and video was very helpful.
I was very pleased with the way you handled my order. I called and was greeted pleasantly and knowledgeable about what I needed and in just a few minutes my order was placed. It arrived just as they said it would in a timely matter.
I would recommend e-trailer to anyone!
I bought this base plate kit for my 2022 Jeep Rubicon Gladiator so I could flat tow behind my class a motor home with a Roadmaster Falcon all terrain non binding tow bar. The instructions were easy to follow and went smoothly except drilling the holes. That was my fault because I was using a dull drill bit. See attached photo
Easy install. Looks great. Apparently they have made some changes so that the video is not accurate. Install instructions though were spot on. A template for cutting the grill would be an added plus.
The base plate arrived on time, with excellent instructions. I went slowly because my truck is only days old and still had it done in an evening.
This kit worked out great for my 2022 Chevy Equinox. I like how it has separate side plates, which make it easier to attach the main bar. The points where it attaches to the frame seem plenty secure. It is important to watch the videos provided by etrailer as Ryan is very thorough and has good tips for installing. I would also recommend installing additional wiring while having the front end off. Overall, I was able to complete in my driveway. The hardest part was sorting out the wiring for whatever braking and tail lights you decide on. William S helped me pick all the necessary components needed for flat towing behind my Jayco RV. I am looking forward to a summer of camping and having more freedom to explore the area, now having a car.
The bracket kit fit my 2023 Subaru Crosstrek perfectly. The instructions are excellent and the video is really useful too. I’m really pleased with this RoadMaster bracket kit and the support from eTrailer.
Easiest I drive done. Works perfectly. I had some concerns if it would work on my Shelby F-150. etrailer put me in touch with Roadmaster directly who had never done one either. Said if it didn’t work I could return it. It fit with minor adjustments. Have towed a few thousand miles already. Couldn’t be happier
Item works good. We pulled our ‘21 Canyon behind our RV on several trips and had no issues other than you need to put in a diode to the rear lights to keep them from back feeding.
Just took the maiden voyage with the new Motorhome and the new Tow Car or ( Toad ). After getting everything set up and installed on the coach and the dingy towing was a breeze. Hardly even noticed that i was towing a car behind me. Bought all RoadMaster equipment and purchased everything from etrailer, baseplate and towbar with the invisibrake system and all the necessary cables. Etrailer was Awesome they made sure that I had everything needed and that everything fit my vehicle.
Have enjoyed the Roadmaster base plate on my Mercedes Benz Sprinter Van. The only complaint I had was what was required to install it. I have installed several in different vehicles and this one was the most difficult. Some are easier than others, but once installed, it performs as expected.
Great Company Product arrived on time and the tracking information was above and beyond what I expected Product is exactly as described and of excellent quality
Would highly recommend etrailer and Roadmaster
This is the fifth Roadmaster base plate that I have purchased. I will not use another brand as I feel it is the best for the money and Quality, installs easy as well. We just got them today and have not installed yet. so no photos sorry.
I have used Roadmaster base plates and tow bars for 18 years and they are great. Just received new base plate today for my new GMC Canyon, came a day early and looks great. Thanks etrailer for great price and super fast shipping. You folks are the greatest. Photos after I install it. RAY
Do you have a question about this Base Plate?
Info for this part was:
At etrailer.com we provide the best information available about the products we sell. We take the quality of our information seriously so that you can get the right part the first time. Let us know if anything is missing or if you have any questions.


Thank you! Your comment has been submitted successfully. You should be able to view your question/comment here within a few days.
Error submitting comment. Please try again momentarily.