
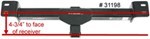
Part Numbers: SS48GV,31198
Thank you! Your comment has been submitted successfully. You should be able to view your question/comment here within a few days.
Error submitting comment. Please try again momentarily.

84 x 18 Heavy-duty plow with thick rubber cutting edge self-adjusts up and down to smoothly clear a path over concrete, gravel, and grass. Side scoops catch more snow with each push. Aluminum blade can be manually angled to either side.
Features:
Specs:
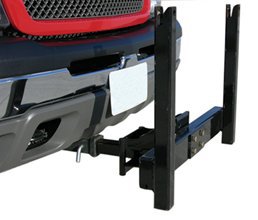
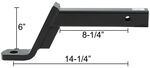
Installation is quick and simple - just slide included shank assembly into your 2" receiver and secure with pin.

Then lift the blade, one end at a time, onto the frame's holders and fasten with snap pins.
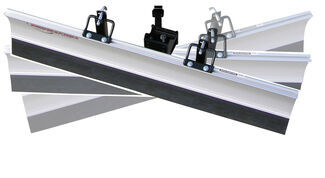
The SnowSport HD blade is mounted on an angled, 3-position shank assembly, allowing you to plow to the left, to the right or straight ahead.
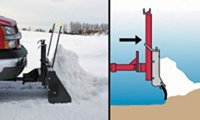
To plow, lower the blade and begin driving; no wiring or hydraulics are needed. The unique push frame on the shank assembly allows the blade to move along the grade of the terrain for easier, more efficient plowing. The heavy-duty rubber cutting edge is effective yet turf friendly, collecting snow and squeegeeing slush without digging into the ground.
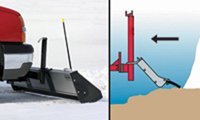
When you reverse direction, the blade lies back, skimming over the surface of the ground so that you can easily take another pass.
Once you're finished plowing, just lift the blade and refasten into the travel position. The blade is secure enough to travel at highway speeds, and the low-profile design keeps it from blocking your vehicle's headlights. Removal for storage is quick and easy. The plow can be used on the rear of your vehicle, making it a cinch to back out of your snow-packed driveway.
California residents: click here
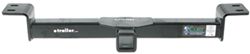
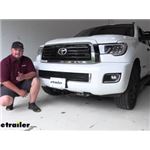
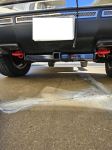
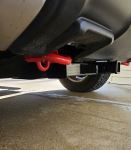
Easily attach a variety of accessories to the front of your vehicle with this fully welded, corrosion-resistant trailer hitch receiver. Perfect for winches, spare tire carriers and more.
Features:
Specs:
At etrailer.com we're committed to the products we sell, and to our customers. Our experienced and knowledgeable staff are available via both phone and email to address your questions and concerns for the lifetime of your hitch. The technicians at etrailer perform hitch installations on a daily basis, making them a valuable resource for do-it-yourselfers. The one-on-one, personal service you'll receive comes straight from an expert in the towing and automotive field. We've installed it, we've wired it and we've towed with it, so whatever your question, we can answer it.
Videos are provided as a guide only. Refer to manufacturer installation instructions and specs for complete information.
(upbeat rock music) (upbeat rock music continues) Narrator This video is to be used in conjunction with your owner's manual to help you with the assembly and mounting of your new SnowSport HD Plow. You will need a receiver plow mount hitch installed on your vehicle before starting the plow assembly. Follow the written instructions for the mount kit for your particular model of truck. Next, you will want to gather the tools shown on the list: torque wrench, impact or ratchet with 9/16-inch and 3/4-inch socket, drill with 3/16-inch and 5/16-inch drill bits, number 3 Philips driver bit, 3/4-inch box wrench, 5/16-inch open end wrench, 3/16-inch Allen wrench, bubble level, and protective eyewear. Make sure your vehicle is parked on a level grade and you're ready to get started. Step 1.
Insert interceptor into receiver and secure with the hitch pin. The interceptor can be installed with the big leg turned either up or down as needed for proper push frame clearance, shown turned up in this video. Bolt the push frame to the proper hole pattern on the interceptor using 4 half-inch by four-inch bolts with flat washers and lock nuts. Leave bolts snug tight for now. Step 2.
With the bolts snug tight, level the push frame horizontally, then check push frame for vertical plum. If plum, tighten all four bolts and proceed. If not plum, refer to the shimming procedure in step number 2 of your owner's manual. Step 3. Align the end of the rubber edge with the matching channel of the bottom section of the aluminum blade.
Slide the rubber edge into the channel until it's centered on the aluminum blade. Take the top half of the blade and connect the tongue-n-groove joint with the bottom half. Slide the top section until it's centered on the bottom section. Step 4. At each end of the blade, insert two square nuts into each channel, flat side facing out.
These nuts will be aligned with the holes at the top and bottom of the slide hinges. Place each slide hinge on the blade and align the edge of the hinge with a factory mark on the blade. When both hinges are properly aligned, they should measure 22 1/2 inches apart. Turn the 3/8-inch by 3/4-inch hex bolts with flat washers into the nuts that we're previously slid into the channels on both the top section of the blade and the bottom section of the blade. Double check to make sure each slide hinge is lined up with the factory mark. Then, tighten the hex bolts on the top section first, then tighten the hex bolts on the bottom section. Using a 5/16-inch bit, drill a hole through the blade in each factory punched hole on the slide hinge. Turn a 3/8-inch by 1-inch self-threading bolt into each drilled down hole and tighten. Step 5. At the tongue-n-groove joint, drill a 5/16-inch pilot hole at the factory mark in the v-groove at each end of the blade. For a 96-inch wide blade, there will be an extra hole drilled, and bolt installed per side. See step number 6 in your owner's manual. Turn a 3/8-inch by 1-inch self-threading bolt into each pilot hole and tighten. Using a torque wrench, tighten all six bolts in each slide hinge to 31 foot pounds. Step 6. At the bottom of the blade, double check that the rubber edge is centered. Then using a 3/16-inch bit, drill a pilot hole at each of the four factory marks in the v-groove. Be sure to only drill through the first layer of aluminum and into the rubber. Using a number 3 Philips bit, run a self-drilling screw into each of the four pilot holes. This prevents the rubber-cutting edge from moving. Step 7. Now, hang the blade on the push frame in the transport position and insert the keyhole pins. Insert two square nuts into the top channel. With a hex nut turned onto the stud of the blade marker, align the blade marker with the hole on the lift handle and bolt the marker and handle to the blade using one of the square nuts in the channel. Turn a 3/8-inch by 3/4-inch bolt into the other hole on the handle and thread it into the second nut that was slid into the channel. With the handle flushed with the blade edge, tighten both bolts connecting the lift handle to the blade. Repeat at the other end. Step 8. Attach the rubber box end to the blade using the metal cap plate and four 3/8-inch by 2 1/2-inch self-threading bolts. Tighten these bolts until the rubber end begins to compress to the blade. Insert a fifth bolt to tighten the bottom of the rubber end to the bottom of the metal cap plate. Secure this bolt with a flat washer and lock nut, tighten all bolts equally, and repeat at the other end. The installation of the plow is now complete, and your plow is ready for the winter season. (upbeat rock music).
Average Customer Rating: 4.8 out of 5 stars (157 Customer Reviews)
84 x 18 Heavy-duty plow with thick rubber cutting edge self-adjusts up and down to smoothly clear a path over concrete, gravel, and grass. Side scoops catch more snow with each push. Aluminum blade can be manually angled to either side. Easily attach a variety of accessories to the front of your vehicle with this fully welded, corrosion-resistant trailer hitch receiver. Perfect for winches, spare tire carriers and more.Shipping was fast and packaged good with no scratches.
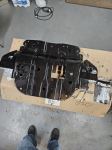
I modified my 2010 Tundra skid pan for oil filter changes before mounting.
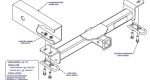
Replaced all 4 OEM tow ring bolts using anti-seize with new longer M12-1.25 X 40MM class 10.9 zinc finished hex cap screws along with new M12 X 24MM OD HARD WASHERS and torqued all 4 to 79 ft/lbs. Mounted new Thule EasyFold XT 2 Hitch Bike Rack and it fits in front without using the hitch extension.
All went together as planned and can now take E-Bikes with us while pulling our camper. We are happy campers!
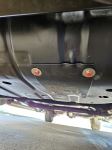
I bought and installed the front hitch to my 2014 Toyota Tundra because I did not want to use my travel trailer's rear bumper. The 2014 Toyota Tundra has a skid plate that has to be removed for oil changes and this front hitch installed would also have to be removed each time the oil is changed. I decided to cut a square hole in the skid plate allowing access to the oil filter so that the skid plate along with the front hitch would not have to be removed to get to the oil filter.
The skid plate has 5 bolts and 3 screws and drops down for oil changes. To completely remove the skid plate after removing the bolts and screws you have to hold the skid plate and move it to the drivers side to unhook two hooks which are "L" shape facing the same way towards the passengers side. Do not leave the skid plate off because too many hoses and lines will be exposed and can be damaged while driving.
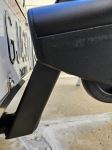
It took me less than 20 minutes to install the front hitch and I also bought a Hitch Extender for a 2" Trailer Hitch 7" which made the hitch come even with the front bumper on my 2014 Toyota Tundra.
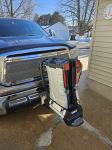
I bought several other accessories to go with the front hitch which I can use when needed. I did buy this hitch mainly to use to carry my 2 beach cruiser bikes and it works perfect.
Now all I have to do is insert the bike carrier into the receiver hitch and load the bikes and I am off with no worries about the bikes being in the rear of my travel trailer or trying to keep them steady in the bed of my Tundra.
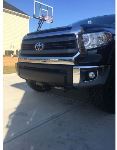
The bikes look really good in front of my Tundra and my driving view is not blocked at all with the bikes on. With the 7 inch extender the bikes are nowhere near the truck and with the Anti-rattle with lock on the 7" trailer hitch receiver there is no swaying while on the road or on the freeway at any speed. Thanks etrailer.

Mike F.
8/13/2015
Do you use any type of strap from the body of the bike rack back to the hood for stabilizing the bikes while on the road? I do not know where such a strap would be secured but I have seen some tuck them under the hood and close the hood on the end of the strap thereby securing the strap that runs from the rack under the hood lid. Does this question makes sense? Maybe such a support straps would not be required with this setup.My Tundra is a 2012 and I am assuming the skid plate is similar to yours. My bike rack looks to be much the same style as in your pics.Thanks.

Alex 8.
8/17/2015
Mike F.I dont think a strap for this type of bike rack would be needed. Even though I did use a rachet strap and made the connection from the tow hooks to the bike rack to keep it from bouncing at one time. Except for that one time I have never had to use a strap at all. Also use an Anti-Rattle Trailer Hitch Receiver Lock to keep the connection secure and tight. I make sure the bolts to the hitch and the hitch extender adapter are tighten to the fullest and the velcro straps that go around the bike tire rims are tight and secured. The hooks that go down on the bike frame are pushed down and then tighten. I have traveled throughout California with these bikes and never had a problem. Of course I always check the connections. I bought several bolts and washers for the hooks to tighten in case the bolts strips which has happened twice.Alex


Terry K.
1/29/2016
Alex- can you tell me what other parts extension, lock, etc you purchased from e-trailer for your application. I just received this unit from them. Also, how did you cut the hole for oil filter removal? Would a Dremel tool work for this? Thank you for any assistance you can provide..Thank you, Terry .
Alex1838
2/5/2016
Terry K. I also bought a Hitch Extender for a 2 Trailer Hitch 7 which made the hitch come even with the front bumper on my 2014 Toyota Tundra. I bought several other accessories to go with the front hitch which was the Anti-rattle with lock on the 7 trailer hitch receiver there is no swaying while on the road.For your question onhow did you cut the hole for oil filter removal? Would a Dremel tool work for this?I guess a dremel would work but what I used was a metal snip cutter. I bought one at home depot for about $9.00 and to start the cut I drilled a large hole at the corner of the square to be cut and then I just snipped along the square like a pair of scissors. I then filed the opening and on the square metal piece I also bought drilled several holes as I attached it to the skid plate.
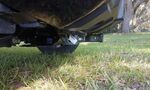
bought this for my 2011 tundra, I launch my boat (5500 lbs) at a private ramp where a front mount hitch is pretty much required due to the tight access. Anyway this mounts to the front frame between the factory tow hooks on the 07-12 tundras. Does not take any time at all to install it. It weighs 29 lbs according to my scale. . It does not hang down any lower than the TRD Package steel skid plate, so I liked that. It looks plenty strong for just about any towing/launching activity I can think of with my truck.
You may need a 6-8 inch hitch extension to mound your receiver. But I would rather have to use an extension then have the hitch. itself stick out any farther forward. You may have to remove it to do an oil change, not sure yet, either way, no big deal.

Pete
10/20/2013
David or anyone!Nice writeup and photo to help us in this purchase. Can you tell me if you had to remove the hitch to complete an oil change sir? It looks like you need to remove the hitch to get the skid plate off, but wasnt sure. Thanks,Pete

David E.
10/23/2013
This front reciever will need to be removed to do an oil change. The 2 toyota dealers that have worked on my tundra did not have a problem removing it. They did not charge me any more for an oil change.

Patrick B.
7/28/2014
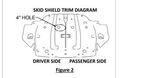
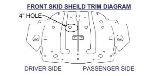
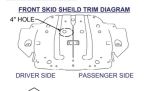
Remember that the hardware included with hitches is usually torque-to-yield, TTY. This means that the hardware is only meant to be torqued once. If removed, the hardware should be discarded and replaced. The instructions do specify a 4 inch hole to be cut that allows easy access for oil changes. Its at the top of the pages in an in-set diagram. Its an easier solution than removing each time and it doesnt significantly reduce the protection the shield provides.

Primarily bought the front receiver hitch to haul our 2 e-bikes. Did that because it was easier than hauling them inside our camper. And didn’t trust them bouncing around on the back bumper of the camper. Hauled the bikes that way on several camping trips. Easy as pie and I could keep an eye on them the whole trip.
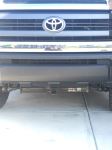
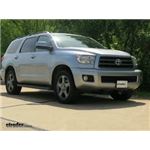
Fit perfectly with tow hooks on my 2016 Tundra. Had my mechanic install it and cut the hole in the skid plate. The receiver is shown with the Kuat Hi/Lo hitch extender and a bike rack.
We chose the Curt Front Mount Trailer Hitch Receiver so we could safely transport our RAD electric bikes while also pulling our travel trailer.
We had it professionally installed onto the front of our Toyota Tundra and it has worked out very well!
We are very pleased, and glad that we have it!
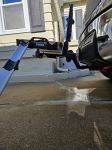
I got this receiver for the front of my 2010 Toyota Tundra pickup truck so that I could mount a Fishin Mate beach cart on the front of the truck when my travel trailer is hooked up to the rear receiver. The Curt front receiver is all I hoped it would be. I have used it for a year now, having made one trip from my home in Virginia to Cape Cod, and another trip to Florida. For a two months stay in Florida, I used the cart on the front or rear receiver several times a week. The Curt front receiver is of the highest quality. It was simple to install. You take two bolts each out of each of the two front tow hooks mounted on the front of the frame, hold up the receiver to line up with the holes in the frame, hold up the tow hooks back to their position one at a time, and reinsert the original bolts. (Simply put, the receiver is inserted between the tow hooks and frame.). The first time I installed it, it did only take the twenty minutes or so that people say it does. I have chosen to not cut a hole in my skid plate under the engine, so when I change the crankcase oil and filter I have to remove the Curt receiver and skid plate every time. It takes some time, but I'm okay with that. It's that easy. I am 72 years old, and don't have the strength I used to have, so I can't manhandle the receiver and skid plate, but instead balance them on the cradle of a floor jack and finesse them into place. I've got the knack of it, and it goes well. I did not get a riser bar to elevate the cargo from the height of the receiver, so my cart carrier goes straight out the front. It is close to the road, but not so close as to have ever scraped going in and out of gas stations. I remain aware of it and am careful. The Curt receiver has traveled thousands of miles over a year now, has been off and back on twice for oil changes, has remained new looking, and has met all my expectations. E-Trailer, as always, remains the best internet shopping business I have ever dealt with.
The receiver was easy to install on my 2017 Tundra. I used a 4” hole saw to cut a hole to provide access to the oil filter. I carefully measured for the location of the hole as the drawing provided appeared to place the hole on the passenger side of the truck although the actual location is the driver’s side. Also, the instructions called for “return the tow hooks to the customer” for 2017 models, but I installed them just fine. That must have referred to a different Toyota model.
Purchased and installed a Curt front hitch in 2016 for my 2011 Tundra. The installation was very easy. I tow a travel trailer and use the front hitch for a bike rack.
Installation was easy, even for one person (and the help of a lift). The hardest part was removing the skid plate from the Tundra. Couldn't be happier.
Matt L.

5/4/2019
It’s been perfect. Modifying the skid plate so it doesn’t have to be removed for oil changes was the best idea. The hitch makes hauling an extra cooler and fishing rods so much more convenient.
Installing was a breeze. I used a floor jack to hold out up while screw the bolts in. Done in 15mins. Looking at other pictures I see, it looks like it was fairly low to the ground but in reality, it's not as low as the pictures make it look. I have no use for it now but future plan is front tray and maybe a plow. The finish is very nice. I cut a removable filter access in my skid plate instead of leaving a big gapping hole. It's a very nice hitch to have.
This is my second purchase of this product. etrailer shipment was fast and delivered ahead of scheduled. Easy fit and installation. I did modify OEM engine plate for future engine oil service.
Great for moving airplanes with my truck! It's harder to do than a maneuverable tug that's designed for this task, but I CAN do it. I have a Cessna 310 which I can't push myself without help. Anyone with a heavy airplane should get one of these.
Fitment is perfect. Installation is really quick (10 minutes) and easy on my 2007 Toyota Tundra. It helps to have friend hold it in place when running the bolts in.
Simply the best way to maneuver your trailer into tight places you can see everything. Because it’s on the front end of your truck excellent product excellent quality thank you E trailer.

Bruce
4/16/2020
Works great just like advertised and it’s made in the USA !!!!
The only thing I had to do was make the tubes
Longer for longer rods
I use this hitch to tow my motorcycle carrier and motorcycle. I've gone over ten thousand miles with the bike on the hitch without a problem. It's a great easy to install product.
If you can use a ratchet, it is a very easy install.
The hitch is great and was easy to install. My problem came when I went for an oil change.
The mechanic said he would have to remove the hitch to then remove the skid plate so he could get to the oil filter and plug.
I have not reinstalled it since then. I’ve been researching a work around like cutting a little door or hole into the skid plate to facilitate future oil changes.
Still trying to figure it out.
If you buy this hitch, keep this in mind.

Jenny N.
1/27/2023
I do know that you would want to enlarge the hole in the front skid shield to allow access to be able to change the oil filter. Were you able to take this step when installing the hitch?
Ty
1/27/2023
Not yet. Was going to ask the advice of my mechanic the next time I get the oil changed.
Had my mechanic install, they had to cut a hole in my Tundra front skid plate so we could have continuous access to the oil filter. Can't remove the skid plate without removing the front hitch. Needed to get an 8 inch hitch extender to attach our Kuat bike rack. Used it several times and everything works well. Thanks, Chris.....
Untested, thus 4 stars for the product. Fitment was perfect, although 20-45 min install goal is a bit lofty for an older truck that has been off-road and has some rust. New rig-easily achievable time windows.
etrailer gets 5 though. I liked that the shipping cost that is associated with the free shipping was applied to my expedited shipping. Shipped very quickly.
Hitch feels like good quality. When I bolted it up. Holes lined up perfectly. I'll be putting the 500 lb vertical load to the test soon. Will give a update. Thanks for the great service.
This process was quick and easy. Installing took only 15 minutes on my 2012 Toyota Tundra. The fit was exactly what I wanted.
The item arrived quickly after ordering. It was wrapped nicely and the product was well painted. It fit great and will make your front towing much easier.
Fit to vehicle without problem, Fast and easy installation, Good service, Fast Shipping . We will buy again from this vendor.
Snowsport PlowEtrailer.com does it right from start to finish. On top of having a great web site, the staff are the best.
Keeping in mind, I ordered this in December, about 5 days before our first big snow, here in Ohio. Within an hour of ordering my SnowSport HD plow, I was upgraded to special priority shipping, that was a nice surprise! The plow arrived in about two days, in three boxes, as I ordered the front hitch at the same time. I feel bad for my UPS carrier, these boxes were not for the faint of heart. The assembly went smoothly, the manufacturer uses high end parts and everything is well marked and the instructions are easy to follow. I estimate it took me two hours to get everything put together, with a coffee break in between. I am impressed with the construction, wow. Heavy duty is right!
We had four inches of snow yesterday. I opened the garage door and went to work, two pushes to clear the parking spots, and one easy push down the two hundred foot gravel driveway. Like butter.
I was done. It took less then 15 minutes. I put this blade on my 2003 rear wheel drive, not 4x4, Chevy Blazer. I backed into the garage and it looked like I had just put the blade on, this blade could last a long time. I love it. I cant wait until we get a foot or more of snow, my wife wants to plow next time. Plus I have cable chains comming from Etrailer, they should be here any day. Just in case my two wheel drive has tracktion problems in the deeper snow. Thanks a bunch, Etrailer!
Ask the Experts about this Snow Plow
Do you have a question about this Snow Plow?


Info for these parts were:
At etrailer.com we provide the best information available about the products we sell. We take the quality of our information seriously so that you can get the right part the first time. Let us know if anything is missing or if you have any questions.


Katrina D.
2/2/2024
Thats so great to hear! Give us some updates on your next trip!