
Tekonsha Prodigy P2 Trailer Brake Controller - 1 to 4 Axles - Proportional
Tekonsha Plug-In Wiring Adapter for Electric Brake Controllers
Part Numbers: 90885,22292
Retail:$393.25
Our Price: $165.09
You Save: $228.16
In Stock
Thank you! Your comment has been submitted successfully. You should be able to view your question/comment here within a few days.
Error submitting comment. Please try again momentarily.


Tekonsha Prodigy P2 Trailer Brake Controller - 1 to 4 Axles - Proportional
part number: 90885
This proportional brake controller keeps it simple with intuitive controls that are easy to use. Includes a large, digital LED display, 3 boost levels, battery protection, and continuous diagnostics.
Features:
- Brake controller activates trailer brakes in proportion to your vehicle's braking action
- Automatically adjusts trailer's braking based on deceleration of tow vehicle
- Simple controls make it easy to operate the controller
- Gain setting lets you adjust the amount of power sent to the trailer's brakes
- 3 Boost levels let you adjust initial braking power and aggressiveness
- Built-in, rotary-style manual override lever is within easy reach for controlling trailer sway or stopping in emergencies
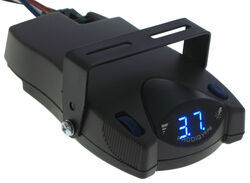
- Auto-dimming, blue LED display is easy to read
- Automatically adjusts screen brightness based on the current lighting conditions
- Built-in safeguards protect your vehicle, trailer, and the controller
- Runs continuous diagnostic checks to alert you to any potential problems
- Minimizes drain on car battery by drawing only 3.6 milliamps when not in use
- Prevents trailer brakes from overheating by reducing power output to them during prolonged stops
- Defends brake controller and trailer breakaway systems against shorts
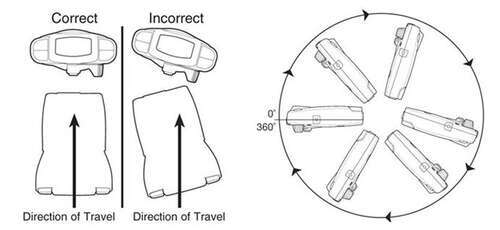
- Automatic leveling lets you mount at any angle up and down for an easy installation
- Controller must be parallel with direction of travel and horizontally level
- Mounting bracket and hardware included
- Included harness hardwires to vehicle and plugs into controller
- Plug-in, vehicle-specific brake-control adapter available for select vehicles to reduce installation time
- Quick-disconnect feature lets you easily remove and store the controller when you don't need it
- Replacement wiring harness (sold separately) and replacement bracket (7686 - sold separately) required to swap controller between vehicles
Specs:
- Application: trailers with up to 4 axles (8 brake assemblies)
- Compatible with electric or electric-over-hydraulic trailer brakes
- Dimensions: 5-1/8" long x 3-1/8" wide x 2" tall
- Length of hardwire pigtail: 30"
- Mounting: 360 degrees vertically
- Limited lifetime warranty
Gain Power Adjustment
You can adjust the gain (also known as output) with the thumbwheel on the front of the controller. Gain lets you set the maximum amount of power that will be applied to your trailer's brakes. A heavier trailer will need more power to achieve smooth, safe braking, while a lighter trailer will need less. Typically, the gain is only readjusted when you experience changing road conditions or if the weight of your trailer changes.
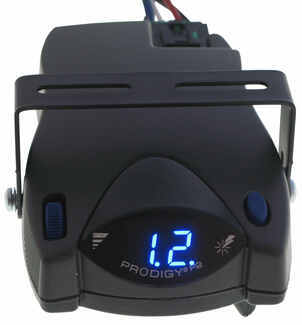
Power Boost for Heavy-Duty Towing
The boost setting controls the aggressiveness of your trailer's braking, meaning how quickly the brakes reach the maximum braking level. You can adjust this when you're towing heavy loads and you need more umph to bring your trailer to a stop. Your tow vehicle doesn't need that much power to brake in time, but your heavy trailer does.
Depending on the level of boost, your trailer brakes can start at either 13 percent or 25 percent of the set gain. What this means is that, instead of starting at 0, the brakes will start at 25 percent and get to100 percent sooner. This keeps the trailer from pushing your tow vehicle forward.
If your trailer weighs less than your tow vehicle, no boost is needed. But, if you want your trailer to lead the braking, you can select level B1.
Boost Levels:
| Approximate Gross Trailer Weight | Boost Level | Increase in Initial Power Output |
|---|---|---|
| Less than tow vehicle GVW | B1 | 13% |
| Equal to tow vehicle GVW | B1 or B2 | 13% or 25% |
| Up to 25% more than tow vehicle GVW | B2 or B3* | 25% |
| Up to 40% more than tow vehicle GVW | B3* | 25% |
*Both B2 and B3 offer a 25-percent boost in initial power. But the braking curve for B3 is more aggressive than that of B2. This means that, even though you will start out with the same intensity when using these boost levels, you will get an overall more aggressive braking experience with the higher level. So if you use B3, you will reach maximum braking sooner than if you use B2.
Safety Features
The Prodigy P2 offers key safety features to prevent damage to various components of your towing setup. Integrated reverse battery protection shields the brake controller and your trailer's breakaway system from shorts. When the P2 is not in use, it will be in power-saving mode. In this setting, it draws only 3.6 milliamps, minimizing drain on your vehicle's battery.
The P2 also comes equipped with a hold feature to prevent wear on your brakes. When you're waiting at a red light, you don't need your trailer brakes on at full power. The longer you sit there, the more they will overheat. But with the P2, any time your tow vehicle and trailer are at a standstill with the brakes applied for more than 5 seconds, the hold feature will kick on and reduce power to just 25 percent. This will keep your trailer in place while saving your brakes.
The P2 keeps the manual override within easy reach, great for stopping sway or controlling your trailer's momentum in emergencies. To engage the manual override, just twist the rotary-style lever from right to left. This will activate the trailer's brakes and brake lights without you having to apply the brakes on your tow vehicle, perfect for limiting trailer movement while you're cruising.
The Prodigy P2 also offers diagnostics such as:
- Open ground
- Overload
- Output short
- Power loss
- No trailer connection
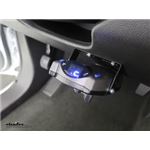
Automatic Leveling and Simple Installation
The self-leveling feature of the P2 ensures that the brake controller continues to function even as you drive up steep hills or through the mountains. Simply mount it in your cab at any vertical angle, and the controller will level itself automatically thanks to its 360-degree rotational range. This makes the installation that much easier. But keep in mind that the P2 must be horizontally level and parallel with the direction of travel to work correctly.
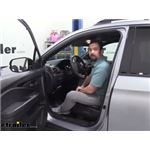
Installation is a snap. After mounting the P2 unit in your cab using the included bracket, hardwire one end of the included pigtail harness directly into your vehicle. The other end plugs into the brake controller. To remove the P2 for storage when you're not using it, just unplug the unit and slide it out of the bracket. With a replacement wiring harness (sold separately) and replacement bracket (P7685 - sold separately), you can even transfer the Prodigy P2 to another vehicle.
Installation Accessories
For even easier installation, a vehicle-specific specific wiring adapter is available for most newer trucks and SUVs. One end of the custom adapter plugs into your vehicle, and the other end plugs into the controller - no hardwiring required.
See also etrailer.com's exclusive 7- and 4-way brake-control installation kit (ETBC7 - sold separately) if you don't already have a 7-way plug at the back of your vehicle.
Note: If a custom brake control wiring adapter is not available for your vehicle, one of the following will be required:
20-Amp circuit breaker (9506P - sold separately) for 2- to 4-brake applications
30-Amp circuit breaker (38630 - sold separately) for 6- to 8-brake applications
Proportional Braking

The Tekonsha Prodigy P2 brake controller comes equipped with proportional braking to give you the best towing experience. Proportional braking means that your trailer brakes mimic your tow vehicle's brakes. If you slam on the brakes in your vehicle, your trailer brakes will activate with the same intensity; if you brake lightly, your trailer brakes lightly too. The trailer's braking is in proportion to your vehicle's braking. This saves wear and tear on the tires and the brakes on both your vehicle and trailer.
The Prodigy P2 uses an internal inertia sensor to detect how your vehicle is braking so it can send the right amount of braking power to your trailer. It measures the inertia of your tow vehicle and activates the trailer's brakes to slow at the same rate. The result is uniform braking across your towing setup. No push-pull action - just smooth, proportional braking every time.
90885 Tekonsha Prodigy P-2 Proportional Brake Controller - 1 to 4 Axles
Replaces Tekonsha 90185
California residents: click here
Tekonsha Plug-In Wiring Adapter for Electric Brake Controllers
part number: 22292
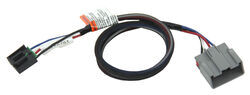
Install your electric brake controller quickly and easily with this custom wiring adapter. Simply plug one end of the adapter into your brake controller and then plug the other end into the built-in harness beneath your vehicle's dash.
Features:
- Wiring adapter eases installation of your electric brake controller
- Custom connector end plugs into the built-in port beneath the dash of your vehicle
- Other end plugs into the back of your electric brake controller
- Compatible time-delayed brake controllers: Draw-Tite Activator I (5100), Draw-Tite Activator II (5500), Draw-Tite Activator III (5520) and Tekonsha PowerTrac (39523)
- Compatible proportional brake controllers: Tekonsha Prodigy (90185), Tekonsha P2 (90885), Tekonsha P3 (90195), Tekonsha Primus IQ (TK90160) and Tekonsha Voyager (39510)
- Pigtail length: 29-1/4" without plugs
- Limited 1-year warranty
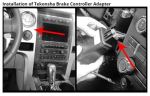
Installation of Tekonsha Brake Controller Adapter
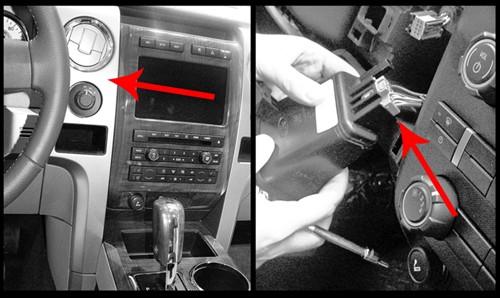
This adapter plugs into the built-in connector beneath your vehicle's dashboard. To access this connector, first locate the instrument cluster finish panel in the center of you dash, near the driver's side. Carefully pry the panel out and undo the locking tabs to remove the panel. Plug the adaptor into the mating connector in the large gray housing behind the panel.
To install your electric brake controller you need to connect the wiring of the controller to your vehicle. Certain manufacturers offer pre-wired options, typically known as tow packages, wherein these wires are run for you from the dash to the trailer connector on the back of your vehicle. Often, a brake controller wiring harness is included with your tow package. This harness plugs into a port beneath your dash and connects to the four wires of the brake controller. If, however, you have a brake controller with a plug in place of the four loose wires, you can use the Tekonsha adapter.
This adapter requires no hardwiring. It is designed to plug directly into your electric brake controller for the simplest installation possible. Because there are no wires to connect, installation is not permanent. You can unplug and remove your brake controller at any time and securely stow it away.
303600 Tekonsha Brake Control Wiring Adapter with 2 Plugs
Replaces Tow Ready 20272
Replaces 3036-P
California residents: click here
Customer Satisfaction Score:
97% were satisfied with this product
3% of customers were not satisfied
- Wrong item was ordered
- Product did not meet expectations
- Did not arrive in time
Customer Reviews
Tekonsha Prodigy P2 Trailer Brake Controller - 1 to 4 Axles - Proportional - 90885
Tekonsha Plug-In Wiring Adapter for Electric Brake Controllers - 22292
Average Customer Rating: 4.9 out of 5 stars (3471 Customer Reviews)
This proportional brake controller keeps it simple with intuitive controls that are easy to use. Includes a large, digital LED display, 3 boost levels, battery protection, and continuous diagnostics. Install your electric brake controller quickly and easily with this custom wiring adapter. Simply plug one end of the adapter into your brake controller and then plug the other end into the built-in harness beneath your vehicle's dash.by: Shaun03/17/2024
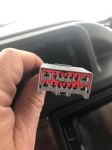
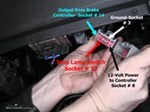
I purchased the brake controller and wiring harness from you all and installed it watching the video on your website. I followed the instructions to an absolute T. Got everything ready and tested the product and got an SH error code for the blue brake wire shorting out. I pinned and measured resistance and everything was coming back fine (4+ ohms resistance). I then hooked a power prope to it to find the short along the frame and nothing. I had power from the female connector all the way up to the brake controller. After 4 hours of troubleshooting, I found that the female trailer connector was shorted internally. See the attached picture. The blue and green ring terminals inside of the female trailer connector were touching. Replaced the trailer connector and now all is well.


by: Albert 01/05/2023
I had a Prodigy P2 controller in my last pickup and was really pleased with it. So wanted to install the same thing in my newer truck Everything worked smoothly on installation. Made the necessary adjustments to controls after hooking to the trailer and it works great!
by: Wayne04/06/2024
Install with pigtail for my F150 was easy. Unfortunately, when I hook up my trailer the controller does not recognize a trailer with electric brakes is attached. Very disappointed.
by: Tom09/23/2020
2014 Ford F-150
This is my third truck using my prodigy brake controller with the plug in adapter. As in the past the wiring is heavy gauge to match vehicle & installed with ease. I used the prodigy mount bracket to take up space & slid it in factory controller slot. I can unplug it when not in use if I want & interior looks stock. I make a slot in back of dash compartment to feed adapter wire through for easy plug in & out. Product was revived quickly & ordering on etrailer site was a breeze. Would definitely recommend this plug & play adapter


Tom

9/24/2021
Still working out great. Just to add to previous review I just wanted to add that another plus to the harness is that there is plenty of wire to reach factory plug.
by: Philip03/04/2016
This is the second one I purchased. The first was 10 years ago and installed in my 06 GMC. It has worked flawlessly allowing for safe and smooth stops from normal braking to a few of the panic stops that had to made over the years. The new owner of the truck likes the way it works too. I have multiple trailers and with one initial setup on the lightest trailer was able to tow all of them without changing anything but the boost setting to compensate for the different trailer weights.
When needing for a controller for my 07 Silverado there was no other unit that would fill the bill. This P2 looks the same except for the blue display instead of the red. The install took 20 minutes using the direct fit cable ordered with the controller. Setup was easy as with the first unit. I wanted the placement above the parking brake pedal so the OBD II connecter had to be moved. I did the same with the 06 GMC. It is a comfortable place to reach and it keeps the light away from the passenger's eyes at night.
As good as the Tekonsha controller is it is even a sweeter deal buying it from etrailer. The quick shipping, excellent pricing and knowledgeable staff are second to none in customer service.


by: Jim10/30/2015
Installed this in my 2015 Jeep Wrangler Unlimited Sport. I thought that I would add some input on installation that would help others.
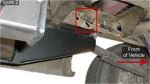
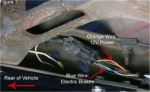
I found a way to route the power distribution wires in the frame of the Jeep that did not require the use of a fish tape. If you look at the frame just behind the rear tire you will see a hole in the face of the frame. Start pushing the wire bundle foreword. It will rise up and over the U shaped frame portion of the rear axle and then down along the passenger compartment area. About there, you will be running out of pushing stiffness. Look for the wire bundle to appear at a similar hole in the frame in that area. Grab it a and pull out approximately 4 feet and then push it right back in the same hole going foreword. This time you will look for the wire bundle to appear at again a similar hole just foreword of the driver compartment. Now is the time to grab it and start heading up to the engine compartment outside the frame. Do the same procedure for the wire going aft for the plug end of the installation. For the wires going through the firewall, Jeep has conveniently added a nice foam lined hole to route wires through. You will see this hole position in the attached photo with a green wire coming through. The plastic cover around the steering column pulls down from the top and hinges at the bottom. Remove the metal plate with two bolts to get to the brake switch. Twist and pull the brake switch out foreword and go for the brown stripped wire as your brake circuit. Do order the LONG frame bracket adapter for the switch plug at the rear. To drill the steel for the supplied plug bracket just takes too long. Now that you have it installed you will notice that the power will remain on the unit after you turn the key off. Don't sweat this as it will not stay on long. I doubt a few milliamps draw is going to kill your battery!


by: Larry L.04/29/2015
The online video showing the installation of the Prodigy P2 trailer brake control into a 2011 Ford Ranger was excellent! It made the installation into my Ranger simple and straight forth.
I have yet to hook up to my travel Trailer and adjust it for brake setting, but all readout displays thus far are as stated in the instructions.
Having previously installed the trailer connector, I did not purchase the installation kit and in retrospect for cost effective and simplicity would recommend anyone to purchase the kit along with the controller.
I believe I am going to be very pleased with this product.
Thank you


by: Duane03/14/2024
I have a Tekonsha controller on my 2001 Chevy Silverado and it worked like a charm for over 18 years.I'm sure that the new Prodigy P2 will do the same.


by: Brian 06/20/2024
Pigtail fit as described. Pretty idiot proof. Hardest part was getting access to the plug and running the wires to the controller. Installed in a 2023 Jayco Greyhawk 29MV. It works as described.
by: Marc 05/16/2024
Ford
Plugged right into my 2023 Ford E-350 RV. Mounted my Tekonsha by my right knee and have electric brakes now! No drama, no splicing, plenty of length.
by: Matt02/24/2014
very nice controller, very smooth and you don't have to mount it flat!! e trailer is the best company i ever worked with. they have pics, video, email support(exellent) and just flat out make it easy for you to do it yourself instead of paying some dirt bag $300 to install at your local trailer shop. i also installed kit #ETBC7 and once agian it was awesome. COMPLETE with DETAILED directions. i'm not a mechanic or hack employee at local trailer shop....BUT dealing with etrailer and there parts made my install very easy and CLEAN!!!


by: Carl05/15/2023
the controller has great reviews, I got it because my factory controller wasn't working well with the new camper that has electric/hydraulic brakes and I was experiencing a 5 second lag for the trailer brakes to come on. this controller works better with a 2 to 3 second lag, need to try a couple different combos on settings, have the boost at 3 (per recommendations) and gain at 2.5 and under hard braking it locks up the trailer tires. going to try boost on 2 and bump up the gain and see if that works better.
by: Brad 05/10/2024
Been one year of ownership now and this controller has performed very well. I would by again for sure.
by: Calvin03/14/2024
Great product! Since I pull my goose neck with electric brakes, with my semi truck tractor, it acts as a interface between the air brakes and the electric trailer brakes, and acts as a Johnson bar if I need to get the trailer back under control.
by: Greg08/30/2018
Great product, very easy install especially with the OEM harness. In about an hour had it installed and trailer set up with controller. Thanks,
Greg


by: Kevin P.03/16/2011
I didn’t have a good location that was reachable while driving so I mounted the controller on top of the dash. I leveled the bracket with a spacer and ran the harness by an access panel. I used about 70’ of the duplex wire due to running the cable to front and then back to the house batteries inside the coach.
The access panel made it easy to make the connections and run the wires through the firewall.
I mounted the 40 AMP and 30 AMP circuit breakers up front in the main fuse panel box. I drilled a hole through the box and firewall to run the wires from the brake controller to the breaker and to the blue wire for the tow connection at the back of the coach.
I ran the battery connections to my house batteries up front instead of using the engine batteries in the back.
I found the brake connection wire under the coach in front directly below the brake pedal.
I mounted the converter in a beam in the back with lots of zip ties


by: Eric07/09/2015
The adaptor seems to be well built. Works like it is supposed to.
Good price. Excellent customer service. Speedy processing.
I will definitely be purchasing future upgrades/products from etrailer.
Thank you for your good service and kind customer rep. Hard to find good experiences like this nowadays.
I've included a picture of a Tekonsha Voyager that I installed in the area the OEM TBC would be. Its sturdy. It works. Too easy.


Eric
7/18/2015
Just got back from a 1,100 mile trip. The Voyager TBC worked perfectly and the cable I ordered from etrailer.com was a perfect fit and performance.
by: Mai N.01/26/2012
Great Brake Controller This was my first time using a brake controller and installing one as well. The directions were easy to follow for both the install and setup.
2012 Ram


by: Garry in Indio06/25/2017
Used in conjunction with harness kit for my 2002 tundra, this year has no provisions for towing trailer with electric brakes.
The controler itself has proven itself nicely, with no issues with installation or use, adjust easily.
The mounting location I chose may have some slight interference issues with legs on taller people, but I have not had any @ 5'11". The truck is a midsized so room is more limited. I'm towing a tandem 14' trialer with 4 seat RZR, tracking and stopping is perfect, even under hard breaking.


by: David03/03/2024
The Tekonsha Prodigy P2 Brake Controller arrived on time and is just what I needed. The installation and operating instructions are easy to understand and should make installation a breeze. I'll give an update after I get it installed.
by: Douglas04/16/2024
Right now my rating is poor because the supplied pigtail for 2018 Ford F150 with tow package does not connect to my F150!
Supplied connector is a rectangle shape, the socket under the dash is a trapezoid and they do not connect together.
I will say though that Robert B is helping me out and I sure hope we can get this figured out quickly
by: Nick04/11/2016
Great Brake Controller, used it with the Universal Install Kit for Brake Controllers and No-Drill Mount Bracket, Short - 18140. It only took me 2.5hrs to have it fully installed in my Jeep Wrangler Unlimited 2013. Videos were great. Also having some 1/4in water tubing helped for phishing wire thru frame.
Wish I had watched the video a couple of times before buying and also purchased the extra wire to go from the battery to the brake controller, but had extra wire from another project that worked.
This brake controller works great as we tow a <3500lbs Travel Trailer with our Jeep.
Comes with a great card that helps with settings, keep it in the glove box for future reference.


by: Steve12/28/2018
2015 Ford F-150
Worked great. Very easy to install.
I cut a hole in the back of the dash cubby hole to the right of the steering wheel for the wires to pass through and used adhesive velcro to mount the brake controller in the cubby. The brake controller is held with velcro on the bottom and the sides and does not vibrate or move at all.
Very easy install and the only hole I drilled was in the back of the cubby hole and the brake controller is very easy to reach for braking and adjusting.
I wanted to slide the controller further back in the cubby, but the velcro started sticking early and I left it. It could probably slide back another 1/2" to 3/4". Not much, but would be nicer. I may pull it out in the future to get it seated further back, but the velcro is really strong so I don't want to mess with it right now.


by: David W02/16/2019
I recently bought a 2018 Chevy Silverado LTZ. It was equipped with a towing package but no brake controller. Not wanting to alter the interior of the truck too much, I called etrailer for advice. Robert S was very helpful. He suggested the Tekonsha Prodigy P2 brake controller and jumper wire that I was able to hide neatly under the dash using an existing screw. I have been very pleased with etrailer and their suggested product.


by: Mike 02/02/2023
ez hook up and install ez setting of co ntroller
25
3524
Show More Reviews Ask the Experts about this Trailer Brake Controller
Do you have a question about this Trailer Brake Controller?
- Which is Better the P3 or P2 Prodigy Brake Controller
- The P3 brake controller part # 90195 is functionally the same brake controller as the P2 part # 90885 but comes with more features and a better display screen setup. So if you prefer a simpler screen setup that has a couple letters and dots to indicate connection, status, and error codes the P2 is the way to go. But if you prefer a full display that uses full words and offers ability to save various trailer presets the P3 is the better choice.
view full answer... - Which Install Harness For P2 Brake Controller for 2023 Nissan Frontier
- Hey John, yes the Tekonsha brake controller install harness part # 3050-P is correct for your 2023 Nissan Frontier and would be what you would need to install the Prodigy P2 part # 90885. This harness has one end that was designed to fit your truck and the other end for a Tekonsha brake controller like the P2.
view full answer... - Which Diode Tow Bar Lighting Kit for 2022 Jeep Cherokee Trailhawk
- You do not need to remove a trailer brake controller from a vehicle like your motorhome when flat towing a vehicle. The brake output circuit of the brake controller won't affect anything so it can be left as-is. The braking systems for towed vehicles do not go through the traditional trailer wiring like for example the Demco SBS DUO part # SM99251 which uses the brake light signal of the towed vehicle to engage it and then it's own inertia sensor to determine how hard it applies brake pedal
view full answer... - Parts Needed to Install Redarc Tow Pro Elite Brake Controller in 2003 R-Vision Condor Motorhome
- It definitely is the case that any vehicle can have a brake controller installed in it. They are pretty universal in how they install but some vehicles have pre-wiring which makes it a bit easier to install them. So to install a brake controller like the Redarc Tow Pro Elite part # RED44FR you would need to first have a 4-way harness installed like the # 119190KIT. Then you would need to convert it to a 7-way with the kit part # ETBC7 which comes with the wiring needed to wire in the brake
view full answer... - Parts Needed to Install Tekonsha Brake Controller in 2019 Entegra Odyssey E-450
- For your 2019 Entegra Odyssey E-450 motorhome the correct install harness for a Tekonsha brake controller like the Primus IQ (we don't have it currently) or the P2 part # 90885 is the part # 22292.
view full answer... - Can Prodigy P2 Brake Controller Install in 2015 Audi Q5
- Yes you can install a Prodigy P2 part # 90885 in your 2015 Audi Q5 that currently does not have any trailer wiring. For that you would need to start with a 4-way like the part # C56404 which installs easily and does not require hardwiring to the vehicle. Next you'd just need the part # ETBC7 which comes with everything needed to convert the 4-way to a 7-way and wire in a brake controller.
view full answer... - Brake Controller Recommendation for a 2016 Honda HR-V
- For a brake controller I would recommend the Prodigy P2 Brake Controller part # 90885. This is our best selling brake controller because of how well it works and how easy it is to setup. This is a proportional brake controller that senses the amount of braking the tow vehicle is applying and applies a proportionate amount to the trailer brakes.
You will need to start with a 4-way (if you do not have one). For that you would want the # C56284.
From there you would need to convert the
view full answer... - Parts Needed to Install Tekonsha P2 Trailer Brake Controller on a 2000 Ford Ranger
- The 2000 Ford Ranger does not have a plug or wire bundle under the dash to install a brake controller. You will need to hardwire in the controller. To do this you will need to first add a 4-Way trailer wiring harness, # 118344, unless you already have one. Then you would need a 4 and 7-Way installation kit # ETBC7.
I have included some links that explain and show the installation of the ETBC7 kit. The video is on a 2002 Ford Ranger and it will be very similar on your truck.
view full answer... - Which Tekonsha Prodigy Brake Controller for 2011 Toyota Tacoma with Factory Tow Package
- There aren't going to be any real functional differences between the Prodigy P2 # 90885 and the Prodigy P3 # 90195; both provide proportional braking and both have a 3 axis accelerometer so that they can be mounted in a 360 range vertically and still sense the braking in your truck. The Prodigy P3 has a nicer LCD display and it's a bit easier to cycle through the different settings and functions, so I do recommend going with the P3 # 90195. If you're looking for an entry level, no frills
view full answer... - How Does Brake Controller Install in 2022 Ford F-650
- I did some digging and I cannot find any info on if there is a brake controller port under the dash of your truck. Doesn't mean there isn't one but I can't find any info on it or any other year F-650 as well. I'd be inclined to hardwire a controller or maybe check with a dealer although I know they aren't super reliable.
We can help with a brake controller though like with the P2 part # 90885 you referenced. Since you have a 7-way you would want the Wiring Kit for 2 and 4 Brake Electric
view full answer... - Which Brake Controller Install Harness Fits 1994 Ford F-350 for Tekonsha Prodigy P2
- The reason you are having issues installing the Tekonsha Prodigy part # 90885 is because the correct install harness you need for your truck is the part # 3035-P and not the 3036. If you replace the install harness the brake controller will function again.
view full answer... - Parts Needed To Install Redarc Tow-Pro Brake Controller In a 2019 GMC Canyon
- There is not an adapter made for your 2019 GMC Canyon as it does not have a factory connector but instead uses wires that are already terminated in the drivers kick panel. I have linked an installation video for a Tekonsha P2 Brake Controller # 90885 on a 2018 Colorado below that will help you find the wiring.
The Redarc Tow-Pro Liberty Brake Controller # RED52VR will include the universal harness needed to install the brake controller. This controller is proportional and works with
view full answer... - Parts Needed to Add 7-Way to 2002 Toyota Tundra With 4-Way
- There isn't a plug-in 7-way for your 2002 Toyota Tundra but since you already have a 4-way you can add a 7-way by using the following:
- Universal Installation Kit for Trailer Brake Controller # ETBC7
You'll plug your 4-way into the 7-way that comes with the # ETBC7, which also gives you the wiring, circuit breakers, and rest of the hardware needed for installation of a brake controller like the Prodigy P2 # 90885.
I have added a link below to a help article which details the install
view full answer... - Brake Controller Recommendation for 2022 Ford Ranger without Tow Package
- We have great options for your 2022 Ford Ranger like the Prodigy P2 part # 90885 but what triggers the brake controller to start slowing down the trailer is the brake light circuit of the vehicle. So if the adaptive speed control does not activate the brake lights the controller won't activate and work to slow the trailer down as well. This most likely wouldn't be a huge deal though as the reduction of throttle is still going to slow the truck and trailer down about the same. Your owners
view full answer... - 7-Way Wiring Harness and Brake Controller for a 2017 Subaru Outback Wagon
- To add a 7-way wiring harness to your 2017 Subaru Outback Wagon you will need two separate wiring harnesses. The first is the Tekonsha T-One Vehicle Wiring Harness with 4-Pole Flat Trailer Connector item # 118467. This custom-fit T-One connector plugs into your Subaru's wiring harness, which is located in your rear cargo area. If you already have a 4-way connector skip this part. The second harness you will need is the Universal Installation Kit for Trailer Brake Controller - 7-Way RV and
view full answer... - Brake Controller and 7-way Trailer Connector Installation on 2017 Chevy Traverse
- According to my research, all 2017 Chevy Traverse models are prewired for a brake controller. If you were wanting to go with the Tekonsha Prodigy P2, part # 90885 (great choice), you'll need the # 3026-P brake controller wiring harness. If your Traverse isn't equipped with the factory 7-way trailer connector at the rear bumper, you can easily add one using the # 118271 wiring harness, which also includes the fuses and relays necessary to activate the tow package wiring. The wiring harness
view full answer... - Parts Needed to Install Brake Controller and 7-Way 2023 Hyundai Palisade
- If you are missing the tow package to install a brake controller would be more involved on your 23 Palisade.
You can still use the P2 and the install harness that plugs in under dash but you'd need to also install a 4-way part # C43FV and convert to 7-way with # ETBC7. In the owners manual of your Palisade will have the connections and fuses that need to be installed.
For a hitch the etrailer # e95ZR would be a really great option that is mostly hidden and has great towing capacities.
view full answer... - Brake Controller and Install Recommendation for a 2015 Mercedes Benz Sprinter and 2005 Honda Pilot
- Since you have a 7-Way in your 2015 Mercedes Sprinter you will only need a few more components to complete a brake controller install on your vehicle.
First let's start with a brake controller. I would recommend the Prodigy P2 Brake Controller part # 90885. This is our best selling brake controller because of how well it works and how easy it is to setup.
Next, for a wiring kit to install the brake controller and the 7-way adapter you would want the Wiring Kit for 2 and 4 Brake Electric
view full answer... - 7-Way and Brake Controller Installation on 2018 Jeep Grand Cherokee without Factory Wiring
- On your 2018 Grand Cherokee without factory wiring you can install a 7-way setup and re-install your Prodigy brake controller, the P2 # 90885 or the P3 # 90195, using just two kits. You'll start with 4-pole kit # 118727 and then simply add # ETBC7 to complete the wiring and controller install.
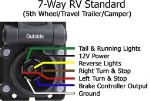
I linked two videos to show you the whole process for installing each kit as well as a photo of a 7-way to show how the various circuits are arranged. Wire colors can vary between different vehicle
view full answer... - Can Prodigy P2 Brake Controller Install in 2014 Ford F-150 with 7-Way without Requiring Hardwiring
- Hey Bill, yes you can install the Prodigy P2 brake controller part # 90885 in your 2014 Ford F-150 with a factory 7-way without requiring any hardwiring. For that all you need is the part # 22292 which plugs into the truck in a port under the dash.
view full answer... - Recommended Brake Controller Wiring for 2018 Ford Expedition
- At this time the Tekonsha Prodigy P3 # 90195 does not have a custom wiring harness, so you would need to hardwire a connection using Wiring Kit # 5506 if you have the factory 7-way or # ETBC7 if you have the factory 4-way. If you need a replacement pigtail for wiring, you can use # 7894.
The only confirmed fit brake controller that requires no further wiring is the Tekonsha Prodigy RF Wireless Controller # TK94FR. This controller does not utilize the brake output pin on a 7-way but
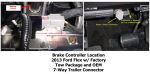
view full answer... - Where is the Brake Controller Port on a 2015 Ford Flex
- According to my research, the brake controller port on your 2015 Ford Flex should be located under the dash directly below the steering column as shown in the attached photo. Please note there is a dummy plug on the end of the port that you will need to remove in order to install the Tekonsha Plug-In Wiring Adapter for Electric Brake Controllers part # 22292 which is correct if you have a Tekonsha brake controller.
view full answer... - Parts Needed to Install a Brake Controller on a 2012 Ford F-150
- If you have a factory 7-way all you will need to install a Tekonsha brake controller would be a Tow Ready Plug-In Wiring Adapter # 22292 that you referenced.
If you have a 4-way you will also need a Tow Package Vehicle Wiring Harness # 118247. This product comes with all the fuses and relays that you would need to activate the 7-way also.
The truck computer should not have to be updated either for one of our controllers to work on your vehicle.
If you are looking for a brake controller
view full answer... - Correct Brake Controller Harness for a 2022 Ford E-Series Cutaway Chassis
- The correct brake controller adapter harness for a 2022 Ford E-Series Cutaway Chassis is the Tekonsha Plug-In Wiring Adapter for Electric Brake Controllers part # 22292 which allows you to install a trailer brake controller like the Tekonsha Prodigy P3 Trailer Brake Controller part # 90195. The plug location should be behind the coin tray inside the dash.
view full answer... - Are Brake Controller Wiring Harnesses 22292 and 3036-P the Same for a 2010 Ford F-150
- Yes, brake controller wiring harness # 22292 and 3036-P are the same wiring harness. No matter which number it has on it the harness will fit the following vehicles:
2009 - 2016 Ford F-150 with factory 4-Flat or 7-Way
2012 - 2016 Ford Flex with factory 7-Way
2012 - 2016 Lincoln MKT with factory 7-Way
2015 - 2015 Lincoln Navigator with factory 4-Flat or 7-Way
For a brake controller I recommend the P2 # 90885 because it is easy to set up, easy to use, and it is reliable. I have linked
view full answer... - Brake Controller Wiring Adapter Location on 2017 Ford F-150
- If you take a look at the accompanying photo you can see exactly where the location is on a 2017 Ford F-150 to plug in the Plug-In Wiring Adapter for Electric Brake Controllers # 22292; additionally I have added a link to a video which shows not only where the location is, but how to find the plug-in port. The plug will be on the right-hand side behind the console.
Adapter # 22292 is the correct one for a '17 F-150 and works with the following brake controllers:
- Prodigy P3 Trailer
view full answer... - Tekonsha Brake Controller Harness for 2018 E-450 Chassis Motorhome
- The Tekonsha Plug-In Wiring Adapter for Electric Brake Controllers - Ford # 3034-P is the correct fit for the harness you have on your 2018 Ford E-450 Chassis. This will work well for your motorhome.
The # 22292 is a fit for the F-series trucks but not the E-series van chassis.
view full answer... - Draw-Tite I-Command Brake Controller Installation on 2021 Ford F-150
- There are two possible solutions in order to complete the installation of the Draw-Tite I-Command Trailer Brake Controller. The brake light switch wire on the 2021 Ford F-150 is not be usable. The first is to use the Tekonsha Plug-In Wiring Adapter for Electric Brake Controllers # 22292. This plugs into the built in harness beneath the dash.
If for some reason you do not have this port, the only other option is to use the Roadmaster Universal Stop Light Switch Kit # RM-751000. This will
view full answer... - Parts Needed to Install Brake Controller on 2017 Ford F-150 with 4-Way
- To convert the 4-way to a 7-way on your 2017 Ford F-150 and install the brake controller would actually want the part # 37185 and the brake controller install harness part # 22292.
Follow the 4-way trailer connector wires from the trailer connector to the front of the vehicle. These wires connect to a factory plug along the frame rail, usually on the driver's side, between the back tires and the rear bumper. The factory plug should be mated to another connector which has wiring that
view full answer... - What Wiring Harness do I Need to Install the Tekonsha Prodigy P2 Brake Controller on My 2019 F-150?
- The appropriate parts you need to transfer the Tekonsha Prodigy P2 # 90885 to your 2019 Ford F-150 depend on if you have a factory 4-pole plug or a factory 7-way plug already installed. If you have a factory 4-way, you will need the following parts:
- Tekonsha Plug-In for Brake Controllers # 22292
- T-One Vehicle Wiring Harness with 7-Way Trailer Connector # 118283
If you have a 7-way installed, you will need only the following part:
- Tekonsha Plug-In for Brake Controllers
view full answer... - Does Computer have to be Flashed to Install Aftermarket Brake Controller on a 2016 Ford F-150
- We have installed brake controllers on 2016 Ford F-150s, see video link, and have not had any problems regarding having to flash the computer for it to work. For a brake controller I recommend the P3, # 90195 with wiring harness # 22292. The P3 offers easy to understand diagnostics, presets you can program if you tow different trailers, and a host of other options making it the most versatile brake controller available.
view full answer... - Factory Brake Controller Plug Location for 2018 Ford F-450 Chassis
- It looks like your 2018 Jayco Redhawk 29xk was built on a E-450 cab and chassis. The Tekonsha Plug-In Wiring Adapter item # 22292 will plug into a port behind the instrument cluster finish panel in the center of the dash on the driver's side. I have attached some pictures below that will help you find it. You will be looking for a grey connector that has to be unplugged to expose the factory plug you need.
If it's not located there then your chassis may be an older one and you would
view full answer... - Brake Controller Recommendation for 2017 Ford F-350
- For a brake controller I would recommend the Prodigy P2 Brake Controller part # 90885. This is our best selling brake controller because of how well it works and how easy it is to setup. This is a proportional brake controller that senses the amount of braking the tow vehicle is applying and applies a proportionate amount to the trailer brakes. This will be the last brake controller you buy. It can easily be transferred to future vehicles as well.
To install it in your 2017 Ford F-350
view full answer... - Recommended 2005 Ford F-150 Plug-In Wiring Adapter for Tekonsha Prodigy Brake Controllers
- The Tekonsha Tow Ready Plug-in Wiring Adapter # 22292 is designed for Ford F-150 models starting in 2009.
You will need the Tekonsha Plug-In Wiring Adapter # 3035-P for your truck. It is a confirmed fit for a 2005 F-150 with factory 7 way harness and the Prodigy P2/P3 electric brake controllers ( # 90885 / # 90195). This is a simple installation. One end plugs into the rear of the controller, the other end plugs into the connector under the dash above the brake pedal. I have attached
view full answer... - Correct Brake Controller Adapter Harness for a 2023 Ford Bronco
- Yes, the Tekonsha Plug-In Wiring Adapter for Electric Brake Controllers part # 22292 is compatible with a 2023 Ford Bronco and will allow you to install any Draw-Tite, Reese, or Tekonsha trailer brake controller like the Tekonsha BRAKE-EVN Trailer Brake Controller part # TK63VR which is what I recommend. The harness makes for a plug and play installation. The plug needed for this harness is located under the driver dash near the center console.
view full answer... - Is Wire Run to 7-Way When Installing Prodigy P3 Brake Controller on 2018 Ford F-150 With 4-Way
- When installing the Prodigy P3 Brake Controller # 90195 on your 2018 Ford F-150 with a factory 4-way, you will need to run the blue wire (brake control wire) to the 7-way on your 2018 Ford F-150.
However, since you have power to the fuse in position 24 you do not need to splice into the Plug-In Wiring Adapter for Electric Brake Controllers # 22292; you simply need to plug it in without any splicing needed and you're set.
view full answer... - Brake Controller Wire Harness Needed For A 2024 Jeep Grand Cherokee L With Tekonsha Brake Controller
- Hey Joan,
There isn't a Tekonsha custom-fit harness but there is a Curt harness # C51446 that you can cut the connector off of and butt connector # 224775 on a Tekonsha connector # 20127 so that you don't cut into your factory wiring. You'll just match the wires color for color and would be able to plug the gray connector into your brake controller port and the Tekonsha connector into the brake controller.
view full answer... - Swapping Tekonsha Prodigy Brake Controller Between 2004 GMC Sierra and 2010 Ford F150
- A brake controller isn't vehicle specific, but the wiring adapter used to connect the Prodigy brake controller to the vehicle is. Therefore, you'll need two different wiring adapters if you have two different trucks.
The 2004 GMC would use the # 3015-P adapter, and your 2010 Ford F150 would use the # 22292 wiring adapter. The plug that the # 22292 would plug into is located behind the dash pocket as shown in the video I've linked. You can use a circuit tester on the plug you found under
view full answer... - Which Brake Controller Adapter for Tekonsha Brake Controller on 2017 Ford F-150
- You're looking for the Tekonsha Brake Controller Adapter # 22292, which is the correct plug and play adapter for your 2017 Ford F-150 to install a Tekonsha brake controller.
view full answer...


Info for these parts were:

Expert Research:
Mike L

Expert Research:
Robert G

Expert Research:
Michael H

Expert Research:
Reno H

Expert Research:
Jameson C

Expert Research:
Adam R

Expert Research:
Jeffrey L

Video by:
Andrew K

Video by:
Kathleen M

Video by:
Zach D

Written by:
Lindsey S

Test Fit:
Nicholas E

Test Fit:
Randy B

Test Fit:
Shane H

Test Fit:
Conner L

Test Fit:
David F

Test Fit:
Adam E

Test Fit:
Bradley B

Video Edited:
Jacob T

Video Edited:
Dustin K

Video Edited:
Chris R

Updated by:
Laura H

Updated by:
Wilson B

Updated by:
Alexander C

Updated by:
Hannah L

Updated by:
Isabelle B
At etrailer.com we provide the best information available about the products we sell. We take the quality of our information seriously so that you can get the right part the first time. Let us know if anything is missing or if you have any questions.
Product Experts Available Now!
Call 1-800-940-8924
Jenny N.
4/11/2024
Wayne, I will help with troubleshooting the controller. To troubleshoot this you will first want to isolate the issue to the vehicle or to the trailer. I suggest hooking up to a second vehicle that has a brake controller and see if the same error code is present. If this is the case then the issue is with the trailer. If you do not see the see the error code then it is an issue with the vehicle. My first suggestion for troubleshooting this is to check the vehicle connection point and make sure that all the pin/blades are functional and there is no sign of damage or corrosion at the vehicle connection point and the wires leading to it. You will want to use a circuit tester like part # PTW2993 to verify the functions of the pin/blades while that function is activated. You will also want to make sure that all the grounding wires are properly secured to an appropriate bare metal surface. This might also cause an open circuit display. The next step is to test the wires leading to and from the brake controller. You will need to use a circuit tester again and test the wires leading to and from the brake controller and make sure that it is receiving and sending the proper signals. You may need to increase the power output level for testing these functions. If you determine that the issue is related to the trailer then I suggest also inspecting the trailer connector for any signs of corrosion, damage or and loose wires. Next you will also want to inspect the magnets on the brakes of the trailer. You will want to make sure that the magnets are properly grounded, in good condition, and the wiring to them is functional. I have included links to several helpful articles for your reference.
Helpful Links
faq-brake-control-troubleshooting.aspx
faq-testing-trailer-brake-magnets-for-proper-function.aspx
faq-wiring.aspx