
Agri-Cover SnowSport LT Snowplow for 2" Hitches - 82" Wide Blade
Curt Front Mount Trailer Hitch Receiver - Custom Fit - 2"
Part Numbers: SS98GV,31114
Retail:$1,867.95
Our Price: $1,697.70
You Save: $170.25
In Stock
Thank you! Your comment has been submitted successfully. You should be able to view your question/comment here within a few days.
Error submitting comment. Please try again momentarily.


Need help with installation?
Locate installers near meAgri-Cover SnowSport LT Snowplow for 2" Hitches - 82" Wide Blade
part number: SS98GV
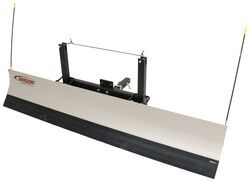
82 x 14 Residential plow with thick rubber cutting edge self-adjusts up and down to smoothly clear a path on any terrain. Aluminum blade stays in straight-ahead position, and makes plowing your driveway as easy as pulling forward or backing out.
Features:
- Lightweight, user-friendly plow allows for quick and easy snowplowing with no controls or hydraulics
- Self-adjusting plow frame allows up and down movement over rough terrain
- Safe for use on grass, concrete, gravel, brick and other uneven surfaces
- Practical design does not block headlights in either plow or transport position
- Effortless installation on the front or back of your vehicle
- Designed for use on 2" front or rear trailer hitches (sold separately)
- Durable construction
- Rust-resistant aluminum blade
- Long-lasting, heavy-duty rubber cutting edge
- Complete kit includes plow blade with blade markers, fixed 2" shank assembly, push frame, hardware kit, and interceptor
- Made in the USA
Specs:
- Application: SUVs, trucks, and minivans with a 2" front- or rear-mounted hitch receiver
- Must have 8" to 14" clearance under the receiver
- Overall blade dimensions: 82" wide x 14-1/2" tall
- Rubber cutting edge dimensions: 6" tall x 1" thick
- Blade weight: approximately 68 lbs
- Plow mounting frame: 31" wide
- Warranty:
- 1-Year for plow parts
- 3-Year for rubber cutting edge
Snowplow Installation
Front or rear mount? Versatility is the SnowSport LT's middle name.
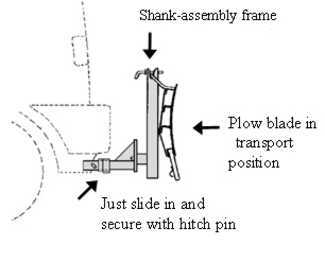
Installation is quick and simple - just slide the included shank assembly into your 2" hitch receiver and secure with pin.
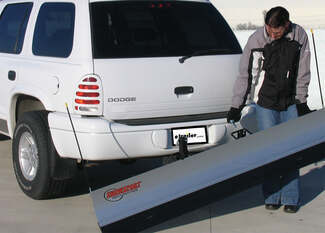
Once the plow frame is connected, attach the blade by lifting one end at a time onto the frame's holders. The lightweight aluminum blade construction makes lifting or adjusting an easy, one-person job. Secure the blade in either the transport or plowing position with the plow's snap pins. The low-profile design won't block your headlights, and the transport position is secure enough for highway travel.
How to Plow
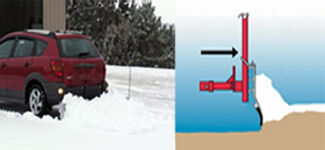
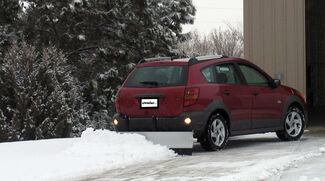
If using with a rear-mount receiver, simply lower the blade to plow position and back up as usual. For a front-mounted plow blade, just drive forward with the blade in the plow position. The unique design takes the hassle out of plowing: This device has no hydraulics or complicated wiring. The push frame on the shank assembly allows the blade to move along the grade of the terrain for easier, more efficient plowing. The heavy-duty rubber cutting edge is effective yet turf friendly, collecting snow and squeegeeing slush without digging into the ground.
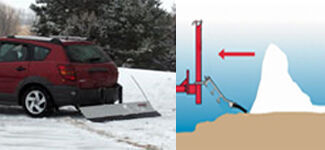
When you are ready to reverse your driving direction, the blade lies back, skimming over the surface of the ground until you change direction again to plow.
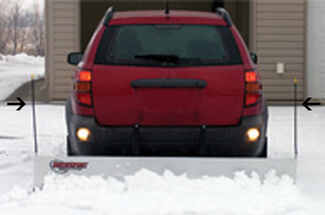
Handy blade markers extend vertically from the ends of the plow to help you see where you are plowing.
With the SnowSport LT, plowing snow is as easy as backing out of your driveway. Once you are finished plowing, simply lift the blade, refasten it in the transport position and head off for work or errands.
80664 Agri-Cover SnowSport LT Snowplow for 2" Hitches - 82" Wide Blade
California residents: click here
Curt Front Mount Trailer Hitch Receiver - Custom Fit - 2"
part number: 31114
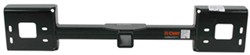
Easily attach a variety of accessories to the front of your vehicle with this fully welded, corrosion-resistant trailer hitch receiver. Perfect for winches, spare tire carriers and more.
Features:
- Front-mount hitch provides attachment point for hitch-mounted accessories
- Winch, spare tire carrier, snowplow, cargo carrier and more
- No more blindly backing trailer in - just hook it up and drive it forward
- Custom fit is designed specifically for your vehicle
- Precision, robotic welding maximizes strength and improves fit
- Easy, bolt-on installation - no welding required
- Complete hardware kit and installation instructions included
- Lifetime technical support from the experts at etrailer.com
- Gloss black powder coat finish over steel resists corrosion
- Sturdy, square-tube design
- Assembled in USA
Specs:
- Line pull: 9,000 lbs
- Vertical load: 500 lbs
- Gross trailer weight: 5,000 lbs
- Receiver opening: 2" x 2"
- Pin hole diameter: 5/8"
- OEM fog lights will have to be permanently removed for this hitch to install on vehicle
- Limited lifetime warranty
etrailer.com Technical Support
At etrailer.com we're committed to the products we sell, and to our customers. Our experienced and knowledgeable staff are available via both phone and email to address your questions and concerns for the lifetime of your hitch. The technicians at etrailer perform hitch installations on a daily basis, making them a valuable resource for do-it-yourselfers. The one-on-one, personal service you'll receive comes straight from an expert in the towing and automotive field. We've installed it, we've wired it and we've towed with it, so whatever your question, we can answer it.
31114 Curt Front-Mount Trailer Hitch Receiver
Video of Agri-Cover SnowSport LT Snowplow for 2" Hitches - 82" Wide Blade


Videos are provided as a guide only. Refer to manufacturer installation instructions and specs for complete information.

Video Transcript for Front Mount Trailer Hitch Installation - 2006 Ford F-350
Today on our 2006 Ford F-350 we're going to take a look at and also show you how to install the Curt Custom Front Mount Receiver Hitch, part number 31114. Now here's what our hitch is going to look like installed. As you can see it's a pretty nice looking hitch. It sits right here in the center of our already existing opening in our truck, so we don't have to worry about cutting or trimming anything there. This is going to be a 2" by 2" receiver tube opening, so there's going to be a great deal of accessories available for it, including your snow plows, some people will put front-mount cargo carries on it, winch mounts. It shares the same 5/8" diameter pin hole here, so any of your Class III accessories will work out fine.
You'll see we're going to have plenty of room there even if you wanted to use an anti-rattle device, or something like that. Now getting the hitch installed takes a little bit of work. It's not just a simple bolt-on installation. You do have to pull the front bumper, drill a couple of holes, but overall it's going to come on and off pretty easily for you. Now the hitch itself has a 500 pound tongue weight rating. That's the maximum downward force you want to put here at the receiver tube opening.
It gives us a 5,000 pound gross trailer wight rating. That would be the total weight of our trailer and anything that we we're to load up on it. As far as straight line pull, that would be most often for a recovery situation, where you've got a winch mounted here in the front, it's going to give us a 9,000 pound rating with that. Your winch, you'll have up here. You'll want to use a pull, direct pull maximum of 9,000 pounds. Now you can drastically reduce that of course by running some snatch block and things.
You got your tow hooks, which are left in place here. You don't have to get rid of those for the hitch to work. That's going to make it nice so you can double back and have a good strong connection point there. Now as a solution for your license plate mounting situation here, you can re-use the factory bracket. You would just want to bring that up, hook it back on that front side, and then just use a couple of small screws to replace those rivets. That would allow you to take it on and off.
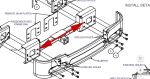
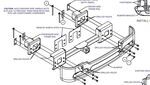
Typically, with the snow plow it's going to be seasonal, but for other accessories you might just want to leave it off, and come up with a different mounting solution. That's completely up to you where you want that plate to go. Just make sure you stay in compliance with your local laws. Now a few measurements that are helpful when selecting accessories from your front mount hitch will be from the ground to the inside top edge of the receiver tube opening, we're going to have about 24". Then from the center of the hitch pin hole to the outer most edge of our bumper it's about 2 1/2. To begin our hitch installation we need to get the front bumper removed. Our hitch is going to mount between the bumper and the front of the frame of the vehicle. Now on each side, right here underneath the corner, there's going to be a bracket. It's going to run from this cross member plate, over to the bottom of the bumper here, so we want to take out this bolt so it won't hang up. Now, typically your '06 should have this bracket. If you're on a different year, you might not have this. Let's do the same thing on our passenger side as well. Now just outside of our tow hooks, we've got the two bolts that are going through our bumper and holding this in place. We'll need a 19 millimeter socket, or a 3/4" socket, and we're going to remove the bottom one completely. I'm going to take the top one almost all the way out. We want to have that for support though while we take care of the other side. Then we can get an extra set of hands and pull the bumper off. Now on the back side of that bolt there is a nut. It also requires a 3/4" or 19 millimeter socket. You just want to hold on to that as you remove it. You'll see that's what you'll be taking out. You just got a bolt, a couple of flat washers, and our nut. Now before we take the bumper off, if your truck is equipped with the fog lights on each side here, you want to take the plug out that's on the back side. You can just pull the bulb like that, or you can lift up on these two tabs and slide it off, whatever you prefer. Now with the help of an extra set of hands, we'll finish taking out our hardware here on both sides. Then we can get that bumper set aside somewhere safe. Now the front-mount hitch is going to require that we do away with these plugs. We're not going to be able to have the lights and the hitch at the same time, so what we're going to do is just take this harness, bundle it up, and we'll secure it up here to the frame rail so it'll be up and out of the way. Now, so you don't have power coming to these plugs, which could potentially cause a short, you will want to cover these. Also, I recommend pulling the fuse that'll control the circuit. That should keep it up and out of the way so if they ever remove the hitch and want to put their fog lights back on, it won't be a problem. Next we're going to remove this lower cross-member. We got a couple of bolts right up that we'll take out, one on each side. You're going to have four push fasteners across this top edge. You need to get those taken out so they don't do any damage to this rubber cover here. You can use a screwdriver for this, or we'll just use a little trim panel tool. Those four should be all we have to take to get that free. We'll take those bolts out and we can set that aside. Now once we have that out, what I want to do is just start it back in there, just with a couple of threads. This one, just like our bumper bolts, uses a 3/4 or 19 millimeter. Now we've got the three bolts here that hold both our cross member up but our tow hook down into position, so we need to take those three out. For these we'll use a 15 millimeter. Take our tow hook out, and then that rear bolt we left in is supporting our cross member for us. We'll take those bolts the rest of the way out, and set our cross member aside. Now there's going to be a few modifications we need to make here on the back side of the bumper. If equipped with fog lights we need to get these taken out. For the bolts here on the top, you want an 8 millimeter. Those are going to be a couple of long bolts. Then the one here on the bottom side, that needs a 10. Those are going to come off, and we just return these to our customer. Now if your license plate is mounted on the front bumper, you're also going to have to remove that and then relocate that somewhere. You want it to remain visible of course. That's going to vary state by state, but some states do require the use of a front plate, so keep that in mind. To remove it we just want to cut these rivets that come up through the bottom side here. Use a small screwdriver and just push those out. That's going to come off just as one assembly. Now we're going to place our hitch onto the rear side of the bumper here. The original bumper bolts, we'll be reusing those later. What we want those to be able to pass through our original mounting locations and the hitch. Then if we come right underneath this lip here there's going to be the original steel. We just want to make sure that we're equal distant on both sides from that. We'll have our hitch right in the middle. Then we need to mark the middle of these holes. This is going to allow us to drill out our 5/8" holes so our bolts will pass through. Now we're going to drill our holes out. We're going to start with a smaller bit and gradually work up. Now we're just about ready to get our hitch set up on our frame rails here. You can see there's a little fastener right here. If your truck's equipped with a block heater you're going to have this. What we want to do is pry that back. That way our hitch will have a place to sit nice and flush. Now this one was hidden back in here non-accessible, so that's the way we're going to leave it. If yours was ran out to the front, then run it back that same way. Now we can place our hitch right over the end of the frame rails, just like that. Get our holes lined up. Now that will rest there while we get that lower cross member in place. Slide our tow hooks back in where they came out of. Now when we pulled our bumper off we had a bolt that just had a flat washer and a nut on the back side of it. That wasn't the factory equipment that came with the bumper. This hardware came with an additional bull bar, or brush guard that was on the front. What we're going to do, because the factory did have a flange, or a plate behind it, once we have this trough the frame rail, it's going to go through our bumper, through our hitch and through our frame rail. We've got these spacer plates that we've got here. We're going to put those on, and we're going to be putting on flange nuts. You will want to re-use your factory spacer plate that goes on that backside if at all possible to help spread out the energy that we're going to generate with our bolt. Now with the help of an extra set of hands, we're going to get our bumper set back into position here. Then we'll want to be sure that we have that supported until we get on, at least one of our nuts back here to help keep it secure. We'll just leave that hand tight for now. Get our other one started, and then we can move on to our new hole locations. Now for our new hole locations we're going to take our provided bolt, want to place that conical tooth washer on there. The teeth of that washer need to face in towards the hitch. You won't really be able to see what we do behind, but we're going to slide that spacer up, right on the back side of the frame. Our bolt's going to be through that, so we'll have our bumper, our hitch, and our frame all stacked up here. We've got handle nuts. We just want to stick those up in from the back side, and then we'll thread our bolt right into that. With that through, we'll put on a spacer block. Now once we've got our first one started there, you'll want to pull that handle over towards the middle of the truck. That's going to give us enough room to get our next one in. Then we can go through and get all of our fasteners snugged up here. Once we've got this done, we'll torque them down to the specifications listed in our instructions. We'll also re-attach the bolts if applicable for our side brackets here. Once we get this done, our hitch is going to be ready for use. That's going to complete our installation of the Curt Custom Fit Front Mount Receiver Hitch, part number 31114 on our 2006 Ford F-350.
Customer Reviews
Agri-Cover SnowSport LT Snowplow for 2" Hitches - 82" Wide Blade - SS98GV
Curt Front Mount Trailer Hitch Receiver - Custom Fit - 2" - 31114
Average Customer Rating: 4.8 out of 5 stars (21 Customer Reviews)
82 x 14 Residential plow with thick rubber cutting edge self-adjusts up and down to smoothly clear a path on any terrain. Aluminum blade stays in straight-ahead position, and makes plowing your driveway as easy as pulling forward or backing out. Easily attach a variety of accessories to the front of your vehicle with this fully welded, corrosion-resistant trailer hitch receiver. Perfect for winches, spare tire carriers and more.by: Al03/22/2023
Great customer service and product.
by: James10/04/2016
I was a little surprised with the snow plow. I thought it was going to be hydraulic/electric. It does okay, going on flat and slight declines. Inclines not so good. I also. Bought a rear trailer hitch. Very pleased with it.
by: Gregory 10/08/2022
2016 Ford F-350 Super Duty
The quality and fit is exceptional. So much so that this is the third hitch assembly I've purchased and installed. This one was for my brother in-laws 1999 F350. I also put a 10k winch on a slider that works perfectly with this assembly. Other vehicles I purchased and installed assemblies on are a 2011 F350 and a 2016 Class C motorhome. Very happy.
by: James 02/19/2021
Great receiver. Didn't actually fit my truck's front bumper, but I was able to make some spacers to get it mounted. Works great for the mounting spot for a rig that holds my kayak on top of the truck.
by: Nv Mb10/29/2019
Well built. Good hardware included. Not a perfect fit. Definitely required some additional drilling and fabrication. Budget some extra time.
by: Eric 04/22/2021
2004 Ford F-350 Super Duty
I installed this on my 2004 F350 super duty. The install was straight forward and for the most part easy. I did have a hard time getting the nuts on the top bolts even with the handles on them just from lack of space, but got them on there and it looks clean.
by: Jonathan02/24/2018
Just as expected. Makes your bumper stick out about a 14 inch further but you cant really tell without carefull inspection.
by: Bill F09/10/2020
Installed the front hitch to carry my motorcycle. Works great.
by: Warner M11/27/2020
Very good product and easy to install.
by: Philip 02/02/2023
Very easy ordering, communication, shipping! Pricing very reasonable! We will order again if needed! Thank you!
by: Greg 03/14/2023
2003 Ford F-350 Super Duty

Greg

3/15/2024
The Curt front hitch receiver is doing a great job at holding my 12,000 pound winch. I have done several double line pulls off of that hitch receiver, no bending, no problems.
by: Josh 10/01/2021
Well worth the money use it for my winch during the snow and it works amazing
by: Scott 05/20/2021
Great price. Installed easily. Works gr eat!
by: Greg 06/20/2020
Excellent company to deal with, item shipped fast, all is good
by: John Little09/26/2012
Hitch fit as advertised. Was very easy to install. Very good shipping and a very good product.
by: Donald 01/10/2023
by: Michael 12/07/2022
2007 Ford F-350 Super Duty
by: Christopher 08/30/2023
by: James 11/28/2022
by: Andrew 01/28/2021
by: Steve 11/09/2022
21
21
Ask the Experts about this Snow Plow
Do you have a question about this Snow Plow?
- Does Curt Trailer Hitch Receiver Fit 2007 Ford F-350 With Crossmember
- What you are referring to is the lower front crossmember, and if your 2007 Ford F-350 Super Duty does have that crossmember you can definitely install the Curt Front Mount Trailer Hitch Receiver # 31114.
You will simply remove it (starting at about 5:45 of the video linked below), and the crossmember does get reattached (starting at about 10:05 of the video).
view full answer... - Correct Curt Front Mount Trailer Hitch for a 2004 Ford F-350
- I do have an option for you but the only Curt Front Mount Trailer Hitch Receiver option for a 2004 Ford F-350 is part # 31114.
view full answer... - Does Blocker Beam of 2006 Ford F-350 Dictate Which Front Hitch Fits
- This is correct. If you have the Blocker Beam on your 2006 Ford F-350 you will need to use the Draw Tite hitch # 65022 or if not you'd need the # 31114. The blocker beam is a small sub-bumper behind air dam.
view full answer... - Front Mount Hitch Fit for a 2005 Ford F-350 Super Duty
- The front mount trailer hitch I recommend for your 2005 Ford F-350 is the Curt Front Mount Trailer Hitch Receiver part # 31114 because it is made in the USA and currently our most cost effective option for a front mount hitch. I called Curt and they were not sure of where you were measuring to get a 37" frame but if you measure the distance between the two innermost mounting points (see photo) on the front end plate of your frame rail, you should get 31" and if you do the above will work
view full answer... - Comparing the Curt Front Hitch 31114 and the Draw-Tite Front Hitch 65022 for a 2000 Ford F-250
- There are virtually no structural differences between the Curt Front Mount Trailer Hitch Receiver part # 31114 and the Draw-Tite Front Mount Trailer Hitch Receiver part # 65022 for your 2000 Ford F-250. They both install in the exact same location and allot for a 500/5,000 Lb vertical load and line pull rating. The main reason for the price difference is that the Curt hitch is made in the USA and has a more resistant powder coating.
I have attached a sample install video for you as well.
view full answer... - Will the Curt Front Hitch for a 2007 Ford F-250 Work with Grille Guard
- The Curt Front Mount Trailer Hitch Receiver part # 31114 which is a fit for a 2007 Ford F-250 Super Duty installs behind the bumper beam to the end of the frame on both the driver and passenger side. I have attached a photo below which shows this.
Unfortunately, we aren't able to confirm fit with aftermarket accessories so this will be up to you but based on the photo below you should be able to make the determination yourself. I did take a look at the grille guard and it does not appear
view full answer... - Do Fog Lights Have to Be Removed to Install Front Hitch # 31114
- It isn't ideal to have to remove the factory fog lights to install the front hitch part # 31114 that you referenced, but since their location is the best place for mounting this hitch there unfortunately isn't a better solution.
I attached an install video for this for you to check out as well.
view full answer... - Why is Curt Front HItch 31114 Difficult to Install on 1999 Ford F350 Super Duty 4x4
- Our contact at Curt Manufacturing said that it sounds like you have a blocker beam on your 99 F350 Super Duty 4x4. A blocker beam is a 3 inch by 1 inch steel bar that mounts underneath the frame on the front of the vehicle and could be the reason your hitch will not mount correctly.
In that case you would need a Curt Front Hitch for the 1999 Ford F-250 and F-350 Super Duty part # C31014. However, if your truck is a cab and chassis model this hitch will not work either.
view full answer... - Recommended Front Mount Hitch for 2021 Ford F-150 Hybrid
- For your 2021 Ford F-150 Hybrid I recommend the Curt Front Mount Trailer Hitch Receiver - Custom Fit - 2" # C31083. This is confirmed to fit all models, including your Hybrid. This hitch has a maximum line pull of 9,000 lbs and the maximum vertical load is 500 lbs.
It sounds like you have the active grill shutter system, which will not be a problem when installing the hitch. If you have the active air dam, there is not a front hitch that will fit your vehicle.
view full answer... - Front Mounted Trailer Hitch for 2006 Ford Super Duty Truck
- A rear bumper trailer hitch cannot be mounted to the front of your 2006 Ford Super Duty. We do have a couple options for your front mounted hitch. We have the Draw-Tite Front Mount Trailer Hitch Receiver # 65022 and the Curt # 31114. Both these options will sit through the opening in the bumper. OEM Fog lights need to be removed or relocated for these hitches. I've attached instructions to help as well as videos.
view full answer... - Will Curt Front-Mount Hitch 31114 Fit 2003 Ford 550 Four Wheel Drive
- Curt front-mount trailer hitch # 31114 will fit the 2003 Ford F-550 cab-and-chassis but it will NOT fit the F-550 Super-Duty pickup. No front hitches are offered for the F-550 pickup. Curt hitch # 31114 does require some drilling for installation and it will also require you to remove/relocate the OEM fog lights. We also offer a similar front hitch from Draw-Tite, part # 65022, whose installation is shown in the linked video.
view full answer... - Front Mount Trailer Hitch and Light Bar Recommendation for a 1999 Ford F-250
- The Curt Front Mount Trailer Hitch, # 31114, that you referenced will fit your 1999 Ford F-250. If you have OEM fog lights, they must be removed because they will interfere with the front mount hitch.
All of the light bars we offer for your 1999 F-250 are roof mounted light bars like part # CARR210701. The Gutterless Mount Kit, # CARR220052, is also required to mount a light bar to your truck. I have attached a link to all of the light bars we offer for your truck as well as a link
view full answer... - Comparison Between Draw-Tite # 65022 and Curt # 31114 Front Mount Receivers for 1999 Ford F250
- The primary difference between the Draw-Tite # 65022 and the Curt # 31114 is that they're manufactured by two different companies. The hitches are nearly identical in appearance, have the same weight ratings and would install in the same manner. Because of this, you can choose the less expensive Draw-Tite model, and not feel that you sacrificed anything.
If you click the provided link, you can see an install video for the Draw-Tite model.
view full answer... - Do Fog Lights on 2002 Ford F-350 have to be Removed to Install a Front Mount Trailer Hitch
- To install the Curt front mount trailer hitch # 31114 the fog lights on your 2002 Ford F-350 will have to be either removed permanently or relocated. But you can install Curt front mount hitch # C31014 and keep the OEM fog lights. I have linked instructions for both hitches for you.
view full answer... - Which Front Mount Trailer Hitch Receiver For a 1999 Ford Excursion
- I reached out to Curt directly and found that the Curt Front Trailer Hitch Receiver # 31114 will work on your Ford Excursion.
From my research Ford started production of the Excursion in September of 1999, but labeled them as 2000 model year vehicles.
I included a picture of the Curt # 31114 for you to take a look at.
view full answer... - Front Mounted Hitch Receiver for 2000 Born Free Motorhome on Ford E450 Cutaway Van Chassis
- We do indeed have one. The Curt # 33055 front mounted receiver is a fit for the 2000 Ford E450 Cutaway Van chassis used on your motorhome. I've linked you to a video that will walk you through the install.
The Curt # 31114 you'd looked at is a fit for an Excursion or a Super Duty truck, and wouldn't fit your Van chassis.
view full answer... - Front-Mount Hitch For Winch On 2001 Ford F-250 Truck With Blocker Beam
- I spoke with my contact at Curt and asked about your 2001 Ford F-250 truck. They told me that the reason for the difference in fit is due to the blocker beam that is installed on the truck. You actually purchased the correct front mounted hitch, part # C31014, if your truck has the front bumper bar. They told me that due to the bar, the hitch will be mounted in a different manner and the receiver will be below the bumper, not through the middle of the bumper like part # 31114.
view full answer...
Info for these parts were:

Expert Research:
Mike L

Expert Research:
Michael H

Expert Research:
Jameson C

Expert Research:
Adam R

Written by:
Lindsey S

Video Edited:
Jacob T

Video by:
Kathleen M

Video by:
Alan C

Test Fit:
Shane T

Test Fit:
Randy B

Updated by:
Wilson B

Updated by:
Kristina F

Updated by:
Isabelle B
At etrailer.com we provide the best information available about the products we sell. We take the quality of our information seriously so that you can get the right part the first time. Let us know if anything is missing or if you have any questions.
Ford F-350, 450, and 550 Cab and Chassis Accessories


Al
3/23/2024
Wonderful, easy install