
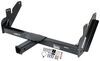
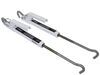
Get the safest and most comfortable ride while hauling your camper with tie-downs that mount on the frame of your pickup. Great for your truck's looks: remove the arms from the brackets and you'll hardly know that the brackets are there.
Features:
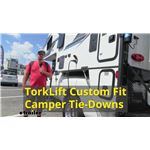
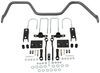
TorkLift Custom Frame-Mounted Camper Tie-Downs - Front:Videos are provided as a guide only. Refer to manufacturer installation instructions and specs for complete information.
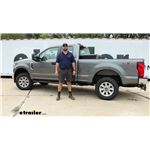
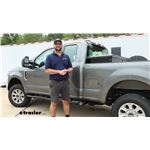
Hey guys, this is Jake here with etrailer. Today, we have a 2022 Ford F-250 and we're gonna be taking a look at and I'm gonna show you how to install the Torklift In-Bed Camper Tie Downs. Now when it comes to hauling a camper in the bed of your truck, it's very important that you get it tied down properly, and these brackets are gonna help you do that. We do have some brackets available that mount inside of the bed. Usually, they go inside your stake pockets, and they have a little bracket that comes out, and you can tie down to that. In my personal opinion, those are not as quite stout enough for my liking for the safety of my camper, but these are going to be sound enough.
They will bolt straight to your frame. They're gonna be custom fit for the 2022 Ford F-250 with the 6 3/4-foot bed. I just, I personally like these better because you're not depending on the sheet metal that the bed is made of, especially because these have aluminum beds now. You're depending on the frame of the truck, which is what the main support plate is gonna be bolted to. Now, we'll give you some measurements so you can figure out whether or not these are gonna work well with your camper.
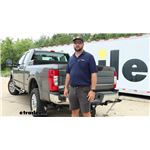
There's two different settings. This is in the closer setting. There's an extended setting that you can have it in in order to properly tie down your camper. So from the center of our bar here, from our bumper to the edge, is gonna be about six inches of extension. There's another setting.
We will slide it out, line it up with this hole, and that is going to give us from the center again 10 inches. So there's a four-inch difference there. If you've got a significantly wider camper, if it hangs way over the edge of your truck and you need to tie it straight down, this is a really, really nice feature that it slides out. And then when you're not using them at all, you slide them out. You can store these in the bed of your truck or with your camper.
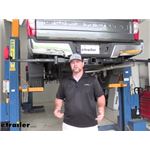
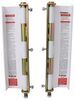
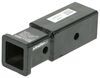
That's probably a better idea. Store them with it so that you know to grab them. When you go to put your in-bed camper in the bed of your truck. As you can see here, they do not stick out past the edge of the truck. They bolt directly into the bumper, so it kinda looks natural. You already have an exposed bumper from the factory here or your hitch here is exposed. So it's really nice that. I like that it doesn't really change the look a whole lot. You just have this 10-or-so-inch cross tube here that'll be sticking out and ready for these brackets whenever you're ready to use them. Now, as for the front brackets, they're going to be about the same distance from the side of the truck. It's about six inches. Slide it out, you'll get that same four-inch extension. But when these are removed, you're not gonna be able to hardly see that insert tube at all, which again, not trying to change the look of your truck, just trying to get a nice, safe, sturdy place to be able to tie your camper down. The entire kit is gonna have this hammertone black powder coat finish. It's a really tough finish if you. Years down the road, if you ever need to touch it up, that is not an abnormal thing. We have it all the time with hitches or anything, essentially anything that's painted that's always exposed to weather. You could spray it, touch it up, but this paint job should last you for a very long time. Now, when it comes to the installation, this is not too bad at all to get installed. The fronts are gonna be a little bit more time-consuming than the backs. The backs are gonna take you about 15 minutes to get both of them installed because they're just gonna slide into the ends of your hitch receiver. As far as the front goes, those are going to be, I'd say it'll probably take you about three, maybe 3 1/2 hours to get both sides installed. What I really like about it and what I was not expecting is that you don't have to drill any holes in the side of your frame rails. They are going to bolt right into pre-existing holes that are already in your frames. They just bolt right up, you torque everything down, and then you're ready to start using them. But with that being said, let's go ahead and pull it in the shop and show you how we got them installed. To begin our installation, we need to first assemble our rear bracket. Now, because we're putting this on an F-250, we're gonna have to put this spacer block here on the end. It just helps take up a little bit more space inside the hitch because this bracket will be installed. This section, it will be sliding in the hitch. We're gonna take our fish wire, slide it down through this hole, come out the end, and we're gonna slide over this lock washer or star washer, and then thread on one of our half-inch bolts. Take that. Just wanna pull it through. And you want to carefully take this off because you'll have to use this fish wire for bolt size. Now, we can take that big X-shaped block. I'm gonna match up the two marks on the side, and we'll take a flat washer, the lock washer, and a nut. And this bolt is strictly to hold that spacer plate in place. We're gonna tighten and torque this to the specifications and the instructions. (drill whirring) Now, if you don't have a torque wrench, we have some available on our website or you can typically rent one from your local auto parts store. Now, this can be a little bit tricky because you gotta hold it while you're torquing it down. (tool beeping) And we'll just simply take our bracket, slide it into our hitch. You wanna leave a little bit of a space there, and we're gonna take this spacer block and put it behind. And then this is what we're gonna slide our hardware through. And we're gonna take one of our other bolts, put a flat washer on, a spacer block, slide it in from the back. While holding that, you'll want to put a flat washer on, a lock washer, and a nut. (bolt clattering) Now, we need to tighten and torque this hardware to the specifications and the instructions. (tool beeping) Now that you've got one side installed, we'll do the same process on the other side. In order to start on the front bracket, we're going to have to loosen up this leaf spring bolt. Now, this is a gonna be an uncommon size. It's a 30-millimeter socket that you're gonna need. So if you don't have one of those at home you're gonna have to go pick one up. And I'm just using a crescent wrench on the backside and we're just loosening this in order to get our bracket to slide in behind it. (drill whirring) There we go. That's more than enough space to be able to slide this end of our bracket right behind it. Now, on the inside of the frame rail, we'll have two 10-millimeter bolts we're gonna have to remove because we're gonna have to get a support bracket mounted up there. So we'll loosen those up with a 10-millimeter socket. (drill whirring) Take our bracket, slide it up into place, get these holes lined back up, thread those switch back into place. (drill whirring) Now, we need to get a support bolt out of this hole, so we'll take our fish wire included in our kit. Run it up through. There's an access hole up here in the top of our frame inside this opening, and you just kinda have to reach down, feel for it, and then push it on the end of your finger, and then pull it out. And we're gonna take a spacer block in this order and then a star washer and one of our larger bolts and thread that on. Toss it down through the hole, (bolt clattering) make sure it pulls out. (bolt clattering) There we go. Just wanna make sure that pulls out through the hole. We're gonna gently set it back down in there 'cause we need to put our bracket up. Now, we'll take our bracket. (bracket clangs) We'll take this fish wire, slide it through the top hole here, and we're ready to lift it up into place. This can kind of get a little tricky. Slide it up over our bracket we just installed. (bracket clangs) Up over top. Slide it over, make sure it's over all the way. And we can pull our bolt (wire snaps) out of the hole. Now, we will take a flat washer, a lock washer, and a nut. I wanna get this as tight as we can by hand. Now, if you're having trouble with the bolt spinning on the backside, you just pull towards you and twist at the same time, and it should get it to bite. I'll take our silver bolt that comes on our kit with a flat washer on it. Slide it down through. We did end up loosening this bracket up on the other side to give us a little bit more room to wiggle. Take flat washer on the bottom, lock washer, and a nut. Now, we can take these smaller bolts that come in our kit, and they're actually both going to go in this elongated hole here. Slide one further back, and we'll put a flat washer, a lock washer, and a nut on the other side. And we're gonna put another one just like it with the same hardware right next to it. Now, the order that you want to snug them up is you want to tighten this one on the bottom first to make sure that this bracket sits flat on the bottom. Then, we'll do the large nut over here or the bolts here. Then, do this one and then come up top, do these two last, and then go on the backside and tighten down that exhaust hanger bracket. (drill whirring) Now, on the driver's side of the vehicle, it's gonna be very similar. You're not gonna have a bracket that goes underneath because we have the support here and the fuel tank's over there. But instead, we're gonna have a second bolt here. So we'll have the one up top that we fish-wired the same way as on the passenger's side. And then you'll have a little bit longer silver bolt our grade 5 bolt. Then, the other four that are in the kit that are designed for the top up here, you'll use that, fish wire it through the frame rail up here on the top like we did the the larger bolt, fish it out there, and then put a flat washer, lock washer, and a knot on it. And then back here, the instructions will tell you to take this bracket off. It's not necessary. I just slid it up and behind. It just takes a little finagling to get the brackets around the emergency brake cable in order to get it slid behind this nut. Now, with both brackets installed and all the hardware tightened down, we'll come back with a torque wrench and torque it down to the specifications and the instructions. (tool beeping) Now, once you've got everything torqued down to the specifications and the instructions, that's gonna do it for the installation of our front brackets. After the installation, you're ready to start using your new camper tie downs. In my personal opinion, I would highly recommend using the fronts and the rears together. There are some people that will just have the rears on and then they'll add a different type of camper tie down like the ones that are in your bed. I just personally like how stout these are in that I know when strapping something down, these are going to be bolted to the frame and bolted to your rear hitch, so that it's not gonna go anywhere. But it's up to you to decide whether or not this kit is right for you in your in-bed camper.
Info for this part was:
At etrailer.com we provide the best information available about the products we sell. We take the quality of our information seriously so that you can get the right part the first time. Let us know if anything is missing or if you have any questions.


Thank you! Your comment has been submitted successfully. You should be able to view your question/comment here within a few days.
Error submitting comment. Please try again momentarily.