
Summer Starts Here - Save up to 70%
To see if this custom-fit item will work for you please tell us what vehicle you'll use it with.
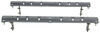
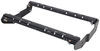
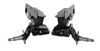
This fully welded trailer hitch receiver bolts onto your vehicle's frame with no welding required. Matte black, powder coated steel is durable and corrosion resistant and creates a rugged look.
Features:
Specs:
The sturdy steel construction is protected with a matte black finish for added durability. This unique powder coating gives etrailer hitches a carbide-like appearance and a rugged look that sets them apart from traditional glossy hitches. In addition to being rust and corrosion resistant, the tough matte coating hides dirt, scuffs, and dings better than a glossy finish.
At etrailer we're committed to the products we sell, and to our customers. Our experienced and knowledgeable staff are available via both phone and email to address your questions and concerns for the lifetime of your hitch. The technicians at etrailer perform hitch installations on a daily basis, making them a valuable resource for do-it-yourselfers. The one-on-one, personal service you'll receive comes straight from an expert in the towing and automotive field. We've installed it, we've wired it and we've towed with it, so whatever your question, we can answer it.

Videos are provided as a guide only. Refer to manufacturer installation instructions and specs for complete information.
Hey guys, it's Jake here with etrailer. Today we have a 2018 Ford Taurus and we're gonna be taking a look at and I'm gonna show you how to install the etrailer class III two inch hitch receiver. Adding a hitch receiver to the back of your Ford Taurus is gonna give you a couple different options to haul accessories. You can use it for a bike rack, which is the most common use for it. You can use it for a cargo carrier, although the hitch receiver is kind of low to be able to use it with a cargo carrier, you might be able to get away with a high low adapter to get it up there a little bit higher. Then the lastly, you can use it to tow lighter trailers.
The hitch is gonna have a pretty impressive tow rating, but you will want to make sure that you check with your vehicle's owner's manual if you decide to tow a trailer with your Taurus. The other thing is, is if you decide to use it for a trailer or you're wanting to use it, you want to use four pole wiring to be able to connect to the trailer. This hitch will have a two inch by two inch hitch receiver tube opening, which is gonna give you a lot of different options for accessories. You'll also notice the matte black paint job that is a triple carbide black powder coat finish, which is very, very tough and will last for the years to come. You'll have a standard 5/8 inch hitch pin hole.
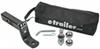
The hitch pin and clip do not come included, but you'll definitely want some sort of hitch pin, whether it's a locking or non locking hitch pin to keep those accessories safe. The safety chain loops are a nice large hoop cell safety chain loop. It fits different safety chain clevises of many different types. You definitely will want to utilize those if you plan on towing a trailer. Now as far as the weight capacities go for this hitch, you're gonna have a max tongue weight capacity of 400 pounds.
That's the downward pressure on the inside of the receiver tube and a max gross trailer weight rating of 4,000 pounds. Again, you will want to check with the Ford Taurus owner's manual to see what the capacities that it's rated for. Compare that to the hitch and go with the lower number between the two of 'em. Now some measurements for you so you know how it's gonna fit on your Taurus. From the center of the hitch pin hole to the outermost part of our bumper is about six and a half inches.
That measurement is important for any accessory that folds up to the back of your vehicle or any accessory that has a component that's close to the shank of the accessory. We've got a lot of videos on our website for cargo carriers or bike racks. They're gonna give you a measurement from the center of the hitch pin hole in the accessory to the closest part of the accessory when folded up or not one folded up so that you know whether or not it's gonna fit your Taurus in this hitch before you even have to make a purchase. From the ground to the top inside of a receiver tube, it's about 12 and a quarter inches. That is low enough to where you probably wanna look for accessories with a raised shank, definitely with a bike rack you will want to get one that has a raised shank so that the bikes sit a little higher off the ground. Again with a cargo carrier, it just kind of depends on what you have loaded on it. If you've got a lot of stuff loaded on it and your car's sagging down, it's gonna be even lower yet on the back end. So just be careful, maybe look for any accessory that has a raised shank no matter what you're looking for. Now as far as the installation goes, this install's not actually too bad. Ours was a little bit more difficult because our vehicle has been hit on the rear end so things weren't quite straight underneath there. You will have to drill out two holes to widen them to be able to fit some hardware in place. I'd say probably the hardest part for you will be is to lay under there and actually have access to be able to work under there. So if you have a set of wheel ramps or a friend of yours has a set of wheel ramps, back the car onto those wheel ramps, get it up in the air so you have more room to work. With that being said, let's go ahead and show you how we did it. To begin our installation, we're gonna need to lower our exhaust because we're gonna have to get access to the bottom of our frame rails up here. What I'm gonna do is just take some silicone, we're gonna spray it on this exhaust hanger right here to help us to pry it off. You do not want to use penetrating oil because it can start to deteriorate this rubber. So we'll have one on the driver's side and one on the passenger side. And we're gonna have a third one right in the middle where they come together. Now we're gonna take a pry tool and come up here and if you push on the side of the exhaust and pry outward, you should be able to pop it right off. We'll do the same thing for our front. Here we go. You wanna make sure you have a strap here to be able to hold the exhaust 'cause you don't wanna put all that strain on the one exhaust hanger that we have left up there. Now on our driver's side we'll have two 10 millimeter bolts we'll need to remove. Now we'll take an 18 millimeter socket on the passenger side to get these bolts removed. Now the next thing that you'll have to do is remove our two push pin fasteners. They're typically here, our vehicle's missing them 'cause there's been some damage to the vehicle, but they're right here and right here. We'll have to take those out. You just wanna flip this down because our hitch is gonna have to go up into place and then we're have to install some hardware there in a little bit. But we'll take our fish wire. We need to run a bolt through here so we'll have to go reverse fish wire, this one, you just want to stick the bolt up through. If you put it on your fish wire, take this, slide our spacer block up in there and then slide the bolt down. Now we're gonna have to reuse this fish wire 'cause they only give you two in the kit and we'll take it over to the driver's side. Now we'll take our fish wire on the driver's side, go up through spring side first. Go up through this smaller hole here, come out of the larger hole. We're gonna take that same spacer block, put it on and then our carriage bolt. Our driver's side's gonna get two carriage bolts and our passenger side is gonna get one carriage bolt and one hex bolt. Slide that over and pull it down. This one we can leave the fish wire on because we've got another fish wire for this bolt here. Now we'll do the same thing that we did for the passenger side. Reverse fish wire this, throw the bolt up in there first, then our spacer block. Wiggle around until it falls into place. Now I'll need to enlarge this hole until our hardware fits that's supposed to go in here. I found that a 15/30 seconds drill bit works just fine. Now before we get our hitch put up into place, we're gonna take the exhaust hangers and put 'em on our new exhaust hangers 'cause we're not gonna be reusing the old factory ones because obviously they're gonna be in the way 'cause they we inchesre mounted on the bottom of our frame rail. So I just put a little bit more silicone on there and they slide right on. Now with an extra set of hands we can get our hitch lifted up into place. If you've got those fish wires, you can thread those down through there and we'll take our hitch and you wanna make sure that you're over top of these plastic pieces here in the center. There we go. Now you want to take the largest of the three hex bolts that come through your kit and you want it threaded up into the weld nut in our frame. We just kind of had to fight with ours a little bit because our vehicle has very clearly been rear ended at some point so it was kind of a little bit wonky. So, but we got it straightened out and we put that bolt into place. And once you get all your hardware installed on the frame rails, so all four of 'em, we'll come back with a torque wrench and get 'em torqued down to the specifications in the instructions. And once we get our hitch all secured, you'll want to take a 15/30 seconds drill bit and drill out this hole so that we can get our hardware installed in this top bracket. Now underneath where we just drilled those two holes, we're gonna take our handle nut, put it on top, and then we'll take another conical tooth washer and the smaller hex bolts that come in your kit and thread it up through that handle nut. And we'll just tighten these up. And we'll come back with a torque wrench and torque these down. Now we just need to take our bumper supports and we'll resecure them using the hole that they give you in the bottom of the hitch. Since ours we inchesre missing, we just found some replacements. Now we can lift their exhaust back up into place. Now once you get everything back in place, that's gonna do it for installation. Hopefully this video helped you decide whether or not the etrailer trailer hitch receiver is gonna be right for you and your 2018 Ford Taurus.
Average Customer Rating: 5.0 out of 5 stars (4 Customer Reviews)
This fully welded trailer hitch receiver bolts onto your vehicle's frame with no welding required. Matte black, powder coated steel is durable and corrosion resistant and creates a rugged look.Fit perfectly, and the tutorial for mounting was on point.
Got my order within 3 days, everything looks great and I am excited to install it. This hitch is be the beginning piece of my food cart buisness. Thank yall for the fast stress free service.
Installed it myself. It can be installed by one person, but it took me three hours. If I had a helper one hour. Make sure you have a half inch drill bit and an 18 mm socket. Easy to follow instructions, but the online video is what really helps. excited to try it out. Shipping came quickly. For installation watch the video it’s much more clear and helpful than the printed directions.
I had this installed on my 2010 Ford Taurus SHO 2nd the installer had no issues during the install.
Easy install , heavy duty great construction, hidden style
I have 0 complaints and I highly appreciate etrailers instructional youtube video on how to install on my exact vehicle.
I ordered a Curt class 3 trailer hitch for my Ford Taurus. It was a perfect fit and easy installation. Great customer service by George and Meghan. I would definitely order another product from etrailer!
This was super easy to install, especially with the instructions and videos they provide you with. The hardest part was getting the factory exhaust hangers off the car before installing the hitch. Will definitely be ordering from here from now on!

The hitch and harness were a perfect fit and have worked wonderfully. Delivery was fast, and everything arrived as ordered. I was so impressed with both the price and quality that we also bought another hitch and bike rack for our company Honda Odyssey (another fast delivery and perfect fit). We'll definitely recommend you to any of our friends or associates that are looking for trailering equipment.
I am very satisfied with my trailer hitch. This it the 3rd one that I have purchased in the past 8 years.
I have used the hitch when pulling a load of 4,600 lbs ( construction boom lift ).
We are getting ready to get another new vehicle to replace a 2010 model, and we will probably purchase another hitch, so all our vehicles have towing capability.
The hitch is quality construction, heavy and sturdy. It pretty much bolts on with some minor adjustments. I had to install a slightly longer rear exhaust rubber hanger to gain enough clearance to keep the exhaust from hitting the hitch when going over bumps in the road. All in all about 4 hours of install and adjustment time. I recommend this for its solid construction.
great service, great price and Bailey did an outstanding job all around
You should have some metal working skills if you buy this hitch it’s not a factory fit not even close.
The installation of the hitch on a 2012 Taurus was very easy with the neat fishing wires. I used a wire snake that I use for threading wire to send the black wire along the driver's door channel and went through the firewall towards the outside of the power brake diaphragm directly to the battery. Definitely view the video before starting installation. Would definitely recommend product to friends.
I was surprised that this was actually available for my car. Received it in a timely fashion and properly boxed. Everything was there and bolted right up, directions were good. Took me about 2 hours start to finish. Looked good on the car and was not ugly.
I have sold the car but didn't actually use the hitch. But I was not concerned about the quality. Would buy again.
UPS delivered my product right to my shop door. Thank your etrailer for your quick service.
Easier to take the mufflers off to install.
The receiver tube is not level (1/2" difference from front of tube to back of tube)so installing a cargo carrier will require an adapter to raise the height up behind the bumper.
Would not be an issue with a ball mount.
Shipping was crazy fast! I got this hitch in less than 3 days with the free shipping! The hitch itself was very easy to install (took me just over an hour by myself) and is nice and firm, my only issue is that if I hit a pothole or a bump on the highway my exhaust hits the metal of the hitch, but that’s nothing a little piece of rubber couldn’t fix.
The trailer hitch is perfprming well and continues to be tightly attached to the car. I am satisfied with it's installation and performance.
The installation went as the directions explained, although in my case it took longer. If I did it again I feel it can be done in the time listed in the instructions. The hitch is well hidden behind the bumper except for the receiver socket.
Do you have a question about this Trailer Hitch?
Info for this part was:
At etrailer.com we provide the best information available about the products we sell. We take the quality of our information seriously so that you can get the right part the first time. Let us know if anything is missing or if you have any questions.


Thank you! Your comment has been submitted successfully. You should be able to view your question/comment here within a few days.
Error submitting comment. Please try again momentarily.