
To see if this custom-fit item will work for you please tell us what vehicle you'll use it with.
Thank you! Your comment has been submitted successfully. You should be able to view your question/comment here within a few days.
Error submitting comment. Please try again momentarily.


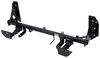
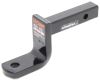
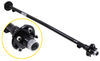
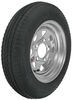
This fully welded, corrosion-resistant vehicle trailer hitch receiver is perfect for your light-duty towing needs. Draw-Tite's Tested Tough guarantee ensures that this hitch exceeds industry standards. Drawbar sold separately.
Features:
Specs:
Draw-Tite's Tested Tough program provides testing standards far superior to those outlined by the Society of Automotive Engineers (SAE), the go-to source for engineering professionals.
Each Draw-Tite trailer hitch receiver undergoes extensive fatigue testing and static testing with the ball mount that is either supplied or recommended for use with that particular hitch, thus ensuring results that are applicable to real life use. Fatigue testing is also conducted on hitches rated for use with weight-distribution systems.
In addition, Draw-Tite performs static testing on a simulated automobile, as opposed to the rigid fixture used for SAE testing, resulting in a more true-to-life scenario.
At etrailer.com we're committed to the products we sell, and to our customers. Our experienced and knowledgeable staff are available via both phone and email to address your questions and concerns for the lifetime of your hitch. The technicians at etrailer perform hitch installations on a daily basis, making them a valuable resource for do-it-yourselfers. The one-on-one, personal service you'll receive comes straight from an expert in the towing and automotive field. We've installed it, we've wired it and we've towed with it, so whatever your question, we can answer it.

Videos are provided as a guide only. Refer to manufacturer installation instructions and specs for complete information.
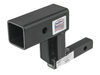
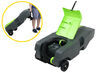
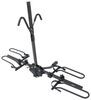
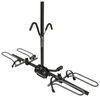
Hello neighbors, it's Brad here at Etrailer and today we're taking a look at installing the Draw-Tite trailer hitch receiver on a 2024 Hyundai Venue. This is what your hitch is gonna look like when it's installed on your Venue and it is gonna be an exposed cross tube, meaning you're gonna see a good portion of the hitch hanging down on the fascia, but this car does hit relatively low so you're really not gonna see a whole lot unless you're directly behind. And you do have a inch and a quarter inch receiver tube opening. And this is a class one hitch and generally, you're gonna find those on smaller vehicles, things that really aren't designed to tow trailers. Now that's not to say you can't do that with this, I personally have an inch quarter on my car that I use for a bike rack, you can also put a cargo carrier on there, and I can pull a small kayak trailer if necessary. And our neighbor today is gonna be using it to take the trash to the dump site at the RV site that way they don't have to use their camper.
So this is a great way to really utilize your vehicle in a bunch of different ways. Whatever accessory you may pick up is gonna require a half inch pin and clip. Now this is not included with the hitch. A lot of times when you pick up accessories, they'll have them included. If you plan on leaving your accessories on your vehicle, you might wanna look into a locking pin and clip.
That way you can lock it in place and know that no one's gonna walk away with it. Now, as far as towing or using your accessories, you do want to adhere to the weight capacities of your hitch. And in a class one, you're gonna be limited to 2000 pounds for your gross trailer weight rating, which is gonna be the weight of the trailer plus the accessories loaded onto it. Your tongue weight rating which is gonna be the downward pressure on the inside of the receiver tube opening, comes down to when you have a cargo carrier or bike rack on the back. You're gonna want to keep that under 200 pounds which is the limit.
Now there are cargo carriers available, an inch and a quarter, so just make sure you stay under that 200 pounds. And with the bike rack, generally you're gonna limit it to two bikes. Just make sure you're checking the weight of the bike rack as well as the bikes that you'll be loading onto it. And as long as you stay under those numbers, you should be safe. Good little reminder though, you might wanna check the vehicle's owner's manual before towing, check what it's capable of towing, and then compare that with the hitch numbers, as well as any of the accessories you'll be using to tow.
Now a lot of your cargo carriers and bike racks have the ability to stow in a vertical position and you do wanna make sure that it's gonna be able to fit on your vehicle. So from the center of our hitch pin hole to the furthest point of our fascia, coming in about two inches. So I don't worry too much that you're not able to use that, a stow feature, keep in mind you're probably not gonna be able to open your hatch with those stored up but you can just simply drop those down if you need to gain access to your hatch. Now what's also important is your ground clearance. So from the top of the receiver tube opening to the ground, it's coming in 11 and a half inches. And that's gonna be important for choosing accessories that might have an upward shank to kind of get that away from the ground because as you have suspended accessories, as you go up an incline, they do wanna tilt towards the ground or if you're going over large bumps, just keep in mind that you don't want those bottoming out. This is also gonna be important if you do plan on pulling that small trailer, you can measure the coupler of your trailer and then determine the riser drop necessary for this vehicle. In this one, you really only want to go in a rise position, but hopefully this determines how high you need to go. And when it comes to installing your hitch, this one's actually not too bad. You are gonna be removing a few little plastic panels and you'll have to trim just a minor amount, but really it just kind of bolts up to spots that are already there. And you're gonna use the tow hook as well with the combination of hardware. So looking at the instructions, it does look like there's a lot there, but really step by step, it's not too bad. And I'm gonna walk you through all the steps to make sure you get yours installed. So let's take a look at that. To begin an installation underneath on our driver's side, we have this plastic panel. It's right behind our canister. And to get this removed, it's gonna be two plastic push pins and then it just hangs on some studs. So to get these popped out, you'll just simply pry on one of the four slots to get the center portion to come out. From there, you can normally pull these out and you might wanna have a nice organized spot to keep your hardware as reinstallation will be that much easier when you have it ready to go. And once we pull this off, it's just these plastic caps on the stud, there's two of 'em. This will not be going back on. We're not gonna have the clearance for it once the hitch is installed. So you can hold onto this, you can do whatever you want with it, but it will not be going back on the vehicle. Now we're gonna head to each of the wheel wells and you're gonna find that we have this plastic cover that we have two plastic push pins on the bottom. So we'll get those removed first. And then as you head to the inside of the wheel well, we're also gonna have two Phillips-Head screws. And to get there it's gonna be kind of tight. Even a stubby Phillips-Head might be tricky to get here in between the tires. So I just have this small quarter inch ratchet and I put my bit in there. I'll go ahead and get those removed. Once you get those screws out and the plastic push pins, it should be able to open up like this and we'll just go ahead and repeat the same process on the other side. Now, we need to lower down our muffler and to do that it's gonna have some exhaust isolators. Near the tailpipe side, it's got two metal tabs that go through with your rubber exhaust hanger. We also go back and you'll see on the backside of the canister there's also one. Now as we pull those off, the muffler's gonna wanna drop down, so you may wanna support it. There is this traction beam that it's not gonna allow it to drop all the way down, but you don't wanna put stress on the exhaust. So if you have a block of wood or something there for when you drop it down for it to rest on, that's probably not a bad idea. And to get these off it's pretty easy, you can use a long flathead screwdriver. I do recommend maybe a little bit of lubrication. Sometimes these can kind of seize up a little bit. So to make it a little easier, just some soapy water, you can spray it on there, and gonna allow that rubber to glide over the metal. And then we can just wedge it on this and pry back. And then from this one, a lot of times you can use the metal hanger that's welded onto the exhaust to kind of pry against it and get this popped off. And then just be careful 'cause this will wanna drop down so we can have that rest on this traction beam. And I think that's gonna be good. It's gonna give us that space to be able to get our hitch up. And we need to head to the end of our frame and this is where it bolts up to the bumper beam. And there's some bolts that attach to weld nuts that are on here. So you're gonna wanna go on the backside and go to the outer portion. So towards the outside of the vehicle. And with a 12 millimeter either ratchet or ratcheting wrench, I'm gonna go ahead and remove this bolt. And we're also gonna be doing this on the passenger side as well. On the passenger side it's gonna be the same thing. It's a little bit lower as far as location wise, but same thing, we're gonna get this removed. We're gonna be modifying the fascia just a little bit here. There's this tab, it's gonna be kind of on the side here where this bump is. And this is where that canister cover kind of mounted up. We're gonna cut this off. So if you have a, honestly, a utility knife will cut through this, if you have a small saw. And this is not the fastest method, but if you have a box knife handy this will accomplish the job. And I'll just clean this up a little bit. Now in the instructions they're gonna tell you that you need to cut a one inch notch and there's measurements for that. It does say optional and we may end up needing to trim those just to make clearance for our hitch. But before just cutting, I'm gonna go ahead and move along with the installation. And if it does require trimming, I'll let you know. But for now, you're gonna want to grab your hitch and I'm gonna get my hardware so we can get our hitch put up in place. What we're gonna do now is grab our flat washers. We should have four of the half inch and four of the three eighths. So grab those from your kit. And we're gonna be taping these on to act as a space to make sure that it bolts up properly. And the larger ones are gonna go on our inside holes here. So just with some painters tape, what you'll do is you'll stack two of them and just run a strip across it. And then once it's kind of taped in place, you can just poke a hole through the center. The smaller washers are gonna go on the outside. So take two of those and we'll tape these in place as well. We'll just poke a hole through there. You can use the screwdriver, whatever you have handy. That way we can get our hardware passed through. And then we'll just repeat the same process on the other side. Grab the large spacer block included. There should only be one of 'em and one of the carriage bolts. And this should drop into place here. We'll then put this on our tow hook 'cause this is gonna clamp up on our hitch to bolt that down. So we want that in place before raising it up. Now I'm gonna give you a little bit of a insight into what we're gonna be doing when we raise the hitch up because as you're holding it, you're gonna wanna make sure you have everything ready to go. So get your carriage bolt and drop it into a spacer block. We're gonna have one on each side so you can repeat that process. And this is going to go through the hole that's on our frame here on the opposite side of where that weld nut was that we removed the bolt. This is gonna pass through here. Our hitch is gonna slide behind and then we're gonna be finishing that up with a conical tooth washer. The teeth need to bite into the hitch, so just have it in this orientation. And then we're gonna have a nut that we're just gonna kind of get hand started. So that's gonna be what we are gonna first look to do is raise it up, get the hitch slid on there, and to give ourselves a little bit of extra room as much as it seems tempting to leave this here. Probably want to keep this out, we'll just raise the hitch in place, pass this through, make sure it goes through the washers, and then we'll get those started on both sides. So as we raised this up, we'll just slide it up in place and go over the exhaust first and then slide this past the fascia. And then as I have my hardware ready, I'll pass this through, making sure that we go through both those washers. So if you need to align those up to get that hole to pass through, if it moved on the tape, go ahead and do that. With that passed through, I'll just take my conical tooth washer, get that started with the nut, and then we'll repeat on the other side. And you can see I'm doing this myself, but it is helpful to have an extra set of hands and that way it's supported until you get your hardware in place. Now if those washers do fall out, what you can do is just loosely get your hardware started and that way it's supported. And then as you get your other hardware to support it, just leave a gap. You can always pull that hardware back out, slide it back in place. Just make sure that you have two per hole once you have it all installed. With those in place, we can then go to our tow hook, carriage bolt, and spacer block that we had. We'll finish that up with a conical tooth washer and then nut. Now on the outside where we remove those bolts previous, we're gonna be using new hardware to replace it. We also have a small conical tooth washer. We're gonna have one of these on both sides. So same thing, just make sure it passes through your washers and you may need to play around with the hitch to get this to align, but you should be able to thread that into the factory weld nut. With all of our in place, I'm gonna start snugging it all down. So we're gonna be using a three quarter inch socket for the larger carriage bolts. Eventually we're gonna go to a 12 millimeter for those small ones that we went through the weld nuts. Now, we're just gonna snug this down. There's torque settings associated with the hardware, so we'll use a torque wrench later. So no need to get crazy here. These ones are a pretty large torque setting so being able to use something electric should be fine. So we'll go ahead, we'll get this one first and then we'll draw these ones in. (machine whirring) Now when getting those bolts in the weld nuts tightened down, I said it was a 12 millimeter, that's what originally it came with but it's actually gonna be a 13. So swap over to a 13 mil socket and then we'll get this snug down. (machine whirring) So for those torque settings, just use the instruction manual and use your torque wrench accordingly. And if you need a torque wrench, you can generally go to an auto parts store and rent one for free. We also have 'em here available at Etrailer, but this is gonna make it to where it's gonna be tight enough for the lifespan of the hitch obviously to be able to use it, but also not too tight, especially when it comes to weld nuts, if you go overboard on those they can actually break those off. So using torque settings is gonna be important here. So we'll just go through and get this all torqued down properly. With all that hardware properly torqued down, we've officially installed our hitch and now we just need to get our push pins put back on the wheel liners as well as those screws and we'll also get our exhaust put back in place. But this is why a lot of times I like to test fit things because I'm glad we didn't cut this out. It's completely unnecessary. Yours may be different, it kinda depends maybe on trim level, but from what I found with our Venue today, we didn't have to do any cutting. So I'll get everything put back together and then all that's left to do is load up your accessories and hit the road. And that was a look and installation of the Draw-Tite trailer hitch receiver on a 2024 Hyundai Venue.
Average Customer Rating: 4.7 out of 5 stars (146 Customer Reviews)
This fully welded, corrosion-resistant vehicle trailer hitch receiver is perfect for your light-duty towing needs. Draw-Tite's Tested Tough guarantee ensures that this hitch exceeds industry standards. Drawbar sold separately.
It was the etrailer’s fault to ship defective products and I was not reimbursed for the labor so, no I would not recommend this company and their poor customer service.
Very nice kit
Perfect fit for my vehicle. No drill fit with all the necessary bolts and great installation instructions. You do not need to drop the muffler, but might be a bit easier if you want to go through that extra step.
I got it on in about 2 hours without a lift. Two strong people is a benefit. Take more screws off of the wheel well covers. You can reach your hands through to tighten the 3/8 bolts. One guy did this without dropping the muffler. I had to drop the muffler. It was not necessary to trim the fascia. There was plenty of room without trimming. make sure you get that bolt on the center tow support first. Then, the weight is off you. I found it best to have my son hand the hitch to me while i was on my back under the car. Then I bench pressed it into place. Getting that first bolt on can be tricky. You can take the rubber hangers off of the muffler by hand by using WD-40. They come off with a good pull. They rated this a 9 out of 10 difficulty rating. I would agree with that. It's a great product. Just give yourself 2 hours.
I have purchased several different hitches from this company and never had any problems
everything good except for original back order. very professional.
Great product
Fit great, easy install
service and sales heip all mavelous
Great fit! Real QUALITY
Works well was not hard to install
Fits perfect
Couldnt use the hitch, drilled the holes and was about to mount it and the was able to. There is and area where the spare tire bump in the center hit the hitch and made it impossible to make it fit.
Instructions are poor. Instructions have you cut off a lot more of the heatshield than is necessary. You also have to tape 2 of the wires for installing the bolts into the frame together for them to be long enough to reach the bolts closest to the bumper. The original wires are too short by a few inches. Why wouldn't you make them a little longer so this isn't necessary?
Also, hardware bag was missing parts and etrailer's attitude about the issue was very poor. They sent me additional hardware that was delivered 5 days later after I requested 2 day shipping and offered to pay additional money to ensure I could complete the install in the time frame I needed it completed by. I even spoke to a supervisor who blatantly lied to me and assured me I would have the parts in 2 days.
Installed super easy under an hour. I used a step drill bit 1.125 inch to enlarge the bolt access hole instead of a die grinder. Worked much easier.
What you see is what you get. Well made, could have some slight more bracing but I’m used to 2 inch hitches not 1 1/4. So tbh it exceeded my expectations so far. The install wasn’t to bad the muffler was a slight pain but those pull through wires that thread onto the carriage bolt were amazing!!! My friend and I made up our own fitting instructions as to save much more of the heat shield and body pane underneath. Photos attached!
Install date-7/1/2021
Vehicle -2021 Mazda CX-30 2.5T
Overall fit is excellent but installation is a bit more complex than other hitches. The concept is the same as most hitches-you have some bolts and hardware to fish through the frame using some music wire that is coiled to thread on to the bolts. It works very well and secures the hardware throughout the process. So as long as you are careful and deliberate there is never any danger of losing the hardware inside the frame of the car. Also typical is the requirement that some pieces be removed in order to access the mounting points on the frame. In my case it was the exhaust hangers for the muffler and a little trim piece below the rear bumper. The instructions say to permanently remove the trim piece but instead I chose to cut it out for hitch clearance and reinstall. I recommend this as the piece was easy to cut with a utility knife and does tie the rear bumper cover down and keep things stationary. The mounting holes for the hitch lined up perfectly and the final product looks great.
There are two reasons for the 4-star review rather than 5-
>Installation is a bit more complex than other hitches. Rather than a simple bolt on operation you need to enlarge two access holes in the frame of the car to get the hardware into the vehicle. This requires use of a die grinder or something else that can grind the thick frame material in tight quarters. The process is outlined in the instructions so it was not unexpected during the process but I would rather not grind off the factory rust protection.
>The hitch does interfere with one of the muffler mounting brackets on my car. The rear driver side mount on the muffler is about .5mm away from the hitch once installed and the movement allowed from the rubber exhaust mounts allowed the exhaust system to contact the hitch every time the car hits a bump. It is very loud and constant inside the car and completely maddening in a matter of seconds. Fortunately I had a new set of die grinder bits from the installation and ground a recess in the muffler mounting bracket that solved the problem. The amount of material removed was about 2mm so I do not think I will have any structural repercussions as a result.
Overall a great product and will do the job of hauling a bike rack perfectly but not 5-star worthy due to the modifications to the vehicle necessary for install and proper function.
Price from etrailer was good as always. Directions were nice and clear. Ended up doing my own trimming and was able to save one fastener location and more of the panels. Hitch itself was decent overall. Very solid, the wide brackets were the same thickness of the class 3 I bought at the same time for my truck. Had a missing chunk of paint on the visible edge of the safety chain bracket and started surface rusting the first time it rained. Will have to sand and paint that. Would be nice if they gave 2 long and 2 short pull wires instead of just 4 short ones you have to twist together (minor gripe, I know).
The Draw-Tite trailer Receiver is a true custom fit for my 2021 Hyundai Elantra SEL.I was very happy with the Draw Tite receiver for my 2017 Hyundai Elantra that one I installed it took about a hour, but the one for my 2021 Elantra was going to take about two hours so I had MP body shop install it great job.I added some pictures check them out.
Always a pleasure working with etrailer. I bought my first hitch last year and it worked perfectly was easy to install and pulled my boat perfectly. I traded my car in for a 2021 Elantra And no one carried a hitch for it yet. Thank etrailer for making one so quickly and getting me back out on the water. Thanks for the quick replies when I email you. I highly recommend etrailer.
No-one locally seemed to be able to supply a hitch for our new car. We can only fit one bike in the back, so I had to ride my MTB on the road to meet my wife at the trailhead. The hitch arrived only two days late and I was able to have it installed immediately. Now we can get to the mountain bike trails together. I have enclosed photos.
Thank you very much.
2022 Mazda CX30 Turbo mostly pulling a 5x10 utility trailer.
Total installation also installed wire kit took me around 3 hours.
Draw-Tite via etrailer won the race to produce the first receiver hitch for the 2021 Kia K5. I've been waiting a year for this and am very happy with this product. I had it professionally installed and the installers encountered no problems. It looks and works great.
Do you have a question about this Trailer Hitch?
Info for this part was:
At etrailer.com we provide the best information available about the products we sell. We take the quality of our information seriously so that you can get the right part the first time. Let us know if anything is missing or if you have any questions.


Mark
1/19/2022
Still extremely happy with this product. Would definitely buy again!