
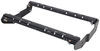
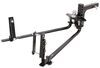
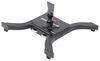
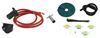
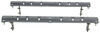
Draw-Tite Max-Frame Trailer Hitch Receiver - Custom Fit - Class IV - 2"
(40 reviews)
Price: $224.88
In Stock
Draw-Tite Max-Frame Trailer Hitch Receiver - Custom Fit - Class IV - 2"
Item # 76320
Retail:$342.89
Our Price: $224.88
You Save: $118.01
Will this fit?
To see if this custom-fit item will work for you please tell us what vehicle you'll use it with.
In Stock
Thank you! Your comment has been submitted successfully. You should be able to view your question/comment here within a few days.
Error submitting comment. Please try again momentarily.


- All Info
- Reviews (40)
- Q & A (0)
- Videos (1)
- Photos
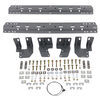
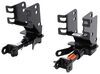
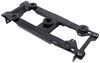
Draw-Tite Trailer Hitch - 76320
- Class IV
- 2 Inch Hitch
- 6000 lbs GTW
- Concealed Cross Tube
- Draw-Tite
- 900 lbs TW
- Custom Fit Hitch
Fully welded vehicle trailer hitch is strong and durable. Draw-Tite's Tested Tough guarantee ensures that this hitch exceeds industry standards. The combination of an e-coat base and a powder coat finish provides excellent rust protection.
Features:
- Custom-fit trailer hitch lets you tow a trailer or carry a bike rack or cargo carrier with your vehicle
- Computer-aided, fully welded steel construction ensures strength and durability
- Tested Tough - safety and reliability criteria exceed industry standards
- Easy, bolt-on installation - no welding required
- Complete hardware kit and installation instructions included
- Lifetime technical support from the experts at etrailer.com
- Black powder coat finish covers e-coat base for superior rust protection
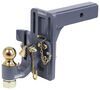
- Sturdy, square-tube design
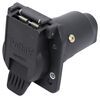
- Ball mount, pin and clip sold separately
Specs:
- Receiver opening: 2" x 2"
- Rating: Class III
- Maximum gross trailer weight: 6,000 lbs
- Maximum tongue weight: 900 lbs
- Not rated for use with weight-distribution systems
- Limited lifetime warranty

Draw-Tite Tested Tough
Draw-Tite's Tested Tough program provides testing standards far superior to those outlined by the Society of Automotive Engineers (SAE), the go-to source for engineering professionals.
Each Draw-Tite trailer hitch receiver undergoes extensive fatigue testing and static testing with the ball mount that is either supplied or recommended for use with that particular hitch, thus ensuring results that are applicable to real life use. Fatigue testing is also conducted on hitches rated for use with weight-distribution systems.
In addition, Draw-Tite performs static testing on a simulated automobile, as opposed to the rigid fixture used for SAE testing, resulting in a more true-to-life scenario.
etrailer.com Technical Support
At etrailer.com we're committed to the products we sell, and to our customers. Our experienced and knowledgeable staff are available via both phone and email to address your questions and concerns for the lifetime of your hitch. The technicians at etrailer perform hitch installations on a daily basis, making them a valuable resource for do-it-yourselfers. The one-on-one, personal service you'll receive comes straight from an expert in the towing and automotive field. We've installed it, we've wired it and we've towed with it, so whatever your question, we can answer it.
76320 Draw-Tite Class 3 Trailer Hitch Receiver - Max-Frame
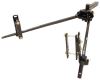
Installation Details
This Product Fits The Following Vehicles
- 2020 - 2024 Lincoln Aviator
- 2020 - 2024 Ford Explorer
California residents: click here


Video of Draw-Tite Max-Frame Trailer Hitch Receiver - Custom Fit - Class IV - 2"


Videos are provided as a guide only. Refer to manufacturer installation instructions and specs for complete information.

Video Transcript for Draw-Tite Max-Frame Trailer Hitch Installation - 2020 Ford Explorer
Hi there, Ford owners. Today in your 2020 Ford Explorer, we're going to be taking a look at and showing you how to install Draw-Tite's Class III 2" Trailer Hitch Receiver. And this is what our hitch looks like when it's installed. The cross tube is going to be hidden completely behind the bumper, so you're only going to see the receiver here at the back. It's a Class III 2" Trailer Hitch Receiver, so it's going to be great for all of your towing needs, whether you want to put a bike rack in it and load it up with four bikes or fully load up a cargo carrier, or if you want to hook up a pop-up camper or bring some Jet Skis to the lake with you to the weekend. It uses a five-eighths inch hitch pin and clip.
One doesn't come included with the hitch, but we have plenty available here at etrailer.com.You also notice a small hole just to the rear of our hitch pin hole and that is for a J-pin. A J-pin is similar to your hitch pin, but it will wrap around and go into the end on one side, a little J-hook, and the other side is threaded down, so it pulls it tight against anything inside the receiver, acting as an anti-rattle device. On bottom, we have hoop style safety chain loops with a very large opening that should accommodate just about every shape, size and style of safety chain. It features a 900 pound tongue weight, which is the force going down on top of the receiver. And like I mentioned earlier, you could easily put a four bike platform rack on it and fully loaded up with that or any of the cargo carriers we have available here at etrailer.com can be inserted in here and load it up to the maximum.
It also features a 6,000 pound gross towing capacity, which is how much they can pull behind it. And again, like I said before, you could have your pop-up campers with that easily.Take those with you. You could bring some medium size trailers as well with you. Now I've got some measurements for you to help you when deciding on accessories. From the center of the hitch pin hole to the edge of the rear bumper, it measures about five inches.
This is important when determining if any of your folding accessories can be placed in the upright storage position without contacting the bumper. And from the ground to the top inside edge of the receiver tube, it measures about 15 and a half inches. This is important when determining if you need to drop or rise or raise shank on any of your accessories. Now that we've gone over some of the features, let's go over the installation together so you can have the confidence to do it at home. We'll begin our installation underneath the vehicle by removing the under shield.
There are four bolts across the back here we're going to remove with a seven millimeter socket. On each side of the under shield, you'll have two nuts. We'll take those off with a 10 millimeter socket.Then at the front of your under shield, you'll have two push pins. We're going to remove those with a flat bladed screwdriver or a trim panel remover tool. You'll want to insert your blade between the head of the pin and the other side of the pin. Once you've separated them, you can pull out on the center and then the entire pin will just pop out after that. We're going to do the same thing with the other pin over here. With both pins removed, we can lower down our under shield and set it aside. We're now going to be lowering down our exhaust, but before we do, we want to put a strap in place to ensure it doesn't lower down too far and cause any damage to anything. So we're just going to hook a strap underneath and run it up just to act as a catch. To lower down your exhaust, we're going to remove the bolt that holds the hanger on, on each side.So we've got dual exhaust here, so there's our hanger and just above the top of the hanger is where your bolt will be, we'll use a 10 millimeter socket to take this bolt out. You'll want to be careful because the heat shield is near here. It can be pretty sharp. And then we're going to take the bolt off on the other side. You can see that it's loose on this side, so we're going to repeat that on the other side. We're then going to remove the hangers towards the front of the vehicle. They're closer to the center. There's one on each side. You can spray them with some lubricant to make it a little bit easier. Ours are already pretty wet from the weather outside, so we don't really need to use any. And we're just going to use our pry bar here to pry it off of the hanger, just like that. And you can see that's why we put our strap in place. We'll do the same thing here on the other side.Now that we've got all the hangers loose, we can go back to our strap. You'll want to support your exhaust a little bit and then just gently lower it down. We've got plenty of room to work there. We're now going to measure our heat shield. Now there are a couple of ways you can do this. You could take your heat shield off first and then cut or you could do it while it's on here. Since we're going to try using a hole saw, since we're going to be cutting a hole in the heat shield at about this spot, you'll want to refer to your instructions for the exact measurements from the distance of the hole. And we're going to cut a hole there. So the problem with taking it off first, if you're going to use a hole saw to cut it, is the hole saw could potentially catch and this is very sharp metal, so you could cut yourself.The other option is to take it off and just use tin snips and you have to cut a line down it to get to the hole to make the whole cutout, but that would be the safer option. We're using a one and a half inch hole saw to make this cut. You'll also want to be careful when removing that little piece. If it gets stuck, you want to use your screwdriver or something to get that out of there because it is also going to be very sharp. And you can see behind it is our access hole where our hardware is going to be passing down. We will still need to take the heat shield off now. We're going to repeat this same process on the other side before taking it off though. To remove our heat shield, there's going to be two nuts and one bolt. We're going to use a 10 millimeter socket to remove. There are then two more bolts we'll have to take out. There's one here on the side and then one just behind the tire. You can see it sticking out right there.These ones though are going to be a seven millimeter socket. At this point now, it will just pull down. You'll see there are some star cutouts, so you are going to have to wiggle it and give it a little bit of a tug to slide off of those bolts. And once it pops off of there, we'll just work it out. We'll set this one aside and then we're going to perform the same procedures on the opposite side to remove the heat shield over there. There's a bolt towards the back of the vehicle on the frame we'll need to remove using a 21 millimeter socket and we're going to remove the one on the other side as well. Next, we'll need to trim out the center of our fascia for our receiver to fit through. You'll want to refer to your instructions for the template. I've gone ahead and marked it out here, so you can see where I'm going to be cutting, and you can cut this either using a pair of snips or a cutoff wheel.I'm going to go ahead and use a cutoff wheel because it is connected to another support panel behind it and we're going to need to cut through that as well. The only thing else I recommend for you is to just double-check to make sure there's no wiring there. Depending on the options you have on your Explorer, there may be wiring that you need to relocate out of the way. We don't have any wiring on ours in the way there. And then I'm going to continue cutting through the second layer here as well. Now that we've got it all cut out here, I'm just going to use a file, you can also use a razor knife, and go back and clean everything out. I just prefer the file over the razor knife because there's less potential to accidentally cut yourself. We're just looking to knock off the rough edges to give it a nice, smooth look.Next, we'll feed in our hardware. So we're going to take a fish wire, go from the front-most hole, feed it towards the back of the vehicle until we come out the larger hole here. Once we get there, we can take our spacer and our bolt, we're going to slide the spacer over the coil then first, then thread our bolt on. You can even take the spacer, if you want, and push it all the way up into the frame. I'm just going to get the bolt on first, push one piece up and put in the second piece, and we're just going to pull our fish wire back down. We're going to do the same thing with this hole on the other side and then we're going to come back to this hole here and we're going to do the reverse fish wire technique, where we take our bolt and our spacer and we place the spacer on the fish wire first, then put the bolts on it.We can then push the bolt up into the frame, followed by our spacer, and pull it back down. And again, we're going to do that on the other side as well. Now with an extra set of hands, we're going to lift our hitch into position, making sure to feed our fish wires down through the holes in our hitch. The fish wires are going to go in the forward most holes. You may need to pull down on the fascia a little bit to get the hitch to fall behind it. We'll then take our factory bolt that we had removed and we're going to thread that in. And then once you do that on each side, the hitch will hold itself up, making it easier to install the rest of your hardware. Now that we've got our hitch up here, you want to double check your cutting to make sure that it all fits okay.Make any adjustments if necessary and then if everything's good, you can clean up any markings that you've made. Now that we're satisfied with the cutout at the back, we can finish installing our hardware. We're going to remove our fish wires, place a conical tooth washer over the bolt with the teeth facing up towards the hitch, be careful not to push the bolt back up into the frame, and then thread a nut on the other side of the bolt. We're going to repeat that for the other bolt on this side and then the two bolts on the other side. We can then go back and tighten down our hardware. The nuts with the conical washers, we'll tighten with a 19 millimeter socket and the factory bolts, we're going to use a 21, just like we did to remove it. And then we can go back and torque the hardware to the specifications found in our instructions. We can now reinstall our heat shields. The holes that we cut out should fit right over the bolts.If they don't want to fit, you may need to make some small additional trims. And then we'll just re-install the hardware that we had removed. We can now reinstall our exhaust. A little bit of spray lubricant will make it easier to re-install it. Just give a little squirt there and lift them up and just slide the hangers back into the rubber isolators. And you also want to reinstall the bolts for the hangers towards the rear of the vehicle as well. We can now take our strap down and then re-install the under shield in reverse order of how we took it off. Now with everything re-installed, we're ready to hook up our trailer and hit the road. And that completes our installation of Draw-Tite's Class III 2" Trailer Hitch Receiver on our 2020 Ford Explorer.
Customer Satisfaction Score:
96% were satisfied with this product
4% of customers were not satisfied
- Product did not meet expectations
- Wrong item was ordered
- etrailer mistake
Customer Reviews
Draw-Tite Max-Frame Trailer Hitch Receiver - Custom Fit - Class IV - 2" - 76320
Average Customer Rating: 4.5 out of 5 stars (40 Customer Reviews)
Fully welded vehicle trailer hitch is strong and durable. Draw-Tite's Tested Tough guarantee ensures that this hitch exceeds industry standards. The combination of an e-coat base and a powder coat finish provides excellent rust protection.by: Stephen10/25/2023
I got the trailer hitch and install was simple but the 2 pre drilled holes for the receiver pin weren't aligned, off about 1/2 inch.
by: Stephanie09/25/2022
2022 Ford Explorer
I was really excited to get this. I was told it would be in within a week. 3 weeks later I finally got a notification that it was going to be delivered. It was delivered on a Saturday. My husband and I were so excited we opened the box only to find out that this was an already used trailer receiver. I immediately called the company and they offered to put another order in, but it was going to be middle to end of October before I would get it. Unfortunately, we are leaving for a trip and we can't wait till middle to end of October. They said that they would send me a shipping lable and I would ship it back. It has been over a week and I've yet to see a shipping label come in.

Jenny N.
10/11/2022
I will have Customer Service reach out to you. In general the labels are emailed to you.
by: Joseph 12/17/2021
Follow directions & watch video. Anyone can install....Merry Christmas & Happy New year staff @ etrailer

Joseph

1/3/2023
After one year no issues we use it for light towing around town & for our bike rack... love the product & would make further purchase from etrailer
by: Adam11/04/2019
2020 Ford Explorer
The 3 stars is because I read that I can't use my WDH, which is a first for me...and because it took me over 4 hours to install this hitch!
OK, so I've installed probably 15 hitch's on trucks and SUV's in the past 20 years, and this was, by far, the most challenging. Note: the tech support at etrailer was great though, I actually could talk to someone on a Sunday afternoon...Thank you! And is the main reason I chose to pay a little more and buy from etrailer.
Why this was so challenging is because several, hard to reach panels and fasteners, had to be removed, and cut and fabricated. Lowering the exhaust turned out to be the easiest part, with just a little simple green on the rubber mount, so they could slide easily out. The exhaust heat shields could not be full removed without the car being on a lift, they could only be slid to the side. So I had to wedge a grinder in there with a slicer wheel to cut the hole for it to clear the new carriage bolts when put back in place. I tried the snips they recommend, but that metal is way to thick, and I couldn't get the correct angles to get leverage on the snip handles. Then there's the issue of fishing the carriage bolt and spacers down the vehicle frame which kept getting hung up somewhere, so I ended up just using a dremmel and an abrasive wheel to widen the rear mounting holes. Then getting the hitch in place takes two strong guys, because it seriously has to be wedged and tucked under the bumper cover just right. Finally cutting the slot on the bottom of the bumper cover/fascia is also tricky, because if you don't cut it just right, there will be a bulge on one side of the bumper bottom. I'd suggest to etrailer, they include a cutting template that could be aligned with the inner edge. After everything went back together, the heat shields didn't sit as flat because they are on top of the hitch now, and were rubbing on the exhaust, so I had to bend the heat shield edges in so they don't hit the exhaust. I ended up using a grinder, dremmel, impact wrench, cut-out tool, three different extensions, and a handful of other tools.
I hope this helps all those attempting to do this yourself...
by: Alicia07/13/2022
This is the second time I have ordered from etrailer and both experiences have been extremely positive. First, not having to deal with UHaul is EVERYTHING. UHaul has been repeatedly unreliable, both in getting the hitch we needed on time and on even being there for scheduled appointments. etrailer has taken this stress off of us. Now, we can get the product we need, in a timely manner (it only took us three days to get the part!) and have our local car repair/service guy install it. Thank you etrailer!
by: Rich W.06/26/2022
Took a rookie about 1.5 hours to install. Only took that long as we doubled checked everything to make sure no mistake was made.


by: Donn05/19/2020
Ford Explorer
Hitch for my 2020 Explorer shipped immediately, was well made, and included the wiring. The cost for this hitch and the installation was less than the factory hitch, and it is does not require having to pull off a section of the rear bumper fascia every time you want to install the hitch.
by: Mike 10/31/2022
2022 Ford Explorer
A quality product, and I’m installing it myself with easy to understand instructions and video. I would definitely recommend etrailer.com for your towing needs.
by: Krystal09/24/2021
After ordering another hitch for another vehicle, we are extremely satisfied with etrailer.com. We have bought two hitches (for 2 separate vehicles) along with a cargo basket. We are extremely happy with etrailers.com customer service as well as fast delivery of our products.
by: James 06/03/2021
2021 Ford Explorer
First of all it was a pleasure dealing with etrailer, I received my Draw -Tite-Max-Frame trailer hitch receiver within a week of ordering. The unit is solid, well constructed and fairly easy to mount.
by: Tom S01/14/2021
Ford Explorer
Very good quality hitch. Installed it myself in a couple hours. All went well . The instructions were spot on. Fit my 2020 Explorer like a glove. Great doing business with etrailer.
by: Rob 03/20/2020
2020 Ford Explorer
Just got my new hitch. During quarantine I am going to install this on my car. This is my second one of these hitches. Pretty easy to bolt on (from what I remember a handful of years ago on my other car). Can't wait to get this on so I can take my bike with me.
Also, this came fast. Ordered Monday and here today.
by: Mark 04/15/2021
2021 Ford Explorer
Really simple to install. No issues other than needing a hand for about 2min to install hitch. A hole saw is a must and I used tape to cut out facia for clearance for the hitch.
by: Craig 12/31/2019
Ford Explorer
It fit but you have to do a lot of cutting and drop the exhaust. Note the bolts they provide to mount the hitch need to be cut and ground down on a 2020 Explorer or the mufflers on both sides will rattle and vibrate thru the SUV making a great noise!!!
by: Alice 12/08/2022
Great service and excellent work
by: Phillip08/26/2022
fit as intended. does require some mechanical skill to install good product.
by: Chris 12/16/2022
Fast shipping!!!
by: Jason 10/26/2020
2020 Ford Explorer
Perfect add on to tow a 4 wheeler. Assembly was pretty easy to install.
by: Bernardo08/04/2022
Missing my hitch that I paid for
by: Stephen10/25/2023
by: William02/12/2021
Does the job for me
by: Jerre02/22/2023
by: Fred 10/09/2022
by: Michael09/06/2022
by: Dave 01/08/2020
great service
25
40
Show More Reviews
See what our Experts say about this Draw-Tite Trailer Hitch
- Trailer Hitch For 2020 Ford Explorer and Bike Rack For Carbon Fiber BikeI recommend the etrailer Trailer Hitch Receiver part # e29YR to carry 2 bikes on the 2020 Ford Explorer. The etrailer hitch is a Class III hitch will give you plenty of options for bike racks. The hitch is a bolt on hitch that doesn't require drilling but require a bit of fascia trimming. The best thing about this hitch is it's concealed cross tube design. The only portion of the hitch that will be visible after installation is the receiver portion so it has a nice sleek look on your brand...
view full answer...
- Recommended Trailer Hitch for a 2020 Ford ExplorerI recommend the Curt Trailer Hitch Receiver part # CU78FR for a 2020 Ford Explorer. I features a custom bolt-on fit with no drilling or welding required. It also has a hidden design which means only the receiver tube will be shown therefore you get the best overall install look and most ground clearance. It also will still allow for the use of a hand free liftgate feature if present. The same can all be said for the Draw-Tite Max-Frame Trailer Hitch Receiver part # 76320 as well as they...
view full answer...
Do you have a question about this Trailer Hitch?
Info for this part was:

Expert Research:
Mike L

Expert Research:
Jameson C

Edited by:
Lindsey S

Video Edited:
Jacob T

Video by:
Dustin K

Updated by:
Leah S

Updated by:
Wilson B

Written by:
Alexander C

Test Fit:
David F
At etrailer.com we provide the best information available about the products we sell. We take the quality of our information seriously so that you can get the right part the first time. Let us know if anything is missing or if you have any questions.
Product Experts Available Now!
Call 1-800-940-8924
Brooke M.
11/4/2023
That sounds like a manufacturing defect. I will have our customer service team reach out to you about this.