

To see if this custom-fit item will work for you please tell us what vehicle you'll use it with.

Thank you! Your comment has been submitted successfully. You should be able to view your question/comment here within a few days.
Error submitting comment. Please try again momentarily.
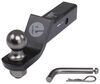
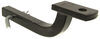
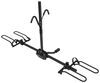
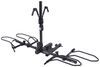
This fully welded, corrosion-resistant vehicle trailer hitch receiver is perfect for your light-duty towing needs. Draw-Tite's Tested Tough guarantee ensures that this hitch exceeds industry standards. Drawbar sold separately.
Features:
Specs:
Draw-Tite's Tested Tough program provides testing standards far superior to those outlined by the Society of Automotive Engineers (SAE), the go-to source for engineering professionals.
Each Draw-Tite trailer hitch receiver undergoes extensive fatigue testing and static testing with the ball mount that is either supplied or recommended for use with that particular hitch, thus ensuring results that are applicable to real life use. Fatigue testing is also conducted on hitches rated for use with weight-distribution systems.
In addition, Draw-Tite performs static testing on a simulated automobile, as opposed to the rigid fixture used for SAE testing, resulting in a more true-to-life scenario.
At etrailer.com we're committed to the products we sell, and to our customers. Our experienced and knowledgeable staff are available via both phone and email to address your questions and concerns for the lifetime of your hitch. The technicians at etrailer perform hitch installations on a daily basis, making them a valuable resource for do-it-yourselfers. The one-on-one, personal service you'll receive comes straight from an expert in the towing and automotive field. We've installed it, we've wired it and we've towed with it, so whatever your question, we can answer it.

California residents: click here
Videos are provided as a guide only. Refer to manufacturer installation instructions and specs for complete information.
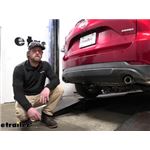
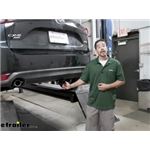
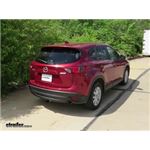
Hey everybody. Ryan here at etrailer. Today on our 2022 Mazda CX-5, we're gonna be showing you how to install the draw-tite class 2 trailer hitch receiver. But before we do that, Why don't have to check it out and make sure such will work for you. So with this hitch having the smaller inch a quarter by inching a quarter opening, this will be a good choice for the those of you that are primarily plan on only using smaller bike racks and things like that especially if you already have a bike rack with this saris hitch that inch and quarter by inch and a quarter shank and you don't feel like having to pick up a new bike rack. You already like it and everything else.
For those of you that are gonna be planning on using accessories but don't have 'em yet or planning on doing any type of towing in the future, I would suggest getting the class three hitch that has the larger two inch by two inch opening. They're a little more versatile. There's a bunch of different options that we carry here at etrailer. So feel free to check those videos out if that's something that interests you, but like I said, nothing at all wrong with the hitch. Just having the larger one to me, a little more versatile but just depends on your situation, right If you already have that bike rack and that's really all you plan on doing with it, perfect option.
And honestly being a little bit smaller in size too, it's a little less noticeable. For the most part, it's gonna be completely hidden. And really the only thing you're gonna be able to see here is the receiver tube opening. The end of the hitch here it is gonna have a reinforced collar for a little bit of extra support. And it's going to use that half inch size pen and clip.
Keep in mind though pen and clip don't come included. If you need one, not really a big deal. You can grab it right here at etrailer. The safety chain openings are actually pretty good size and will allow us to use just about any size hook that we might have. And one thing that I do think is important since a lot of people are probably gonna be using this for bike racks is the clearance.
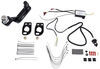
It's gonna give us in regards to our bumper. So end of the receiver tube is gonna be almost flush. I mean, just sitting behind the bumper a little bit. And what that should allow you to do is take your bike rack, fold it in that upright position. Not have to worry about it hitting the back of your Mazda. As far as hitch's weight capacities go, it's gonna have a 350 pound maximum gross ton weight rating and that's gonna be the amount of weight that's pushing down on the hitch. So that's good for those one to three maybe even four bike racks. I was kinda give you an example. As far as the maximum gross trailer weight rating goes that's gonna be 3500 pounds and that's gonna be the amount of weight that is pulling on the hitch. So whatever trailer plus anything you might have on it. And I do always like to suggest it's never a bad idea just to grab your Mazda's owner's manual. That way you can make sure your CX-5 can pull out much weight safely. So now I'll give you a couple of measurements and you can use these to help figure out which hitch mounted accessories will work best. From the ground to the top inside edge of the receiver tube opening that's gonna be about 13 inches. So if you do plan on pulling a small trailer around or something like that, chances are pretty good. You're gonna need to get a ball mount that has a rise and shank. From the center of the hitch pin hole to the edge of the rear bumper that's gonna be about three inches and you can use that measurement to figure out exactly if any of those towing accessories you might have can be stored in an upright position without hitting your back bumper. But other than that, at the end of the day, if you're looking for a hitch that has that smaller opening, definitely the way to go it'll function for you and look pretty good as well. As far as the installation goes, really not too bad. I did run across a couple of small hiccups but stuff that's definitely manageable. I'll show you how I kinda overcame that. And so hopefully if it happens to you, hopefully it'll be able to help you out along the way. But speaking of installation, if you'd like to see how that's done, feel free to follow along. We'll go ahead and put the hitch on together now. To begin our installation, we're gonna be here underneath the back of our Mazda. And what we're gonna need to do is lower the exhaust down some. Give us some room to work. So prior to doing that. I like to take a strap And just run it from side to side. That way we can kind of control how fast and how far we let our exhaust come down. So to get the exhaust down, we're gonna have a total of four rubber isolator hangers. So two on each side. One there. One there. Obviously the other side of her vehicles can be set up the exact same way, but to get these off, you can spray 'em now some lubricant, soapy water or whatever you got and we're gonna take a pry bar. We need to pry one end of the hanger off. Usually it really doesn't matter what end you go with General one is easier. So I'll just continue to kinda work this off here. And usually once you get one of them off the other ones get easier. Everything loosens off and whatnot Kinda swing this up and out of the way You do the same thing for other remaining hangers. So once you have all the hangers removed, you go ahead and loosen up the strap and let the exhaust come down a little ways. Now we can do, if you look at the bottom of your frame rail, in our case you have this foam coke sealer type stuff, and it's layered up on here pretty thick. I'm afraid it's gonna affect how my hitch is gonna sit. I've had them in the past where it's super thin and it's not really a big deal, but if yours is all caked up like this, probably a good idea to scrape it clean. So I'm just gonna take a razor you can use a scraper whatever you got. I'm just kinda work that bottom edge off. That way that hitch will set up there flat and flush. We won't have to worry about any fitment issues here. About something like that had to do the trick and I wanna mention from this point on anything we do to one side of our vehicle, we're also gonna do to the other side 'cause it'll be set up the same way. So now we can get our hardware in place. We're gonna have two attachment points. On each frame rail we're gonna be using this hole. So this one actually double as an access hole as well. We're gonna start with this one. You're gonna take the coil in of your whole wire, put through there and we're trying to accomplish is to get the other end of that wire drop out of our hole, our access hole there. I'll take it the spacer block, slide the spacer block over it. Then we're gonna take a carriage bolt And thread that carriage bolt onto the fish wire. You can feed the hardware up into the frame. Just pulled out until we get the bolt to drop out like so And then for the other attachment point we're gonna use a little bit different of a method. We're just gonna take a spacer block, put that over the quarter end of your fish wire. Take another carriage bolt. Thread that on. Then you're just gonna feed the bolt end first Then the spacer block and then pull it back down through. Now if you move to the bottom edge of our fascia here we're gonna have this plastic piece. We need to remove it. And there should be a couple of fasteners under there as well. We could pull off and that way we can move our bumper out of the way a little bit. Give us some more room to get the hitch up there. So to get this off, you're gonna take flathead screwdriver and just pry underneath the head. The fastener that'll pull out. Same thing over here. And then to get this off there's a little clip in this hole. You can kind of just take your screwdriver and pry it. So it comes down. There's kind of a better look. That was putting pressure on it like that. Same deal. We'll just set this out of the way for now. And it looks like we'll have two fasteners. So this one here, Same difference. This stuff Pry out the head, pull out the fastener and I'll do it over here as well. And that will let us kind of move this around and have a little more flexibility there. Just wanna go over the hardware combination that we're gonna be using to actually secure the hitch. So once we get it up, obviously the hitch is gonna sit up here and these bolts are gonna come through the holes in the hitch. And once you have it up there, you can remove the whole wire and then secure the hitch using a conical tooth washer And a hex nut. When you put these conical tooth washers on you wanna make sure that they up towards the hitch. So we'll hold that up and then thread on the nut. It's now with the next set of hands. We can take our hitch and get it into position. So you're gonna wanna feed the whole wire through the appropriate holes in the hitch. You're gonna go up and over your exhaust and might have to kinda pull back on your fascia. Just kinda sneak it in there. If you wanna munch in make sure you have the exhaust hanger installed on the side 'cause once the hitch is up you can't really get to it. So make sure you have that like that. Just gonna take a little bit of finesse to kinda work everything in. Actually it looks like our hitch is just barely hitting that metal portion. So if that happens to you what we can do is maybe get a pry bar or something in here and just barely bend that out of the way. We have to come across that issue but I'm assuming it does happen from time to time. So that's when I'm gonna do real quick. Just kind of letting the hitch hang a little bit and I'm gonna take a pry bar kind go in between the hitch and that exhaust hanger and hopefully just move it over. Just ever so slightly and it would barely, barely touch it. So I Should do it with it did put it in So hanger is set. Not a big deal. Once we have everything in place here. Go ahead remove our wire Take our hardware and we'll get it started hand tight. And a trick with these too. If you get the washer up there, you can kind of apply some side pressure that'll keep the bolt steady. Make it a little bit easier to get the nuts started. Once you have the hardware in place and hand tight you come back with a three quarter inch or 19 millimeter socket. Snug everything down. This one here, you don't have a ton of room so if you're trying to get a power tool in here like I am, you might need a swivel there. I'll go ahead and slug these up. Once everything's snug we need to make sure to come back with torque wrench and torque down all of the hardware to the amount specified in the instructions. If you don't have a torque wrench, grab one here at etrailer, or a lot of times you go to your local auto parts store and they'll have one they're available. You can rent. Once we have our hitch torque down we can rehang our exhaust. So with these you want to re-lubricate 'em again. Makes a little lot easier and we're just gonna do this by hand now. Lift it up and slide the hangers back into place. So once the exhaust is supporting itself again, we'll go ahead and get our strap removed. So now we come back to our fascia here. This piece, obviously isn't gonna fit. Not really a big deal. We'll just set that side. We are gonna be putting these fasteners back into those attachment points and that'll finish off our look at and our installation of the draw-tite class two trailer hitch receiver on our 2022 Mazda CX-5..
Average Customer Rating: 4.8 out of 5 stars (114 Customer Reviews)
This fully welded, corrosion-resistant vehicle trailer hitch receiver is perfect for your light-duty towing needs. Draw-Tite's Tested Tough guarantee ensures that this hitch exceeds industry standards. Drawbar sold separately.This is the third Hitch I have purchased and installed myself from etrailer which testifies to the quality, reasonable delivery times, ease of installation, clear instructions and overall satisfaction I have with products I have purchased. While it is easier if there are two people when the hitch is lifted into place, I have installed two of the three by myself. I am over 60 years old.

This is installed on our 2020 Mazda CX-5. It has been great. I had it installed by a local garage, but it took them less than an hour and they didn't report any problems. Since then the trailer has been rock solid. We use it with a Kuat bike rack. That rack is easy to get on and off the hitch and very stable when installed.
Product is as described, this particular hitch seems to be nicely concealed behind the bumper as compared to pictures I've seen of other brands. I installed this hitch onto my 2017 CX-5 alone and in about an hour. I was slightly worried about fitment because of the redesigned body for 2017. It bolted up fine and as described, i did however have to leave one small trim piece off due to lack of clearance (pictured). It attaches to the lower skirt of the bumper and extends forward, I've included a picture of the space remaining between the bumper skirt and hitch. I'm not sure what the piece's function is intended to be as it is completely unseen and beneath the car when installed. The same hitch was installed on my 2013 CX-5 and this wasnt an issue.
Overall I see no problems arising from the issue and I'm pleased with the product as well as etrailer.com.
2014 Mazda CX-5 - Video shows it goes right in but it did not. It was tuff getting it in with pulling on the bumper, 2 brackets on bumper and the exhaust hanger. But after a little persuasion it went right in. After that it was home free. Installation took a little over an hour. Very happy with it.
Install took an hour and 40 minutes due to bolt alignment mishap where bolt went back into frame and had to reacquire. Once acquired and aligned again with all four bolts the installation completed.
Second purchase of an etrailer hitch. Very happy with the quality and use of the hitch. The installation videos and advice are useful for any hitch.
Installation was straight forward and easy, with the exception of inadvertently removing the top isolator from the exhaust and having to remove the hitch to fix the issue. Very tight clearances but no rubbing or contact between parts. Provides a very clean appearance. Looking forward to lots of miles on our bikes this summer.
The mounting was just as described in the video. I had my wife help me and it took about 40 minutes or so working from the floor of our garage. To help, I drove the rear of the vehicle onto some scrap wood I had laying around. This got the rear end of the vehicle a little higher. Getting the exhaust hangers off was the toughest part of the job (and even that wasn't too bad). I didn't have any issue with fitment and, overall, I'm happy with the product.
We'll be using it for a 2-bike rack from Kuat (and perhaps a utility trailer now and then) so this hitch will be more than adequate.

Brent

10/7/2022
The hitch is still holding up just fine. Weve used it exclusively for a bike rack but we have made multiple long trips and everything is just as it was when installed.
Looks great and is well made. We'll be using this for a bike rack. I've used etrailer.com twice now and have been very happy. I back the vehicle up on ramps and highly recommend using a second person to help position the hitch and get the bolts started. I did this last one by myself, so it can be done, but it requires using every limb you have. This hitch barely fit between the exhaust hangers, but no complaints, very happy.
Vicki
2/28/2022
After a year, still happy, no problems!
I think this is a quality product. I wish I would have purchased the class 111 with 2 in receiver instead, but was told by my brother to purchase the class 11.
Hitch worked great for my car. Installation was immensely helped by the eTrailer videos. eTrailer customer service is great.
Reliable and solid business. Outstanding products. Highly recommend. I wish they had approved hitch installers nationwide.
Paint was chip when it showed up, easy fix though. I like the fact that it's tucked up tight and has a low profile look. It will take 2 people to install.
The trailer hitch did go on, but it will be more difficult to remove the rear rubber muffler mounts when it's time to change the muffler. The hitch will need to be removed if the rubber mount needs to be changed, because the clearance is so tight.

Sierra K.
6/28/2022
You wont have to take the hitch off if you want to change your muffler. Since the hitch installs above the exhaust all you would need to do is release the rubber hangers. Your exhaust will tilt down and you can fix your muffler, then put your hangers back into place. Can you see what I mean in this install video of a 2013 Mazda CX-5:
Helpful Links
This is the second hitch I've purchased from etrailer.com - the first was in 2012 for a Honda Fit (used for a hitch-mounted bike rack).
Everything good about the first experience brought me back for the second hitch - put a hitch on my son's Mazda CX-5.
This install was as straightforward as the first. I watched the videos the first time and was able to show my son how to use the wires to pull the bolts and washers through the frame. Everything fit perfectly.
I recommend etrailer.com to anyone - minimal tools needed, great instructions, great prices and fast service!
I use this hitch to mount a bike carrier on my 2013 Mazda CX5. The product performs exactly as advertised - sturdy and secure. I consider the hitch itself a five star product, but the installation video made it look SO much easier to install than it turned out to be. Installation may be easier on other vehicles. Not having access to a lift and not feeling comfortable partially removing my exhaust system, I asked my mechanic to do the job, and even HE had a tough time with it. It probably gets easier if you install hitches for a living, but understand that this hitch is NOT a simple installation on a CX5.
E trailer makes it easy to buy and inst all.
I am extremely disappointed with this Drawtite product. The installation instructions stated installation time as 20 minutes for a professional install. It took my installers 3-1/2 hours because this receiver did not fit my 2022 Mazda CX-5 as stated on your website! The horizontal portion of the receiver did not fit between the rubber hangar brackets on the frame. It was off by about 3/16 of an inch. My installer had to bend the hangar brackets and force fit the receiver up and in so the bolts could be tightened. Once installed, the 1/2 inch holes on the receiver for a hitch pin did not line up with the holes in my bike rack. I had to buy a 1/2 inch drill bit and force drill through the opening with my rack slid in which widened the holes in my bike rack so a pin could slide in! Once again, it seems the overall design of this product for my 2022 Mazda CX-5 and my bike rack was extremely poor and cost me a lot of additional dollars and labor to make work. Would not recommend this product as advertised!
Good hitch, no issues. I got it for a Mazda CX5. I had to hunt around a bit for a shop that would install it for me but overall still saved money by getting it through etrailer. I use the hitch for a 4-cycle bike rack with ski rack add-on during the winter and cargo carrier occasionally.
I bought this hitch for a 2022 Mazda CX5. The installation was pretty easy, and the quality of the part was very good. I had intended to get a factory hitch installed, but that would have been $900! I saved alot of money, and it is very inconspicuous.
I wanted a light duty receiver for a bike rack on my new Mazda CX-5, and didn't want to pay $700 at the dealership. My hitch arrived quickly, and I was able to install it following the video and instructions. One tip that would have been nice to read in the directions is to leave the rubber exhaust hangers on the vehicle, because once the hitch is in place there is no way to put it back on. I had to unbolt and start over. I did not lift the vehicle, and used a floor jack to lift and hold the hitch in place.
Got the hitch in 2 days. Quick and easy install with an extra pair of hands to hold the hitch in place while tightening the bolts.

Patrick
11/7/2018
All good still. It was an easy install. Thanks for a great product!
The hitch will be used primarily for a bike rack. As received, one of the side pieces of the hitch that bolts to the car rails was bent inward and needed to be bent out to allow the install. I had dropped the exhaust and then saw that on one side the holes didn’t meet up with those on the car.
I called to find out how to proceed and was told the part could be bent into the proper position. I was able to do that with help and then the install was quick and easy as per the instructuctions and video. Result looks very clean.
This was my 4th hitch install and the first time I had the hitch arrive bent, but apparently from my phone call it must be a somewhat frequent issue. It would have been quicker if there was a note on that issue with the product.
I like this trailer hitch. It's strong and it was easy to install (with an extra set of helping hands). I have used the hitch to pull a motorcycle trailer to transport my dirt bike and I also use it to transport bicyles to the trailhead.
I recommend it!
My hitch for my CX5 installed very easy and I was able to do it myself without any issues. the wiring harness also was easy to install and product has my full approval. I have bought hitches from this site before and will continue to do so. thank you
Everything went well for me with this hitch: the right product at the right price, delivered on time with no damage. The only issue was that the installation instructions should probably include a warning to measure the distance between the two hitch side rails to see if it matches the distance between the two muffler hangers that need to be cleared to install the hitch. The hitch was right at 35 and 3/4 inches, while the distance on my 2019 Mazda was 1/4 inch shorter - and that 1/4 inch mattered a lot. I think every Mazda is slightly different. So, after spending an hour trying to wedge the hitch into place, I finally took it off again, bent the Mazda hooks the required amount, and successfully reinstalled the hitch and muffler in about 10 minutes. Now I'm ready to start towing...
Info for this part was:
At etrailer.com we provide the best information available about the products we sell. We take the quality of our information seriously so that you can get the right part the first time. Let us know if anything is missing or if you have any questions.


David
4/22/2023
Great!