
To see if this custom-fit item will work for you please tell us what vehicle you'll use it with.
Thank you! Your comment has been submitted successfully. You should be able to view your question/comment here within a few days.
Error submitting comment. Please try again momentarily.
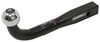
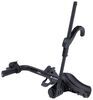
This fully welded, corrosion-resistant Chevrolet Spark trailer hitch receiver is perfect for your light-duty towing needs. Draw-Tite's Tested Tough guarantee ensures that this hitch exceeds industry standards. Drawbar sold separately.
Features:
Specs:
Draw-Tite's Tested Tough program provides testing standards far superior to those outlined by the Society of Automotive Engineers (SAE), the go-to source for engineering professionals.
Each Draw-Tite trailer hitch receiver undergoes extensive fatigue testing and static testing with the ball mount that is either supplied or recommended for use with that particular hitch, thus ensuring results that are applicable to real life use. Fatigue testing is also conducted on hitches rated for use with weight-distribution systems.
In addition, Draw-Tite performs static testing on a simulated automobile, as opposed to the rigid fixture used for SAE testing, resulting in a more true-to-life scenario.
At etrailer.com we're committed to the products we sell, and to our customers. Our experienced and knowledgeable staff are available via both phone and email to address your questions and concerns for the lifetime of your hitch. The technicians at etrailer perform hitch installations on a daily basis, making them a valuable resource for do-it-yourselfers. The one-on-one, personal service you'll receive comes straight from an expert in the towing and automotive field. We've installed it, we've wired it and we've towed with it, so whatever your question, we can answer it.


Tech Tip
Hitch does not fit EV models. No drilling required for installation , Underbody panel(s) and/or fascia must be temporarily loosened or removed. Trimming may be needed to reattach panel or fascia. , Requires temporary removal of bumper/fascia during installation , Fascia trimming required
California residents: click here
Videos are provided as a guide only. Refer to manufacturer installation instructions and specs for complete information.
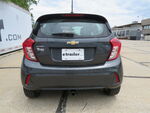
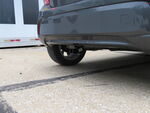
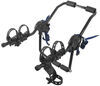
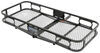
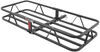
Shane: Hi, I'm Shane with etrailer.com. Today you're going to be taking a look at, and I'm going to walk you through the installation, on a Draw-Tite Class I Sport Frame Trailer Hitch Receiver on your 2017 Chevrolet Spark. There's a lot of benefits to adding a hitch to a Spark. For Spark owners, you know there's not a whole lot of room on the inside. Adding a hitch is going to allow you to carry a cargo carrier, or put on a bike rack so you can move a lot of the cargo from the inside, put it on the outside, to make more room on the inside for passengers.This is what our hitch is going to look like when it's installed. As you can see, the cross tube and everything is hidden up behind the fascia.
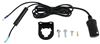
It's going to be a Class I hitch, 1-1/4" by 1-1/4" receiver tube opening. Hitch pinhole is going to be 1/2" in diameter, does not come with a hitch pin and clip, however it can be found here at etrailer.com. We're going to have a rolled steel style safety chain loops, gives you plenty of room for different size hooks. Again, this is a Class I, so it's only going to accept Class I accessories. It's also going to have a nice, black powder coat, it's going to be constructed out of steel.
Black powder coat is really going to help resist any rust or corrosion.Now as far as our weight capacities go, we're going to have a 200 pound max tongue weight, which is the downward pressure on the inside of the receiver tube. So when adding that cargo carrier, you want to make sure adding any items on it you're not exceeding that downward pressure. We're going to have a 2,000 pound gross trailer weight, which is the trailer plus the load included. That's how much the hitch can pull. You want to check your owners manual of your Spark, make sure the vehicle can withstand that amount of weight.
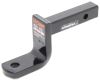
You're going to go with the lowest number between the vehicle and the hitch.Now I'm going to give you a few measurements to help you in deciding on bike racks and cargo carriers. From the center of our hitch pinhole to the outermost part of our bumper is going to be about 3". That number's important for any of your hitch mount accessories that may fold up against your vehicle. You want to make sure that they're not going to hit your bumper fascia. From the ground to the top, innermost part of your receiver tube is going to be about 11".
That number's important for any of your hitch mount accessories that may require a little more ground clearance. With the hitch only being 11" off the ground, will recommend getting a raised shank.To start our installation, we're going to remove our taillights. We're going to use a Phillips head screwdriver, we're going to remove the two screws, and we're going to pull your light rearward. Take note of the color wires and the positions that they're in, and we're going to do the same thing with the other taillight.We're going to take a Phillips screwdriver, we're going to have a Phillips screw here, and we're going to have one on this side. We're going to remove both of those. Seven millimeter socket, we're going to remove the one screw here on both sides of the vehicle, and we're going to have two pushpin fasteners, one here, and one here, on the bottom of our fascia. Take a flathead screwdriver, or trim panel tool. We're going to pry the center down like that, and then pull out the base. Each one of these should have a little slot to get the screwdriver into.We'll take a seven millimeter socket, we're going to have a bolt here, bolt here, bolt here, and one on bottom. Directions say five, your vehicle has five, you're going to remove all five. This one has four. This is for the splash guard. We're going to remove those on both sides of the vehicle. And we'll set those aside to be reinstalled later on.Then we're going to start on one side, all the way down where our fender meets our wheel well . or, I'm sorry, our fascia meets our fender, and we're going to slowly pull out, work our way to the center. And then we're going to set our fascia aside to be reinstalled later.Next, we're going to take a 13 millimeter socket and we're going to remove our bumper beam. We're going to have a nut here, a nut here, and a nut on the bottom. We're going to have three of them on each side. Looks like we have a little bit of sealer right around the top here. We're going to have to cut that loose. Just take a knife, run across it like that. Same thing over here. We're going to set it down for a second, we're going to place on our hitch, like that, going to reinstall our bumper beam, and reinstall the hardware we just removed. Then you're going to torque the hardware to the specifications in the instructions.Next we're going to have to trim the bottom part of our fascia. When you find your center, mark it; you're going to go an 1-5/8" one way, 1-5/8 the other to give you a total of 3-1/4, and then you're going to go up 2-1/4. Now we're going to cut out this inside square here. I'm going to use a Dremel tool, or a rotary tool with a plastic cutting blade. If you don't have one, you can use a utility knife to cut this, just be careful when you're doing it. Pull out the piece. We'll take a utility . or our knife, and we can peel this off, and take it and run it right along the edge. Cut off the burrs to kind of clean it up a little bit.Now we'll set our fascia in place, do a little test fit, look to see if we have to make any adjustments. If not, we can go ahead and reinstall our fascia in reverse order from the way we took it off.Again, I'm Shane with etrailer.com. I hope this video has helped you whether you're still deciding, or installing, the Draw-Tite Sport Frame Class I Trailer Hitch Receiver on your 2017 Chevrolet Spark.
Average Customer Rating: 5.0 out of 5 stars (50 Customer Reviews)
This fully welded, corrosion-resistant vehicle trailer hitch receiver is perfect for your light-duty towing needs. Draw-Tite's Tested Tough guarantee ensures that this hitch exceeds industry standards. Drawbar sold separately.
Great little hitch. Easy install. Works perfect for a bike rack on my Chevy Spark.
Was easy to install and has worked well. I could have used a 2" receiver but the extender works fine.
Perfect fit. Etrailer is a one stop shop for anything trailers.
I love this hitch! We wanted the hitch for a bike rack, as we don't like roof racks because of the fuel mileage impacts or the strap-on racks for their lack of security.
I watched the video made by etrailer prior to ordering and it answered some questions and made the install look rather easy. The install was easy, but the video glossed over one point that some people could get in trouble with. In the video when the fascia cover over the bumper is removed, what occurs in the video is far from what needs to happen. You will need some plastic tools to remove this fascia correctly or you will damage the attachment pieces. Other than that the video is spot on as to how to do the install. One addition for me was to use some blue Loctite on the mounting bolts. I didn't want to have to go back in because the bolts loosened up.
I love that etrailer does these videos. It allows us to see where "no man has gone before" before we start. You can see the potential snags before getting there.
We have hauled the bikes on the car with the hitch several times and it's very secure and stable. If you have a Spark and want to haul bikes, this is the way to go.
This hitch looks nice and has a nice finish. It was heavier than I expected so it made me feel more confident in the hitch. The hitch was so easy to install. It took me about 30-40 minutes total! Try removing the wheel for more space. I put a little bit of blue thread lock just to be safe. Measuring the center of the bumper is a little tricky so I'll provide a photo of where I took my measurements from and the measurements I got(the length was 44 1/4 inches, so the center of the bumper is 22 1/8 inches from where I measured from). Make sure to watch the installation videos by etrailer on YouTube and read the instructions for additional help!
Great instructions. Only took me 2 hours start to finish. Now that I've done it once I could probably do it in less than an hour on another car. Highly recommend if you've never removed plastic facia you look up a quick video on how to do it so you don't break any clips. Put it on an old Vietnam vets car who recently lost mobility so he can easy mount his wheelchair and continue on his Independence. Bravo etrailer great product
So far its everything expected.... only issue if there was one would be in the packaging. box tore hitch sticking out a foot on one end and paint scraped off a good piece. But hey nothing a touch of rustolium couldn't hide.Its a hitch not a hood ornament we're happy !!!just made our Spark that much more functional for a minimal price$$$!
It is just what I needed for my bike rack. It was easy to install - especially after watching the video.
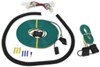
This was an easy install just don't go by the plug holes in the bumper skin to make your cut, they are not centered. over all looks good fits good, took about 30-60 minutes. Now if they could give me the correct wiring kit...You should pull the panels off to see your tail light plug first then order the wiring kit.
Very satisfied with hitch. Easy to install I think it was a lot easier to install then rated on the site
I love my hitch. I pull a motorcycle camper with my car and this hitch is the greatest. I have also pulled a small trailer with lawnmower. It has made my fun a lot more fun and I love that I don't have to get the big truck out just to run the lawnmower to the shop.

Mary S.

4/5/2021
The hitch has been great. I love being able to use my car to pull my camper
This hitch went on super easy. I have made two trips from SoCal to Nebraska and it rides nice.
Fairly straightforward install if you are mechanically capable and if you have basic tools...and I was able to perform another task while I had the bumper fascia off (I installed LED bulbs on a separate dedicated circuit for towing). This particular brand of tow hitch is rated at a higher towing capacity than other brands...and even though I use it for a bike rack I wanted something sturdy.
Easy enough to install. It only took about an hour maybe? It looks good and operates like it should (using it for a bike rack). No complaints here! The hitch receiver came with few areas with chipped paint, but I just sanded those areas a bit and blasted it with primer. No one is ever going to see it anyway. Some installation tips: if you don't have the required tools to remove the bumper you can use a small flat head screw driver to get the edges by the wheel wells started and remember to pull evenly so you don't break any tabs. Install the hitch receiver and triple check you have that sucker torqued down correctly. As for cutting: after the hitch receiver is installed, pretend to install the bumper and line it up to where it should mount, then use a marker to mark where it contacts the hitch receiver and measure in 2 1/4". Voila. This way you don't have to fool around trying to find center of the bumper. Frame your cut with tape and use a Dremel rotory tool to make your cuts... it will make your life so much easier. If you don't have one, buy one. It will change your life lol.
Order received fast hitch is great. Gonna be great for my little spark on road trips.
The hitch fit great. And it holds my bike rack just fine. I was very impressed by how well packed it was. I've had large items like this arrive loose in the box and missing parts. But not this time. Great job etrailer shipping department! The installation video was helpful, but more detail of how to remove the rear fascia would help folks in the future. A close up of the direction to pull would have made the job even easier. It looks fine on the car, and seems quite sturdy.
I installed it on a 2019 Chevrolet Spark.
Quick delivery - I ordered the product on Friday morning and it arrived in Ohio on Tuesday (standard free shipping). It was a easy install - followed the .pdf instruction from the etrailer site except for 1 question I had. I emailed them and got a great answer within an hour or so including a video, pictures and link to products that answered my question The product is very good too. Gland I bought this one instead of the Curt. The mounting points are very solid and integrated into the structure of the frame. When I had my car apart, I looked the area where the Curt hitch would mount and it was just flat sheet metal along the bottom of the car that wasn't very substantial.
Fantastic hitch. Bought it primarily for a bike rack and have used it for small trailers as well. It wasn’t hard to install and it’s really solid. Would highly recommend it.
Have not installed the hitch yet but the shipping was very fast and it arrived in excellent condition. I have ordered from etrailer several times and never had any problems with the installation or any of the products I ordered. In my opinion the best place to buy hitches and the best prices I have found.
Thank you for the good service.
fits the Spark car that I have and was easy to install. Very useful for small trailer hitching.
Product was easy to install and the instructions were complete. My only surprise was two small dime size spots on the surface of the hitch which appeared to have been scored or buffed to bare metal by a grinding wheel. These spots were not on the mating surfaces and not in areas that could have been damaged in shipping. A tack cloth wipe and a squirt of primer and the problem was solved.
Super fast shipment! Easy install. Lookinf forward to actually useing it! Crazy to have a Spark with a trailer hitch!
Fit great and better mounting than the other versions due to oem style
An easy installation. Just need to follow the excellent videos produced by etrailer.Took a little longer than advertised.
I took longer to get installation right.
Info for this part was:
At etrailer.com we provide the best information available about the products we sell. We take the quality of our information seriously so that you can get the right part the first time. Let us know if anything is missing or if you have any questions.


Andrew
7/12/2021
Still working great!