
Summer Starts Here - Save up to 70%


Perfect for light-duty towing, this custom, vehicle trailer hitch receiver features fully welded, gloss powder coated steel construction. Euro-style drawbar with 1-7/8" hitch ball included.
Features:
Specs:
Note: All non-trailer loads - bike racks, cargo carriers and so forth - should be supported with stabilizing straps. Failure to properly support these loads will void your hitch warranty from Curt.
At etrailer.com we're committed to the products we sell, and to our customers. Our experienced and knowledgeable staff are available via both phone and email to address your questions and concerns for the lifetime of your hitch. The technicians at etrailer perform hitch installations on a daily basis, making them a valuable resource for do-it-yourselfers. The one-on-one, personal service you'll receive comes straight from an expert in the towing and automotive field. We've installed it, we've wired it and we've towed with it, so whatever your question, we can answer it.

Videos are provided as a guide only. Refer to manufacturer installation instructions and specs for complete information.
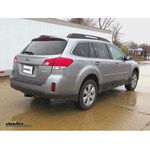
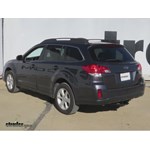
Today on our 2011 Subaru Outback wagon, we'll be installing the Curt trailer hitch receiver in a class two, with an inch and a quarter opening on the receiver, part number C12290. Here's what our hitch looks like installed on our vehicle. Now we'll go ahead and give you a couple measurements in helping you choose some accessories for your hitch, such as a bicycle rack or a cargo carrier. From the center of the hitch pin hold to the outermost edge of the bumper is approximately three inches. From the top of the opening in the receiver to the ground is approximately 14 inches. Now let's go ahead and install our hitch. Now to begin with, we'll need to lower our exhaust down, out of the way. Before we do this, though, we'll install a safety strap to support the exhaust once the three rubber hangers have been removed. There's two at the muffler and one a little bit farther forward in the center of the vehicle. We use a little bit of spray lubricant and a large pry bar to remove the three rubber exhaust hangers. Now with our exhaust lowered down out of the way, we need to remove the heat shield. There's a total of four bolts that will need to be removed in order for the heat shield to come down. Now that we have the heat shield down out of the way, we're going to have to trim a small section of it off in order for the hitch to clear. We'll use this paint marker here to mark out the area that we'll need to trim off.
To do this we'll use a set of tin snips or you can even use a rotary tool if you so choose. Now let's go ahead and point out the locations that we'll be using to mount our hitch on the vehicle. To begin with we'll need to remove two rubber plugs from each side of the frame rail. This is where the rear hardware mounting location will be used. The forward most rubber plug will need to have the hole enlarged to allow for the spacer block, as well as the carriage bolt to fit through. We'll need to repeat this process for both the driver and the passenger side. We're ready to use our fish wire and fish wire our hardware into place. Our hardware will be a half inch by inch and a half long carriage bolt, a square hole spacer block, followed by a hex flange nut that will secure the hitch. We'll then slide our square hold spacer block over the coil then of the fish wire, followed by threading on the carriage bolt. We'll then pull the spacer block and carriage bolt into place, coming out the rear most mounting location. We'll do this for each side. Once we have both of these in place, it's a good idea to get an extra set of hands to help you raise the hitch up into place.
With the hitch held up into place, we'll install the half inch flange nut on the two carriage bolts we just installed. Now we'll go ahead and tighten them down enough to hold the hitch up tight to the frame. At this time you also want to make sure that the hitch is centered, as we'll need to drill the two forward most locations using a 17 30 seconds drill bit. Now we're ready to again use our fish wire and put the other two carriage bolts and square hole spacer blocks into place. Once that's done we'll put the half inch flange nut in place, tighten it down and then torque it to the manufacturer's specification. Once all the hardware's been torqued we'll go ahead and reinstall the heat shield. We'll go ahead and tighten up on our safety strap to pull the exhaust back up into place, and then we'll put our rubber exhaust hangers back on. Now that we have all three of our rubber exhaust hangers back in place, we can remove our safety strap. With that, that'll conclude our installation of the Curt Trailer Hitch Receiver, part number C12290 on our 2011 Subaru Outback wagon. .
Info for this part was:
At etrailer.com we provide the best information available about the products we sell. We take the quality of our information seriously so that you can get the right part the first time. Let us know if anything is missing or if you have any questions.


Thank you! Your comment has been submitted successfully. You should be able to view your question/comment here within a few days.
Error submitting comment. Please try again momentarily.