
Summer Starts Here - Save up to 70%
To see if this custom-fit item will work for you please tell us what vehicle you'll use it with.


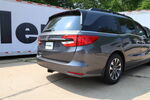
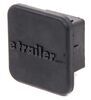
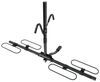
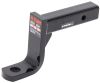
Perfect for light-duty towing, this custom, vehicle trailer hitch receiver features fully welded, gloss powder coated steel construction. Drawbar sold separately.
Features:
Specs:
At etrailer.com we're committed to the products we sell, and to our customers. Our experienced and knowledgeable staff are available via both phone and email to address your questions and concerns for the lifetime of your hitch. The technicians at etrailer perform hitch installations on a daily basis, making them a valuable resource for do-it-yourselfers. The one-on-one, personal service you'll receive comes straight from an expert in the towing and automotive field. We've installed it, we've wired it and we've towed with it, so whatever your question, we can answer it.

Videos are provided as a guide only. Refer to manufacturer installation instructions and specs for complete information.
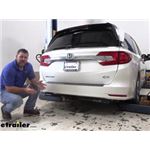
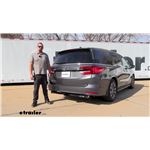
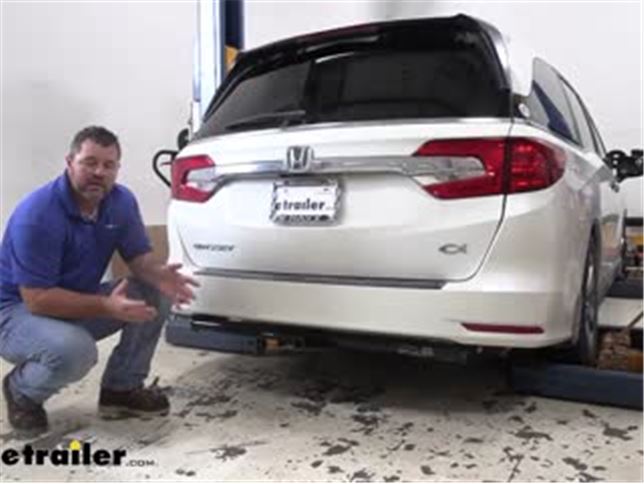
Hey everyone, Shane here with etrailer.com. Today I have a 2019 Honda Odyssey. I'm gonna walk through how to install the Curt Class 2 Trailer Hitch Receiver. This is what our hitch is gonna look like when it's installed. You can see it's fairly tucked underneath the vehicle, so it's not gonna stick out too far, we don't have to worry about hitting our legs or shins on the receiver tube if we're trying to load or unload the vehicle. Having a class 2 hitch is gonna give you a few different options.
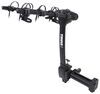
One, it's gonna give you a little bit higher weight capacity than your class 1 hitches, but it's not gonna give you as much or as many options as a class 3. It's gonna be a steel construction, black powder coat finish to hold up against rust and corrosion really well. Having a class 2 hitch on here it's still gonna give you the 1 1/4" x 1 1/4" receiver tube opening, so you're gonna be limited on some of the accessories that you can put on it. That being said, you can still put a bike rack on, you can still put a cargo carrier on there, maybe to move some stuff from inside to outside, and make a little bit more room for your passengers. You can also still pull a small trailer, and you can find any of those here at etrailer.
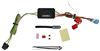
As I mentioned, we're gonna have an 1 1/4" x 1 1/4" receiver tube opening, reinforced collar beams to give it a little extra stability. Each pinhole is gonna be half-inch in diameter. You're gonna take a standard half-inch hitch pin. Hitch pin and clip does not come with this hitch, however they can be found here at etrailer. Safety chain loops, there's gonna be a welded plate welded on the bottom of the receiver tube and bottom of the cross beam so we have plenty of stability there.
Very large openings that will accommodate some different-size safety chain loops. I'm gonna give you some weight capacities and measurements to help you when deciding on any of those hitch mount accessories. From the center of the hitch pin hole to the outermost part of the bumper, we're looking at about three inches. That number is important for any of your hitch mount accessories, like your bike racks and cargo carriers that may fold up against the vehicle. You want to make sure you're not going to make contact.
From the ground, to the top innermost part of the receiver tube, you're looking at about 11 inches. That number is important for any of our hitch mount accessories that may require a little bit more ground clearance. What I recommend is if you're going to be using a ball mount, put it in the rise position. As far as our weight capacities go, we're gonna have a 350 pound max tongue weight, which is the downward pressure on the inside of the receiver tube. So whether you're putting the cargo carrier on, putting a bike rack on, maybe pulling the trailer, you're going to make sure you're not exceeding that. You wanna have a 3,500 pound gross trailer weight, which is the trailer plus the load included. I always recommend checking the owners manual of the vehicle to make sure that the vehicle can withstand that amount of weight. You're going to go to with the lowest amount between the vehicle and the hitch. Now that we've gone over some of the features, let's walk you through how to get it installed. To start our installation, if you have this panel on our driver's side, we need to remove it. We're gonna take a trim panel tool, we're gonna remove the push pin fasteners, and there's a 10 millimeter bolt right on this back side. Pull the center out and then remove the base with it. And then of course the 10 millimeter here. And in some cases, you may either have the Philips, or a push pin fastener where your wheel well liner attaches to that panel. In our case, we have a Philips, so we're gonna remove that, you should be able to . Then on our passenger side, we're gonna have an exhaust, it's a plastic piece here. To push them fasteners, we need to remove both of those and remove Then we'll set that aside. The directions don't tell you this, but it might be easier if you lower your exhaust just a little. Right here on this side we'll have an exhaust hanger. We'll see how much play it gives us 'cause we're gonna be working right in this area. And if we need to, we can also take the center one down. Spray the end of it with some lubricant, Silver water works pretty well. Then we'll just take a pry bar and we're going to pry this thing around. We may get enough room like that. You need to spray some cleaner inside your weld nuts on each frame rail. Some brake 3, or a brake cleaner, anything like that. We're gonna take a toothbrush and we're gonna run it inside that hole and we want to make sure we get all of the gunk that may be in there out. And our driver's side, you remember had a panel. So this side might not be too bad. The passenger's side however, is open. So those bolt nuts on the passenger's side are gonna need to be cleaned out pretty well. So what I suggest to test it out and make sure you got it clean, just take the bolt you're gonna be inserting. It's gonna look like this. Take said bolt and you wanna be able to hand-thread that into that hole. You don't necessarily have to go all the to where it's tight you just wanna make sure when you're running it in there, that it's not getting caught up on anything. I suggest doing this with each of the welded nuts. Next we're gonna take a pull wire, spring in, we're gonna take a spacer block. Put it on top. We're gonna take a carriage bolt and thread it onto the string. We're gonna take the head of the bolt, we're gonna go up through that hole, followed by the spacer block, and we're just gonna pull it back down. We're gonna leave our wire attached for now. We're gonna repeat that on the other side. I suggest one, getting an extra set of hands that'll help you lift the hitch into place, two, getting your hardware ready for the weld nuts. We're gonna take our hitch bolt, you're gonna make sure the teeth are facing up toward the hitch, and we're gonna slide it on the bolt. We're gonna have two for each side. Now with our extra set of hands, we're gonna put our pull wire into the corresponding hole in the hitch. We're gonna lift it up into place and we're gonna take our hex bolts, we'll go ahead and thread one in on each side. That will hold our hitch up in place while we install our remaining hardware. So once we have our two hex bolts in place, we'll go ahead and remove our pull wire and then we'll put on a flange nut. We'll take a 3/4" socket and we'll come back and we'll tighten all our hardware. We'll come back and torque everything to specifications in the instructions. Once you have everything torqued down, reinstall your panel on the driver's side, your exhaust heat shield on the passenger's side. Your exhaust on the passenger's side and you're ready to go. That'll do it for a look at an installation on the Curt Class 2 Trailer Hitch Receiver on a 2019 Honda Odyssey..
Average Customer Rating: 4.5 out of 5 stars (8 Customer Reviews)
Perfect for light-duty towing, this custom, vehicle trailer hitch receiver features fully welded, gloss powder coated steel construction. Drawbar sold separately.My box came open and broken - my product came rusty and banged up chipped - this doesn’t look like a new product would come .
GREAT FIT & FAST SHIPPING. THANK YOU.
A very solid appearing hitch and went in perfectly, after the confusing instructions were deciphered. That is the only reason for the 4 star. Better instructions or a link to a video would be helpful
Great hitch for a great price,prompt delivery,easy installation, my second one, first hitch on my 2015 Honda same outstanding remarks as with my 2018. Would recommend to anyone great product.

Hitch went on quickly with help from my son. I'm very pleased with how it looks on my 2019 Honda Odyssey
Fast shipping. Easy installation. Fit my new 2022 odyssey elite.
The hitch I bought was delivered as I expected. I had it installed and it fit my 2020 Odyssey fine as the person I had it installed by had no complaints. It seems it will work fine.
Great website! Prompt shippng!
Do you have a question about this Trailer Hitch?
Info for this part was:
At etrailer.com we provide the best information available about the products we sell. We take the quality of our information seriously so that you can get the right part the first time. Let us know if anything is missing or if you have any questions.


Thank you! Your comment has been submitted successfully. You should be able to view your question/comment here within a few days.
Error submitting comment. Please try again momentarily.