
Summer Starts Here - Save up to 70%
Perfect for light-duty towing, this custom, vehicle trailer hitch receiver features fully welded, gloss powder coated steel construction. Standard drawbar included.
Features:
Specs:
At etrailer.com we're committed to the products we sell, and to our customers. Our experienced and knowledgeable staff are available via both phone and email to address your questions and concerns for the lifetime of your hitch. The technicians at etrailer perform hitch installations on a daily basis, making them a valuable resource for do-it-yourselfers. The one-on-one, personal service you'll receive comes straight from an expert in the towing and automotive field. We've installed it, we've wired it and we've towed with it, so whatever your question, we can answer it.

Videos are provided as a guide only. Refer to manufacturer installation instructions and specs for complete information.
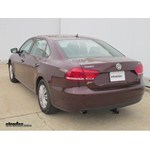
Alright, today on this 2013 Volkswagen Passat we're going to install part number C11234 from Curt. Alright, this is what the hitch looks like once installed on our Passat, next we'll go ahead and give you some measurements so it will help you out selecting some accessories such as a bicycle rack or cargo carrier. From top of receiver opening down to the ground will be about ten and a quarter inches, and from center of the hitch pin hole to the edge of the bumper will be about three and three quarter inches. Now I'llgo ahead and show you how the hitch is installed. First thing we need to do is go ahead and loosen up the fascia, they'll be three fascia screws we have to remove and they go into a plastic clip that goes into the bumper supports. We'll go ahead and remove these screws and then pop the clips away from the supports. Now after we're done we'll only reinstall two of them, the one in the middle and the area by the hitch.
Next we'll go ahead and remove the spare tire from inside the trunk. Then we'll go ahead and locate the two rearmostrubber drain plugs from the bottom of the trunk pan. We'll just use a pair of pliers and grip one edge, and just pull themstraight up. Next we'll go back to the bottom of the fascia and do some trimming for the hitch. Go ahead and measure according to the instructions, but we found out that it actually helps to go a little bit over size on the width to maneuver the hitch into place.
At this point we can go ahead and make our cuts into the plastic. Now we'll go ahead and install the nut plates, these two plates sit on top of the bumper beam supports, there will be one on each side. We'll next lift our hitch into position, it may be a good idea to get an extra set of hands to help do this while we install our hardware. And we want to take our passenger's side and work it up into place first since it's a little bit tighter area to work it in on that side, and then we'll go ahead and push up on the driver's side. To finish, it has more flexibility on that side so we can work the hitch up easier there. Okay, once we have it in place we're going to go ahead and use a jack to help hold up the hitch into place. Now we'll install our hardware that goes into the nut place.
It'll just be a long half inch bolt and I'll use a conical tooth washer along with it. We'll put the two together to see how they look. We'll go ahead and show you how it goes into one of the nut plates, if we could see it on the outside. Alright, so now we'll go ahead and run our hardware back into the nut plates and we just want to get them started. Now it's a tight fit, but you may be able to reach up behind the bumper cover and around the bumper structure to grab a hold of the nut plate while you guide the bolt into place.
This will take some time and some patience. Once we have our passenger's side done, we'll go ahead and repeat the same process over on the driver's side. Now we'll go back into the trunk and we'll go ahead and install our hardware. First we'll go ahead and show you how the plate covers the hole, then we'll go ahead and put some silicon sealant around the hole to help seal it up. Now the sealant we use is from Loctite, part number Lt37467. We'll put our plate back into place, along with our half inch carriage bolt. We'll drop it through the plate and into the hitch, and we'll do this on both sides. Now we'll go back underneath the vehicle and go ahead and install the flange nut for the carriage bolts, and they'll be one on each side. One all our hardware is loosely installed we can go ahead and tighten it down, then torque the bolts down as specifiedin the instructions. We'll start from the center and work our way out. With that our hitch is fully installed, nowwe'll go ahead and reinstall the spare tire and all the components. Now we can go ahead and reinstall the two screws and clips that held the bumper fascia to the supports. That'll finish it for our install part number C11234 from Curt on our 2013 Volkswagen Passat.
Average Customer Rating: 4.8 out of 5 stars (4 Customer Reviews)
Perfect for light-duty towing, this custom, vehicle trailer hitch receiver features fully welded, gloss powder coated steel construction. Standard drawbar included.Instructions with the trailer hitch attachment included were very clear and facilitated the install very much .
We used 2 persons to lift the hitch in position and stabilized the assembly with the two trunk bolts loosely fastened
I had some trouble lining up the 5.1/2 inch hex bolt with the holes in the nut plate and therefore I suggest to weld the bolts instead of the nuts on the plate weldment. Other than that, a wonderful product.
Ordered a trailer hitch for a 2014 VW Passat TDI SE. Arrived within a few days and was a perfect fit. Online videos were very helpful in demonstrating the install. Of course, they had a lift and I had to do it lying on the concrete with ten or eleven inches of ground clearance. Even with that, the installation went smoothly. All of the holes lined up very nicely. Ready now to tow the drift boat to Idaho to get in some trout fishing.
the hitch shipped promptly and was relatively easy to install with the on line video as a reference. Put it to the test last weekend towing a tent trailer on a 500 mile trip with no problems.
the best you could get for this price.
thanks to etrailer,
delivery more than fast.
thanks again.
Info for this part was:
At etrailer.com we provide the best information available about the products we sell. We take the quality of our information seriously so that you can get the right part the first time. Let us know if anything is missing or if you have any questions.


Thank you! Your comment has been submitted successfully. You should be able to view your question/comment here within a few days.
Error submitting comment. Please try again momentarily.