
Thank you! Your comment has been submitted successfully. You should be able to view your question/comment here within a few days.
Error submitting comment. Please try again momentarily.
Perfect for light-duty towing, this custom, vehicle trailer hitch receiver features fully welded, gloss powder coated steel construction. Euro-style drawbar with 2" hitch ball included.
Features:
Specs:
Note: All non-trailer loads - bike racks, cargo carriers and so forth - should be supported with stabilizing straps. Failure to properly support these loads will void your hitch warranty from Curt.
At etrailer.com we're committed to the products we sell, and to our customers. Our experienced and knowledgeable staff are available via both phone and email to address your questions and concerns for the lifetime of your hitch. The technicians at etrailer perform hitch installations on a daily basis, making them a valuable resource for do-it-yourselfers. The one-on-one, personal service you'll receive comes straight from an expert in the towing and automotive field. We've installed it, we've wired it and we've towed with it, so whatever your question, we can answer it.

Videos are provided as a guide only. Refer to manufacturer installation instructions and specs for complete information.
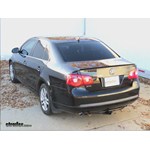
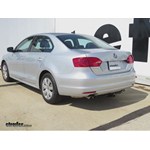
Today on our 2006 Volkswagen Jetta, we will be installing theCurt Hitch, part number C11072. This is what our hitch should look like once installed. Next we will go ahead and give you a couple of measurements to assist you in selecting accessories for your new hitch. From the center of the hitch pin hole to the outermost edge of the bumper is 6-3/8". From the top of the receiver tube to the ground is 10-1/4". This will assist you in selecting accessories such as a ball mount, bike rack, or cargo carrier. Now we'll go ahead with installation. To begin our install, we will first need to raise the vehicle up and remove the underbody panel on the passenger side.
To remove the panel, there are multiple torque spit and plastic fasteners that will need to be removed. Once we remove the fasteners, we will go ahead and pull the panel down and set it aside for reinstallation later. Next, we will need to lower the exhaust on the driver's side. To do this, we will remove the two fasteners that secure the exhaust hanger to the frame. Once we remove these fasteners, we will set them aside, as they will not be reinstalled. To install these fasteners, we will use a 7/16" pull wire provided with our install kit, and will be installing the 7/16" carriage bolt and block.
These attachment points are pre-drilled holes in the frame by the manufacturer. We will also use the larger cutout in the frame as an access hole. We will take the pull wire, feed it through the attachment point, and out the access hole. There we can slide on the block and thread on the carriage bolt. We will feed the block and bolt into the frame and pull them into position.
We will go ahead and leave the pull wire on as this will assist with gettingthe hitchup into position without pushing our hardware back up into the frame. Now we will go ahead and repeat the same process for our second attachment point here on the passenger side frame rail. Now with both of those carriage bolts in place, we will move over to the driver's side where we will need to remove the rubber plug in the bottom of the spare tire well. To remove the plug, we will go ahead and open up the trunk, remove the spare cover, the spare tire holdown, and pull the spare tire up and out of the way. Then, we can use our flat-bladed screwdriver to get underneath the plug and pull it out as it will not be reinstalled. Now we are ready to put our hitch in place. We will take the hitch and feed the driver's side up over the exhaust and then bring the passenger's side up to the frame rail feeding the pull wires through the attachment points. Once we get the hitch up tight to frame rail on the passenger's side, we will remove the pull wire and install the 7/16" flange nut to secure our carriage bolt. Next, we will move back over to the driver's side.
The exhaust hanger will need to be slightly modified. There are two tabs on the hanger that will have to be bent out of the way to make room for the hitch. We will go ahead and do that now. Then we will put our hanger back into position and take the new 8mm bolt, feed it through the exhaust hanger, through the hitch attachment point, and then into the well nut of the frame, replacing the manufacturer's hardware. Once we have both those fasteners in place, we will move back over to the passenger's side where we will need to install a third attachment point that will be in the vertical side of the frame. To do this, we will take our pull wire and go through the hitch, into the frame, and out the access hole we used earlier. Once again, we will slide on the block and thread on the carriage bolt. We will feed them both into the frame and pull them into position. Once in place, we will go ahead and remove the pull wire and install the 7/16" flange nut finger-tight. Our final attachment point will go down through the spare tire well. This will be the 1/2" carriage bolt, along with a round spacer block. We will be using the locktight RTV high performance gasket maker, part number LT37467 to seal up the spare tire well from the outside. Once we applyour silicone tothe block, we will go ahead and drop it into place and down through our hitch. Then we willmove backunderneath the vehicleand install the 1/2" flange nut. Now with all the hardware in place, we are ready to tighten it down. Next, we will go ahead and torque to specifications as indicated in the instructions. Now, with the hitch secured and torqued to specification, we are ready to reinstall the underbody panel. To do this we will hold the panel up into position just underneath the hitch, lining up our attachment points, and then marking it with a paint marker. Once we have it marked out, we will go ahead and trace out our cut line and then use a rotary tool to cut out the section. Now with our section cut out, we will go ahead and reinstall the underbody panel and its fasteners. With everything reinstalled, we are now ready to hit the road. That does it for the install of the Curt Hitch part number C11072 on our 2006 Volkswagen Jetta. .
Average Customer Rating: 4.8 out of 5 stars (8 Customer Reviews)
Perfect for light-duty towing, this custom, vehicle trailer hitch receiver features fully welded, gloss powder coated steel construction. Euro-style drawbar with 2" hitch ball included.This product was exactly what I needed. They couldn't have made it any easier to install too, bolts right up to factory holes. I watched the you tube video of the installation which was very helpful as well. I installed this to pull a small 5' x 8' trailior with all my camping supplies. We just got back from our first trip which was a great success. The only issue I have seen, is that my cars rear suspension wasn't made for this. After some research, I just purchased the Firestone Air Bag Suspension Kit from etrailer. From the reveiws, this should do the trick. The only thing that they dont provide with the hitch is a tube of silicone which you will need as part of the installation. Love the product and have had a great experience with etrailer and Curt Trailer products as I have also purchased the hitch for my wifes Honda Pilot and wiring kits for both vehicles from etrailer.

Well, it's been a year with the trailer hitch and I have some insights for prospective owners.
We purchased this hitch because we already had a nice trailer and didn't feel the need to sacrifice good fuel economy in favor of the towing capacity of a full sized truck/Van.
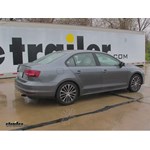
I installed this Curt hitch and receiver on a 2011 VW Jetta TDI and it will pull loads up to 800 lbs very nicely. I have towed larger, touring type, motorcycles with this over distances of 200 miles at highway speeds of up to 75mph with ease (and gotten in the mid 30mpg).
I have also towed larger loads over shorter distances (<20 miles) with a bit more labor from the VW diesel motor -and more fuel consumption as well.
I am surprised with the quality of the hitch and the relative ease of installation. I installed the hitch myself and can say that it bolts up well, but that removing the paneling from inside the trunk of the VW to run the electrical wiring is definitely more difficult.
Be prepared to allow yourself at least 2.5 hours to do this job the right way. You don't need any special tools, but it does take some time to identify and splice the wiring for the trailer lights. Plus you will need to run the power all the way underneath the car up to the positive battery terminal.
I appreciate the fact that I can pick up a load of gypsum board or underlayment at the lumberyard without needing a larger vehicle. I also appreciate being able to tow my dirt bike to another state to do some off road riding.
Overall, I am satisfied with this product, but the installation did not go as smoothly as I had anticipated. The box the product was shipped in was badly damaged (both ends of the hitch were sticking out), but since it is a steel hitch, I thought it was fine. As I was installing, I learned the passenger side section had been bent. This was easy to fix, but required uninstalling the driver side which you have to wiggle around the muffler. The final bolt through the spare tire well was also out of alignment, but again, I think this was due to shipping damage. If the product was packaged better, this would definitely be five stars. Etrailer was very easy to work with and I would recommend them.
I bought this for my 2006 VW Jetta. It works great to pull my utility trailer! I pull my atv and renovation materials. The install was very easy and the directions were very helpful.
Shipped really fast, installation took about an hour. Note: when modifying the trim panel, the cutout dimensions on the drawing are slightly different for the TDI Jetta.
Easy fit and good instructions. Box was punctured in two places on arrival, resulting in paint damage to the product but nothing beyond that.
Seems to be a good product, well packaged and on time as promised. A pleasure working with your company.

Phil W.

7/5/2015
Fine but I do not use it for a trailer. I only use it for my custom bike carrier and it works very well. I had anticipated getting a small trailer but in very carefull reading of the car manual they say that my car is not built for a trailer and that towing a trailer will void the warranties.This was a surprise to me.
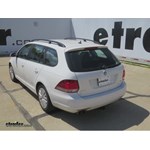
Super easy install on my new 2014 VW Sportwagen, very solid design.
Info for this part was:
At etrailer.com we provide the best information available about the products we sell. We take the quality of our information seriously so that you can get the right part the first time. Let us know if anything is missing or if you have any questions.


Careforapint
6/1/2015
I just installed this hitch on my 2014 VW JSW, but have yet to put it to use besides a cargo basket.Just to be clear... youre pulling that load with a Class 1 1-14 hitch? Other than the suspension, no other troubles?How was it to install the suspension kit?Thanks