
To see if this custom-fit item will work for you please tell us what vehicle you'll use it with.
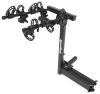
Retractable tonneau cover with mid-height truck bed rack lets you outfit your truck bed for any overlanding adventure. Aluminum and vinyl deck is strong and seamless. Offers enhanced cargo protection for your Ram 1500.
Features:
Specs:
Videos are provided as a guide only. Refer to manufacturer installation instructions and specs for complete information.
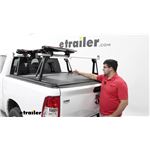
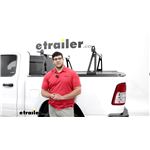
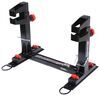
Hi, Matt with etrailer, and today, we're going to be talking about the Leer Tonneau Cover and Ladder Rack Set on the back of our 2022 Ram 1500. This is going to be a really nice option for you if you plan on hauling a lot of deer in the back of your truck. It's really going to open up a lot of space because whether if you want to put any accessories on top of here, anything like ski carriers or snowboard carriers, or if you want to put a rooftop tent in the back, you're going to have that option too. Now if you want to put ladders or anything longer like that, keep in mind when you are putting 'em in here, you're going to be very limited on space because of how high this ladder rack system sits, it's not higher than the front of your cab. So if you have anything longer than six feet, then it's going to make contact with that cab. Now, this is going to be comprised of three parts.
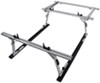
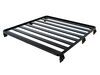
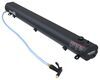
And that first part is going to be our 69-inch crossbars. Now it's going to have a T-channel on top and that's going to be for your T-channel accessories. I'd recommend using that since a lot of clamp on accessories won't fit on here 'cause this is a pretty wide bar. But as you can see today, we do have a clamp on accessory that does still accommodate it. Well, it's going to have two more channels on the bottom and that's going to be how these towers install.
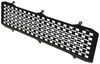
Now you can also use this for if you have any light bars you want to put underneath here. So if you need a little bit extra light when you are working at night, you're going to have that ability too. And we're going to have this end cap at the very end and this is going to double as two things. That's going to double as not only a load stopper for if you have anything sliding around on top, but it's also going to have this built-in anchor point. That built-in anchor point's great if you need to tie anything off, kind of like a kayak.
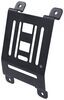
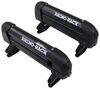
So what I'd recommend doing is flipping this around for a few cases. So if you have anything like ski carriers, if you want that closer to the edge, it's going to be better to have it facing down so it's easy to get those skis or snowboards off, or if you have that rooftop tent 'cause that rooftop tent will have a piece that extends out and if this is facing up, that's going to interact with it and prevent it from folding completely. Going to our towers now, the way this is going to seat into our tonneau cover is we're going to have two bolts underneath with some nuts that hold it into place. And the way those bolts are going to sit in here is we're going to have our tonneau cover that has this T-track that runs down and that's where those bolts are going to sit in. The system we have today comes in two options.
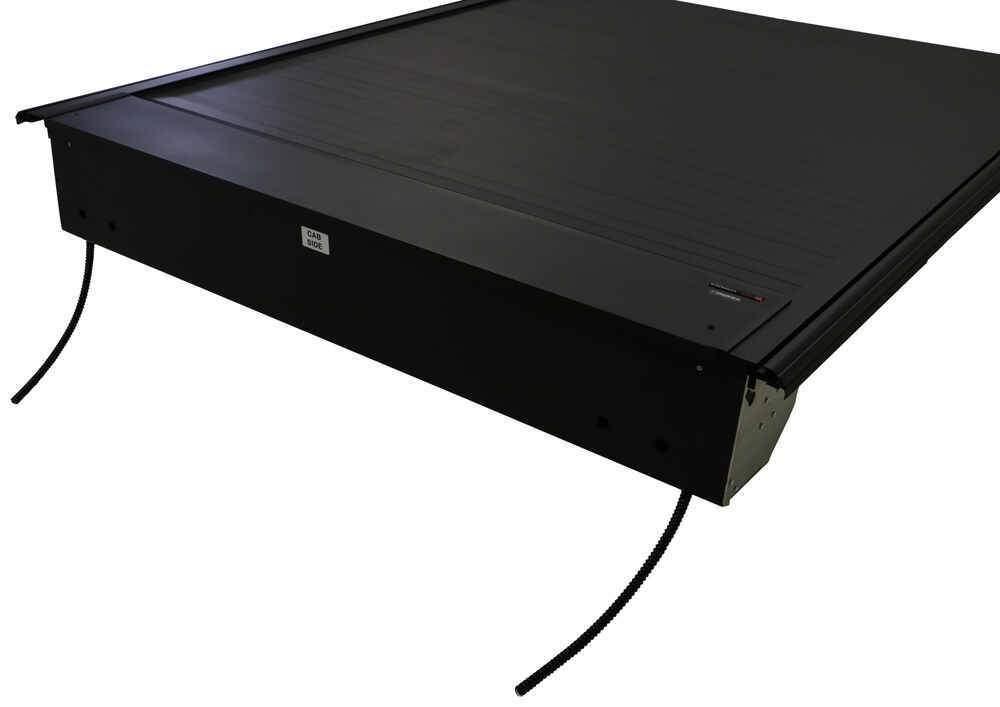
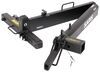
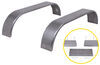
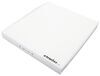
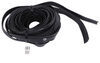
That's going to be the 200-pound configuration and the 400-pound configuration. And the only difference between the 200 and 400 is the 400's going to come with these additional clamps and that's just going to make it more sturdy. As for the material, the crossbar is going to be constructed from aluminum, so it's going to be very lightweight and corrosion resistant. And our towers are going to be made from steel with a black powder coat finish. So these are going to be very durable and that finish is going to help you be more weather resistant. Now moving over to the tonneau cover itself, this is going to be a canister style, so instead of folding in on itself, it's just going to roll up to the center and you can pull it out really easy. Giving you this really nice clean look to it. And it's not going to sit up too high, if we just look at the rails, that's going to sit up at most an inch. So it's going to be very low profile. It's a great option if you're looking for that extra coverage if you have anything in the back that you don't want getting wet and it's going to be really nice for storing any additional items. And earlier when I was talking about the towers and how they install onto your tonneau cover, I pointed out this T-channel. This is also going to be great because maybe you don't want the legs on here, the ladder rack on here at all, you can take 'em off and use this T-channel for any other accessories too. Now we're going to have this clean seal on the side that's going to prevent any water from seeping through. You're also going to have one on the backside and one by your tailgate. Underneath is actually this locking mechanism. If I turn that over to the side, you'll hear it click into place and this lock-in mechanism is what prevents us from pushing back at all. But with it unlocked, you'll notice I have the ability to push it now and at this point right in here, you can see one of the locations it locks to. We're going to have one of these every 12 inches so you don't have to open this up fully if you don't want to. The reason why you might not want to open it up completely and have it lock into place is if you have anything you want to be covered like this tote back here. I don't want to risk that getting wet, but I do need something I do need to access like this tote right next to me. If I'm working outside, it's going to be a lot easier to reach in and grab this. Now there isn't a set weight capacity for your tonneau cover but I recommend don't loading it up too heavy. Now it should be okay if you're walking outside, you're working outside, you need to set your cup down, it'll be fine for that, or if you have any light tools, it'll be fine putting that on here too. And we're going to have some drains installed on the tonneau cover. As for when it is raining outside and things are getting wet, it's going to leave a point for that water to run off through and go through this drain and leave your vehicle. It's going to have four points. We're going to have two on the tailgate end and then we're going to have two on the cab side. You'll be able to see it, it comes right underneath this canister on both ends. Now we're can get some measurements on how much space this is going to take up in the bed of your truck. And that's going to be about 13 inches. And you are going to have some space underneath this, but that's going to depend on how much space you have in your bed. Now for the distance from the top of the tonneau cover to the bottom of our crossbar is going to be 16 inches. So that kind of gives you an idea of how much space you're going to have in the back. And if I pull it back in, (tonneau cover slams) we can take a closer look at that material. So we're going to have this black vinyl that's going to help make it more aerodynamic and give this nice clean finish. And that's going to be connected to this aluminum panel, which is going to be very sturdy and be weather resistant. Overall, this system is a great option if you do plan on going overlanding, especially with that ability to put a rooftop tent on top. And if you want to put any of your gear or supplies in the back where it's going to be protected by this tonneau cover, that's awesome. Now having a ladder rack in conjunction with a tonneau cover isn't that common and it's great that you have the ability to use 'em together. Let's start off the installation, we're just going to lay everything out. So we're going to have the rails for the driver's side and passenger side. Along with that, we're going to have our drain tubes. And we're going to have our top cover foam and our clamp extensions, along with the hardware for it too. You're going to have some recommended tools that says in your instructions. Your utility knife, some masking tape, needle nose pliers, a Allen key, and Phillips screwdriver, and a socket wrench. Now we don't have the tonneau canister over here at this moment since it is pretty large, but you'll see it in one of our next steps. Now we've got our tonneau cover out and you'll notice we have this plywood on either side, and we're going to have to remove that. So you're going to take a socket wrench and that's going to be a 3/8 one. And you're just going to remove these bolts that are holding it in place. And you do the same thing for the other side. (socket wrench clicking) The next step is going to be grabbing a friend and putting it in the bed of your truck. You can do this by yourself but it is going to be more difficult. When we are placing in the bed, what's recommended is putting something inside so it has something to rest on. As you can see, we use some totes on either side to keep it elevated. Now we're going to come over to the tailgate end of our bed and we're going to grab one of our stake pockets. We're going to remove this white plastic on the back of it and then you're just going to lay that over this hole. And with that covered, you just repeat that same process on the other side. Now we're going to install the rails and the way we want to put this on, what I like to do is line it up with your own bed rails to make sure you get the right one. We want to make sure that this rounded edge is facing the tailgate side and then we're going to have a flat side too. And we want this facing your cab side. You're going to have a passenger and a driver's side, so just make sure it fits around the contours of your bed rails. And once you have that done, we can start installing it onto the tonneau cover. What I like to do before I install this rail is you'll notice we have this tab at the very end of our tonneau cover. What you want to do is push this in so it's out of the way, 'cause this is going to catch on the rail if you try to install it. And then you're going to grab this rail. And if you notice, we have this tab here, we want to line that up with the gutters over here. We're going to go in between the third and fourth one, so one, two, three, four, in between these two. Once it's lined up, I'm going to push in and angle it until it catches. Once it's caught, we're going to push. You might have to apply pressure from the backside. You want to make sure this is flush and push against it. Sometimes you might have to come underneath, check if everything's fitting well. My case, mine was a little bit off. Now that I've adjusted for that, I'm going to push some more now. Now that I've pushed, I'm going to tilt it. Once everything's looking flush and is caught on the edge of that rail, we're going to push it down until it's flush and push against it until it makes the all the way across. You might have to push a little bit and it's going to stick out a little bit past the back of it. What we want to do is make sure that underneath it's lined up with this hole where a bolt's going to go through. And now we're going to grab this bolt and run it up through there. We're just going to use our Phillips screwdriver to get it on there all the way. Now we're going to set the tonneau cover on top of our bed rails. And so, that's going to involve moving those totes out. So I recommend grabbing a friend again to help you do that. So we're just going to lift up, pull these boxes out and let it rest. Our next step is going to be grabbing our canister cover. So I want to come over to the tonneau cover itself. And we're going to come over to this place where we're going to make that connection, screwing on our bolts. And if we take a closer look at this, this actually has the ability to go up and down. I'm going to pull 'em both closest to me or down, just so it's consistent on both sides. And then I'm going to grab that canister cover and place it on top of there. You want to make sure that the holes are facing forward, closest to our cab. And what we want to do at this point is line everything up. Once it's lined up, we're going to grab one of our black bolts and just lightly screw it in. We don't want to screw it in all the way because we going to want to make some adjustments after this. And when both sides are loosely on, we want to pull on it all the way forward, make sure both sides are even, and then we want to come over and look at the back. And see how we have this gap here that I can get my finger between We want to get rid of that and make it flush. And we want to make sure both sides are even. And when both sides are flush then we can tighten this down the rest of the way. We're going to come over to our tailgate side now and you're going to notice we have multiple notches. And what we want to go to is this notch furthest away or closest to our tailgate. And I want to grab this included tool, use this thin point we have on it and we want to make sure this is able to fit in between there and it's flush. We don't want it to be too far away. We have a gap and we don't want it to be too close either where we can't get it to fit under. So once you've adjusted that just by pulling on it either side, the next step is we'll be installing this foam. And how we're going to do that is by pulling back this tonneau cover. Now I'm going to grab some masking tape and this is going to be used to mark where our tonneau cover was sitting. So now that we have this placed, and I put this on the other side too, then we can pull this back some. Now when I have that gap, we can line up where this foam is going to sit. And this is going to be used so it prevents any water from getting in. We're going to lay out this foam on top of this sill and when you're doing this, you're going to remove this paper so it sticks to it and you don't have to worry about sliding around, but since we're just doing this for demonstrations today, we're just going to lay it on top. And then afterwards when you have everything marked out, you're going to come by with your utility knife and just cut this where it meets the end of the rail. And I'm just going to lift up on this and place it on top of that foam, and I'm going to line it back up with that tape. Now I want to grab our clamp extenders and you want to make sure you put these in the right locations. So FL is going to go on the front left or your driver's side front. FR going to go on the front right, front passenger. Back, BL, for the back left. And then BR for back right. When installing the clamp extensions, we want to make sure it's lined up with this rail underneath here. And we want this side clamp with that foam side facing towards the outside of your vehicle. Now when you are putting this on here, the directions want you to kind of slide it on or rotate it on like this. I find it easier if you just go to the very back and line it up with this rail underneath and slide it on. And sometimes it can be a little bit difficult because it'll catch. And if it does catch or if it's really hard to slide on, you can come underneath here to where that hole is and just loosen that bolt up just a little bit, so you can slide it better. When you have it on here, you want to push this in the back ones, the one closest to your tailgate, to this point where we meet this divot. And we want to get right at the beginning of it but not overlap it. Now when you're working on the front side, instead you're going to push this extender all the way down, past it, to where it sits on the front side of it. Now we're going to tighten this all the way and to do that, we're going to come to the front of this extender, we're going to grab our 5/32 Allen key and find a hole at the very front of it. Match it up to a bolt that's inside of it and tighten it. You'll want to tighten this the rest of the way and repeat that process for the rest of the extenders. Now we're going to grab our clamp grips and how you put this together is just by lining these two up until slides in place like this. And now I'm going to line up these two tabs and slide it on to that extension. And this can be a little bit tricky sometimes to get on. So the trick I like to do if I'm having issues with it, I'll just remove the second half, slide this part on, and then come back around, and slide that back half on. And with that in place, we're going to grab our next items. And that's going to be this knob with this bolt at the very end, along with this piece right here. And we're going to align this to this rounded section here, slide that bolt through until this makes connection and bolt them together. This is what's going to apply that tension. (components clanking) And we'll make sure this is all the way tight. And then you repeat that process for the other ones. And now we're going to install our kick stands. And you're going to have two of these and they're both going to go on the tailgate side. Now we're going to have this bolt positioned where it goes through that hole right there. And the way we want this installed is we want to make sure that this sits squarely and applies pressure to our bed wall. So to get it on there better, we're going to put on these washers, and then we're going to come by with this wing nut, and tighten this on first. (components clanking) And once this is nice and tight and that kickstand is positioned facing towards our bed wall, we're then going to tighten that down. (components clanking) And get to the point where it won't tighten anymore and at that point, you are good. Now I'm going to grab our drainage tube and the adapter that goes with it. And the way they're going to connect is this is going to screw on top of that tube. We're going to come back over to our rails. You are going to do this on both sides too. And underneath here, there's a location that has a hole underneath it, that's where that water's going to come out of. And you want to make sure that you have the open side, line it up with those tabs until it slides on and clicks into place. And then you're going to run this tube through one of your factory openings. So this is a great location down here. If you don't have one, then you're going to have to make one in a similar location to where this is. And just make sure you run it through and it sits flush with your vehicle. Now we're going to install the drain tube on the cab side and this is going to be a little bit of a tight fit, but what you want to do is grab this and make sure when you have this, you want to make sure we have this foam washer. And if you notice, we have these tabs on either side of this. And if we go underneath here, you'll notice that there's an opening with a circle and two tabs on either side. So what you want to do is line that up, so it meets and fits in that. Once it's fitted in, then you're going to make sure you take this tube and bring it over to one of the factory cutouts on your vehicle and push it through there. Now you might need to trim this if need be, just be careful that you don't trim it too much. And then after we have this side installed, you can go to the passenger side. Now we're going to come over to our weather strips and we're going to have our sweep seal at the very top. And underneath that one, we're going to have the wear strip. What we want to do is use the UV lubricant that comes with your kit and you're going to lubricate underneath that sweep seal and then on top of that wear strip. Now since we're just doing this for demonstrations, we won't be doing that today, but after when you've done that, then you're going to fully open up your tonneau cover and make sure nothing bends in on itself. (tonneau cover snapping) And this is something we do want to watch out for. So if we come over here, we'll notice this right here is bending in on itself just a little bit. What you want to do is come in, you can come in with a screwdriver and get underneath there, make sure this is flush. And the last part of the installation for the tonneau cover of this video is going to be just inserting this hook and loop system. And how that's going to work is you already have the one that's already attached to the top of the tonneau cover, which will then attach to this other one. And where you place this hook and loop system is your choice. We're just going to place it somewhere on the inside of our bed, closest to the tailgate so it's easy to access. So now we're going to grab this tower, and get it ready to put on our crossbars. And the way we want to do that is by flipping this upside down and running these carriage bolts through this channel. We just want to roughly place them where we want our tower to sit. (bolts scraping) And with them in place, we're going to grab that tower and line 'em up with these holes. (components clanking) Everything lined up, we're then going to grab our washers, put 'em in place, and then we're going to grab our nuts, and thread those on. And now we're going to grab that half-inch socket and tighten these down, but we don't want to tighten 'em down all the way. We just want to make sure they're tight enough so we can still adjust it, but it's not going to be wobbling all over the place. You're going to have some additional carriage bolts and the way you're going to put 'em in in your track is just lining up that square with the track itself. We want to put two on each side. And a trick that we are trying is putting on that adhesive strip on these bolts so we already know how to line it up and roughly placing it where we need it to be. And we'll just repeat that process on the other side and make sure you remove this paper cover, so it can adhere to the bottom of the tower. Now we're going to put our rear ladder rack system on the back of our bed. It's going to make it a lot easier if you grab a friend. And we're just going to lift up and line it up with those bolts we have on our rails. And you might have to do some adjustments so this sits in place. But once it's on there, we can start tightening everything up. When those washers are on, I'm going to grab our nuts and hand tighten them at first. And once they're hand tightened, I can go back through with our half-inch socket and tighten them down the rest of the way. And one thing to note too, you do have the ability to move this up and down the track at the moment, and that's going to be great for finding your crossbar spread, and that's going to be for whatever accessories you have. Before we tighten our crossbars all the way to our towers, what I like to do is get an overhang distance. And once I have that distance, I just like to make sure it's even on both sides. And once it is, I can start tightening it down with my half-inch socket. (socket wrench clicking) And one of our last steps is when we're putting on our end caps. So when we place it up here, we want to line it up with those two holes. Run our bolts through here. And once they are attached, we can tighten them down the rest of the way with the Allen key. And that'll do it for the look at the installation and some of the features of our tonneau cover and ladder rack system on the back of our 2022 Ram 1500.
Average Customer Rating: 5.0 out of 5 stars (1 Customer Reviews)
Retractable tonneau cover with mid-height truck bed rack lets you outfit your truck bed for any overlanding adventure. Aluminum and vinyl deck is strong and seamless. Offers enhanced cargo protection for your vehicle.The bed cover, rack and communication was awesome. The printed instructions were a little difficult to understand so I looked at the installation video on the etrailer website which was much better. All in All, I was pleased!
Info for this part was:
At etrailer.com we provide the best information available about the products we sell. We take the quality of our information seriously so that you can get the right part the first time. Let us know if anything is missing or if you have any questions.


Thank you! Your comment has been submitted successfully. You should be able to view your question/comment here within a few days.
Error submitting comment. Please try again momentarily.