
Summer Starts Here - Save up to 70%
To see if this custom-fit item will work for you please tell us what vehicle you'll use it with.
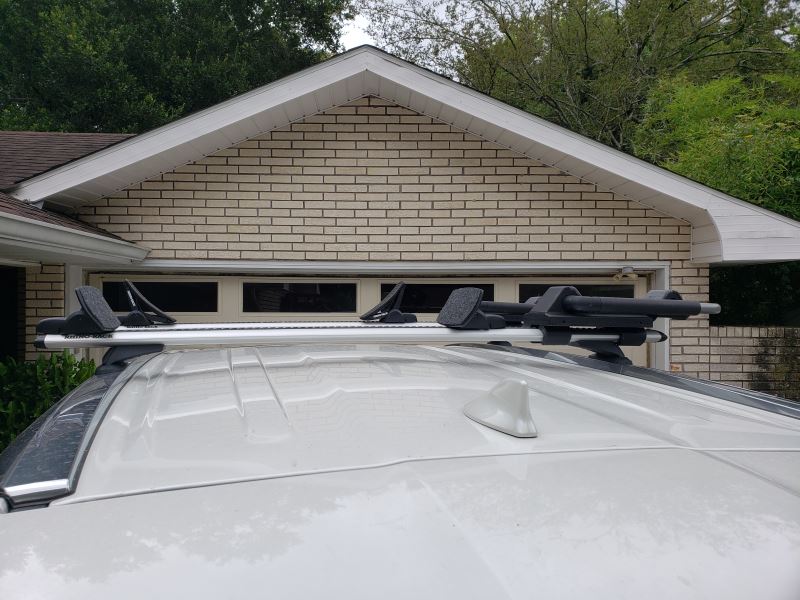
Aerodynamic, aluminum crossbar lets you build an aftermarket roof rack for your vehicle. Full-length bar provides plenty of space for carriers and accessories. Vortex strips in C-channels reduce wind noise. Includes theft-deterring plastic locks.
Features:
Rhino-Rack Vortex Aero Crossbar - 49" - Black - Qty 1:Videos are provided as a guide only. Refer to manufacturer installation instructions and specs for complete information.
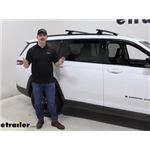
Hi, everyone. Aiden here with etrailer. Today, we're gonna be taking a look at and showing you how to install this Rhino Rack Roof Rack System on our 2022 Jeep Grand Cherokee L. A roof rack is a really solid option for expanding your cargo space where if you wanna put a basket or a box on top of your vehicle to get some extra cargo in there or maybe you wanna get some larger items like a roof-mounted bike rack or a kayak carrier, it's a great way to get some of the extra stuff with you that you maybe don't have space for inside your vehicle. Maybe you've got that third row seats up and you've got passengers in the back and your cargo space is a little bit limited, this is a great place to go because the roof is very large and the roof rack is a really solid one too. And the reason it's so solid is because it mounts directly to the vehicle.
Rather than using something like clamps or wraparound bars, it's going to bolt directly into these raised rails on your roof. So it creates a really solid contact and it's probably my favorite way of attaching a roof rack because for one, you've got fixed mounting points. It makes the install really easy. But two, it's just a lot more stable and I trust it a lot more going down the road. Because these have fixed mounting points, you do wanna keep in mind your crossbar spread.
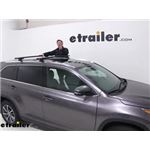
It's gonna be important when picking out our accessories. So from the center of one bar to the center of the other, it's gonna be 27 and one quarter of an inch. So when you're picking out different rooftop accessories, a lot of them are gonna have a range of crossbar spreads that they'll work with, whether it's a box that has adjustable clamps or a basket that only has so much room for those clamps to go apart. You wanna make sure that whatever you're picking out can work with that crossbar spread because these can't be moved. Some other measurements to keep in mind are gonna be the 49-inch length of the crossbars themselves.
They don't have a whole lot of overhang off the sides. So for something like a load-assist kayak carrier, it probably wouldn't work super well with this kit and you'd probably need to upgrade to longer bars because with those load-assist carriers, you need a little bit of overhang on your crossbars to get that load assist system far enough away from the side of your vehicle. But with the kit that it comes with, I think it's a pretty solid fit and it gives you a little bit of overhang the play with for certain accessories. As far as how tall it sticks up on top of your roof, from the roof to the top of the bar, it's gonna be four and a half inches. Now, from the roof to the bottom of the bar, that's gonna be two and 3/4 of an inch.
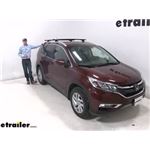
So that leaves plenty of room underneath for clamp-around accessories because if you do have a clamp-around accessory, especially one that has like a hand knob on the bottom, you need room for that so it doesn't hit your roof and so you can get your hand in there to tighten it down. But for this, it's a pretty good option, it leaves enough space, and it doesn't stick up too tall either. On top of the crossbars, there's a T-track system. So if you wanted to remove this rubber stripping, take off the end cap and slide your accessories into the slotted hole on the top of the bar, you can. The only thing I'd keep in mind is that Rhino Rack's method of doing this is probably my least favorite because you have to peel back the different sections of weather stripping and cut it to length to accommodate those or just remove it entirely, which is gonna create a lot of wind noise. Something like a Yakima bar would work a lot better because you don't have to cut that weather stripping to length. You can just slide into your accessory and it'll conform around that T bolt. To access that T-track, it uses a special tool that you get with your Rhino Rack kit. So that's gonna keep it protected if you do use a T-track accessory. And for the towers underneath, you're gonna have a key to lock that cover up. That cover is what secures our mounting bolt inside so that keeps the roof rack locked to your roof. The only other thing you need to consider is the weight capacity. The whole system can support 165 pounds and that's just, it's moving weight. So whenever you've got it loaded up driving down the road, your load must not exceed 165 pounds, which is pretty on par with most of our roof racks. Just keep in mind that if you throw a box on top of the roof, you have to factor in that weight as well. So if it's a 40-pound box, subtract that 40 pounds from the total roof rack weight capacity and go from there. And that's all there is to it for the Rhino Rack Roof Rack system on top of our Jeep Grand Cherokee L. Overall, I think it's a really solid system. It fits well, the install process is very straightforward, and in general, I'm just a big fan of Rhino Rack's Roof Racks. I think it looks really good on top of the Jeep here and I've been using them personally on my own vehicle for a long time now and they've always worked really well for me, so I trust it going down the road. Like I mentioned before, that install process is very easy. So let's jump up to the roof and get that started now. The install process is gonna be really straightforward. Up on the roof, there's gonna be a few fixed mounting points that we're gonna utilize for our installation. You can find them by just looking on the inside of your rails and there's gonna be these two plastic caps that are next to each other. That's one point. There's gonna be point at the front, middle, and rear of these rails. We're gonna be focusing on the middle and the front one for our crossbars. I've already got the middle one installed, and we're gonna be taking these plastic caps off of each of those mounting holes for the front together. So you can use a flat blade screwdriver for this, but I prefer a plastic trim tool just because then it's going to be plastic on plastic rather than having metal on plastic and potentially damaging some of these components. With those removed, we're gonna turn our attention to the fit kit. This is gonna be the box that comes with four metal plates, four of these rubber sleeves, and then all of your hardware. Each of these metal plates is going to have an L or an R on them. L for driver's side, R for passenger side. And then all of those rubber sleeves are gonna be exact same. There's four tabs that will line up with tabs on the top of our plate. So we just wanna nest these two together, kind of getting that metal plate underneath the lip and getting those tabs to pop through the top. They can be a bit stubborn, but once you get those pop through, the two will be joined together. To secure this piece of the rails, turn our attention to the Allen bolts that are included in our kit, slide on a lock washer and a flat washer, and we'll do two of these for each of our plates. Getting that lined up with the threaded holes on the rail and just starting them by hand. Now, I've got a towel laid down for all of this just to make sure none of these metal components end up falling and scratching our roof up and it just helps keep everything straight and from rolling around. Once they're both loosely installed, we can take our included Allen key and tighten them down fully. Back down on the ground, we can get our crossbar assembled. The crossbar itself is going to house our towers. Now, with these, we're gonna have a block with a bolt on the bottom. We want this nice and loose right now because what we'll do is come to the end of our bar on the bottom side of it and slide that bolt or that block into the track underneath to lock it in place, but still loose enough to move around. We then want to get the right positioning. This measurement can be found in your instructions or by measuring from the center of one mounting location on the fit kit to the center of the other. And I'm just going to measure for ours from the mounting locations on the towers. And after I get that measurement where I want it, I wanna make sure everything is also centered up so that we have even crossbar spread on either side. That's gonna be the overhang on either side just so it looks nice and even. And once I'm happy with that, I can take that same included Allen Key that we used earlier, come right over to those feet, and tighten up that bolt underneath. That will snug down that block inside the track and immobilize the tower. Just like that. Then we can repeat that for the other tower. We can take the whole crossbar assembly up to the roof with everything tightened down, and just set it on top of the fit kit. If you measured everything right, it should just slot right in. We can go back down to the ground, grab our remaining hardware, and secure it right in there into the threaded holes on the fit kit. That remaining hardware will be a 10-millimeter bolt, lock washer and flat washer, and it's gonna be kind of tough to get it in there at first by hand just because you do have limited space for your fingers, but start it by hand and run it down the rest of the way with a 10 millimeter wrench that isn't included in the kit. So you will need to go and grab your own. A ratcheting one makes this a lot easier because now we can just run it down. With everything tightened down, you can secure your end caps. So you can use the key and the cap for the towers to secure that mounting bolt so no one can mess with it when you're not around. And then use the special tool from Rhino Rack to secure the end caps on your crossbar and secure up that T track inside. After that, you're good to go. And that'll do it for our look at the Rhino Rack Roof Rack System on our 2022 Jeep Grand Cherokee L.
Average Customer Rating: 4.6 out of 5 stars (165 Customer Reviews)
Aerodynamic, aluminum crossbar lets you build an aftermarket roof rack for your vehicle. Full-length bar provides plenty of space for carriers and accessories. Vortex strips in C-channels reduce wind noise. Includes theft-deterring plastic locks.
The only complaint I have about the crossbars is that it causes a high pitch sound. I've been meaning to contact you about a possible solution. Pls advise.
Other than that they are just fine.
Great bars. It's my second pair. Both on jeep Grand cherokee. The pair I put on my 2015 overland didn't whistle at all. This pair I put on my 2020 trailhawk whistled starting at 20mph and changed pitch throughout the acceleration process and while causing. I bought a fairing and the problem is solved. At least for now. I put the fairing on wit the label in. Looks better and Rhino Rack isn't paying me to advertise. The fairing they recommended seemed small but works so go with whatever they recommend.
The Rhino Rack BLOCKS my SUNROOF. It was recommended for my 2018 Highlander on the etrailer website. A 2018 Highlander with a sunroof is shown on etrailer in the install video. However, I can not open my sunroof. etrailer refuses to refund or exchange it and have no options for fixing this issue!
Bought all parts for complete Rhino Rack roof rack for my 2022 Kia Soul Turbo. I got the 46" Vortex Aero Crossbars that were originally suggested on the etrailer website instead of the 54" listed on the RR website. The 46" bars work the best for me. The 54" would be wider than the car. All parts are well engineered. Other reviews have been critical of the finish on the bars as being easy to scratch. I think that is one area where the quality could be improved. Installation was a little more involved than I anticipated but still a doable DIY. I think the RCL leg system is probably the most challenging to install. I have ordered quit a few items from etrailer, and as previously experienced, all etrailer staff that I interacted with were very friendly, helpful and professional.
Proper fit on our 2023 cx-5
My Rhino Rack RCL Roof Rack was installed one year ago on a 2014 Honda CRV (fixed rails). It whistles very loudly. In fact, if I use my bluetooth to talk on the phone, everyone asks what the loud whistling is. If my moonroof is opened about a third of the way, the turbulence is diverted and the whistling stops. However, that obviously is not practical in cold weather. I'm disappointed because my understanding is that there was not supposed to be too much noise with these crossbars.
Exactly what I needed! No hassle ordering and great customer service.
All of the parts were a perfect / tight fit and solidly built.
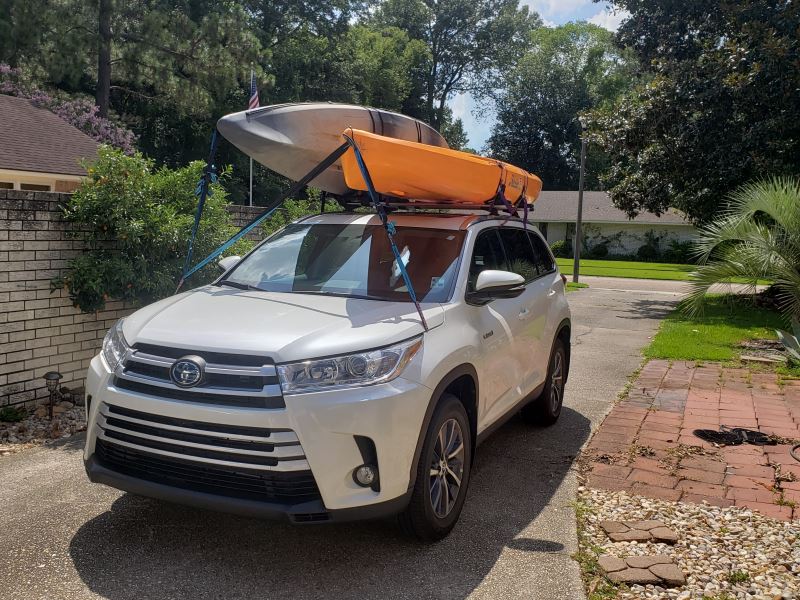
I recently purchased the Rhino rack below with these boat supports:
Rhino-Rack Nautic 581 Rear Loading Kayak Carrier - Saddle Style - Rear Loading - Channel Mount
Item # RR581
Also, I attached a Yakima Jaylow kayak carrier, all to a 2019 Toyota Highlander Hybrid.
On the 54 inch aero bars, I was able to carry a Hobie Compass Duo kayak (35" beam, carried flat on the Rhino pads) and West Marine Pompano 120 (28" beam, propped up as shown on the Jaylow racks). To have enough width, the Jaylows and the Rhino pads are mounted as far out as they can go, and the straps are looped back under the rack pillars on the car.
The bow and stern were secured with hood loops on each side (front diagonal straps on the Hobie), on the front placed under the hood where shown (this is the only place I could find a good metal-metal contact under the hood, and no electronics in the way), and in the back, tucked under the rear door.
We did a 500 mile round trip to the beach and back, with no problems at all with the mounts. Little noise, no movement. My only recommendation is to figure out some kind of load assist for the large tandem kayak, to make it easier if one of the folks loading is under 5'8" in height or so. We worked it out, but only after a few failed attempts (especially when the boat is wet, and loaders are tired).
Carol C at etrailer provided thoughtful, expert, and knowledgeable tech support for our purchase. Many thanks!
Fit my 2023 4Xe perfectly! Like others have said, I used the back rail mounts as opposed to the middle set to allow my ski bindings to fit between the two rails. Pretty easy to install. All you need besides the included screws and tools is a 10mm wrench and scissors to cut the trim to length.
What a great experience it was working with etrailer.com and Vicky N, in particular. I needed a roof rack system for my daughter's vehicle and Vicky was very knowledgeable and helpful. Unfortunately, the product I originally wanted was backordered but Vicky was able to guide me to a system that should work as well. She was also reassuring that, if the mounting system needed to be exchanged for a different configuration, it would be no problem to exchange it Additionally, the rack arrived within two days and appears to be the correct one. Thus far, I have nothing but praise for etrailer.com and would not hesitate to shop here again. Thanks, Vicky!
Good Service. These were purchased as lower profile legs for Aero bars or a platform. They fit backbone roof castings by trimming the small tabs, sanding the base flat and crafting rubber gaskets.
Great item
great products and great customer service, I would recommend them to anyone!
These are very durable mounting points! My suggestion for the manufacturer is to engineer this in such a way that it can be a quick install & removal without having to remove bolts or replace it with a cap when removing from my vehicle. Perhaps it's just me and my fat fingers, but it's difficult for me to get my fingers in the mount to remove the bolts once their loosened.
These have been on our 2016 Toyota Highlander for 1 year and we have not had any issues with them.
Time consuming to assemble, once you hit 25 mph you can hear a faint whistle from the sound bar. Double checked all plugs to confirm there were no gaps in the top or bottom rubber but noise continues. Easy to remove so decision made the use only when there is a need vs leaving on my jeep full time. Disappointed.
The product info on your website led me to believe that the vortex strips were included with the bars. They were not. I have always bought Yakima in the past and will in the future.
We got it installed and it has works just fine. It will not be that easy to take off and re-install though. It seems like this kit was not really intended for the 2019 CR-V since when the posts were installed, the cross-bar attachment "tongues" tilted down somewhat. With enough effort tightening the top bolts they pulled up flush to the bars and seem fine. This seems kind of kludgy for a design however. I would have expected them to install such that the attachment points for the cross bars would have been more parallel to the roof of the car. This setup means constant stress on those metal components - perhaps that is intentional, but it means that pulling the bars and re-installing them so the car can go through a car wash will not be much fun.
So far, so good. Assembly and installation was a breeze. Seems like a sturdy, product with many years of life in its future.
Easy to install on the Aero crossbar and to fasten to the custom Rhino mounts on my Jeep Grand Cherokee WL.
Great low-profile platforms for the Rhino-Rack Vortex crossbars on my 2019 Jeep Compass! They look nice, are easy to install/adjust and seem sturdy.
Install was easy. Just make sure that you follow the instructions provided with the fit kit and take your time. Product is well manufactured. Service was excellent as always
Great service very responsive
My review of the rhino roof rack is disappointing. It has been whistling and I tried undoing and trying again a second time and it still whistles. I’m left thinking of other methods to silence the whistling.
Info for this part was:
At etrailer.com we provide the best information available about the products we sell. We take the quality of our information seriously so that you can get the right part the first time. Let us know if anything is missing or if you have any questions.


Thank you! Your comment has been submitted successfully. You should be able to view your question/comment here within a few days.
Error submitting comment. Please try again momentarily.