
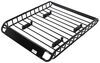
Inno Square Bar Roof Rack for Naked Roofs - Black - Steel - Qty 2
Item # IN35TR
Our Price: $359.97
Confirmed to Fit
2014 Dodge Durango
Will this fit?
To see if this custom-fit item will work for you please tell us what vehicle you'll use it with.


- All Info
- Reviews (290)
- Q & A (0)
- Videos (4)
- Photos
Inno Roof Rack - IN35TR
- Square Bars
- Crossbars
- 58 Inch Bar Space
- Inno
- Black
- Overhang
- 2 Bars
These steel, square crossbars attach to Inno feet to create a sturdy roof rack for your vehicle. Elastomer coating resists corrosion and helps cushion your load. Bars accommodate carriers and accessories that clamp around bars.
Features:
Inno Square Load Bars - Black - 58" Long:- Square crossbars let you build a roof rack for your vehicle
- Pair with Inno feet and custom fit kit to create a complete roof rack
- Standard square bars provide exceptional load support
- Clamp-on carriers and accessories conveniently wrap around bars
- Elastomer coating helps to prevent rust and cushion your load
- Endcaps keep out dirt and water
- Hardened steel construction is strong and durable
- Black color
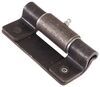
Inno Custom Fit for XS200, XS250, and INSU-K5 Roof Rack Feet:
- Custom-fit clamps and pads let you install Inno roof rack feet on your vehicle with a naked roof
- Works with XS200, XS250, or INSU-K5 feet
- Pairs with 4 feet and 2 crossbars to create a complete roof rack
- Clamps are designed specifically to fit the curves of your doorjambs
- Mount to roof rack feet with bolts
- Molded pads are custom designed to fit the contours of your roof
- Protect your roof surface from scratches and abrasions
- Press onto the bottoms of your roof rack feet
Inno Feet for Square Crossbars - Naked Roofs - Black - Qty 4:
- 4 Feet let you mount Inno square crossbars on your vehicle's naked roof
- Pair with 2 crossbars and a custom fit kit (sold separately) to create a complete roof rack
- Bases pivot to ensure crossbars are level on your roof
- Locking torque knobs secure system to your roof
- 2 Keys included
- Durable, weather-resistant AES plastic construction
- Tool-free installation and removal - no drilling required
- Torque knobs prevent over- and under-tightening
- Black color
IN-B147 Inno Standard Square Steel Load Bars - 58" Long - Black
K611 Inno Fit Kit Hooks for Flush, Through, and INSU-K5 Stays
IN-SUT Inno Roof Rack Stays for Bare Roofs - Black - Qty 4
Replaces Inno INSU-K5


Video of Inno Square Bar Roof Rack for Naked Roofs - Black - Steel - Qty 2


Videos are provided as a guide only. Refer to manufacturer installation instructions and specs for complete information.


Video Transcript for Inno Aero Crossbars Roof Rack Installation - 2022 Dodge Durango
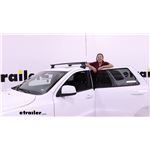
Hi, everyone. Aiden here with etrailer. Today we're gonna be taking a look at and showing you how to install this Inno roof rack system with the flush-mounted crossbars on our 2022 Dodge Durango. Now, when I say flush-mounted, what I mean by that is that the crossbar, that piece up top that we're gonna attach our accessories to, ends inside the foot pack here, meaning that nothing overhangs off the side of the vehicle. A lot of people prefer this style because it is a little bit more clean and custom looking. And if you only plan on mounting up one accessory on your roof, maybe something like a box for a road trip or a basket, then this is gonna be plenty of room.
We don't need all that extra crossbar space just for one thing. Plus, if you're a bit taller, it's going to be less risk of maybe hitting your head as you're getting into the vehicle because if there is a bar right here, that might be something to worry about. But depending on the accessory you plan on carrying, sometimes you need crossbar overhang. For something like a load-assist kayak carrier that will come down, let you load up the kayak at an easier height, and push it up onto the roof easier, you need that overhang to make those systems work. So take a look at what you plan on carrying with your roof rack or what you think you might end up carrying and decide whether this or the overhang is going to work better for you.
And one other thing you need to consider is what type of roof you have on your Durango because there are multiple options. Ours is a naked roof, which means that there's no existing rails or crossbars on the top. It's just the roof with this ridge here on the side, meaning that we need a roof rack that can attach that way. And the way we do that is with our fit kit. The fit kit is going to consist of this custom-molded rubber pad on the bottom that matches the contours of this lip and custom-length clamps that will reach down from that base and into the door jamb here, hooking in place and giving us a firm attachment point.
If you have a different type of roof where you've got some rails, it's gonna be a different kit for you. But just plug in your vehicle information and your roof type into our fit guide and find the right kit for you. This kit is gonna use Inno's Aero Bar, which is a longer, wider bar that's a bit thicker up front and tapers off towards the back. That's gonna help with wind drag and wind noise as we're going down the road and offer a lot of options for mounting up accessories because it is going to work with the most things. That wider base means clamp-around accessories are gonna work and sit on there really well.
It's a pretty standard size. And if we take our included keys and pop off these covers here, that's going to expose the T track up top where we can channel mount accessories if we want to. That T track is gonna be the way that we just maybe mount some things up a little bit more cleanly. If you have one accessory that you use all the time and you want it to look nice without any clamps or extra pieces hanging below it, that's the way I would do it. And I like the way Inno sets up their channels because it's got one long rubber weather strip in there that's going to keep the wind noise down and that we don't have to cut to length. You just slide your accessory in and push it to where you want it and you're good to go. One thing to note up top is that the roof rack can hold up to 120 pounds, which is a little bit lower than some options out there. But one thing you always want to check is your own Durango's roof capacity and go by the lowest rated component. Oftentimes the roof on most vehicles is the limiting factor, and you don't wanna load up too much weight up top on your vehicle anyway. This is gonna be more for your lightweight items, maybe some bikes and kayaks, things like that. And as far as some measurements go, we are gonna be working with a 32-inch crossbar spread. That's the distance from the center of one bar to the center of the other. That's gonna be a pretty good in-between range for most rooftop accessories, but depending on what you plan on putting up here, just check it and make sure that it'll work with that crossbar spread because everything in the kit, from those pads to the clamps, are designed to work in these specific locations. Some other measurements are our clearances, because this is a very low-profile roof rack. From the roof to the top of the rack, it's only adding about two and a half inches to the roof of our vehicle, which is great for things like garages. Depending on what you plan on mounting up here, do check that after the fact because if you put a box up here, there's no way it's gonna fit in your garage. Just depends on the accessory you have here. And from the bottom of the crossbar to the roof, it's only gonna be about one and a quarter inches, which is really low clearance. Depending on the accessories you go with, if they have clamps, if they're really thick clamps, I'd be worried about making contact with the roof or just being hard to tighten down. So check on that. And in those cases, a channel-mounted accessory might be the favorable option just to save space underneath the bar. And if your vehicle does have a sunroof or something, I would be cautious of opening it. Personally, I'd recommend just not bothering with it at all because, one, you might hit it, but two, having anything mounted up on your roof is gonna create wind noise. So if we plan on driving with this open, we're gonna hear a lot more noise and it's gonna be pretty obnoxious. So I just wouldn't do it for that reason anyway, but I would advise against it for risk of damaging your vehicle. And if you think the roof rack is gonna work for you and the things you plan on putting on top of your Durango, I think the best part about all of this is that it's a very easy and non-invasive install process. So let's walk through that whole thing with you step by step right now. Starting off the installation, we're gonna be on a table, somewhere where we can lay out all the parts for our roof rack and take note of everything. The crossbar, just keep in mind where the thicker part is. That's the front of the crossbar. And as it tapers off to this thinner section, that's the back. You will need to know that for when you're attaching things like your feet and the clamps. So for now, just take the crossbar and flip it upside down where we can see the track underneath. So on the track underneath, there's gonna be this sliding piece here, and if we push it all the way out, there's a rectangular slot that can match up with our plate. Now, our plate is gonna have a small notch in the top that will line up with a small tab on this hole. So just get those two lined up together, push it in, and slide it into that channel on that track underneath. And if we slide it all the way over, pushing this button here so it actually slides into the crossbar, this is gonna be the place where we need to attach our foot. Now, the feet are side specific. There's an L or an R depending on the one you're looking at. And it'll give you a little diagram of that crossbar. You can see the thicker part should be towards the front here and the thinner part should be over here. So we've got it all lined up already. And up top we can see a bolt poking through with the threads, a small tab, and this T shape. The threaded bolt is going to line up with this threaded hole right here, the tab will be right next to that, and the T will go into this slot back here. So flip it upside down, get that T lined up, and drag it out so it holds itself in the thinner part of the channel there. And when you get to the outside of the crossbar, the foot will kind of drop down and we can take the included tool and tighten down that bolt into the threaded hole. So just give it a few turns, and if it doesn't pull up anymore, then you know that the thread's caught. We can leave it slightly loose right now as we make some adjustments side to side. Now, as for the exact spacing of that foot, we kept it loose to move around. In our instructions, there's going to be a measurement that goes from this middle point on the crossbar where Inno has put a sticker out to the foot pack. So you can find that measurement in your instructions. It's gonna be different for the front and the rear crossbar. And in our experience, for the front crossbar that we already installed, the measurement wasn't super accurate. So take it with a grain of salt, use it more as a start point, and when you've got it where you like it, tighten it down the rest of the way and repeat that process on the other side. Depending on how it fits on the roof, we might need to come back down, loosen it, move it in or out, and then re-tighten it. Once it's tight side to side, you'll notice there's still a little bit of movement kind of angling the foot. That's okay. Leave it like that for now. We'll adjust that later. For now, we need to get the fit kit into place. You can probably see right now those tabs will line up with those notches. And on the bottom of that fit kit, the thicker part is going to be facing in towards the middle of the crossbar or towards the middle of the vehicle. And all of these number codes are the exact same for all four fit kits, so no need to keep any of those straight. They're all the same. Once it's been done on both sides, we can go to the roof. If you've got a friend on hand, it's really helpful to have that extra set of hands on the other side of the vehicle, but not necessary. We're gonna line this up as best we can and break the tape measure out later to get the spacing front to back more exact. But you want that pad to be fitting around the lip on the roof right here on both sides. We'll go ahead and check it out from the front of the vehicle, make sure it's looking even, and if we're happy with the spacing, then we can go forward and tighten things up. If we're not happy, again, we can take it down and adjust those feet if we need to. The measurement that we're taking can be found in your instructions. It just goes from this seam between the front and the back door back to the center of where we want our crossbar to be lining up. And we want to take that measurement on both sides, making adjustments as we need to. And make sure it's the same on both sides to ensure that these bars are running parallel to one another and perfectly perpendicular with the car. And if you notice a small gap under your fit kit like this, just remember we've got our foot loose so it's kind of pivoting side to side like that. We left it loose so that we can adjust it and make sure that we take that weird gap away. When you're happy with how everything is pivoted, take the other Allen key, slide it underneath this red tab. There's a bolt hidden in there. It's tucked back pretty far, but you can use the included tool to tighten that up and secure that side to side. The clamps and the bolts that secure those clamps are going on next. The bolt will feed through the clamp and into the cylinder right here where there's a threaded block behind it and the top of the clamp will line up with this ridge right here. So get those put in, pass this through, and thread it in by hand. I like to go until it touches and we're not really able to turn it much more. And repeat that on both sides. And once we're happy with it making contact, tighten it up, making sure to evenly do it on both sides so you don't pull the whole crossbar over to one end of the roof. Now, as we're tightening these down and you're going back and forth, there's no need to overtighten this. Just get it nice and snug where the crossbar isn't moving and make sure that the clamp here doesn't have any strange gaps with the door jamb. We want that sitting nice and flush on both sides. When you're happy with how tight everything is, close the door on those clamps and take your covers, pop them into place, making sure to line up the lock core on the right-hand side. Lock it in, make sure it's secured, and you're good to go. Once you've got those covers in place, I like to go through and just do one final shake test to make sure that nothing shifts or moves on me. But I'd say we're looking pretty good. It's a really easy install process. Inno lays everything out pretty well. There's not that many components to adjust and the end result is a pretty nice looking roof rack. I'm not the biggest fan of Inno's flush feet here, but it is going to be pretty functional and give you that extra cargo space on top of your Durango. And that'll do it for our look at and installation of this Inno roof rack system on our 2022 Dodge Durango. Thanks for watching.
Customer Reviews
Inno Square Bar Roof Rack for Naked Roofs - Black - Steel - Qty 2 - IN35TR
Average Customer Rating: 4.7 out of 5 stars (290 Customer Reviews)
These steel, square crossbars attach to Inno feet to create a sturdy roof rack for your vehicle. Elastomer coating resists corrosion and helps cushion your load. Bars accommodate carriers and accessories that clamp around bars.by: Lisa L.04/07/2023
Great looks, feels very sturdy. Super easy to install. Only downside is they are a little noisy, but that was expected from the square bars. Went with square bars to use my older Thule kayak and bike rack systems. I installed the Inno mounting system myself...no problem. Directions were very good!


by: 04/23/2024
Been a month haven’t received them yet they are in stock but guess we are waiting for one item which it’s in stock date gets pushed back every day. And the company doesn’t let the customer know the date changes or when they will send it.
by: Michael09/21/2023
2015 Honda Civic
Good quality rack system, easy to assemble and install, works well, looks good, fair price, I'm very satisfied with this purchase. I appreciate the guidance I received from William B. at the beginning of my search for a roof rack to carry a canoe on my 2015 Honda Civic. Two thumbs up for this purchase.
by: Blah Blah Blah Motorcycles04/08/2024
Easy to install and have worked great so far!
by: Ferne03/27/2024
Super easy to install and remove. Lock feature is great
by: Chris02/21/2024
Incredible engineering: does not feel like an aftermarket rack. Easy to take off if necessary. Solid; highly recommend.
by: Caitlin08/10/2023
Volkswagen Golf
Works well, has stayed attached with no issues. We've used them (plus the bars) to keep a canoe and a rocket box on the car at different times throughout the year (not at the same time, it's on a tiny golf).
by: David 05/08/2024
Perfection!!!
by: Charles 05/10/2024
Perfect fit.
by: Chris07/13/2023
Worked great! Traveled with a carrier on these racks from Chicago to Seattle. No issues, would buy again!
by: Ian07/26/2023
I have two standup paddle boards that literally live in the racks, and have since day one.
The racks are awesome.
by: Alberto11/22/2022
Really great value! No need to spend a lot on Thule. Even those these are square shaped I actually don't hear much road noise. Besides, you're gonna have music playing or riding with the windows down anyway. I would definitely buy these again.


by: William11/16/2020
etrailer.com you guys are great every thing came on time. i bought the inno sq bar roof rack for its price point and i like the look. I have a thule roof box I need to mount . The SQ bars are a bit noisy so I plan on buying the rack faring. On the front mounting pads the directions say there is a gap but it seems extreme i will post a pic I also checked the measurements 3 times. when i get a chance i might re-adjust the front pads.. Please Advise


by: Brian Kashner02/21/2023
Odelia was extremely helpful in helping me choose the right product. I had an end-cap that was missing and she sent me whole package of four. This is the kind of customer support one hopes to receive when deciding to spend a few hundred dollars on a product. I will definitely return to etrailer if I need another car rack for our other car.
by: Jake 04/07/2023
Just what I was looking for to put up my rooftop tent. These are also a fraction of the cost for Yakima bars.
by: Lisa07/23/2020
I am a fifty-four year old single woman and being able to install these roof racks by myself makes me feel empowered!!
I watched a video emailed with my delivery confirmation of an installation on a similar vehicle all the way through first, and then watched it again as I did the steps myself, pausing when I needed to.
The products appear to be of high quality, were packaged/shipped neatly and it was easy to organize everything for installation. I couldn't be happier!


by: Sean D06/01/2019
Waited till I put the new rack to work before review. Used it the first time today and it worked Great. Seems like a very durable rack system. Love that everything is rubber coated so it doesnt scratch the paint on your car. Installing instructions where a little confusing but found YouTube videos from etrailer on how to install exact rack system.


by: David08/12/2018
Installation is easy. Just follow directions. Front bar parts are different than rear bar parts so you need to look at part numbers and use in correct location. Rack is only rated for 100 pounds but looks and feels much stronger than rating. As noted square bars do create lot of wind noise when driving. Purchase this product to carry my Canoe and it does that at almost $200 less than other rack systems on market. For me the square bars are better fit with ratchet straps to hold Canoe down. Hard to find ratchet strap with hook to fit areo bars.
Dislike. No way to level square bars. With car on level ground high point to high point on bars is level. But each bar is off by 1/8" front to back. Wish they were round bars.


by: Daniel07/01/2023
Quick and responsive customer service! Thank you etrailer!
by: Daniel07/01/2023
Quick and responsive customer service! Thank you etrailer!
by: Bradley07/16/2020
2003 Toyota Tacoma
Good morning so the order I got is amazing I have a old school thule roof rack that I needed the write stuff so can start putting bikes on my roof an my fishing gear or some small stuff for off roading an it works great I will be sure to be buying more stuff from this site great job with the shipping it was very fast an packaging was great it was easy to install an it looks great on my 03 Toyota tacoma thanks again


by: CP05/12/2023
Great roof rack. Easy to install and du rable!
by: LD05/14/2023
Toyota
Worked well for my 2006 Toyota Prius
by: Tom Burger05/23/2021
I followed directions and the rack went on without a hitch. The measuring tape provided was a bit confusing but my tape measure did just fine. It pays to watch for any movement of the stays as you tighten them. It fit perfectly. I was impressed with the quality of the unit. The torque wrench provided was a nice bonus. I attached a boat rack for my rowing shell and I’m confident it will be safe all the way to the water.


by: Josh12/12/2020
I’ve had many Thule and Yakima racks over the years, both great products, but this Inno product is equally as good if not better at a much better price, I couldn’t be happier! Courtney was super helpful shipping was FAST!! Don’t hesitate....


25
1008
Show More Reviews
See what our Experts say about this Inno Roof Rack
- Roof Rack Recommendation for 2002 Land Rover Range RoverFor your 2002 Land Rover Range Rover with factory raised rails we have the Inno Roof Rack part numbers # INB147 and # INFR which is a confirmed fit. It clamps and wraps around the rail and does not require a mounting hole at all.
view full answer... - Inno Square Bar Roof Rack for 2003 Mercury MountaineerIn order to get the longer bars, you'd order the parts separately. You'd need the roof rack feet, part # INFR and the # INB147. There won't be a cost difference by ordering the feet and crossbars separately. You might also be interested in a fairing like # INA260 would make the rack more aerodynamic, reducing the wind noise. I've linked you to some product description videos for some of the parts I mentioned.
view full answer... - Inno Roof Rack Recommendation for 2007 Subaru ForesterFor your 2007 Subaru Forester with raised side rails we have the Inno roof rack part numbers # INB117, # INTR, # INTR104 that INNO recommends as a fit. The bars that come with this, # INB117 are 46 inches long. If you wanted the longer 58 inch bars you'd need the part # INB147.
view full answer... - Can 2007 Chevy Suburban w/ Raised Rails Use Inno Square Crossbars Longer Than 54 InchesIf you'd like you can go with Inno square crossbars that are longer than the 54 inch # INB137 on your 2007 Chevy Suburban with raised side rails. There aren't 60 inch crossbars but you can go with 58 inch long bars to give you some extra space, and here is exactly what you will need: - Inno Square Crossbars - 58" Long # INB147 - Inno Feet for Square Crossbars - Raised Side Rails # INFR This will give you a nice amount of added room to carry cargo on top of your '07 Suburban, and the...
view full answer... - Does the 2013 Scion xB Roof Rack by Inno Have Pads That Protect the Roof/PaintYes, the 2013 Scion xB Roof Rack by Inno which consist of the below parts, does include pads to protect your paint/roof. 2013 Scion xB Roof Rack by Inno - Inno Square Crossbars # INB147 - Inno Feet for Square Crossbars # INSUT - Custom Fit Kit for Inno # INK300 The Custom Fit Kit for Inno # INK300 is the part that has the pads. They are molded pads that are custom designed to fit the contours of your roof, protect your roof surface from scratches and abrasions and they just press onto...
view full answer... - Will the Inno Square Crossbars Fit the Thule Tracker II Feet?Yes. Since the Inno Square Crossbars # INB147 have the same dimensions as the Thule SquareBar Evo Crossbars # TH712300 (7/8" tall x 1-1/4" wide), the Inno Square Crossbars will fit the Replacement Railing Foot for Thule Tracker II 753-2152..
view full answer... - Recommended Carrier for SUP on 2002 Toyota Tundra Extended CabI have two options I recommend for you to carry your SUP on your 2002 Toyota Tundra Extra Cab. Either set-up will work great for carrying your SUP. One option is to use crossbars on the cab of your truck to carry the SUP. I recommend using the Inno Square Bar Roof Rack, # INB147 for the crossbars, # INSUT for the foot pack, and # INK532 for the fit kit. These crossbars have a 140 pound weight capacity and a 28 inch spread when installed on your Tundra. To hold your SUP while on the crossbars,...
view full answer... - Can You Use Square Thule Crossbars On An Inno Roof Rack Installed On 2008 Scion xB?You will want to stick with one brand throughout the entire roof rack kit; various brands of roof racks are not made to be compatible and interchangeable with each other. The most economical roof rack for your 2008 Scion xB is Inno Square Crossbars - Steel - Black - 58" Long - Qty 2 # INB147 with Feet # INSUT and Fit Kit # INK300. This has a weight capacity of 120lbs.
view full answer... - Parts Needed to Mount Rooftop Cargo Basket on 2014 Ford Flex with Bare RoofThe Surco Safari Rack 5.0 Rooftop Cargo Basket for Factory Rails # SPS4550-1101 is designed to fit on vehicles that have raised roof side rails but not a compete roof rack with crossbars. It cannot mount on a vehicle with a bare roof. To install a rooftop cargo basket on your 2014 Ford Flex you will need to first install a roof rack system. The linked page displays all roof racks offered for your Flex with bare roof. The lowest-cost option is the square bar system from Inno consisting...
view full answer... - Will the Thule Stacker Work with the Inno Square CrossbarsYes, the Inno Square Crossbar System part # INB147, part # INSUT, and part # INK263 which is a fit for your 2011 Ford Flex will work with the Thule Stacker part # TH830. This option will allow you to carry multiple kayaks on the roof of your vehicle. The roof racks comes with locks for security and the carrier comes with tie-downs. I have attached a review video on each of these items for you. Please note that the weight of the roof rack, stacker, and water sport accessories will need...
view full answer... - Rhino-Rack Roof Rack Parts for a 2011 Infiniti G37The Rhino-Rack 2500 parts you need for your 2011 Infiniti G37 include the following: 46" Vortex Aero Crossbars - # RRVA118B-2 2500 Series Legs - # RRRLKVA Fit Kit - # DK211 The Rhino-Rack crossbars only have a limited amount of space on the underside of the crossbars so you will be limited to the 46" crossbars. If you'd like to use longer crossbars then I recommend checking out the Inno Square Crossbar setup: 50" Crossbars - # INB127 Feet - # INSUT Fit Kit - # INK735 If you'd like to...
view full answer... - Weight Limit of Thule Traverse Roof Rack with FitKit # THKIT1520 on 2014 Ram 1500 Crew CabThe different components that make up the Thule Traverse roof rack for your 2014 Dodge 1500 crew cab have differing ratings. The load bars # INB147 for example are themselves rated for 165-lbs while the foot pack and fit kit are rated lower, 130-lbs. It can also be that the vehicle has a lower roof weight rating than any of the rack system components. Whenever different parts of a system have different ratings, the lowest-rated one determines the overall capacity. My contact at Thule...
view full answer... - Carrying A Previous Generation Thule Hullavator On A 2011 Subaru ForesterYour least expensive option would be to go with an Inno roof rack. Your older Thule Hullavator was designed to go with either square crossbars or round crossbars. The Inno rack uses square crossbars that are the same dimension as Thule's square crossbars. Your rack will consist of the following; Inno Square Crossbars - Steel - Black - 50" Long - Qty 2, part # INB127 or Inno Square Crossbars - Steel - Black - 58" Long - Qty 2, part # INB147 and Inno Feet for Square Crossbars - Raised Side...
view full answer...
- Roof Rack Fit for 2013 Toyota Tundra CrewMaxWe do have a reasonably-priced roof rack option for your 2013 Tundra CrewMax, but none of the SportRack roof racks like the # SR1002 you mentioned would be compatible. Inno offers a roof rack that would be assembled from the following parts: 58 Inch Square Crossbars, part # INB147 Roof Rack Feet, part # INSUT Vehicle Specific Clamp Kit, part # INK742
view full answer... - Roof Rack Feet for 2019 Ford Expedition that Can Fit Thule Square Bars Inno square bars are exact same dimensions as the Thule crossbars so what you could use is the Inno Feet for Raised Rails part # INFR which fits the raised rails of your 2019 Ford Expedition and you'd be set. Normally you'd use these feet with the bars # INB147.
view full answer... - How Do I Know Which Roof Rack Accessories Will Work With My Roof Rack On 2012 Scion XB?When determining if certain accessories can be mounted to a roof rack system you want to look at a few things. First, if it is a clamp-on accessory then you to make sure it can fit the style of roof rack that you have (square, round, aero etc.). You then want to check the max crossbar dimensions that the accessory can fit and make sure the roof rack is not bigger than that max dimension; these dimensions are typically listed on the product page of roof racks and any roof rack-mounted accessories....
view full answer...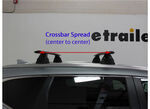
- Are the Inno Square Crossbars # INB147 and the Malone SteelTop Roof Rack # MPG202 the Same?I have an answer for you. Unfortunately, the Inno Square Crossbars # INB147 does not come with the feet (that have the locking mechanism) that are needed to mount the crossbars to your 2018 Honda Odyssey's roof. The Malone SteelTop Roof Rack # MPG202, on the other hand, comes with all the parts needed to mount onto your vehicle's roof. For the feet for the Inno crossbars, that is part # INFR. Other than the feet on the Inno square crossbars, another difference between the roof rack systems...
view full answer... - Roof Rack Recommendation for 2015 Toyota Tundra Double CabI have a great priced roof rack option that is confirmed as a fit for your 2015 Toyota Tundra Double Cab, but the Sport Rack part # SR1002 is not a confirmed fit, and even if it was I wouldn't recommend it for you since it is a semi-custom rack that has a reputation as not fitting all of the vehicles it's listed for perfectly. Instead the INNO rack part numbers # INB147, # INSUT, and # INK742 would be your best option.
view full answer... - Recommended Roof Rack for a 2007 Toyota Sienna Using a Thule Hullavator I would be happy to! There are two different types of rails to mount a roof rack you could have on the roof of your 2007 Toyota Sienna so I will make recommendations for both. The Thule Hullavator item # TH898 also requires an extra 4" - 8" past the mounting legs for the lift assist function to operate without hitting the side of your van. I have listed the two options below that would be the best choice and included the longer crossbars: With Raised Rails Rhino-Rack Vortex Aero Crossbars...
view full answer... - Can 58" Square Inno Crossbars be Purchased IndividuallyAll of the Inno crossbars, including the 58" Inno Square Crossbars # INB147 that you referenced, are sold in pairs. I confirmed this with my contact at Inno. You will need to purchase 2 sets of crossbars and keep 1 as a backup in case something were to happen to one of them. If you need any parts to mount these to your vehicle just let me know the year/make/model and I can see what other parts will be needed.
view full answer... - Roof Rack for 2010 Ford Flex for Installation of Sears X Cargo Rooftop CarrierWe can help you with a roof rack for your 2010 Ford Flex to allow installation of your X Cargo rooftop carrier. If your Flex has raised front-to-back side rails on the roof then a good rack choice for the cargo box is the Thule WingBar Evo system made of parts # TH711420 and # TH710401. This rack will install with a bar spread of 50-inches and it can handle up to 165-lbs. Check the mounting hardware spacing on the box to see if it is compatible with the 50-inch bar spread. If on the other...
view full answer... - Will Inno Ski and Snowboard Roof Rack Fit On Roof Of 2013 Ford Flex Without a Roof Rack? I was able to verify with Inno that you will need a roof rack to use the Inno Ski and Snowboard Roof Rack # INTX726 on your 2013 Ford Flex with the bare roof. They do not have a way to install the rack the way you see in the image you found. The Inno Square bar rack consisting of the Crossbars # INB147, Feet # INSUT and Fit Kit # INK263 will allow you to mount their carrier. The mounts for the roof rack are very similar in the way they clamp to the door frames. We do have the SeaSucker...
view full answer...

- Availability Of Replacement Inno Square Crossbar For Stolen CrossbarInno does not sell single square bars, so even though you only need one bar you'll need to buy a pair. You didn't mention anything about the size of your crossbar, so you'll need to measure your current crossbar and match it to one of the below lengths: 42" # INB107 46" # INB117 50" # INB127 54" # INB137 58" # INB147 65" # INB165
view full answer... - What Crossbars and Fly Rod Carrier do You Recommend for My 2019 Chevy Traverse?When looking to mount a CRC fishing rod system to the Malone AirFlow2 Crossbars # MPG216 on your 2019 Chevy Traverse, it really depends on the mounting clamps on your CRC system. If you already own a CRC system, I recommend measuring the width and depth of your clamps to make sure they can wrap around the 3" wide x 1" tall crossbars of the Malone AirFlow2. With that being said, the AirFlow2 crossbars will work great with a compatible CRC setup on your vehicle. It is important to note, though,...
view full answer... - Which Inno Roof Rack Kit for My 2011 Hyundai Accent 3 Door HatchbackYes. The Inno Roof Rack Kit for a 2011 Hyundai Accent that uses the following parts will fit the 3 door hatchback models: # INB117, # INSUT, # INJK and # INK214. This kit includes the short roof adapter kit and fit kit designed to allow you to use these parts on your vehicle. I've linked a short review video of these parts for you to have a look at.
view full answer... - Why is the SportRack Semi-Custom Roof Rack Recommended To Be Removed When Not Used?The SportRack Semi-Custom Roof Rack for Naked Roofs - Square Crossbars - Steel - 50" Long # SR1002 are recommended to be removed when not in use because they are not a custom fit. The semi-custom fit means they have a good fit for a variety of vehicles so if you left the rack on your vehicle you would want to check it regularly to make sure nothing has slightly loosened. A custom fit roof rack would be a precise fit for your vehicle and wouldn't require removal so you could keep the rack...
view full answer... - Could Thule Square Bars Fit Inno Feet and Fit Kit for 2010 Toyota CorollaThe Thule square bars and the Inno square bars like the # INB127 that are recommended for your 2010 Toyota Corolla are the exact same size so you could use the # INSUT and # INK593 to mount them on your vehicle.
view full answer... - Weight Capacity For The Inno Square Bar Roof Rack System For My 2019 Kia SportageThe Inno Square Bar System # INB137 # INSUT # INK686 you will have 132 lbs of dynamic weight capacity. That is the amount of weight you can have on the roof rack system while driving. Plenty of weight for a cargo basket like this one # Y07138.
view full answer... - How to Fit Older Thule Square Crossbars on a 2015 Toyota Corolla Sedan Naked RoofThanks for reaching out! To utilize your older Thule square crossbars on your 2015 Toyota Corolla Sedan you'll need to use the Inno Feet # INSUT and their Fit Kit # INK306. The new Thule square crossbars have the slots on the bottom so they mount to different legs whereas the Inno square bars have the same design and dimensions as the older Thule square crossbars which is why these feet are compatible with your Thule bars.
view full answer... - Best Economically Priced Roof Rack that Fits 2014 Nissan JukeThe Sportrack semi custom roof racks like the SR1010 that you have for your 2014 Nissan Juke unfortunately don't have a great reputation for fitting well which is why I try to avoid recommending them for people. We've found that they tried to make them too universal which means they don't really fit anything that well and it's hard to say which vehicles happen to fit better than others. If you wanted a custom fit rack for your vehicle that is still lower in price the best option is the...
view full answer... - 2005 Lexus IS 300 Sportcross Square Bar Roof Rack RecommendationTo install a square-bar roof rack on your 2005 Lexus IS 300 Sportcross you need to go with an Inno rack as Rhino-Rack doesn't have a fit for your specific vehicle. For the Inno alternative you need the following: 46" Square Crossbars - # INB117 Feet - # INSUT Fit Kit - # INK251 This gives you a nice roof rack system that installs via clamps in your door jambs. I have linked the installation instructions for you to check out. If you let me know what you plan on using this roof rack for...
view full answer... - Cost-Effective Roof Rack Fits for a 1999 Toyota TacomaThe SportRack Semi-Custom Roof Rack for Naked Roofs # SR1005 will fit the Regular and Xtracab for your 1999 Toyota Tacoma when you combine it with the Short-Roof Adapter # SR1116. This should help it fit better and keep it from leaking when it rains. If you'd like to add a gasket seal around the feet of the rack to help you can use part # LT37467, but I'm not sure if that will help or hurt anything as it might cause other parts of the weather strip to sit weird. If you have the Double...
view full answer... - Can I Use the Thule Rapid Traverse Feet # TH480R On My 2013 Chevy Volt with a Bare Roof? I have a great roof rack solution for you. Unfortunately, I confirmed with Thule that they currently do not have any customized roof rack components or setups that work with your 2013 Chevy Volt (with or without the Thule Rapid Traverse Feet # TH480R). However, with that being said, Inno makes a great system that fits your bare roof. For that system, you need the following components: - Inno Square Crossbars - Steel - Black - 50" Long # INB127 - Inno Feet for Square Crossbars - Naked...
view full answer... - Recommendation Roof Rack For 2014 Ford Fusion with Naked RoofWith a naked roof, I recommend looking at the Yakima roof rack system that is a custom fit for your 2014 Ford Fusion. This system includes: Round CoreBar Crossbars, Item # Y00409 BaseLine Towers, Item # Y28TR RoundBar Adapter, Item # Y03536 Base Clips and Pads, Item # Y06110 & Item # Y06102 If you want securely lock the roof rack then you will need Yakima Same Key System locking cores, Item # Y07204. For a more economical option, I recommend the Inno Roof Rack system. This system...
view full answer... - Recommended Roof Rack for a 2014 Mazda CX-5 With a Naked RoofYou almost have everything, you're just going to need a fit kit # INK758. This kit will allow you to mount the Inno Feet for Square Crossbars # INSUT to your 2014 Mazda CX-5. The # INSUT crossbars you mention have a dynamic weight capacity of 220 lbs, measures 50" long, 7/8" tall, and is 1 1/4" wide.
view full answer... - 1999 Toyota Tacoma Square Roof Rack RecommendationIt looks like you have the newer Thule SquareBar system for your 2021 Honda Ridgeline so we need to look for a completely different roof rack system on your 1999 Toyota Tacoma because Thule no longer has a fit for your Tacoma. What I recommend using is the Inno Square Bar roof rack system because it is essentially the same as the older Thule square bars and I like the quality of Inno over Rhino-Rack. The correct parts you need depend on the size of your cab: Xtracab (2 door extended) 50"...
view full answer... - What Crossbars System do You Recommend for Transporting a Kayak on My 2019 Prius Prime?I have a great roof rack that works for you. When you say that you do not have a sunroof, I am assuming you mean that you do not have a glass roof. In either case, the SportRack Semi-Custom Roof Rack # SR1005 does not fit your 2019 Toyota Prius with a bare roof with or without a glass roof. We also do not carry any SportRack crossbars systems that are designed to fit your vehicle. If you do not have a glass roof, I recommend the following roof rack system: - Inno Square Crossbars - Steel...
view full answer... - Roof Rack and Cargo Box Recommendation for 2000 Pontiac Grand AmTo mount the SportRack Skyline XL roof cargo box SR7095 on the roof of your 2000 Pontiac Grand Am would require a roof rack installed with crossbars that are spaced 21-1/2 inches apart. Since the roof racks for your vehicle like the Inno Rack part # INB117, # INSUT, # INJK, and # INK153 have a wider bar spacing of 28 inches this would not be the box to go with. So instead for a similar sized box that would fit you'd want the SportRack box part # SR7016 which would work really well. It's...
view full answer... - Recommended Roof Rack for a 2010 Hyundai Accent HatchbackThe only roof rack option we have for a 2010 Hyundai Accent Hatchback is the Inno Square Crossbar System which is composed of part # INB117, part # INSUT, part # INJK, and part # INK214. This is still a great system, it features custom fit clamps for an easy install and standardized square crossbars which work with all your favorite rooftop accessories. If you can let me know what you'll be using the system for, I'd be glad to offer some recommendations.
view full answer... - Yakima Roof Rack Bike Carrier Fit on a 2008 Toyota HighlanderThe Yakima Boa roof mounted bike carrier, # Y02065, can be used on the roof of your 2008 Toyota Highlander as long as you have a set of aftermarket round or square cross bars on the roof. If you do not have aftermarket cross bars or side rails, the Boa can be used with the Inno roof rack system part # INB137, #INSUT, and # INK561. If you have raised side rails on you Highlander, let me know and I can send a recommendation. Finally, if you have a factory roof rack on the roof the Boa...
view full answer... - Can a Roof Mount Cargo Bag be Used on a 2005 Mini Cooper S with No Roof RackSince you do not have anywhere to run the rear strap from a cargo bag designed for naked roofs, I do reocmmend installing a roof rack and using either a bag or cargo box attached to the rack. The most economical rack for your 2005 Mini Cooper is a Yakima rack made of the following parts: CrossBars # INB117 Short roof adapter # INJK Custom Fit Kit # INK118 Feet # INSUT With this rack installed you could then use a cargo bag or box secured to the crossbars. Given the distance you are traveling,...
view full answer... - Is There A Roof Rack Available For A 1998 Toyota Celica?Yes, we do have a roof rack available for your 1998 Toyota Celica GT 2.2L Liftback model. That is a cool car, you don't see those around too often. I recommend the Inno Square bar roof rack. The complete roof rack system consists of the following parts. Crossbars - # INB117 Feet - # INSUT Adapter kit - # INJK Fit kit - # INK111 This will be everything you need, locks included. Please note that with this setup, it is not recommended to load items longer that 98" on the crossbars. I have...
view full answer... - Roof Rack Recommendation for 1997 Lexus SC 300The SportRack Semi-Custom Roof Rack part numbers # SR1005 and # SR1116 is a confirmed fit for your 1997 Lexus SC 300. For the price this option is tough to beat, but this is a semi-custom rack that isn't going to fit as well as a fully custom rack. For a fully custom rack I would strongly recommend the Inno part numbers # INB117, # INSUT, # INJK, and # INK153 which is going to fit much better.
view full answer... - SportRack Semi-Custom Roof Rack for Naked Roofs # SR1005 Compatibility With 2005 PontiacThe SportRack Semi-Custom Roof Rack for Naked Roofs - Square Crossbars - Steel - 45-1/2" Long # SR1005 is unfortunately not a fit for a 2005 Pontiac. However, I do have a solution for you if you have a 2005 Sunfire. The Inno with short roof adapter kit system # INB117, # INSUT, # INJK, # INK153 is a confirmed fit for your 2005 Sunfire. What's neat about this rack is that it includes all the locks already and has a square bar design which is the most compatible with aftermarket accessories. If...
view full answer... - Roof Racks Recommended for 2016 Ford Focus 5-Door HatchbackThe roof racks recommended for your 2016 Ford Focus 5-door are shown on the linked page. The SportRack rack system # SR1010 is not among the recommended rack systems for your Focus. The most cost-effective roof rack option for your car is the Inno system made of parts # INB137, # INSUT and # INK528. This custom-fit rack uses square crossbars and is designed specifically for your vehicle. It will provide a superior fit to products like the SportRack semi-custom racks that are made to fit...
view full answer... - Recommended Inno Roof Rack Fairing for Use on Square Bar Rack for 2011 Ford FiestaFor the Inno roof rack that fits your 2011 Ford Fiesta, the combination of parts # INB127, # INSUT and # INK410, the wind fairing recommended is their 48-inch model # INA262. This fairing will fit Inno bars, factory bar and aftermarket crossbars up to a size of 1-inch tall x 3-1/2-inches wide x 1-1/8-inches in diameter. You can refer to the linked review video for more details and installation guidance.
view full answer... - Recommended Roof Rack And Paddleboard Carrier For 2015 Lexus NX 300h With Naked RoofAll three of the Inno roof racks will work well on your 2015 Lexus. The difference between the roof racks are the crossbars and feet. Our least expensive roof rack features square crossbars, while the other two roof racks have aerodynamic bars. All three roof racks have the same weight capacity at 140 lbs. Since aerodynamic crossbars will mean less wind noise and drag I recommend the NX 300h roof rack. To order this roof rack you will need part # INXB138-145, part # INXS250, and part...
view full answer... - Will the Inno Feet for Square Crossbars Fit My 2009 Pontiac Vibe?I have a solution for you. Unfortunately, the Inno Feet for Square Crossbars # INXP will not fit your naked roof with fixed mounting points on your 2009 Pontiac Vibe. Although, I did confirm with Rhino-Rack that they do have crossbars that are compatible with your vehicle's rails. For the Rhino-Rack setup, you will need: - Inno Square Crossbars - Steel - Black - 42" Long - Qty 2 # INB107 - Inno Feet for Square Crossbars - Naked Roofs - Black - Qty 4 # INSUT - Custom Fit Kit for Inno XS200,...
view full answer... - Can Inno Square Crossbars be Trimmed on a 2013 Dodge DurangoYes, the Inno Square Crossbars part # IN434 can be cut down to fit your exact specifications. If you will be installing these on your 2013 Dodge Durango then you will also need to use the Inno Feet part # INSUT and Custom Fit Kit part # INK611. Please keep in mind that most states require that the crossbars do not extend out past the side mirrors on the vehicle. The Inno Square Crossbar System is an excellent option for your Durango. It comes with a lifetime warranty, provides a tool...
view full answer... - Roof Rack Recommendation for Both 2015 Durango R/T and 2012 Ram 1500The most efficient way to buy a roof rack for both your 2012 Ram 1500 Crew Cab and your 2015 Dodge Durango is to go with the Inno rack that has the following parts that would work on both vehicles: Crossbars # INB165 and Feet # INSUT For the Ram you would need the fit kit part # INK653 and then for the Durango part # INK611.
view full answer...
Do you have a question about this Roof Rack?
Info for this part was:

Edited by:
Daron K

Updated by:
Alex H

Written by:
Ashley K
At etrailer.com we provide the best information available about the products we sell. We take the quality of our information seriously so that you can get the right part the first time. Let us know if anything is missing or if you have any questions.
Product Experts Available Now!
Call 1-800-940-8924
Thank you! Your comment has been submitted successfully. You should be able to view your question/comment here within a few days.
Error submitting comment. Please try again momentarily.