
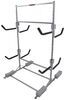
Inno Aero Roof Rack for Naked Roofs - Black - Aluminum - Qty 2
Item # IN24ZV
Our Price: $485.96
Confirmed to Fit
2014 Dodge Durango
Will this fit?
To see if this custom-fit item will work for you please tell us what vehicle you'll use it with.
In Stock


- All Info
- Reviews (125)
- Q & A (0)
- Videos (5)
- Photos
Inno Roof Rack - IN24ZV
- Aero Bars
- Crossbars
- 57 Inch Bar Space
- Inno
- Black
- Overhang
- 2 Bars
Low-profile, aerodynamic crossbars create an aftermarket roof rack for your vehicle. Aluminum bars have T-slots that let you mount channel-mounted carriers and accessories. Flexible rubber strips in T-slots keep out dirt and won't need trimming.
Features:
Inno Aero Crossbar - Aluminum - Black - 57" Long - Qty 1:- Low-profile crossbar lets you build a roof rack for your vehicle
- Elliptical shape helps to create an aerodynamic system with no need for a fairing
- Integrated T-slot makes it easy to slide channel-mounted carriers and accessories onto the bar
- Clamp-on accessories conveniently wrap around bar
- Flexible rubber strip keeps out dirt and allows for simple mounting in T-slot
- Press down on strip and slide accessories into slot - no trimming required
- Plastic coating on strip allows T-bolts to slide easily along channel
- Bottom channel allows easy installation to Inno roof rack feet
- Simply clip the foot into the crossbar and slide it along the channel
- Lightweight aluminum construction is durable and rustproof
- Internal extrusion provides exceptional bar strength
- Glass-blasted powder coat finish resists corrosion, scuffs, and scratches
- Matte black color
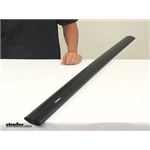
Inno Aero Aluminum Load Bar - 60" Long - Black - Qty 1:
- Low-profile crossbar lets you build a roof rack for your vehicle
- Elliptical shape helps to create an aerodynamic system with no need for a fairing
- Integrated T-slot makes it easy to slide channel-mounted carriers and accessories onto the bar
- Clamp-on accessories conveniently wrap around bar
- Flexible rubber strip keeps out dirt and allows for simple mounting in T-slot
- Press down on strip and slide accessories into slot - no trimming required
- Plastic coating on strip allows T-bolts to slide easily along channel
- Bottom channel allows easy installation to Inno roof rack feet
- Simply clip the foot into the crossbar and slide it along the channel
- Lightweight aluminum construction is durable and rustproof
- Internal extrusion provides exceptional bar strength
- Glass-blasted powder coat finish resists corrosion, scuffs, and scratches
- Matte black color
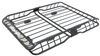
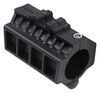
Inno Through Feet for Aero Crossbars - Naked Roofs - Qty 4:
- 4 Feet let you mount Inno Aero crossbars on your vehicle's naked roof
- Pair with 2 crossbars and a custom fit kit to create a complete roof rack
- Through design helps create an extended-length roof rack that maximizes carrying capacity
- Torque tool included to secure feet to your roof
- Easy, slide-on installation to channels in bottoms of crossbars
- Locking covers secure system to your roof
- Also secure T-slot-mounted accessories to your crossbars
- 2 Keys included
- Durable, weather-resistant AES plastic construction
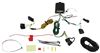
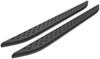
Inno Custom Fit for XS200, XS250, and INSU-K5 Roof Rack Feet:
- Custom-fit clamps and pads let you install Inno roof rack feet on your vehicle with a naked roof
- Works with XS200, XS250, or INSU-K5 feet
- Pairs with 4 feet and 2 crossbars to create a complete roof rack
- Clamps are designed specifically to fit the curves of your doorjambs
- Mount to roof rack feet with bolts
- Molded pads are custom designed to fit the contours of your roof
- Protect your roof surface from scratches and abrasions
- Press onto the bottoms of your roof rack feet
XB153 Inno Aero Aluminum Load Bar - Black - 60" Long - Qty 1
XS250 Inno Aero Bar Through Stays for Bare Roofs - Qty 4
K611 Inno Fit Kit Hooks for Flush, Through, and INSU-K5 Stays
XB145 Inno Aero Aluminum Load Bar - Black - 57" Long - Qty 1

Video of Inno Aero Roof Rack for Naked Roofs - Black - Aluminum - Qty 2


Videos are provided as a guide only. Refer to manufacturer installation instructions and specs for complete information.


Video Transcript for Inno Aero Crossbars Roof Rack Installation - 2022 Dodge Durango
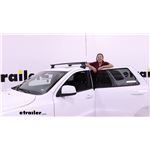
Hi, everyone. Aiden here with etrailer. Today we're gonna be taking a look at and showing you how to install this Inno roof rack system with the flush-mounted crossbars on our 2022 Dodge Durango. Now, when I say flush-mounted, what I mean by that is that the crossbar, that piece up top that we're gonna attach our accessories to, ends inside the foot pack here, meaning that nothing overhangs off the side of the vehicle. A lot of people prefer this style because it is a little bit more clean and custom looking. And if you only plan on mounting up one accessory on your roof, maybe something like a box for a road trip or a basket, then this is gonna be plenty of room.
We don't need all that extra crossbar space just for one thing. Plus, if you're a bit taller, it's going to be less risk of maybe hitting your head as you're getting into the vehicle because if there is a bar right here, that might be something to worry about. But depending on the accessory you plan on carrying, sometimes you need crossbar overhang. For something like a load-assist kayak carrier that will come down, let you load up the kayak at an easier height, and push it up onto the roof easier, you need that overhang to make those systems work. So take a look at what you plan on carrying with your roof rack or what you think you might end up carrying and decide whether this or the overhang is going to work better for you.
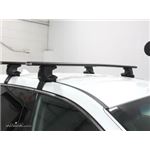
And one other thing you need to consider is what type of roof you have on your Durango because there are multiple options. Ours is a naked roof, which means that there's no existing rails or crossbars on the top. It's just the roof with this ridge here on the side, meaning that we need a roof rack that can attach that way. And the way we do that is with our fit kit. The fit kit is going to consist of this custom-molded rubber pad on the bottom that matches the contours of this lip and custom-length clamps that will reach down from that base and into the door jamb here, hooking in place and giving us a firm attachment point.
If you have a different type of roof where you've got some rails, it's gonna be a different kit for you. But just plug in your vehicle information and your roof type into our fit guide and find the right kit for you. This kit is gonna use Inno's Aero Bar, which is a longer, wider bar that's a bit thicker up front and tapers off towards the back. That's gonna help with wind drag and wind noise as we're going down the road and offer a lot of options for mounting up accessories because it is going to work with the most things. That wider base means clamp-around accessories are gonna work and sit on there really well.
It's a pretty standard size. And if we take our included keys and pop off these covers here, that's going to expose the T track up top where we can channel mount accessories if we want to. That T track is gonna be the way that we just maybe mount some things up a little bit more cleanly. If you have one accessory that you use all the time and you want it to look nice without any clamps or extra pieces hanging below it, that's the way I would do it. And I like the way Inno sets up their channels because it's got one long rubber weather strip in there that's going to keep the wind noise down and that we don't have to cut to length. You just slide your accessory in and push it to where you want it and you're good to go. One thing to note up top is that the roof rack can hold up to 120 pounds, which is a little bit lower than some options out there. But one thing you always want to check is your own Durango's roof capacity and go by the lowest rated component. Oftentimes the roof on most vehicles is the limiting factor, and you don't wanna load up too much weight up top on your vehicle anyway. This is gonna be more for your lightweight items, maybe some bikes and kayaks, things like that. And as far as some measurements go, we are gonna be working with a 32-inch crossbar spread. That's the distance from the center of one bar to the center of the other. That's gonna be a pretty good in-between range for most rooftop accessories, but depending on what you plan on putting up here, just check it and make sure that it'll work with that crossbar spread because everything in the kit, from those pads to the clamps, are designed to work in these specific locations. Some other measurements are our clearances, because this is a very low-profile roof rack. From the roof to the top of the rack, it's only adding about two and a half inches to the roof of our vehicle, which is great for things like garages. Depending on what you plan on mounting up here, do check that after the fact because if you put a box up here, there's no way it's gonna fit in your garage. Just depends on the accessory you have here. And from the bottom of the crossbar to the roof, it's only gonna be about one and a quarter inches, which is really low clearance. Depending on the accessories you go with, if they have clamps, if they're really thick clamps, I'd be worried about making contact with the roof or just being hard to tighten down. So check on that. And in those cases, a channel-mounted accessory might be the favorable option just to save space underneath the bar. And if your vehicle does have a sunroof or something, I would be cautious of opening it. Personally, I'd recommend just not bothering with it at all because, one, you might hit it, but two, having anything mounted up on your roof is gonna create wind noise. So if we plan on driving with this open, we're gonna hear a lot more noise and it's gonna be pretty obnoxious. So I just wouldn't do it for that reason anyway, but I would advise against it for risk of damaging your vehicle. And if you think the roof rack is gonna work for you and the things you plan on putting on top of your Durango, I think the best part about all of this is that it's a very easy and non-invasive install process. So let's walk through that whole thing with you step by step right now. Starting off the installation, we're gonna be on a table, somewhere where we can lay out all the parts for our roof rack and take note of everything. The crossbar, just keep in mind where the thicker part is. That's the front of the crossbar. And as it tapers off to this thinner section, that's the back. You will need to know that for when you're attaching things like your feet and the clamps. So for now, just take the crossbar and flip it upside down where we can see the track underneath. So on the track underneath, there's gonna be this sliding piece here, and if we push it all the way out, there's a rectangular slot that can match up with our plate. Now, our plate is gonna have a small notch in the top that will line up with a small tab on this hole. So just get those two lined up together, push it in, and slide it into that channel on that track underneath. And if we slide it all the way over, pushing this button here so it actually slides into the crossbar, this is gonna be the place where we need to attach our foot. Now, the feet are side specific. There's an L or an R depending on the one you're looking at. And it'll give you a little diagram of that crossbar. You can see the thicker part should be towards the front here and the thinner part should be over here. So we've got it all lined up already. And up top we can see a bolt poking through with the threads, a small tab, and this T shape. The threaded bolt is going to line up with this threaded hole right here, the tab will be right next to that, and the T will go into this slot back here. So flip it upside down, get that T lined up, and drag it out so it holds itself in the thinner part of the channel there. And when you get to the outside of the crossbar, the foot will kind of drop down and we can take the included tool and tighten down that bolt into the threaded hole. So just give it a few turns, and if it doesn't pull up anymore, then you know that the thread's caught. We can leave it slightly loose right now as we make some adjustments side to side. Now, as for the exact spacing of that foot, we kept it loose to move around. In our instructions, there's going to be a measurement that goes from this middle point on the crossbar where Inno has put a sticker out to the foot pack. So you can find that measurement in your instructions. It's gonna be different for the front and the rear crossbar. And in our experience, for the front crossbar that we already installed, the measurement wasn't super accurate. So take it with a grain of salt, use it more as a start point, and when you've got it where you like it, tighten it down the rest of the way and repeat that process on the other side. Depending on how it fits on the roof, we might need to come back down, loosen it, move it in or out, and then re-tighten it. Once it's tight side to side, you'll notice there's still a little bit of movement kind of angling the foot. That's okay. Leave it like that for now. We'll adjust that later. For now, we need to get the fit kit into place. You can probably see right now those tabs will line up with those notches. And on the bottom of that fit kit, the thicker part is going to be facing in towards the middle of the crossbar or towards the middle of the vehicle. And all of these number codes are the exact same for all four fit kits, so no need to keep any of those straight. They're all the same. Once it's been done on both sides, we can go to the roof. If you've got a friend on hand, it's really helpful to have that extra set of hands on the other side of the vehicle, but not necessary. We're gonna line this up as best we can and break the tape measure out later to get the spacing front to back more exact. But you want that pad to be fitting around the lip on the roof right here on both sides. We'll go ahead and check it out from the front of the vehicle, make sure it's looking even, and if we're happy with the spacing, then we can go forward and tighten things up. If we're not happy, again, we can take it down and adjust those feet if we need to. The measurement that we're taking can be found in your instructions. It just goes from this seam between the front and the back door back to the center of where we want our crossbar to be lining up. And we want to take that measurement on both sides, making adjustments as we need to. And make sure it's the same on both sides to ensure that these bars are running parallel to one another and perfectly perpendicular with the car. And if you notice a small gap under your fit kit like this, just remember we've got our foot loose so it's kind of pivoting side to side like that. We left it loose so that we can adjust it and make sure that we take that weird gap away. When you're happy with how everything is pivoted, take the other Allen key, slide it underneath this red tab. There's a bolt hidden in there. It's tucked back pretty far, but you can use the included tool to tighten that up and secure that side to side. The clamps and the bolts that secure those clamps are going on next. The bolt will feed through the clamp and into the cylinder right here where there's a threaded block behind it and the top of the clamp will line up with this ridge right here. So get those put in, pass this through, and thread it in by hand. I like to go until it touches and we're not really able to turn it much more. And repeat that on both sides. And once we're happy with it making contact, tighten it up, making sure to evenly do it on both sides so you don't pull the whole crossbar over to one end of the roof. Now, as we're tightening these down and you're going back and forth, there's no need to overtighten this. Just get it nice and snug where the crossbar isn't moving and make sure that the clamp here doesn't have any strange gaps with the door jamb. We want that sitting nice and flush on both sides. When you're happy with how tight everything is, close the door on those clamps and take your covers, pop them into place, making sure to line up the lock core on the right-hand side. Lock it in, make sure it's secured, and you're good to go. Once you've got those covers in place, I like to go through and just do one final shake test to make sure that nothing shifts or moves on me. But I'd say we're looking pretty good. It's a really easy install process. Inno lays everything out pretty well. There's not that many components to adjust and the end result is a pretty nice looking roof rack. I'm not the biggest fan of Inno's flush feet here, but it is going to be pretty functional and give you that extra cargo space on top of your Durango. And that'll do it for our look at and installation of this Inno roof rack system on our 2022 Dodge Durango. Thanks for watching.
Customer Reviews
Inno Aero Roof Rack for Naked Roofs - Black - Aluminum - Qty 2 - IN24ZV
Average Customer Rating: 4.8 out of 5 stars (125 Customer Reviews)
Low-profile, aerodynamic crossbars create an aftermarket roof rack for your vehicle. Aluminum bars have T-slots that let you mount channel-mounted carriers and accessories. Flexible rubber strips in T-slots keep out dirt and won't need trimming.by: ft05/21/2024
Waste of money. Most annoying couple hours spent in a long time. Extremely disappointed. Does not fit well. Not exactly a cheap option, but a cheap option in terms of fit and engineering. The instructions online and in the kits do not agree. But there is no helping the design. Plus there are no universal set of instructions--they are all individual items for the fit kit, the bars, etc. But a reasonably inclined person can figure it out so no big deal, but the engineering design is garbage--requires precise measurement yet the design is such that exact measurement is impossible due to the design.
Additionally, the parts are low quality Either low density plastic or easily stripped bolts. Even when as precise as possible, I wouldn't trust it with my kayak. What a mistake. Do yourself a favor and get a Yakima trailer or similar. It isn't that much more money in the scheme of things and then it isn't tied to your car. Can add a hitch to most vehicles anyway.
by: RJK in Delaware08/26/2023
Acura MDX
Racks were perfect for my Acura MDX. They fit like a glove and I have used them several times.
by: John A.04/26/2023
Has worked great for transporting my fishing Kayak as well as small loads of lumber. It has worked fine for about a dozen and a half boards at a time or a couple of sheets of plywood. Just make sure that you have a good way to strap them down as well as maybe a rubber mat to help hold everything in place. The noise from it on the high way can be a lot but certainly not as bad as some that I have heard. I figure that anything on the outside of a vehicle like that will produce some noise.
by: Preston Ghim06/23/2023
2016 Subaru Outback Wagon
worked as expected, I used them to carry my hobie outback kayak (about 100lbs) on my Honda Civic 2016 Coupe (2 doors). They worked with no problem so far (1 year) even under high speed like 70mph.
by: Debbie11/12/2018
2017 Lincoln MKX
We recently purchased 2 kayaks & Thule roof racks from our local outdoor store.
After waiting 2 weeks for our roof racks and J bars to come in we found that the Thule racks did not fit our 2017 Lincoln MKX and they didn't make any racks that would. The vehicle does not have roof racks and has a moon roof.
After a couple of days searching the internet we discovered etrailer.com. We found the Inno roof racks, but still was not sure they would work. We spoke to a repesenative and he assured us that the racks we chose would fit and the Thule J bars we did return would also work. As you can see by the photos 2 days later we were happy Kayakers.


by: Matthew05/22/2023
This kit does not fit well. All measurements have been double and triple checked down to the millimeter. The lock on the covers interfere with the hooks. You have to apply so much pressure to get it to close that it makes the rack come loose. Not very satisfied
by: Mark05/15/2022
2014 Ford Flex
I bought these as part of a kit with 60" Aero bars and the appropriate kit for my 14 Flex. I spent probably an hour and a half double checking my measurements and getting them torqued down properly. I spaced the bars on top of the car just a little wider than proscribed because I was planning on carrying 4x8 plywood, and it looked better to my eye. One thing to watch for: The instructions for the car-specific kit (in my case INK263) show the foot spacing measurements for a square bar, and the measuring point for these feet and Aero bars is different. That measurement point is indicated in the instructions for the feet, not the kit. Same numbers, just different reference point. Otherwise, they look good and are rock solid.


by: Michael06/29/2020
Installation was a little tricky but once the "feet" were attached to the roof and the bars properly spaced, everything wrapped up very well.
There is no noticeable wind noise with these installed.


by: Craig01/19/2023
DodgeDurango
I did a lot of searching before selecting this rack for my Durango RT (no factory roof rails). It is easy to reinstall once the initial process is followed, I marked my doorjambs with a sharpie and it is easy to set up. Great product!
by: Christopher10/09/2022
Great racks. High quality parts. Fit perfectly. Went together easily.


by: Andy10/27/2021
I was trying to put a roof rack onto a Dodge Durango SRT...not a typical vehicle for this accessory! I looked everywhere for a suitable roof rack and thought I was settling by ordering the Inno kit from etrailer. I could not have been more wrong! I am so happy with the purchase! I was shocked that my partner and I had the whole system installed in less than 30 minutes in the dark! I couldn't wait to try the install once I received the package. I even did a test drive to see if the aero crossbars made noise, but no issues there! They are very quiet (unlike a ladder rack I had on a truck before this). 10/10 recommend this to others.
by: Peter 10/03/2021
Pontiac Trans Sport Van
These are made perfectly for your vehicle. They are very secure when combined with the other Inno products. No worries of the rack system coming off. Using them to transport kayaks using kayak holders.
by: Bren09/29/2020
One was extremely hard to get on compared to the others (not sure if it had some rough machining or something), but once all we’re on, all was good


by: Andy10/27/2021
DodgeDurango
etrailer was the only vendor who had the custom fit roof rack feet I needed for my vehicle. I was trying to put a roof rack onto a Dodge Durango SRT...not a typical vehicle for this accessory! I looked everywhere for a suitable roof rack and thought I was settling by ordering the Inno kit from etrailer. I could not have been more wrong! I am so happy with the purchase!
by: Spencer 07/05/2021
These feet are easy to use and go well wit the Inno system. I was worried since my car did not come with any roof racks, but this is the solution to haul things on my roof. They work well and are very secure.
by: Andrew06/14/2022
Started assembly last summer and finally completed installation this spring. Directions took a lot of attention to detail but were adequate. Rack went on car securely and looks great. Have attached kayak rack and a roof pod and both worked flawlessly. Would definitely recommend.
by: Jeff G07/13/2020
Ford F-150
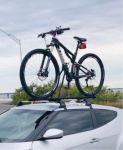
I have had countless bike racks over the years and this is by far the best system I have ever had. Fits like a glove on my F150. Easy to install, looks great and the bikes do not move when on the roof.
by: Gilbert08/29/2021
Nissan Murano
Tule and Yakima did not have a rack for my Nissan murano. So it was a blessing to find the immo rack. It seems like it can fit any car model. It's strong and secure. I feel my equipment will be safe with this rack.
by: Nathan 11/06/2021
I’ve had the system in place for over a year now and haul dual kayaks often! I love it! The only thing I wish I could change is the wind noise that’s comes with it. But I’m sure with any rook rack system you get that.
by: Robert08/02/2022
Once I realized which bar was the front one and which was the back it was a fairly easy install. Since the measurements for the foot placement were wrong in the instructions I would suggest not tightening the feet all the way to the bars until you put it on the car. It would have been nice if both sets of rubber pads were the same, with the tunnel hook, and if they had adhesive backing to avoid losing them. I added 2 sided tape.
by: Peter 04/22/2021
Installation went pretty smoothly. The trick is to fully understand each step before moving to the next. There are a lot of small parts which at first was a little intimidating, but soon I was able to "get with it". I love the finished product and think you helped me get a good deal. Thank you for that
by: Daren04/21/2023
Noticed box was taped up more then usual, found other manuals that was not specifically for this, and also found one of the feet already had been mounted as there was scratches on the plastic and metal parts
by: Jennifer 07/15/2021
2014 Toyota Prius
Installed incredibly quickly on my 2014 Prius V with some of the best instructions I could have ever asked for. Used the video as well in tandem and got it on the car in about an hour and a half with my partner. It was a lovely experience, which is sometimes difficult for couples to say in situations like this!
by: Laura08/29/2020
They were so helpful. Geoffrey got me the parts the next day and the roof rack works great. Easy assembly. Just needed a little muscle power to click the final pieces together. Everything else was an easy bolt.
by: Ken 07/28/2022
Seem to be well made for the price. I didn't realize that they came with locks so that was a pleasant surprise. Easy installation.
25
857
Show More Reviews
See what our Experts say about this Inno Roof Rack
- Recommended Raised Side Rails and Crossbars for 2012 Honda OdysseySince you have the naked roof without the raised side rails, I recommend first adding the etrailer Raised Side Rails for Roof Rack - Black Powder Coated Steel # E99033 confirmed to fit your van. Then I recommend using the Inno Crossbars # INXB145-153 and Flush Feet # INXS100. We don't have any installers we recommend in different locations, so we simply suggest if you aren't comfortable doing the installation yourself that you take your parts to a trusted friend or a mechanic you trust...
view full answer... - Availability of a Roof Rack to Fit a 2012 Nissan CubeWe carry several brands of roof rack that will work well on your 2012 Nissan Cube. The racks vary from a base line model to a top of the line roof rack system. Our base line model that is confirmed to fit your vehicle is the Inno Square Bar Roof Rack System, # INB147 Square Crossbars, # INSUT Feet for Inno Square Crossbars, and # INK370 Custom Fit Kit. The Inno square bar rack is constructed with hardened steel to provide strong bar support. The bars dimensions are 58 inches long x 7/8...
view full answer... - Roof Rack that Fits 2020 Honda Passport Elite With Naked RoofFor your 2020 Honda Passport Elite with a naked roof use the Inno roof rack, parts # INXB145-153, # INXS250, and # IN75FR.
view full answer... - Recommended Roof Rack for 2020 Honda Passport With Naked RoofWe've got you covered! I recommend the Inno roof rack, and the parts that fit your '20 Passport are # INXB145-153, # INXS250, and # IN75FR. This will give you a nice, durable roof rack for your 2020 Honda Passport capable of carrying almost anything you can throw at it. If you don't already have your kayak carrier and bike rack picked out, the Malone Pilot TC # MPG2103 is a nice economical option that lets you leave your wheel on and will mount to the Rhino Rack crossbars. For the kayak...
view full answer... - What do Roof Rack Feet do for Inno Roof Rack on 2010 Pontiac Vibe With Naked RoofIt sounds like you are asking the purpose of the "feet" of the Inno roof rack that fits your 2010 Pontiac Vibe. What the feet do is act as a base for the crossbars, and an attachment point for the fit kit. So what you will do is attach the fit kit to the feet, with the fit kit being what allows the rack to clamp to your door sills; then the crossbars will attach to the feet. Essentially, the feet of a roof rack act as something of an anchor for the crossbars so you can mount them. The...
view full answer... - Mixing The Old With The New On My 2010 Toyota Prius With Thule And Inno Roof Rack PartsI can definitely find a solution that will work for your 2010 Toyota Prius. Unfortunately, it will not be a Thule roof rack. The Thule foot pack and fit kit for your Volkswagen Jetta are not compatible with the new Thule products. Our best solution would be using the Thule square crossbars with an Inno roof rack. The Inno roof rack you need will consist of the following: Inno Feet for Square Crossbars - Naked Roofs - Black - Qty 4, part # INSUT and Custom Fit Kit for Inno XS200, XS250,...
view full answer...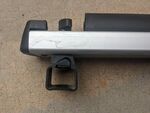
- Inno Roof Rack that Is Guaranteed to fit 2008 Mazda RX-8 RoofInno test fit their roof rack part numbers # INXB123-2, # INXS250, and # INK163 on a 2008 Mazda RX-8 just like yours and they determined it fit well. While we haven't had the chance to test the fit we can guarantee it will fit your vehicle and work great! I attached a link to this page for our return policy but you wouldn't need to worry.
view full answer... - Recommended Roof Rack for a 2023 Toyota Camry We have a couple of options for roof racks depending on whether or not your 2023 Toyota Camry has factory installed rails that run front to back or a naked roof with nothing on it. I have listed both options below: Naked Roof Thule WingBar Evo Crossbars - Aluminum - Black - 53" Long - Qty 2 item # TH711420 Evo Clamp Feet for Thule Crossbars - Naked Roofs - Qty 4 item # TH710501 Fit Kit for Thule Evo Clamp and Edge Clamp Roof Rack Feet - 5082 item # TH145082 Flush Mount Rails Inno...
view full answer... - How To Carry 2 Bikes On 2019 Honda Civic Si With Spoiler and Center ExhaustFor your 2019 Honda Civic Coupe Si or Sedan SI, you can use the Yakima FullBack 2 bike trunk rack # Y02634. However, for your car, especially if you have the Civic coupe, SI, I would really recommend looking at a roof rack instead of a trunk rack so you won't have to worry about damage to the spoiler. If your Honda Civic SI is a coupe, I recommend Inno Roof Rack part # INXB130-2 for the bars, # INXS250 for the feet and # INK683 for the fit kit. If your Honda Civic SI is a hatchback,...
view full answer...
- Recommended Roof Rack System For 2002 Nissan Frontier Crew Cab With Bare RoofI have a few options but the Kit # TH145142 is only a confirmed for the 2015-2018 BMW X4. The first option is since your 2002 Nissan Frontier Crew Cab originally had the flush rails running front to back you can contact your local Nissan dealer and see if you can purchase the replacement rails as Thule does not make a fit kit for bare roofs for your vehicle. The only other option is to use a different roof rack like the Inno Roof Rack System for Bare Roofs that uses 51" Inno Aero Crossbars...
view full answer...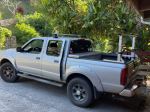
- Bike Rack Solution for 2017 Honda Civic SI with SpoilerI wish we had a trunk rack that fit your vehicle but we don't have any due to the spoiler. Only option might be a roof rack like the Inno Aero Roof Rack # INXB130-2, # INXS250, and # INK683 and then you could use a roof rack like the Malone Pilot part # MPG2103.
view full answer... - Recommended Roof Rack to Fit a 2015 Honda Civic CoupeI have a solution for you, but the SportRack Semi-Custom Roof Rack # SR1002 is not a fit on the 2015 Honda Civic coupe. However, the Inno roof rack system for a 2015 Honda Civic that uses parts # INXB130-138, # INXS250 and # INK642 is a really well made system that won't break the bank. This roof rack gives you aero style bars that will reduce wind noise compared to a square bar or round bar, and Inno roof rack parts are backed by a lifetime limited warranty. I've linked a short review...
view full answer... - Best Roof Rack Option For 2020 Nissan Rogue With Naked RoofThe best roof rack option for the 2020 Nissan Rogue with a naked roof is Inno Aero Cross bars # INXB138-2 with Inno feet part # INXS250 and custom fit kit part # INK466. The Inno bars are low profile aerodynamic bars that are designed to cut down on the wind noise that you may experience with other brands available. The built in t-slot makes it easier to mount accessories like bike racks and water sport carriers. Other brands do require cutting the rubber strip in the t-slot to make room...
view full answer... - Highest Capacity Roof Rack to Use With Rooftop Tent On 2010 Toyota PriusThe highest roof rack weight capacity we have for a 2010 Toyota Prius is 140 lbs, the Inno Aero Crossbar System part # INXB123-130, part # INXS250, and part # INK865 is what I recommend. This could then be used with the Yakima SkyRise HD Tent part # Y07436 or part # Y07437 which only weighs around 100 lbs and 115 lbs respectively. I am not aware of a roof racks for the 2010 Toyota Prius which can support 175 lbs, the roof simply won't be rated that high.
view full answer... - Recommendation for a Roof Rack and Kayak Carrier with Slide Out Roller for a 2002 Isuzu AxiomYou will need the following items to install cross bars on the naked roof of your 2002 Isuzu Axiom: Crossbars # INXB130-2 Feet # INXS250 Fit Kit # INK117 Once you have the cross bars correctly installed you will be able to use the Malone Channel Loader Kayak Load Assist, item # MAL48FR, along with another set of cross bars. You can then use any of the Yakima Kayak carriers including the Kayak Carrier, item # Y04082 to secure your kayaks on the roof of your vehicle.
view full answer... - Recommended Roof Rack and Kayak Carrier to Transport 2 Kayaks on 2019 Subaru Legacy The Inno Aero Crossbar Roof Rack that you referenced, which consists of # INXB145-2 for the two 57 inch Aero Crossbars, # INXS250 for the Through Feet, and # INK439 for the Fit Kit, is confirmed to fit your 2019 Subaru Legacy as long as it is the Sedan model without any existing rails or bars on the roof. In order to safely secure 2 kayaks to these crossbars you will need to add a kayak carrier. For this I recommend the Yakima JayLow Kayak Carrier # Y04073. This is a really nice, versatile...
view full answer... - Recommended Roof Rack For Carrying Cargo On 2012 Honda Accord SedanI recommend going with the largest crossbar available so that you have as much room as possible for your cargo. A nice large setup that fits your 2012 Honda Accord Sedan is the Inno Aero Crossbars - Aluminum - Black - 54" Long - Qty 2 # INXB138-2. You'll also need the appropriate Feet # INXS250 and Fit Kit # INK745.
view full answer... - How to Carry Bikes on 2017 Honda Civic SI Coupe With SpoilerWhile there is a way for you to carry bikes with your 2017 Honda Civic SI coupe with a rear spoiler, a trunk-mounted bike rack like the Thule one you referenced is not a fit due to that spoiler interfering, specifically with the main body of the rack. Since the SI has a center exhaust, a hitch isn't something that can be installed either, so the only way to carry bikes with this particular vehicle is with a roof rack and roof bike rack. Let's start with the roof rack for your '17 Civic...
view full answer... - Inno Roof Rack Recommendation for 2019 Hyundai TucsonFor your 2019 Hyundai Tucson the Inno Roof Rack I'd recommend is the aero bar kit part numbers # INXB130-138, # INXS250, and # INK680 because it will give you the quietest ride quality over the square bar options from Inno.
view full answer... - Roof Rack For 2016 Fiat 500X With Bare RoofWe have the exact roof rack you need for your 2016 Fiat 500X with a bare roof. The rack is from Inno, and consists of the following parts: - Inno Aero Crossbars # INXB123-130 - Inno Through Feet for Aero Crossbars - Naked Roofs # INXS250 - Custom Fit Kit # INK482 I verified this fit directly with Inno for you, and this gives you a quiet rack that is easy to use so you can haul whatever cargo you need. Prices can be found on the product pages or by scrolling down.
view full answer... - Erickson Big Bed Load Extender and Roof Rack for a 2004 Toytoa TacomaAs long as you have a 2 inch hitch installed on your 2004 Toyota Tacoma the Erickson Load Extender # EM07600-07601 would work well. For a roof rack you would then need the following: Inno Aero Crossbars - Aluminum - Black - 51" Long - Qty 2 # INXB130-2 Inno Through Feet for Aero Crossbars - Naked Roofs - Qty 4 # INXS250 Custom Fit Kit for Inno XS200, XS250, and INSU-K5 Roof Rack Feet # INK143
view full answer... - Inno Roof Rack For My 2017 Honda Accord And A 2005 Toyota CorollaIf you are looking for a fixed option, but want to possibly be able to change it to another vehicle your decision on the Inno rack is a great choice. In order to make the Inno roof rack compatible between both vehicles, the parts for the kit are listed below. Inno Aero Crossbars - Aluminum 51" Long Item # INXB130-2 Inno Through Feet for Aero Crossbars Item # INXS250 Custom Fit Kit For Inno Roof Rack Feet - Fits 2017 Honda Accord Sedan -Item # INK592 Custom Fit Kit For Inno Roof Rack Feet...
view full answer... - Roof Rack Recommendation for 2022 Chevy Equinox with Naked RoofFor your 2022 Chevy Equinox that has a naked roof the roof rack I would recommend is the Inno Aero Bar Roof Rack part # INXB130-2, # INXS250, # IN43FR. This is a higher quality roof rack that beats it's competitors in price by quite a bit. It's still one of the nicer rack options that's going to fit well, install easy, and be quieter but it just comes in a much better price so I really like it.
view full answer... - Inno Aero Roof Rack Recommendation for 2018 Ram 1500 Quad CabFor your 2018 Ram 1500 quad cab the Inno Aero roof rack crossbar length recommended is 60 inch like the part # INXB153-2, # INXS250, and # INK653 so that is what I would recommend you go with.
view full answer... - Do Rhino-Rack Roof Racks Require Drilling on a 2006 Toyota TundraThe roof rack that you mentioned, part # RR69GR, is not compatible with the 2006 Toyota Tundra. The only Rhino-Rack roof racks for your vehicle do require drilling to be used with tracks. Instead, I recommend using Inno Aero Crossbars, part # INXB138-2. They're aero-style bars with T-slots, so they're compatible with most accessories. To mount them, you need the Through Feet, part # INXS250, and the Custom Fit Kit, part # INK153. This doesn't require drilling since the fit kit mounts...
view full answer... - Recommended Parts Needed to Carry a 12 Jon Boat on the Roof of a 2019 Hyundai TucsonWe do have a solution for you via installing a roof rack on your 2019 Hyundai Tucson. If your Tucson has flush mount rails that run front to back then I recommend the Thule WingBar Evo roof rack which consists of 47" # TH711220 WingBar Evo Bars, the Evo Flush Foot Pack # TH710601, and Fit Kit # TH186013. If you just have a naked roof (no rails) then I recommend the Inno Aero style roof rack which uses Crossbars # INXB138-145, Through Feet # INXS250, and Fit Kit # INK680. The Thule roof...
view full answer... - Roof Rack Recommendation for 2000 Honda Civic SedanWe have roof racks that are a fit for your 2000 Honda Civic sedan but Sportrack does not have any fits for the sedan models of your vehicle. Also worth mentioning is that the Sportrack roof racks don't generally fit well so we try not to recommend them since they are only a semi-custom fit and not a full custom fit. Instead the Inno roof rack part # INXB123-2, # INXS250, # INK707 would be your best option. This the best priced option that fits your vehicle, it's a custom fit rack so it...
view full answer... - Recommended Roof Rack and Kayak Carriers for 2020 Mazda CX-5The JetStream Rack from Yakima I previously recommended will be easy to remove and won't require pulling that rubber piece out of the roof gully. Once you assembly the feet and crossbars all you have to do is sit it on the roof, attach the hooks and tighten them down. You only have to do the assembly once so putting the rack on and taking it off after is just a matter of positioning it correctly and installing the DropHook system again. You need the following for this rack: -Yakima JetStream...
view full answer... - Can Inno Square Crossbars be Trimmed on a 2013 Dodge DurangoYes, the Inno Square Crossbars part # IN434 can be cut down to fit your exact specifications. If you will be installing these on your 2013 Dodge Durango then you will also need to use the Inno Feet part # INSUT and Custom Fit Kit part # INK611. Please keep in mind that most states require that the crossbars do not extend out past the side mirrors on the vehicle. The Inno Square Crossbar System is an excellent option for your Durango. It comes with a lifetime warranty, provides a tool...
view full answer... - Roof Rack Recommendation for Both 2015 Durango R/T and 2012 Ram 1500The most efficient way to buy a roof rack for both your 2012 Ram 1500 Crew Cab and your 2015 Dodge Durango is to go with the Inno rack that has the following parts that would work on both vehicles: Crossbars # INB165 and Feet # INSUT For the Ram you would need the fit kit part # INK653 and then for the Durango part # INK611.
view full answer...
Do you have a question about this Roof Rack?
Info for this part was:

Video Edited:
Chris R

Edited by:
Daron K

Updated by:
Alex H

Written by:
Ashley K
At etrailer.com we provide the best information available about the products we sell. We take the quality of our information seriously so that you can get the right part the first time. Let us know if anything is missing or if you have any questions.
Product Experts Available Now!
Call 1-800-940-8924
Thank you! Your comment has been submitted successfully. You should be able to view your question/comment here within a few days.
Error submitting comment. Please try again momentarily.