
To see if this custom-fit item will work for you please tell us what vehicle you'll use it with.
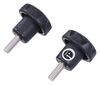
A direct replacement for your Subaru Forester's side-view mirror, this power mirror features electric adjustment, heated glass, turn signal, and breakaway design. Simple bolt-on mounting and plug-in wiring.
Features:
Specs:
Notes:
Videos are provided as a guide only. Refer to manufacturer installation instructions and specs for complete information.
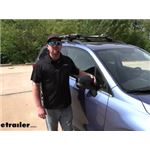
Hey everybody, Ryan here at etrailer. Today on our 2017 Subaru Forester, we're going to be showing you how to install the K-Source replacement side mirror, but before we do that, Why don't we check it out and make sure that this is the right thing for you So, first and foremost, I do want to mention that these mirrors are sold individually. So if you need, say just the passenger side, you can pick that one up, but if you need two or one of both to match, you can also grab the driver's side. You know, for a replacement side mirror, really not much to it. Honestly, if I we're looking at 'em, I would just want something that looked good, looked original and fit well. And this kind of checks all those boxes for me, you know, it's a direct-type replacement and you can have some confidence knowing, you know, when you put this on the side of your Subaru, it's gonna line up and it's gonna work.
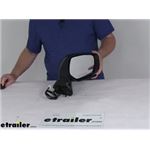
But that said, and you know, just to kind of give you an example, here's our factory mirror, the one that was originally on it, and it had broken down here, but, you know, just to kind of give you an image of that, you can see they're pretty much identical. Now, granted, these are not painted to match, but not really a big deal. Our customer actually replaced both sides and looks really good, you know, when they both match, doesn't really stick out or isn't really all that noticeable. So essentially, this mirror, it's going to have a few different functions. That we can still retain, you know, to power when, so, you know, you're still going to be able to adjust this from your driver's seat and change it to the angle that you want.
These are also going to be heated. So that function will work as well. And in our case today, we have the turn signal and that actually works. And I was kind of surprised because our factory mirror actually did not have this on there, but the connector was the same, everything plugged in and this actually started to work. Now, you know, I can't speak for every single Forester out there, if that's going to be the case for you as well.
But you know, to my surprise, it did work and you might get lucky also. So at the end of the day, you know, you couldn't really ask for too much more out of a replacement mirror. It's going to look good and just work as well, really nice fitment. Now as far as getting it installed, really not too bad, actually, you don't need a bunch of crazy tools or anything like that. You're only going to have to pop the door panel off to get to the bolts in here, but it comes apart pretty easy, more or less, it kind of just snaps apart and you got more than enough room to get them swapped out.
But speaking of that, why don't we go ahead and do it together now To begin our installation, first thing that we need to do is remove our original mirror. And so you want to make sure that your window is rolled all the way up and your car is turned off. And the way to get the original mirror off is actually through the inside, behind our door panel. So we'll open up our door and get started. So if you look at our door handle, the little plastic piece behind it, there's a small cover. You can take a pick or a flat head screwdriver, pop that open, and that's going to expose a Phillips head screw, take our driver here, and get that one pulled out. And then we're going to have this, your door handle here, where you actually grab it to open and close it. This silver portion is actually a cover and it's going to be a little tricky to see, but up here in this corner, there's a small cutout. And what you can do is kind of get your tool behind it, pry up on it, that cover will pop off. And once that is out of the way, we're going to have two more Phillips head screws. So on the top and one on the bottom, I'll go ahead and get both of those out as well. So now the only thing left that's holding our door panel on is some plastic fasteners actually behind it. And what you're going to do is take a trim tool like this, and you want to get in behind there, and it's really tricky to see, but a lot of times you can actually start to feel that plastic fastener. I don't know if you could see that in there, but what you're going to do is release one, then kind of just start to work your way down and get them released. A lot of times, since you get one or two of them going, the rest of them will kind of pop off or become a lot easier. And once they're all free, you can kind of just lift up and let the door panel come down. So what we'll do next is actually disconnect the wiring and that's the connector right there. To make it a little bit easier, you can just slide it this way, it'll pop off. And there's a small tab right there. And if you push down on it, we're able to separate the two and we'll say it is pretty small, so it might help to use a pick or screwdriver just to kinda help you out a little bit. When you push down on that, you're able to pull the two apart. With that done, now we actually need to get kind of in here to get to the fasteners holding the mirror on. So we just have this rubber cover and some sticky, it's almost like a tar. Do your best to try to keep this all together, but we're just going to work this off to about there. So, we need to get into this opening as well as this one. So there's gonna be a total of three 10-millimeter head bolts that we need to pull out. Two of them are going to be in this larger opening and the other one's going to be in this opening. So with that said, I'll take our socket and extension, get in there. What I like to do is kind of break all three of them loose to begin with, because what you don't want to try to do is end up dropping one of these down and inside of the door, kind of be a pain to get it out and not to mention, you know, if you'd pull them off, pull all of them off, you don't want the mirror, you know, to actually fall off essentially and scratch up your car. So once I have them all loose, I'll work them out very carefully, one at a time here. If you feel like it is loose and it doesn't come out with the socket, one thing you can do if you have a magnet like this, you can actually try to get in there, and pull that bolt out using that magnet, makes it a little easier sometimes. So, I'm going to get one more out and I'm going to very carefully on the last one, I'm going to try to hold the mirror and pull the bolts out. Now with all the bolts removed, we can take our mirror and start to pull it off. That's really all there is to it to get the old one removed. So now we can take our new replacement mirror and you want to make sure to take the wiring in and feed that into that opening. Make sure this rubber seals on there good. And pretty straight forward here, we're just going to line it up and push it into place. Once we have it where we want it, we can kind of hold it in place, move around to the other side. So, while we're holding the mirror, we want to take one of the bolts and just very carefully, put that line back up and I'm just going to tighten this by hand and that should be enough to kind of hold the mirror steady. That way, we can work on the other two bolts. So, once you have all those bolts in, you want to make sure just to come back and snug them down a little bit. You don't need to get carried away and get them extremely tight, but just make sure the mirror is not going to go anywhere. If I can manage to get the socket on it here, So, got them snug. Now, all that's left to do is take our connector here and get that plugged in. Now, before we get carried away and start putting the panel back and the actual covers on the mirror itself, I figured it'd be useful just to test it, make sure it works properly. so, we're just going to have a couple of things to test. First one being our turn signal. So I'll go ahead and hit that, and see that it's lighting up. So that's working properly. Now, we'll see if we have adjustability in the lens itself. So from side to side and we'll go up and down as well. Looks like we have full movement, so we're good to go and we can finish putting everything back together. So now that we verified that everything's working. We'll go ahead and just stick that plastic back on, and re-install our door panel here the opposite way that we removed it. Now, what we need to do on the outside of the mirror is take the included covers and snap them into place. It essentially just lines up and kind of snaps in. You want to do this one first, this larger one and take your time when you're doing this. Sometimes- This one actually popped in pretty easy. Sometimes it'll fight you a little bit and if you try to force it and break that clip, then you're kind of out of luck there. So take your time with it and make sure everything's lined up. And that way, it'll work right and look good. And if you picked up the other side, you'd simply just repeat that same exact process to get this one installed as well. And that'll finish up our look at and our installation of the K-Source replacement side mirror on our 2017 Subaru Forester..
Average Customer Rating: 5.0 out of 5 stars (1 Customer Reviews)
A direct replacement for your vehicle's side-view mirror, this power mirror features electric adjustment, heated glass, turn signal, and breakaway design. Simple bolt-on mounting and plug-in wiring.
Info for this part was:
At etrailer.com we provide the best information available about the products we sell. We take the quality of our information seriously so that you can get the right part the first time. Let us know if anything is missing or if you have any questions.


Thank you! Your comment has been submitted successfully. You should be able to view your question/comment here within a few days.
Error submitting comment. Please try again momentarily.