
To see if this custom-fit item will work for you please tell us what vehicle you'll use it with.


California residents: click here
Videos are provided as a guide only. Refer to manufacturer installation instructions and specs for complete information.
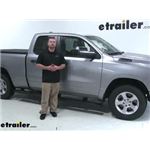
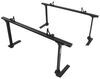
Today on our 2019 Ram 1500, we're going to be taking a look at and showing you how to install the Westin R5 M-Series, Wheel-to-Wheel Nerf Bars. With trucks being higher and higher off the ground nowadays, these are going to be especially useful for people with mobility issues or even kids. And they're going to help keep your seat in better condition as well, because you won't have to kind of slide on the side of it just to put your feet onto the ground. Not only are the running boards going to give us a solid and safe place to step while we're getting in and out of the truck, they're also going to be there to allow us to do some things you wouldn't normally think about. For example, a place to knock that snow or mud off of your boots, and they're going to look good and give a touch of style to the Ram, in my opinion too.Now, one of the things that really separates these running boards from some of the others is that these are going to be full length. So from the front wheel to the back wheel, so that's going to give us a place to step.
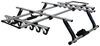
Say if you've got some things in the bed of our truck, we're not going to have to climb on the wheel or reach all the way over. We're going to have a nice place to give us that height advantage. These are made from a high grade corrosion resistant steel. So not only are they going to look good, but they're really going to stand up to all those elements and stay that way for a long time. The cover is going to be slip-resistant, that way when it's wet, muddy or snowy, you're not going to have to worry about slipping while you're climbing into your truck.Since the running boards do drop down a little bit, they are going to take up some of our truck's ground clearance.
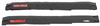
So just to give you an idea from the floor to the bottom edge of our running board, it's going to be about nine and a half inches. Now, as far as the installation goes, there are a lot of pieces, but it's really not that difficult and you shouldn't have any problem getting it done at home. Speaking of which let's go ahead and put them on together now.To begin our installation, we're going to be over here on the passenger side of the truck, working from the front to the back. We're going to, pre-assemble our bracket that goes right here in the front and it'll have a B stamped onto it. So when it's setting, it'll set like this.
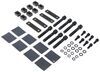
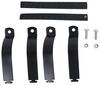
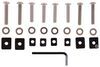
What we're going to do is take our shorter brackets, put that over this tab, and we can take a carriage bolt, slide that through. And if we flip it over we're to secure it first, using a flat washer, a split lock washer, and then just a nut. And we'll go ahead and just keep this hand tight for now.So if we move underneath the truck on the inside, we're going to have three studs that are sticking out. So what we're going to do is take our bracket that we pre-assembled, put it over those studs and just loosely secure it for now. So take a flat washer, a split lock washer and a nut, and get it hand tight.
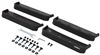
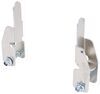
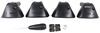
I'm going to use that same hardware combination for the two remaining studs. And we're going to have two more brackets, just like that one that we need to put on, on here and here. They're going to install the exact same way.I would just like to point out which brackets we're used for these locations. This bracket will be labeled P, and this bracket will be labeled A. To get our fourth bracket installed, we're going to need to remove a couple of bolts. They're going to be right here in this area next to the frame. And the bolt that we're taking out is attaching the frame to the bed of the truck. And this is the bolt that we're going to remove. So to take it out, we're going to grab a 15 millimeter socket and it is very tight. So you want to make sure to get an impact or even a big breaker bar.All right, now we're going to take this bracket and how this is going to work is it's going to kind of slide in between that piece of the frame rail. And then on top of our panel support, and it's going to line up with the holes. We're just going to re-secure it using that factory hardware that we just removed before you screw in your large bolt, you're going to want to make sure to take this L bracket with the short end facing up, slide it up through that hole. And that hole on the bracket is going to line up with the hole in our other portion of our bracket. And then we can go ahead and take our big bolt and tighten all those down together.Now we're going to do is take this bolt and a larger flat washer and we're going to go up inside of this frame and slide it through that side bracket that went on second and it'll come out the outside towards the back of the truck. Once we have it through, we're going to secure the other side, using another one of the larger washers and then just a nut. All right, with that bolt in place. Now we can go ahead and tighten it down. All right, now we're going to go ahead and take our larger bracket and put our bushings in place. So the way we're going to do that is to take our bushing, pull it apart.This piece is going to come in from the top, and I just push through there. And this one, will just go back into it. And the same thing for this opening as well. So our large bracket is going to bolt into these threaded holes right here. I'll go ahead and use an 18 millimeter socket to tighten those bolts down. Now we can assemble our actual running boards. Now these are side specific so make sure to check your instructions to make sure you have the right ones. So we're going to go ahead and lay them flat. We're going to take our plastic step and connect that to the steps. We're going to have a couple tabs on each side that are going to line up with holes on the running boards. And so we're just going to lay this down, line those holes up and push the running boards through. On these plastic posts that we used to poke through our running boards, we're going to secure that plastic step to our running boards, using these self cutting nuts. Just kind of get them started.Sometimes you do have to put a little downward pressure to help get it going. We'll just use a half inch socket. Usually it can tighten these down by hand. You don't really need to crank on them, just get them flush and snug. We're going to do this for all of the tabs coming out of the backside of our step. All right, so now we can go ahead and bolt our two pieces together. So we'll take this longer bracket here with the well nuts. And this is going to go on the taller side of the running board. So I'll slip in like this and line those holes up with the bracket, with the holes on running board.Same thing for the shorter bracket, except you want the flat side without the holes to face inside the running board. Slide that through and get them all lined up. Now we're going to take our square plate and with the edge pointing up, that's going to go on the skinny side of the running board. You want to make sure that the sides with the well nuts are facing down towards the running board. So to line up the four holes on the corners with the four holes on the running boards, just like that. Then we can secure the outer most four corners using the black hardware and put on a split lock washer, a flat washer and go ahead and get them hand tight for now. With them in place and hand tight, now we'll kind of go ahead and make sure everything is lined up and then snug them down.And I went ahead and kind of laid our running board next to our truck, getting it pretty close. We're going to put in these brackets. Now, the way these work is you're going to want these studs facing down because they're actually going to connect into here. So these will actually just kind of slide into place and they'll just rest in there just like that. That way when you run them through the bracket and put a nut on it, it'll pull the running board down to the bracket. We're going to have a total of three of these. Well, one here in the very front and the two brackets in the very back.Now, before we put our running boards on our brackets. It's a lot easier to take these little covers and get these installed first, just because we have a little more room. Now, the way these work is, we're going to line up the holes with the two holes in the bracket. So this will just kind of slide over it. We're going to take a bolt with the flat washer on it and run those from the driver's side towards the back of the truck. And we're going to put flat washers on both of them followed by a nylon lock nut. Once we have these hand tight, we can go ahead and snug them down using a 10 millimeter wrench and socket.Now the other three are set up the exact same way. So we will just repeat that same process for the rest of those. Now we're able to take our running board and set it in place over our brackets. You're going to want to make sure that your brackets line up with the studs coming out of our running board, just like that. Once you have it through what you're going to do is secure it using a flat washer, a split lock washer and finally a nut. Just get all these hand tight for now. Now for the second bracket back in the beginning, this one is going to be a little bit different. We're going to have two holes here and here. We're just going to directly screw bolts right into it.Then we're going to need to put two more bolts in this hole and this hole. You have our smaller bolt, a split lock washer, and a flat washer. We can go ahead and just thread those in. It's going to be the same setup for this hole. Now it would be a good time to make sure you have your running board centered and straight because after we verify that we have it in the position that we want it, we're going to go ahead and tighten down all of our hardware. The first bit of tightening down all of the hardware that attaches the brackets to the body, using a 13 millimeter socket. Now we can tighten down the hardware that attaches our running boards to the brackets themselves, again, using a 13 millimeter. And for our two smaller bolts here and here, we'll tighten those down using a 10 millimeter. And that'll finish up our look at and our installation of the Westin R5 M-Series Nerf Bars on our 2019 Ram 1500..
Info for this part was:
At etrailer.com we provide the best information available about the products we sell. We take the quality of our information seriously so that you can get the right part the first time. Let us know if anything is missing or if you have any questions.


Thank you! Your comment has been submitted successfully. You should be able to view your question/comment here within a few days.
Error submitting comment. Please try again momentarily.