
Westin Sure-Grip Running Boards w/ Custom Installation Kit - 6" Wide - Brushed Aluminum
Item # 27-6120-1855
Our Price: $432.28
Confirmed to Fit
2009 Toyota Highlander
Will this fit?
To see if this custom-fit item will work for you please tell us what vehicle you'll use it with.


- All Info
- Reviews (103)
- Q & A (0)
- Videos (2)
- Photos
2009 Toyota Highlander - Westin Sure-Grip Running Boards w/ Custom Installation Kit - 6" Wide - Brushed Aluminum
- Running Boards
- Silver
- Fixed Step
- Aluminum
- Brushed Finish
- Westin
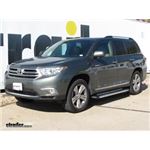
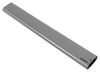
These 6" wide, brushed aluminum running boards sit close to your Toyota Highlander's frame for a streamlined look. The 1-piece, non-slip step pad on each board is made of soft, durable rubber, providing better grip than a molded step surface.
Features:
- Running boards make it easy to get into and out of your vehicle
- Extra-wide platform delivers a stable step surface
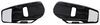
- 1-Piece, non-slip rubber pad runs the full length of each board for sure footing
- Rubber step area offers better grip than a molded surface
- Special grooves channel water away and provide extra grip
- UV-resistant material will not crack or fade
- Step boards mount close to your truck for a streamlined look
- Brushed aluminum construction is durable and rustproof
- Black molded endcaps provide a finished look and help to protect boards from internal corrosion
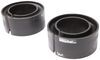
- Light kit (27-6000 - sold separately) can be added for safety and increased visibility
- Quick and easy bolt-on installation
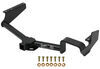
- Custom mounting kit included
Specs:
- Step pad width: 4-1/2"
- Overall board width: 6"
- Board length: 72"
- Quantity: 2 step boards
- 5-Year warranty
27-6120 Westin Sure-Grip Step Boards - Brushed Aluminum
27-1855 Westin Custom Mounting Kit for Sure-Grip Running Boards
Installation Details
California residents: click here


Video of Westin Sure-Grip Running Boards w/ Custom Installation Kit - 6" Wide - Brushed Aluminum


Videos are provided as a guide only. Refer to manufacturer installation instructions and specs for complete information.


Video Transcript for Westin Sure-Grip Running Boards Installation - 2013 Toyota Highlander
Today on our 2013 Toyota Highlander we're going to take a look at and show you how to install the Westin sure grip 6 inch wide running boards with custom installation kit. The part number is 27-6120-1855. Here's what our running boards are going to look like installed. As you can see this is going to be a very nice clean look. These running boards I think are some of the closest after market running boards to what factory running boards are. They're going to be a 6 foot long board, 6 inches wide and they've got a textured grip strip here which is 4 and a half inches wide.
This is going to give us superior footing whether it's rain, snow, mud, ice. We shouldn't have any issues getting in and out of the vehicle. Now on the outside here we've got a brushed nickel finish, really accents a lot of the alloy wheels now that are on cars or the the trim on the side. It really accents that nicely. We've got our caps on either end there to really clean up the look and prevent any kind of hanging on clothing or anything like that. It'll give us nice wide area to step so it'll really make getting in and out the vehicle much easier. Then when we get to our destination they don't stick so far that you can't step over if you choose or if you need to they'll be there to allow you out safely.
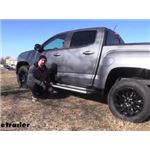
Also here in the back door you can see it's going to come back plenty far enough, still gives us plenty of room so if we need it to get in and out we'll have that available. Now this application requires no drilling whatsoever. We're going to use pre-existing holes underneath the vehicle and the provided hardware to attach it. Which makes it really, really nice. Now if you'd like to add a bit of safety for night time situations and you want to get your running board even closer to that factory look, we do have a light kit available that you mount right on the board. That part number is 27-6000. Now the first thing we need to for our installation is get the black appearance strip put into position.
It's going to fit right in a groove that runs along the bottom side of the running board here. All the way across. Now we didn't have any luck trying to snap it in. We recommend doing is using a small Phillips screw driver, you're going to take out the 3 screws. We've got 2 here in the bottom and then one that's a little bit more on the side there.
Get those popped out. Set those aside then just slide that right off the end there. You can see the strip there it's going to have that rounded edge. It's going to run the full length and we're going to slide that right into that track we saw. We just need to that slide into position for now. We can adjust that forward and back once we get it about closer to fully installed. Then the caps going to go back on. There's a little hook right here on this edge that'll need to go around the edge of the running board so it'll kind of be underneath our strip there. We'll just bring it on in. Slide it in til it stops, our 3 holes will be lined back up and we can replace our screws. All right that'll take care of the pre assembly of the running board. Let's get our brackets installed on the vehicle and we'll add this to it later. Now for the rear we're going to use one of the half inch bolt style nut plates here. We also need to take our three eighths by inch and three quarter bolt and we're going to thread it through one of the nut plates just til it comes down and stops like that. These are going to be our rear attachment points. We'll get those put into position. Now we're going to grab our rear bracket. It's going to be the one that has the larger flange that goes up top. You can see we want the downward leg to be on the left hand side of that. Just like that. Nut plate will go through. You need a flat washer, lock washer and nut on this side. That needs to go just underneath where this cap is. We'll pull that down and out of the way. We pass that up and in. Then just gently tighten it down til it's about hang tight. We're good for now. Now we also want to pull down the rubber cap here a little bit further towards the inside. Now keep in mind we're just in front of the rear tire here. It's going to be the first hole that's on the side frame where the side rail here and then directly in from that and we'll find that larger oblong hole. That's where we're going to put our half inch nut plate. Sit it in just like that. Now our rear bracket comes in and now this needs to be facing towards the front of the vehicle, the arms that stick out need to be facing towards the front and the passenger bracket is the smaller of the two. Place that up on there. You need a flat washer and lock washer and we'll also thread on our hex nut. Just like that. Now for the point where the two connect we're going to take our three eighths bolt and flat washer, pass that through both brackets there and we'll add on another flat washer then lock washer and nut. Now we're going to leave this a little bit loose here but this one is very tough to get to after the fact. It's a good idea to go ahead and get that torqued down now. You'll find the appropriate torque specifications listed in your instructions, just follow along with those to make sure you have the appropriate tension on all your bolts. Let's move to the front and get that bracket in place. Now here in the front again we're going to come back from the tire and it's going to be the very first hole. There's going to be a little plug in it, take that plug out. Then we want to go in about eight inches and forward about four inches and we've got another one right here. For the attachment point closer to the middle of the vehicle we'll use another three eighths bolt with a nut plat on it, like that. Now for the forward attachment point, we've got our support bracket we need to take one of the three quarter inch three eighths bolts. You want a flat washer on there, serrated lock washer on there. It's going to go right up through and another one of our nut plates, we just want to very gently or lightly start, like that. That's going to pass up in that hole. Just to make it easier to kind of hold up, I'm going to put my bolt in the middle here first. Just like before it's going to be the inch and three quarter by three eighths bolt with a flat washer. Then on the back side it'll be a flat washer, lock washer and nut. Bring the rear portion of our bracket up into its place and it gets the same hardware. Just like before this bolt again is going to be pretty impossible to get to after the running board's in place. We want to get it torqued down. Now we've got our five sixteenths square head bolts. We need to slide two of those in our inside track here and two of them on the outside track. Get them positioned just near the end of the board there. Now we're ready to raise it up into position. As we do it can be a challenge with this strip on here. You kind of need to compress it, kind of roll the board down into position. But it certainly makes it look very nice once it's on there. Certainly recommend using it. We just need to line those bolts up with the slots in our bracket there, move them down through like that. Then we'll loosely install the five sixteenths flat washer and nylon lock nut. That'll keep our board from coming off there for any reason. We'll be able to adjust it forward and back to get it right where we want it. You see I just kind of curl that strip outward. Bring it down around that bolt there. Just make sure we get our board even on both sides. Once we do we'll start torquing down all of our bolts. Now you just want to repeat that exact same process for the other side, you're running boards will be ready for use. With everything torqued down properly that's going to complete our installation of the Westin sure grip running boards part number 27-6120-1855 on our 2013 Toyota Highlander.
Customer Reviews
Westin Sure-Grip Running Boards w/ Custom Installation Kit - 6" Wide - Brushed Aluminum - 27-6120-1855
Average Customer Rating: 4.8 out of 5 stars (103 Customer Reviews)
These 6" wide, brushed aluminum running boards sit close to your vehicle's frame for a streamlined look. The 1-piece, non-slip step pad on each board is made of soft, durable rubber, providing better grip than a molded step surface.by: Mark07/20/2021
Just want to say thank you…Great item and very useful
Thank you and have a wonderful day


by: Steven B04/29/2024
I like them. The only drawback is the treadwidth. We have to turn our feet ifewYs to get a good foothold on the running board.


by: Charles03/08/2024
These running boards were an easy 2 person installation. The added sleeve to fill the gap keeps the side and bottom of doors clean by most of so much easier to get in and out of the truck


by: Richinraleigh01/05/2024
Order placed 1/1/24. Received 1/4/24. Two boxes, 1 with running boards, second with hardware, all good. 2 black plastic "J-strips" in long box not included on parts list nor described in instructions (packing spacers?). Broke two square head bolts off while tightening nylon nuts holding running boards onto support brackets - very soft, be careful. Running boards otherwise look great and appear well built. Other aspects of install on 2024 4-Runner were straight forward and were completed in about 75 minutes.


by: Cindy 06/07/2024
These running boards make it very easy to get in and out of my 4Runner. They look great as well, so can't ask for more. My husband didn't have any problem with the install.
by: Thomas04/15/2023
Fit perfectly to replace my damaged running board
by: Loren06/01/2024
Looks great. Only an hour and a half to install myself. Thanks.


by: Robert02/06/2023
VERY happy with the finished product. There were a couple steps not called out in the instructions that I had to figure out*, but once I did... all went together easy enough. First side I installed, the passenger side, took about an hour, and the driver side took about 30 mins.
*First was a trim strip that comes in the box. Had to figure out how to mate them to each running board. Also, on my wife's 2023 4Runner, there was a small (~2" x 5") piece of plastic in front of each rear wheel. My hunch is that it's to protect against stuff getting flung up. Had to remove those from each side to make room for the running boards. Once removed, all just came together easily.


by: Ray 11/24/2022
It was easy to install. Had 2 extra parts in box that the instructions did not cover. I called the 800 number and the person new what I was talking about right away. He explained where it went and how to install it. It only took me and a helper about 45 minutes to install.
by: Carl02/01/2023
Not only stylish but worked perfectly for the lift application for my handicap wife


by: Curt W.05/31/2024
Look great in my new Ram!!!!


by: Jerry D04/01/2020
The runningboards that where installed a year ago are still looking brand new. It made a great addition to my Explorer, not just for the look but for the practical use. My wife who needs that extra step is grateful. etrailer did an awesome job helping picking the right product for my vehicle, the sale and installation.


by: David11/08/2022
Love it but it was missing one bolt for the running board M 8 square head bolt


by: Fred 11/05/2023
I really like these runningboards. They look great on the truck they were nicely. Everything is good.
by: Paul07/31/2023
Great product and easy installation. It only took about one hour to install these and they look great. Perfect fit for my 2019 Colorado.


by: Don10/13/2022
Arrived 1 day early. Installed it in less than an hour and a half. Looks fantastic. Did not have to drill any holes. Simple bolt up install. Instructions were okay , would suggest using the [online] video- very helpful. Looking to now order a hitch


by: Christopher 10/06/2023
Kit was delivered promptly. Installation instructions were clear. There was even a note in the instructions about excess paint likely to exist on specific frame bolts. My only suggestion in this case would be to use a die to clear the threads. I purchased one separately to fix this issue. I could not get the nuts on otherwise, and I didn't want to strip the threads.
Other than that hiccup, installation was a breeze.
by: Carlos R08/10/2022
I recommend this running boards. If you are determined you can install by yourself. It took me approximately 1.5 hours for each side.
Overall looks good and helps with the kids.


by: David05/19/2023
Easy to install, look great. Another trouble free order. Keep it up and I'll be back


by: Ron12/30/2022
They need another brace that I will make. The rear mount flexes the metal on the cab. Fit good but not real sturdy.


by: Anthony 02/13/2024
easy install & look great !!!
by: Peggy01/16/2022
Quick delivery. Extremely nice running boards and easy to install. What a difference they make on my 4runner. Thank you for your service.


by: Bryant12/16/2020
Good quality. Definitely recommend a second person just to give a hand and check to make sure it's even. Very sturdy and decent amount for stepping on and off.


by: Jonathan 10/22/2021
GREAT Product! Price was perfect. Fits well, looks like OEM and actually looks better than the Ford sidestep (non electric).
Needs: perhaps a little wider and a taller gap from step to door. My foot slipped a few times on entry and on exit, not much room to step on. That is my only grip....Overall and outstanding product!
by: David06/06/2019
Looks great on my 2019 Ford Explorer. Easy installation, took me and friend 1.5 hours without lift.


25
102
Show More Reviews
See what our Experts say about this Westin Nerf Bars - Running Boards
- Does Westin Tube Step Kit 27-6120-1855 Include the Installation Hardware KitThe price does include the installation hardware kit. We offer a shipping special on orders over $150. We offer free standard ground shipping on orders over $150 to the Continental 48 states. Certain over-sized items are excluded. To find out if this item qualifies for free shipping, please call our Customer Service department at 1-800-298-8924. You can also place your order with them over the phone.
view full answer... - What Is Included in the Westin Sure-Grip Running Boards with Custom Install Kit # 27-6120-1855The contents of the Westin Sure-Grip Running Boards with Custom Install Kit, part # 27-6120-1855, is for two running boards and the custom install kit for a 2009 Toyota Highlander. If you are wanting to install lighting on your running boards I have the Westin LED Light Kit for Sure-Grip Running Boards, part # 27-6000. These lights can be installed anywhere on the boards and wired to give you light when the doors are opened. This kit will include 4 lights (2 for each side) and the wiring...
view full answer...
Do you have a question about this Nerf Bars - Running Board?
Info for this part was:

Expert Research:
Patrick B

Expert Research:
Jeff D

Video Edited:
Jacob T

Video Edited:
Chris R

Video by:
Kathleen M

Video by:
Dustin K

Test Fit:
Randy B

Updated by:
Jenny M

Updated by:
Isabelle B

Installed by:
David F
At etrailer.com we provide the best information available about the products we sell. We take the quality of our information seriously so that you can get the right part the first time. Let us know if anything is missing or if you have any questions.
Product Experts Available Now!
Call 1-800-940-8924
Thank you! Your comment has been submitted successfully. You should be able to view your question/comment here within a few days.
Error submitting comment. Please try again momentarily.