
Summer Starts Here - Save up to 70%
To see if this custom-fit item will work for you please tell us what vehicle you'll use it with.
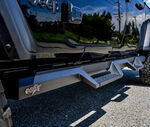
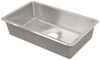
Get into and out of your vehicle with ease by using these sturdy, durable steps. Multi-mount system ensures a precise, stable fit. Wide, flat, non-slip surfaces provide sure footing, and the black finish complements almost any application.
Features:
Specs:
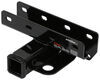
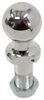
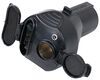
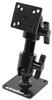
The heads of the unique multi-mount installation system on Super Hoop side steps attach to your rocker panels and allow the steps to pivot for a precise fit.

Videos are provided as a guide only. Refer to manufacturer installation instructions and specs for complete information.
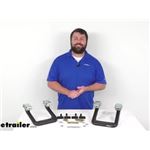
Hello, neighbors, it's Brad here at etrailer, and today we're taking a look and installing the Carr Hoop II side steps on a 2020 Jeep Wrangler. Here we have them in the matte black powder coat finish, but they're also gonna be available in polished aluminum. So really if you want to custom cater the look to your Jeep, you do have those two options. One of the staples of the wranglers is the high ground clearance that they have, and that's for that off-road capabilities. And that's what we have today on our Rubicon. It's fairly tall.
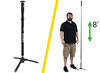
For me, it's not too hard to get in, but the owner of this Jeep is right at about five foot and that makes it pretty hard for her to get in and out as she's daily driving her Jeep. And this is gonna be a great option to be able to easily step on here with a surefooted grip, and be able to get in the Jeep with no problem. (door slamming) Now these are a great surface to step onto. Out the gate, they look really good. This mat black matches our rock guards on our Jeep today, so it almost gives it a nice factory look.
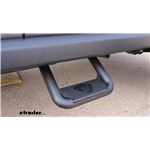
It's nice and open. You can actually get a decent sized shoe in here, even my feet are able to get into it no problem. And when you do step down, it's got a really nice grip here. So it's a non-slip diamond tread. So that means even if it's wet or if you have mud on your shoes, there's quite a bit of grip here.
That way your foot's not sliding as you're hopping in your Jeep. The step is made out of aluminum, so it's pretty lightweight, which is really nice when you're installing it. But also that means that it's gonna be rustproof and just durable to all the elements. So even if you go with that polished aluminum, you're not gonna see any rust forming on this. That's kind of the pros of the aluminum.
Now as far as the brackets that mount up to the Jeep, these are custom fit and they fit really well. It makes it super easy for the installation. Those are gonna be steel and zinc coated, which is also gonna hold up to those elements long term. As far as the finished position, when it's mounted, it's really nice because it puts your foot in a great position. You can still definitely get a shoe in here, and that comes down from being 10 inches. That extends this step out far enough. You're not having to fit your foot underneath the rocker panel too much. You also have a nice size platform here, so it's seven inches long, so that allows for a nice wide foot. It's also 3 1/2 inches, which is enough to get the front of your foot on here to be able to step in. And the drop that you're gonna get is five inches, and that's gonna make all the difference of when hopping into your Jeep. It also has a 500 pound capacity. So really any size driver can step on these with no problem. One drawback from these is gonna be the fact that as far as off-road capabilities, this is gonna lower that ground clearance by a decent amount. So from the ground to the bottom of our step, it's coming in right at one foot, whereas previous, at least to our rock guards, it was almost at 17 1/2. But again, if you're just daily driving your Jeep, and you're not doing hardcore off-roading, this is gonna be a great option. If you do plan on off-roading, just know that these are gonna have the potential to hit things, and it's probably gonna cause some damage to 'em. So it's definitely something you're gonna wanna keep in mind. When picking these up, they come in a quantity of two. So not only will the driver be able to get in, but also the passengers. And overall the installation on this is actually really easy. You are gonna be doing some drilling, you're not using factory holes, which is totally fine, because once it's mounted up it's extremely sturdy, and overall it's not too hard to gain access to any of the spots that you're gonna drill. I'll walk you through all the steps to make sure you get your steps installed. So let's take a look at that. Now the first thing you're gonna wanna do to get your steps installed, if you have this factory rock guard, you're gonna want to get that removed, and it will be able to go back up once you have the steps installed. But we're gonna be drilling through the side pinch well to get this mounted up. So in order to do that, this needs to come down and it's pretty easy to do. There's just two 13 millimeter bolts, and then we just have four 10 millimeter nuts. They're pretty easy to get to, so we'll go ahead and get this removed. (tool scraping) And those 10 millimeter nuts are just on both sides of the bracket where you took that 13 millimeter off. (tool buzzing) We will just set this aside for now. Now in the instructions, they have a kind of recommended spot to put it, and they talk about moving this 10 millimeter bolt and the hex that it goes into further up. I found that where they want it mounted is gonna be a little bit too far forward. I think a good rule of thumb is if you open your door, you're gonna kind of want the step to be midline with the front of the seat, and that's gonna put it in a good position. And we're gonna assemble the brackets on our step just to kind of get it mocked up and mark out where we're gonna be drilling. Something I'll point out is in the hardware there's gonna be excess hardware. I think it's kind of universal what they supply. So you won't be using everything, but there's gonna be two bolts that are very close to one another. You're gonna want the longer of the two. So go ahead and grab four of those. And we're just gonna mock these up again just to kind of space it out and mark where we're gonna drill. So we're gonna loosely put our hardware in place. So these just kind of slide over this portion, so kind of just put it in an angle, and then we can get this aligned. I got a flat washer here, and then on the backside we'll put a flat washer, and then just start our nylon lock nut here. And this front one, you can see these tabs are a little bit wider and that's so it tightens down into place once we're happy with its orientation. So to get this one started is a little tricky. You just wanna pinch together the metal. And really for this point, it doesn't matter if we have that flat washer 'cause we're gonna be taking this off. We mostly just want this bracket to be in place. So this should be good. We'll go ahead and get the other side put on. So to get this mounted up, it is again gonna be personal preference. The main thing we need to do is make sure we're not gonna be in the way of anywhere where our rock guard's gonna mount back up. And also here, there is some bend out on the pinch welds here. So I found a spot that I'm pretty happy with and I have a chalk marker. You can use a, I wouldn't recommend a paint marker because later I'm gonna be marking on this outside, it's kind of up to you. But anything that can make a mark, grab that. And this should seat to where it pretty well sits nice and flush. So just kind of push it up and against the pinch weld. And while holding that in place, you're just gonna mark on each side of the bracket, just put a line on each of it there. And we're gonna make four lines. So one on each side of each bracket. This is where I've marked mine out, should look something like that. And at this point you can take your bracket off. So just that hardware that we put on loosely. And we're gonna be using this as our template. So as I mentioned before, it should sit up there pretty well to when you push it up, everything's pretty tidy here. It's almost flush at the bottom. So we'll just get our marks all aligned and we're gonna be marking on this hole here. And then also at the top, there's gonna be this hole. So get this all aligned and then mark that out as well. And that's something I'll point out to when choosing a spot to get this mounted up. You don't have a ton of different places you can put this, but do make sure that when you hold your bracket up that there's gonna be metal to be able to drill into. So go ahead and get both of them marked out where we're gonna be drilling. As far as drilling from the inside, you're probably not gonna be able to do that. I have a right angle drill and even with the drill bit in, I can't really get to this. So we are gonna be drilling from the outside. So it's hard to translate this over to the other side. But what I'll do is on the bottom with my chalk marker, center that up with your mark. And then measuring up from the center of that to the bottom of our metal, it's just half an inch. So on the other side we can just measure up half an inch following this center mark, and that's gonna be where we can start drilling. So lining that up, just go ahead and mark right here. And I'll do the same on the other. Now to get a nice drill on this mark, I'm gonna use a center punch. And this is just gonna help align the drill bit. Do that on this one as well. And eventually we're gonna be stepping up to a larger bit. But since you're cutting, you're really going through a few different sheets of metal here that's all pressed together. It is gonna take a little bit to drill out, so I recommend getting a smaller bit. It's gonna make it a little bit easier to get that hole started and then we can go back and enlarge it. (tool buzzing) And once you have that drilled out for your pilot hole, you can go ahead with a 516 drill bit and enlarge it out. (tool buzzing) We'll go ahead and do the same thing on our other marked hole. And we also need to drill out the marks that we made up top. And this is gonna be an 1/8 inch drill bit, so it's quite a bit smaller, but we'll go ahead, we'll center punch these, and get these drilled out. (tool buzzing) We are gonna get ready to put our brackets up. And again, I'm gonna point out that there's two different types of hardware. So these are gonna be going through the side where we drilled through. I'm gonna use the longer ones. I don't really think it matters, it just makes a little bit easier to be able to get your hardware started, and having a little bit more teeth for the nut to bite on. It's probably a good option to use these. So we'll get this in place. We're gonna take a flat washer, we'll slide it over our bolt. We'll pass this up. And then on the backside we'll put a flat washer. And then a nylon lock nut. And I'm just gonna hand thread this on there for now. And we'll get both of these in place. And before we tighten that down, we're gonna want to get our sheet metal screws put in place. There's gonna be some longer ones and then some shorter ones. The shorter ones should be just fine. And I have a 5/16th bit that I'm gonna be using with my impact. So we'll get this aligned with that hole we just drilled. (tool buzzing) And just tighten that up until it's snug. We'll get our other one in place as well. Get this tightened down. I just have a half inch socket and a half inch wrench holding that hardware in place as I tighten it. (tool rattling) Now we can get our step and just slide this in, and then we'll get our hardware line just as we did before. So make sure you have your flat washer on the bolt head, past this through, and you may need to kind of move this around to get it aligned. And then on the back ends, make sure you're putting a flat washer before putting your nylon lock nut. And this one may be a little bit tight, so just if you need to, just kind of pinch on that bracket to get that started. Before we tighten these down, it's a good chance to really make sure it's exactly where you want it. And really it comes down to just kind of what your preference is. But to get this kind of a good point and make sure it's even with the other side using a bubble level here, I'm just gonna kinda level it out and I think that's gonna be the best option. But as you can tell, there's a decent amount of adjustment here. So it's really however much you want it. Gonna tighten these down. You're gonna want a 7/16 wrench and then a 7/16 socket. And then we'll go ahead and get these all snug down. (tool buzzing) Now with everything tightened down, we can go ahead and get our rock slider put back on. And all we need to do is repeat the exact same steps on the other side of the Jeep. And that was a look at installation of the Carr Hoop II side steps on a 2020 Jeep Wrangler.
Average Customer Rating: 4.7 out of 5 stars (260 Customer Reviews)
Get into and out of your vehicle with ease by using these sturdy, durable steps. Multi-mount system ensures a precise, stable fit. Wide, flat, non-slip surfaces provide sure footing, and the black finish complements almost any application.Fit perfectly. Great addition to my Jeep as I'm getting older.
Originally ordered these as a replacement for the front. Did not check size before ordering.
Decided to put them under the rear doors instead.
Since I already had them on the front and was able to see how they were mounted, it made the install was a piece of cake.
The instructions were clearly understood for my Silverado and only took me about 15 minutes per side to install.
I have since ordered the larger pair for the front and will use the same brackets to replace.
Only gripe is the finish on the ones that were originally on the truck (8 years old) has chipped off due to mag chloride on the road and frozen ice being knocked off.
Since I was not the original purchaser, I cannot claim warranty issues as they are guaranteed for life.
Hopefully with the new ones Carr perfected their coating, we will find out in another 8 years!

It helps me to climb into my truck,with adding an extra step. Very happy with it.
Prompt shipping. Product appears as adv ertised.
Purchased to replace one that had broken with previous owner,not sure how it was broken. That said delivery was as expected and packaged in good shape . Steps seem sturdy and well built.
why are they called Nerf bars? none of my other Nerf stuff looks like that.....
Great product, easy installation
Thank you
My order arrived in less than a week and it took about a hour or so to install. Instructions were clear and easy for most any fitment. For my Chevy it could not have been any easier. This truck is for my daughter who has spina bifada so it enables her to climb in easier. The steps look great and I'd highly recommend them and etrailer. I've used etrailer a few times now and will continue as they have quality parts at some of the best prices!
These steps are great very easy to install and etrailer as usual was fast shipping and great to work with thank you
Awesome customer service. Answered all of my questions to help me get an account setup and to get the correct part.
easy install good instructions
It's a nice install and nice-looking product.
You always deliver a quality product fast.
We love them! Work and still look great !??
Once u watch YouTube for installation, they are great
The Carr side steps are well designed, well engineered, and well manufactured. The kit comes complete with all the necessary hardware, and the instructions are clear and easy to follow. Overall, I found them quite easy to install. Only time will tell as to their durability.
Love this step!It is a replacement for one we lost in an accident. Glad they sell just one!
Very well made and so easy to install!
Great product but I couldn’t use your directions because I mounted it on my Ford 8n tractor. In fact I only used the four bolts that connect mounting brackets to step. I cut two pieces of flat stock welded it on frame and drilled 2 1/4” holes 2 on each mount and viola the job is finished and now my wife can get one and off tractor with ease. Great product and it was the only one I found that fitted my needs for mounting flat on top of stock and stair is adjustable. I recommend this product to anyone looking for a quality piece at a great price. Thank you etrailer for creating this outstanding step.
Good quick service. Side Steps are well made and easy to install. Good videos on install if needed.
Still very happy with the steps. Instructions were useful and the product has held up well. It doesn't have a lift kit or muddier tires, but my old F250 is still pretty tall. The steps make entry and exit much easier for and old guy and his short wife.
Simple ordering precise & quick. Nice Email response from etrailer. Easy instructions right out of the box & on to the truck. Easy in & easy out of the vehicle, nice & sturdy you cannot go wrong with a reputable name to back it up. I am a satisfied consumer.
This fits perfectly on a 2014 Tundra. I had trouble finding ones that fit with the way the rocker panels are angled. Worked out well and I’m very happy with the results. etrailer is a great place to search for items you need and the service is excellent.
Great service
Wanted help with the ladies to get into the truck but did not want a full length step bar. These do the job perfectly. Very easy to install and very sturdy and strong when stepped on. Not to mention they look pretty awesome on the truck.
Info for this part was:
At etrailer.com we provide the best information available about the products we sell. We take the quality of our information seriously so that you can get the right part the first time. Let us know if anything is missing or if you have any questions.


Thank you! Your comment has been submitted successfully. You should be able to view your question/comment here within a few days.
Error submitting comment. Please try again momentarily.