
To see if this custom-fit item will work for you please tell us what vehicle you'll use it with.
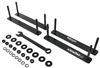
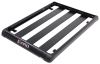
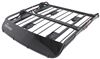
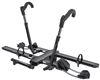
These premium mud flaps are easy to install and digitally designed to fit your car or truck. Protect your vehicle and your trailer from road debris. Flaps are constructed of durable thermoplastic resin with stainless steel fasteners.
Features:
Precision fit, durable components and ease of installation make WeatherTech NoDrills your first choice in mud flaps. Installing mud flaps has never been this painless. Patent-pending QuickTurn stainless steel fasteners makes installation quick and easy - no drilling required.
Videos are provided as a guide only. Refer to manufacturer installation instructions and specs for complete information.
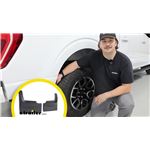
Hi, Matt with etrailer, and today we're talking about the WeatherTech front and rear custom mud flaps on your 2021 Toyota RAV4. This is gonna be a great way to keep your wheel wheel from building up a lot of debris, whether you're doing some light off-roading, you're driving on some dirt roads, or you're trying to drive through snow. So let's take a closer look at them. Before go into the details about this kit, I will say if you do have the Adventurers trim on your RAV4, this might not be the best fit for you. We we inchesre able to get this on kind of, but it's not gonna be a very snug fit. And if you do plan on driving down some bumpy roads, there's the chance of this coming loose.
But if you just have the regular trim package, you should be fine. What I like about these mud flaps is two things, first off, there's no drilling required. Now you will need some tools to install these, but it's relatively pretty easy. And what's also really nice is it's going to be a custom fit, so contour to the shape of your vehicle. What's really nice about these mud flaps is how custom fit they are.
As you can see, really contours to the shape of our vehicle, and even with me shaking at some, you still got that good fit. And the way these are gonna install is really nice. You don't have to worry about drilling any holes because you're gonna use the already pre-made holes inside of your vehicle to help bolt this on. These are gonna be constructed from a thermal plastic resin, so what that means is they're gonna be able to stand up to the test of time, whether when you're driving down the roads or any road salt, gravel, or mud, they're gonna be able to handle that. Overall, I think this is gonna be a good fit for you if you do plan on doing a little bit of off-roading or driving through any snow, gravel, or mud.
As for the installation, it wasn't too bad. If you're going off the instructions, it can be hard to understand with some of those pictures. So if you do need a hand, just stay tuned. We will walk you through it. To start off the installation, right now, we're gonna be showing you how to install the front side, and then afterwards, I'll show you the backside too.
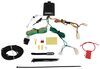
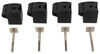
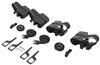
So this is going to be the parts you're gonna need. You're gonna need your mud flap and the hardware that comes with it, and you're gonna need a couple tools. I recommend getting some socket wrenches. You're gonna need a 10-millimeter one and 1/4 inch one. Now if you don't have those, you can use a flathead and a Phillips screwdriver. It is gonna be a lot more difficult. You'll also need a trim tool, but I found that using a flathead for that too is just as easy. There's gonna be a few things you're gonna want to do to get started too. You wanna make sure you have the right mud flap. So if you have the one that says LH, that's gonna go on your driver's side. If you are starting on the driver's side, you wanna make sure your wheels are turned all the way to the left and you clean this off too. We're not gonna clean it just 'cause we're doing this for demonstration purposes, but after we have all that ready, we can get started. Now you're gonna have three plastic fasteners that you're gonna bolt into. Now the one at the very bottom underneath your fender, yes, you're gonna have to remove. And how you can do that is by grabbing that trim tool or a screwdriver and just pulling it out just like this. This next step might be a little tricky, but all you're gonna do is pull that fender forward revealing this hole that that fastener is just connected to. And we're gonna slide this clip through here with that larger area facing up. Just like this. We're gonna wanna line up these holes too so everything's locked in place. And then we can put this back to right here. We're gonna grab that mud flap now and line it up with these two fasteners, so it kind of fits around the contour of your vehicle. You're gonna grab one of your black hex bolts, thread it in by hand just a little bit, just get things started, held into place, and grab your 10-millimeter socket wrench and tighten it down a little bit more. And we don't wanna tighten this all the way down just in case we have to make adjustments. Or we wanna grab that second one, wind up with this hole right here. Just kind of get it on hand tight. You might have to push on that mud flap just a little bit, help you get that angle. This one can be a little more tricky than the first one. Now this one on the bottom is the one that's gonna be the most tricky, and now you're gonna grab a washer and this silver bolt and run it up through there, trying to get everything aligned. Again, you might have to grab onto that mud flap and try to maneuver it a little bit. Once you get it started, at least with your hand, then you can come back through with that 1/4 inch socket wrench and tighten it down the rest of the way. Finally, just make sure you come back through all your bolts, making sure everything's tight, and just make sure you tighten 'em down all the way. I'm gonna give it a good tug test, make sure everything's fitting really well, and if it is, then you can repeat this process on the passenger side. I also recommend turning your wheels all the way to the right side now. The installation of the rear mud flaps is gonna be pretty similar to the front ones only with less steps. So we wanna lay out everything. We wanna have our mud flap itself, the hardware, and then some tools. You'll need that 10-millimeter socket wrench. If you don't have one of those, then you can use a Phillips screwdriver, and you can use a trim tool or a flathead screwdriver. I'm gonna come over to that plastic fastener and just take it off either with that trim tool or in this case, using a flathead screwdriver, just to show you guys that it can be done this way. It won't be as easy, but if you just work with it for a little bit, you'll be able to get it off. This is gonna be the bolt we're gonna be removing on the bottom and we'll be using a 10-millimeter socket wrench. Or if you don't have that, you can use a Phillips screwdriver. Once we get this all the way off, we'll just put it to the side because we will be using it again to put on our mud flaps. And if you get to the point where you can either just pull it out or just take it off by hand. When we're putting on our mud flap, we wanna make sure we have the right one. So if you're on the driver's side, you wanna make sure you have the one that says LH. And to get this on here, we're gonna grab the fasteners or one of the fasteners that came with this kit. What I like to do is put this through the hole first all the way, so it looks like this. Now we're gonna line it up with that hole at the top here where we took out that original fastener, placed it all the way on, and then pushed down on it. Just like that. Then we'll pull up on the bottom of here And then we will reinstall this bolt that came with it. Push it in through the bottom of your mud flap and line it up with these holes, and then you just screw it into place. After when you get it hand tight, then you can grab your 10-millimeter socket wrench or Phillips screwdriver and put it on the rest of the way. Then you'll repeat this process on the other side and make sure everything's a nice snug fit. And if it is, then you can take it out for a ride. But if you liked everything you saw today, that's just a look at the installation and some of the features of the WeatherTech mud flaps on our 2021 Toyota RAV4.
Average Customer Rating: 4.8 out of 5 stars (1379 Customer Reviews)
These premium mud flaps are easy to install and digitally designed to fit your car or truck. Protect your vehicle and your trailer from road debris. Flaps are constructed of durable thermoplastic resin with stainless steel fasteners.Easy to install, fit perfectly,add nice look to vehicle
They fit my 2023 Rav4 perfectly. The color and texture of the plastic match like they were oem.
Did not fit well on the 2022 Dodge Ram 3500. The rear flaps did not quite fit the OEM fender flares on the vehicle. Too tight - not enough clearance to sit nicely against the flares. There was also no hole for the trim fastener so had to drill a 1/4" hole for little plastic fastener - not a big deal. Hoping the front ones fit better, but they were worse. Same story - the "digital fit" flaps did not fit the OEM fender flares. Tried a heat gun to hopefully warm the flap and maybe get them to fit together better, but couldn't quite get it. I'll need to get some longer fasteners, otherwise one bolt and the little plastic tab are all thats holding it on. Maybe if the weather warms a bit...? Def not as advertised.
Just like the description says...easy install, no drill, digital fit. Looks like they came with the truck. Highly recommend.
Delivery was quick. The mudflaps were very easy to install it took me about 15 minutes. Extremely happy with the way they look and no more rocks and debris flying up from my tires. Definitely recommend.

Fantastic product. Very easy installation. High quality. Very fast delivery! Etrailer is the best as always!
Look great! Look OEM. Wish all the hardware was black. And in the front the two screws you pull out both sides, trash go get something a little longer and more girth. etrailer was great the arrived earlier then expected.
holes did not line up with pre existing holes on car
for installation. Very hard
to install. will NOT buy weathertec again
These mud flaps are great! Good Instructions and install went quickly. They look really good and should perform well, protecting the rocker panels and the side steps from mud and stones. Very pricey but good quality. Front Pair.
Took a little effort to get it to match up with the plastic wheel well fender flares but once I did I have not had any issues. Looks somewhat subtle but is pretty effective at stopping thrown debris onto the paint.
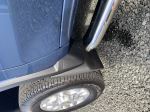
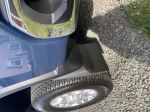
I was apprehensive about buying these as the weather tech company said they would not fit. My vehicle has power running boards and 22” wheels..I researched forums and took a chance. They fit…no problem. See attached photos and video.
Thanks
Great service item was shipped and received quickly. Mud flaps were easy to install.
For someone who is "old school" and reluctant to install plastic onto a machine, I'm impressed with the ease of installation and durability so far. I've put about 7500 miles on them without an issue. And thanks to Etrailer for carrying great products and providing great info to consumers. You folks have a great Business model!
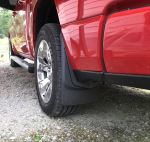
This is a good investment. First, etrailer is a great place to get what you need for supplies! The weathertech mud flaps are a great addition to a raised F-250 with larger tires that pulls. This will provide the rest of the protection I need as well as cut down on debris that the tires throw up at other cars/trucks. Very easy to install and if I want to remove them then I have all the pieces necessary except for the push grommets which I can get anywhere. I think I will leave them on for a while....not bad looking either.
Great product, easy to install, I didn't find the instructions, but was easy to figure out. I would recommend this product
I ordered a set of weathertech no drill mud flaps for my new 2022 Colorado and they fit great and easy to install. Well after a couple of weeks I put on GM flares so I had to order another set for flares. Same thing excellent fit and easy install. Quick shipping and good service.
I ordered Weather Tech mud flaps for my GMC Sierra 1500. The front flaps were easy to install by using existing fasteners installed on the truck by GMC. The rear flaps were slightly more challenging requiring the placement of clamps (integral to the flaps) on the rear fender. The entire installation of all flaps required about 45 minutes. they look great and they will protect my fenders from being damaged by road debris.
Fit my 2020 Honda Ridgeline perfect! Easy to install with easy to follow instructions. Match oem black plastic great. Really complete the look of truck. Very happy customer.
East install on 2023 Thor Compass 23te Motorhome. Fit perfectly. Place some tape on a open end wrench to hole the nut on and you are good to go.
Weather tech always fits and looks good
Good quality. Arrived quickly
Easy to install.
Seems like a solid product. Made in the USA. The instructions were a bit off. So I jumped on the etrailer YouTube account, found the install video. Issue solved. I will say I'm more impressed with etrailer than weathertech. However, nice fit and finish. I would recommend this product.
Good service and product from etrailer, and the mud flaps fit was exact, no issues and easy to install.
If anyone wonders how difficult these mud flaps are to install. You have no need to worry, it doesn’t get easier to install the weather tech mud flaps.
Protect your vehicle in a matter of 30 minutes!
Easy to install great product
Do you have a question about this Mud Flap?
Info for this part was:
At etrailer.com we provide the best information available about the products we sell. We take the quality of our information seriously so that you can get the right part the first time. Let us know if anything is missing or if you have any questions.


Thank you! Your comment has been submitted successfully. You should be able to view your question/comment here within a few days.
Error submitting comment. Please try again momentarily.