
To see if this custom-fit item will work for you please tell us what vehicle you'll use it with.
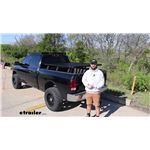
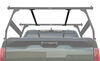
Built for off-road use, this platform rack's large, flat surface lets you carry all types of cargo above the truck bed on your Ram 2500. Mounts to legs that install on the side rails of your bed. Works with many Front Runner accessories.
Features:
Specs:
Note: You should never exceed your vehicle's maximum roof load capacity. Check your owner's manual for weight limits.
 Alternate Instructions
Videos are provided as a guide only. Refer to manufacturer installation instructions and specs for complete information.
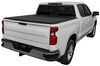
Hey guys, it's Jake here with etrailer. Today we've got my 2013 Ram 2500 and we're gonna be taking a look at, and I'm gonna show you how to install the Front Runner Slimline II Bed Rack. Front Runner makes a lot of racks that will mount to the top of your vehicle that you can see up here on top of my truck. A lot of people don't like to permanently mount their racks to the roof because they just use it during the summer or for a few trips a year. That's when this bed rack's gonna come in handy is you can mount the rails to the side rails of your truck and then if you take the bolts out you can slide this rack off and it's as if it was never there. The benefit of having this type of rack over top of your bed is so that if you ever run out of space when you're going on a long extended camping trip or if you like to go overlanding, you can load your bed up with stuff pretty quickly.
I know that personally from camping. So it's always good to have a lot of extra space. So this platform basically is going to double the size of your bed. The one thing that you will want to be careful with is obviously strapping things down. If you put stuff in your bed, usually you can leave it loose in there, but whenever you're putting stuff on top of this rack they have lots of different tie down point options that you can put on here and make sure that all your accessories on top are safely secured.
There's some other options out there for truck beds, for storage solutions or mounting accessories and typically they're gonna look like a load bar. So basically it's a roof rack or a ladder rack style that's just going to be mounted. Usually for a normal sized truck bed like this, you'll just have two bars that you can mount a rooftop tent to. You can mount bike racks to different things like that. You could also do that with a ladder rack.
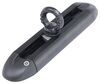
The problem with ladder racks is that typically the bars are very, very thick to be able to haul those heavy extended loads. And with a rack like this, you're going to not only get those two that you would get with the load bars, but you're gonna get nine different mounting locations in these tracks all across the top. The entire perimeter of this rack is gonna have a track that'll accept an M8 bolt that goes in the side here. That's the same thing with these other tracks and we've only got about half the amount of slats that can fit in this. So you can fit a slat in here, in here and all the way down the rack.
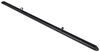
So you can make this a solid platform if you want to. What I like about having that option is that you can move the slats. So if I wanted to take all like these three slats and move them forward into these three gaps, I can do that and then I still have usability inside of this space to be able to reach down haul extended load, stuff like that. So if you ever need to go pick up a one time thing from the store or something, you can take these bolts out, take the slats out, haul your extended loads, and then put your slats back in place. On a lot of overlanding rigs you'll see that people will mount lights and other accessories to their rigs, but typically they're gonna have to drill because the rack itself will use all the holes that the manufacturer has designed. If you decide to not go with any extra slats to go in between, you're still gonna have all these pre-drilled holes perfectly spaced throughout the entire rack. So like if you wanted to mount a couple of lights on here so that you can see at your campsite, I plan to mount several different types of lights on this rack and on my roof rack and those holes are gonna come in really, really handy when I go to do that. The entire rack is gonna be an aluminum construction. The uprights, the side rails, the top, everything's gonna be aluminum so you don't have to worry about rust later on in the future. Speaking of the side rails, this is where it's gonna be essentially a T track with nuts on the inside and they're gonna be track nuts. You can loosen the six bolts on each side and this is what you're gonna slide the rack out of. So if I don't ever want to use it or if it's coming up in winter and I know I'm not gonna be using it for a long time and I don't want it up here, I can loosen those six bolts on each side, drop my tailgate and slide the whole thing out. You will have to remove these caps in order to do that, but this is a little bit extra safety measure so that your rack doesn't go missing. Front Runner makes a lot of really, really cool accessories. The thing I like about them is they went with one theme and that the paint finish on the rack is gonna match virtually all of their accessories. They've got containers that you can mount up here, bike racks, cargo carriers, stuff like that. You can mount all that stuff up here and it's all gonna match. And to me that's really important is so that your whole rig matches. But if you already have accessories at home, like a bike rack that you normally mount to a roof, it's the shape of a T on the inside, but it's gonna accept an M8 bolt and not a T track bolt. So if you have accessories that are T track mountable, you may have to pick up some M8 bolts from your local hardware store and kind of check it out a little bit and see if it will be compatible with your bike rack that you already have. Depending on the length of your truck bed or depending on the size of rack that you're wanting to build, you can see we have three uprights here on my truck bed 'cause I have a 6-1/2 foot bed, or it's technically 6'4. This is a 63 inch long rack, so it's the standard rack which is right here. That's the same size rack that's on my roof, but we have an extension here to make it a little bit longer. If you have a long bed truck, you'll probably want to get an even longer rack and with that you'll get another upright, so you have four uprights and then this back section will be a little bit longer to take up more space in your truck. Now that we've gone over some of those cool details, let's go ahead and pull it inside and show you how to get installed. To get our installation, we're gonna need to mark out where we need to drill our holes for our side rails. These rails are gonna be installed on the side here. So what we do is we need to mark the center but not the center of the whole bed here. What we need to do is from this point on the bed right there, so the usable space, we need to mark that, the halfway point between that and then up here at the front of our bed, you wanna basically feel to where you can't use it anymore underneath, measure side to side. I'm measuring 66 inches, so I've got a mark 33 inches. We're gonna use this as a reference point, and in your instructions it says they want you to measure from this point backwards and forwards, 283 millimeters. Well, I don't have a millimeter tape, so I've got a centimeter tape and we'll just measure 28.3 or 3/10 centimeters. So I'll hold that there at 28 and mark out our spot here. On our rail, we're gonna have two sets of holes towards the back, two sets of holes towards the front. Basically we're gonna use the two most inner holes. Those are gonna line up with the two marks that we just put on here. We're going to line this up the best we can with the top of our bed rail. And then we need to mark out all eight of these holes on the side of our bed rail. And we're gonna take a 4 millimeter drill bit and we're going to work up to a 7 millimeter drill bit. So we're gonna drill these holes out first, all eight of 'em, and then come back with the 7 millimeter. (drill grinding) We'll take our rail, put it on the end of our tailgate. We've got it upside down right now, but we need to peel all this adhesive, the backing off of it, and we're gonna end up sticking this rubber seal to the back. And it's just gonna make it so that we don't have this aluminum rail directly on the side of our truck bed, whether you have the plastic liner or not. So we're gonna stick this to the back. It really just has to hold it temporarily. This is not super sticky, but you can see here these two tracks in the side, that's where these two tracks are gonna go. So just make sure, I found it's easier just to line up the one side and then we'll come back and make sure the other side's tucked in. Any of our holes that are covered up by these rubber slats, they don't line up perfectly. We'll just take our knife, cut a straight line here, straight line here, and then just pop this little piece out. Now we're gonna take our rail, we'll set it up, line it up with our holes, and you're gonna take your flathead bolts that come in your kit, they're gonna slide right in. And you'll take your metal plates that come in your kit. We're gonna line it up with each one of our bolts. And I wouldn't worry about too much about the alignment of the top, when we go to tighten these down, we can do that later. Then you'll take a flat washer, slide it on the back and follow that with an nylon lock nut. And we'll repeat this process until we get plates and nuts on the backside of each one of these two sets of holes. At this point, it's good to have an extra set of hands. We've got Joe helping us hold this rail up where we want it to be permanently mounted. I'm doing it to where the seal up here is right at the top of the bed or just a little bit over. Then we're gonna take a 10 millimeter wrench and a 4 millimeter Allen key and snug these up. (drill grinding) We need to prep our uprights in order to slide 'em through our rails. We're gonna take our button head bolts, put a lock washer, flat washer on it, and then what we can do is slide it through. You want to use these that are across from each other, not the vertical ones because those are what's gonna hold our rack in place. And we're just gonna slide one of these nuts, sort of like a T nut, but it's what's gonna slide inside of our track. We're gonna do this to each one of our uprights. Then you'll need to measure the total length of your rail, which is 63 inches. I just put a tiny little tick mark with a marker at 31-1/2 to find our center. And then we're gonna want to measure, depending on what size rack you're putting on this, we're wanting to mount it to the second to last rails on our platform. So we need to measure 23-3/4 from the center this way and then put a tick mark, and then 23-3/4 this way and put a tick mark. And essentially that will line us up right with the rails that we're wanting to mount this to. Then we're gonna take these and slide 'em into our track and we're just gonna slide it to where the center of each of these brackets is going to be on our marks. We're not gonna tighten those down because we want to make sure that these are gonna line up with our rack first before we go and snug everything up. Now, whichever tracks you're planning on lining up with the uprights that we just put in place, you're gonna take your M8 bolts and you can see these little circle cutouts, they're just same ones underneath. We're gonna slide those bolts into place. You can roughly just slide 'em to the end and we'll want to put two of them in each of the tracks. So we did it on the second rail here and then we're gonna skip two, do it on the center one and then we'll skip two and do it on that other one. Now with an extra set of hands, you don't have to have this many people, these guys just happen to be around the shop. We're gonna lift it up into place and we're going to, as we set it down, try to line those bolts up the best we can. Once you get 'em all lined up, then we can just set it down in place and you can make some minor adjustments later. But once we tighten everything up, it should lock everything into place. On each of these bolts, you wanna put a flat washer and a lock nut. Once we get all our hardware in place we're gonna take our 5 millimeter Allen key and a 13 millimeter socket and snug up all of our hardware. You'll want to snug up these bolts first on the uprights down low. I will tell you we ended up having to get some extra washers for the top. We swapped out the black ones for the silver ones, you just wanna make sure that they're gonna fit your M8 bolts. We put those washers up there and then took the thicker black washers, put 'em down here because the top nuts are gonna get caps anyway, so just covers it up. What we we inchesre having issues with is when we tightened down these bolts, they we inchesre bottoming out before they we inchesre tightening up flat against here. So advice from Front Runner is just to use extra washers wherever you may need them. And we'll want to take our end caps, slide those in place, and then take the tiny screws that come in your kit and sink those in. (drill grinding) Once you get your end caps in place, that's gonna do it for the installation. Well guys, hopefully this video helped you decide whether or not the Front Runner Slimline II Bed Rack is right for you and your 2013 Ram 2500.
Info for this part was:
At etrailer.com we provide the best information available about the products we sell. We take the quality of our information seriously so that you can get the right part the first time. Let us know if anything is missing or if you have any questions.


Thank you! Your comment has been submitted successfully. You should be able to view your question/comment here within a few days.
Error submitting comment. Please try again momentarily.