
Summer Starts Here - Save up to 70%
To see if this custom-fit item will work for you please tell us what vehicle you'll use it with.
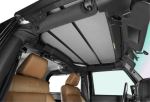
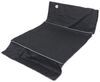
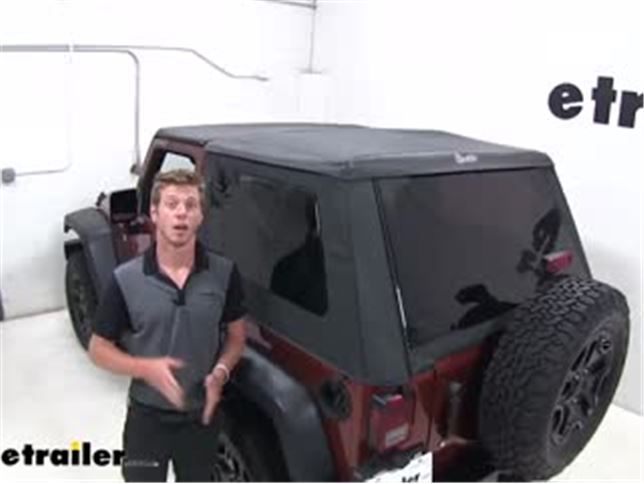
Versatile replacement soft top folds down completely for full open-air driving. A built-in sunroof and easily removable windows provide more driving configurations. Constructed of black diamond sailcloth. Includes mounting hardware for installation.
Features:
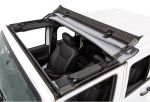
Bestop's Trektop NX Glide soft top offers full coverage with a folding frame that functions like a convertible top. It includes all hardware necessary for no-drill installation and quickly converts from a full, fastback-style top to a Sunrider with the flip of a panel. Sunrider panel includes zippered pockets to store small items. Zipperless side and rear windows are simple to remove, making it easy to convert the Glide into a Safari Bikini.
The Glide is constructed of premium, 3-ply sailcloth. Compared with vinyl and denim soft tops, this heavy-duty fabric reduces road noise by 50 percent, giving you a much quieter ride. The sailcloth maintains its shape in all temperatures, resists mildew, and is treated with UV inhibitors to prevent sun damage.
The Glide lets you keep all your options open when it comes to open-air driving. For maximum rays, the Glide lets you fold back the frame behind the rear seat for the total open-air experience.
If you want plenty of air but less sun, pull out the zipperless window panels and leave the top up for a Safari Bikini-style ride.
For a third option, the top's Sunrider panel can be flipped back to let sunshine into your jeep's cab. The front section of the top, over the cab, folds back in seconds when you release the latches in the windshield channel.
Zippered mesh pockets are incorporated into the Sunrider panel, giving you a place to store small items like sunglasses.
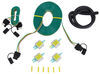
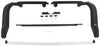
The Glide comes with all the soft top fabric, window panels, and bows for a no-drill installation. It includes an anodized aluminum top arch bar that spans the length of your cab and attaches to your door surrounds to keep the top from sagging. The driver's and passenger's side, OEM-style door surrounds install in seconds and create an excellent seal against the elements.
Tinted vinyl windows are integrated into panels that can quickly and easily be installed or removed. These panels slide in or out without the need for zippers.
The top includes a handy tailgate bar that lets you get to the rear cargo area of your Jeep without opening the rear window.

California residents: click here
Videos are provided as a guide only. Refer to manufacturer installation instructions and specs for complete information.
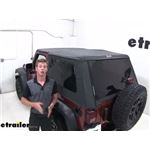
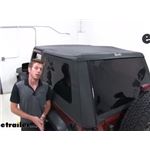
Adam: Hi, everyone, Adam with etrailer.com. Today, we're going to be taking a look at the Bestop's Trektop NX glide soft top for our 2014 Jeep Wrangler.So this soft top does come in a variety of colors. It's going to be also available for the two-door Jeep and also our Unlimited, which is going to be the four doors. Our color options will be blue. We have black, we have red, tan, and beige.So this is the sailcloth material option. As you can see, it's a little bit harder and more so kind of like a vinyl, but we also have our twill types, and that's going to be a little bit thicker and a little bit softer.
But this sailcloth is going to match your OEM look.So we do have three different windows that come with our soft top, and they are DOT compliant, and they come with a nice tinted finish.And with our tailgate bar, we don't have to worry about removing our back window. We'll be able to grab whatever we need and close it. And as you can see, we have a nice weather strip, so we don't got to worry about water getting in there.So we are going to have a decent amount of protection from the elements. We do have this section that folds over quite a bit more than this little ridge here. A lot of customers have complained about having water seeping through, but in all honesty, if you have this properly aligned, there's not going to be any gaps for that water to find its way through.
Even with our door jamb here, we don't really have much of any space for that water to get in there.So there are some different orientations we can put this soft top in, and I'll show you a couple right now. What we could do is take all the windows out. And just by undoing that there, undoing this up top, and then just sliding it out.You can also do it on the sides. So this would be pretty cool for on those hot days. You need a little bit more air inside your Jeep, but the sun's a little too hot for you.
You could take off all the sides, and cruise down the road like this.Bestop did include some cool bags for storage. It's always a nice feature to have a little bit more compartments in your car. But, if we want to do a sunroof version, what we got to do is take these out. And then on both sides, we're going to have this latch, and it does hook to our OEM spots there. And then it is spring loaded, so we can just flip that back, like so, and we got a sunroof.
So this is also a pretty cool orientation to dry with. Wranglers usually don't come with sunroofs, especially with those soft tops. It definitely gives you the option, and you can have a little bit of sun, but not all of it.Or you could also fold this back like a complete convertible top. We are going to have two latches on the inside in here, pull those latches. It's going to release that. You're going to do that on the other side. And then it's going to fold back like so. We can fold this all the way back to basically have a convertible Jeep.So regardless of what your mood is, you have three different modes that you can drive with this soft top. And if you do just want a little bit of sun and not as much wind, you can keep all the windows on and just pop open your sunroof.It's about start raining here, so I'm going to go ahead and lower this down. Get that there. Once we get that, you can get this latch hooked on to that rail. We will have to take this out, actually. And then we're ready to go.A lot of customers have told us that this is an extremely quiet top compared to a lot of those denim cloth tops. So, that's always nice to have a soft top that's not going to be flapping around and making a bunch of noise when you're going down the road.So we do have kind of an overcast day out, so this didn't really get too hot whenever we we're laying it out. I do suggest putting it out in the sun, maybe for an hour or two, just to kind of loosen it up. We we're wrestling with it for a little bit, but again, it never really loosened up, and it will kind of get a little bit more easier as it stretches out over time. And if you get everything aligned up how it's supposed to, you won't really have any issues with water or anything like that. But now that I've gone over some of those features, let's just go ahead and install it on our Jeep.So the first thing I'm doing is just unboxing everything and just going to lay everything out nice like. I just tore this apart, so let's get that soft top out so we can get to all of our hardware.At first glance, I'm actually pretty impressed. This is pretty heavy duty, pretty heavy as well, good material, no scratches or anything. So, so far so good. So let's just keep doing this and start getting our hardware all laid out so we can start the install.So to start the installation, what we're going to want to do is remove all this padding from our bars on our Wrangler. We do have the provided bracket, which we're going to replace this existing bracket. It does look like there was a another soft top on this before, so we're going to remove this and replace it with the one included with our kit.It is just a zipper. You got to zip that all the way up, undo some of this. And then we can kind of work it around these brackets. Luckily, we won't be having to cut any more slits as they already did that for us earlier. You can kind of get this off to the side, and then we can go ahead and take our hex bit and remove this bracket. And this does seem to be the same hardware as the one included, so whatever your preference is, you can either reuse this hardware or just use the new stuff that comes in your kit. It's all preference. So, whatever you would like, you can go with either set.Now, this hardware doesn't look too bad and it's already threaded into those holes, so I'm just going to go ahead and use our hardware that was already in here before. We could take our bracket. It is going to be labeled. Make sure that arrows pointing up, and then we can start threading it in by hand, making sure it's getting in there, and then we can go ahead and torque it down with our wrench.This is going into our frame, so we can get these pretty tight, but be mindful that you don't want to over-tighten them and strip those threads, because then we'll have quite a bigger problem on our hands.Do you give it a decent amount of torque, but again, not too much.Now we can go ahead and take our main bracketing system and fold it out like so. We do have a little circle right here, which is going to fit in this slot. So line up that. It's going to fit in there nice. And as you can see, we do have, these are pre-cut and there's a hole here and a hole here, and this is going to slide around our bar like so, and then we can take these and thread them in through the top and it's going to thread in this bottom notch here.So just put them in like so. Try to get them to thread. You might have to maneuver it a little bit to get that started and get it completely through. Feels like I got it. Okay. Get them both threaded down somewhat evenly, and once they get a little tighter, then you can do them at the same time, just to make sure it's nice and even.Now that we got all that installed, we can go ahead and replace our fabric. And if you do not have holes already cut, just be sure to cut it just so that bracket can slide through as you see there. Start from up top and just put it all back the way it was.Once you get all that done, you can repeat the same exact process on the other side.So now what we want to do is take this middle bar and fit it into these slots on each side. It is going to be an extremely tight fit. And then once that's on there properly, we can go ahead and take this off.Now, we want to take our brackets and come back to the back of our vehicle, and what we're going to do is we're going to feed this back part in first, and then kind of just slip it over this lip here. So once it's in place, all you got to do is kind of just pull it back and that should be good. You can do the same exact thing for the other side.So I went ahead and put our cover on the roof of our Jeep. Be sure to get the symbol facing back and your clamps are going to be facing forward. And the next step is going to be to remove these two screws, as we're about to insert a rod into the back here and secure it down. So remove these on both sides. Now we can repeat that process for the other side.So we're going to lift it up a little bit and there is a slot. I'm trying to find the best orientation to do this. I guess I'm just going to flip it upside down and put it in like so. So what you want to do is get it to where those holes are lined up properly.Now with that rod inserted and those holes lined up correctly, we can take our pan head washer screw, put those in, and tighten them down. Get them pretty tight. You don't want to over-tighten them. Definitely use a hand tool and not a power tool for this. But once you get those tight, we can flap this back around and replace our screws we just removed.One thing I did find to make this a little easier is put your screws in linking this back metal plate to your fabric, and it's going to make it a little easier to get it back into place. It's not necessarily the easiest part, but this definitely helps a lot. Once you get them lined up, you can go ahead and tighten them back down. And you're going to repeat that same exact process for the other side.Now with our top in place, what we're going to do is fasten down this portion of our top. What we're going to do is we're actually going to fold it down and there is a little pin. I don't know if you could see it, but right here, there is a pin, and it should automatically snap into place, and if it doesn't, you can reach underneath and there is a latch down here.So it did just snap into place, and we got to fit this down, and then we can secure this part by pulling this lever, sliding it in that slot and getting it to snap into place. You might have to work with it a little bit, just so it snaps correctly. But as you can see, it will snap into place once it finds that hole. You can repeat that same exact process for the other side.So now we're going to connect this bar right here to the bar that we just installed. You might have to undo the little snap pin up top and down low for this tube to get loose. This is the hole we're going through, so you might have to undo that to access it.So this is the end result. It does bolt to the inside of that bar, and it does sit in that little plastic groove piece a little bit farther towards the back of the vehicle, but I'll show you how I got that done on the driver's side.So what you want to do is you take your hardware here, and we're not going to need these plastic bumpers until it goes through this main bar. So, that's my main objective here. We're going to use this hole directly above the quick pin hole, thread that in.I have found it easier to let it go completely through, as these bumpers are going to seat on the inside of this bracket. So, what you want to do is get it through that bar, insert this plastic piece right there, screw it in a little bit more, and then put your bar where it needs to be. Screw it in a little bit more, and then you can put the last bumper on there, and then we will have a nylon locking nut that'll go on the end of this as well. Get it nice and tight, and then you're going to need to grab a wrench to tighten that all the way.So we do have some back brackets to install. This is what the end result is going to be. We're going to use a preexisting hole that is used for our seat belts. So this is what's going to look like when we're done. The zip ties are just there to kind of just keep this from really moving. This is the orientation we're going to want to use. We're going to use this hole on the actual curvature part of this bracket, with the bolt and the washer on one side, washer on the other side, the rubber boot, and then this nut, and you see there is some teeth on those on this nut, and you want that facing this rubber portion. So let's go ahead and do it on the driver's side.So what this is going to do, you're going to insert it in there, and as we start tightening it, it's going to expand this rubber boot, which is going to make it decently tight inside that hole. So, we do want this curved part to face the outside of our support bar and to make sure that this tab is nice and straight. And once we get that, we can take our tool and then we can start tightening it down. And you can kind of see, as we're tightening this down, that boot spreading out in there. It's pretty tight, but they do say to throw some zip ties over it, so I'm going to do that.Fish it through there. I'm going to put it right on that edge. Do the second one, and then we can go ahead and trim it. And once we get that done, we can then replace our strap.One thing to know, we are going to have to cut this a little bit, just so it will be able to fit through here so we can use this with this completely zipped up. So I just made a little incision there, didn't really take a whole lot. I made it small and kept getting bigger just to make sure I didn't cut too much out. So it's really clean look, and we're still going to be able to use that.Now with those brackets installed, we can take our last piece right here, and we can utilize those brackets by pulling out on that pin and letting it fall back through. As you can see, it does pivot and it's nice and secure.So, what we need to do is fold this back like so, and make sure it's folding nicely. And then we're going to go ahead and strap some of this top down.So we're going to take this little section, it was just flapping down. We're going to stretch it back like so, and there are pre-drilled holes. There are three holes, but in the instructions, it does say just to do these two. So you take your screws that are included in your kit, do those, and then you can go ahead and grab one of your smaller bolts with a little washer, if you can see it, and then there is going to be a nylon bolt on the other side. So I'll just show you how to do that on the driver's side.So I have found it a little bit easier to put these in there beforehand. There are holes already there, as you can see, and we're going to use the two on the innermost point. So I get those started just so they're sticking out a little bit. And then once we do that, we can drape it over like so. We might have to give us a little bit of wiggle room here, disconnect that front, just to get it into place. And these are our holes, and we're going to use these two right here. Get them nice and tight. You don't want to get them too tight, and definitely use a hand tool, not a power tool. You don't want to strip out the inside of that bar.So we are going to take our smaller bolt and our little, tiny washer, put those on there like so, and again, it is a little bit easier to put these bolts through the fabric first, but if you find it easier to do it the other way, go for it. Whatever's easiest. This is just what got the job done for me.So there isn't really any tool that goes with your kit to fit around this tiny, tiny nut. So what I did, I just took the pliers here, held onto it and did take a power tool just to speed up the process, and it got it nice and tight. So, be sure to check and see if you have that size wrench or whatever it may be. If you don't, a pliers does work.Next thing we're going to do is attach our top to our back bar here. So as you can see, we do have some pre-drilled holes on the back end of this bar, and that's where we're going to be going with our flat head screws. So, on top of that, in regards to which section of the top we are going to screw into that, on the back, we have one flap here that has a plastic coating on it. It's not going to be that one. It's going to be a smaller one underneath. What we're going to do is we're going to wrap it around like so, and fold it back, and then we're going to hit those holes I pointed out earlier. So let's just go ahead and get that going.Again, it is easier to get these screws in there before we enter them in there. I don't know why, but it honestly makes this job a lot easier. So once you do that, line them up, and then you can go ahead and start getting those started. It will get easier once you get past your first thread or two, but you are going to have to hold this bar, because it does pivot. As you do that, get it as tight as you can and try to keep that fabric from twisting up on you. So we are going to have six, these three and these three. So that's what's it's going to look like when you're done.So now we're going to attach this little tab on the top part of our soft top. And it's going to go in that third hole that we didn't use when we we're doing these two. So again, I threaded it through this fabric first and then lined it up with the holes, and now I'm tightening it down.It's going to be the same exact installation on the other side.Next, what we're going to do is connect this spring to this bracket, with that hole right there. I have found it a lot easier to fold this first section back to keep a lot of that tension off that spring. So we are going to fish this through like so, because what's going to happen is once it's installed, it's going to slide over all that pretty nicely. So I did end up bending that back a little bit so it goes in there easier, and it is going to fit like so.Before we do anything else, once it's on there, we do want to crimp this down a little bit, just so she won't slide off whenever we're maneuvering this around. Bend that in, just so it's nice and locked into place. You do that for the same exact steps on the other side.Now we're going to fasten this bracket into place. So we're going to take our little machine screw with a washer on the end of it, what we're going to do, we're going to go through this hole and then through this hole as well. And there is a hole right here. I'm going to use that as well, just to secure it in between this bracket and this one. Go like this. So with that in place, we can take our nylon lock nut and start threading it on. And once we get it threaded, then we can come back and tighten it up with the tool.And I am going to hold the back with a needle nose pliers. Get it pretty snug, and then make sure it's adjusted right, and then tighten down the rest of the way.Now we can go ahead and install our foam protective strips. What we're going to do is, as you can see, this little notch out portion is going to go right there, and it is going to stretch across those screws and stop right about there. Take the coating off. Perfect. Line it up on one side first like so, and then we can go ahead and stretch this across like so. Make sure it's nice and in place, and then we can take this one and it is going to go on that lip a little bit and stretch down at the very farthest back part of this plastic housing. So I'm actually going to start up here, making sure I get that edge and carefully place it. It's all lined up. We can give it a little bit of pressure, and that should do a good job of protecting.Now we can take our back window and we're going to take this channel and feed it onto this channel, kind of looks like a little bullet. It'll help it get started. Feed that through. Perfect.Now for our quarter windows. We're going to do the same exact thing as we did on the back window. Just fish it onto here, like so. And then what we can do is we're going to get this little metal pin, we're going to fit it in this hole right here.Once we get that nice and in place, we can take this and snap it onto the back of this bracket right there. And then, as you can see down here, we do have these plastic tabs and that's going to fit underneath our ridge of our Wrangler. And that goes all the way to your front door.Then we can take our back window and fit it into the groove that is on this side post here. Nice and easy.So when installing this back bar, I found that we can just undo this section of our tabs, and as you can see how that goes on. So you're going to feed it in through here. You're going to have the bumpers on the outside, facing the rear of the vehicle, and these are going to be at the bottom, this little gap, facing in. So what it's going to do, it's going to fit into our bracket back here, like so, so you kind of put it in there and you rotate it like so, making sure that both sides does the same thing, and then you can come inside and make sure that both sides we're fastened down correctly. Then you can go ahead and replace these tabs like so.So now that everything is installed properly, all we really need to do is latch it down. So once you fold it back, take this latch. It goes around our factory rail there, and then lock it down into place and place your mirror. We're ready to go.Well guys, thanks for watching and tuning in, and taking a look at the Bestop Trektop NX glide soft top for our 2014 Jeep Wrangler..
Average Customer Rating: 5.0 out of 5 stars (2 Customer Reviews)
Versatile replacement soft top folds down completely for full open-air driving. A built-in sunroof and easily removable windows provide more driving configurations. Constructed of black diamond sailcloth. Includes mounting hardware for installation.Rugged floor mats with a perfect fit. I'd highly recommend them to anyone. Great product.
Finally got a weekend where I was home and it was warm enough to put on my new top! I love this top so far! It makes my Jeep look almost new. It was not hard to put on just tedious. This is the third top for my 2007. I wish I had a garage for to park it in this go around. It is supposed to rain this weekend so we will see how it does then.
Do you have a question about this Jeep Top?
Info for this part was:
At etrailer.com we provide the best information available about the products we sell. We take the quality of our information seriously so that you can get the right part the first time. Let us know if anything is missing or if you have any questions.


Thank you! Your comment has been submitted successfully. You should be able to view your question/comment here within a few days.
Error submitting comment. Please try again momentarily.