
THIS ITEM IS NOT A FIT FOR
2001 Toyota Sienna
EcoHitch Hidden Front Mount Trailer Hitch Receiver - Custom Fit - 2"
Item # EH87SR
Our Price: $528.04
2001 Toyota Sienna
Will this fit?
To see if this custom-fit item will work for you please tell us what vehicle you'll use it with.
In Stock


Need help with installation?
Locate installers near me- All Info
- Q & A (0)
- Videos (1)
- Photos
EcoHitch Front Receiver Hitch - EH87SR
- Front Mount Hitch
- Custom Fit Hitch
- EcoHitch
- 7500 lbs Line Pull
- 750 lbs Vert Load
- 2 Inch Hitch
- Square Tube
Attach accessories to the front of your vehicle with this trailer hitch receiver. Perfect for winches, spare tire carriers and more. Hidden cross tube leaves only receiver visible. Stainless steel construction is sturdy and eco-friendly.
Features:
- Custom-fit, front-mount hitch provides attachment points for hitch-mounted accessories
- Winch, spare tire carrier, snowplow, cargo carrier and more
- No more blindly backing trailer in - just hook it up and drive forward
- Hidden cross tube provides a clean, from-the-factory look
- Easy, bolt-on installation - no drilling or welding required
- Stainless steel construction is durable and rustproof
- Meets SAE J684 towing safety regulations
- Made in the USA
Specs:
- Line pull: 7,500 lbs
- Vertical load: 750 lbs
- Gross trailer weight: 10,000 lbs
- Receiver opening: 2" x 2"
- Pin hole diameter: 5/8"
- Limited lifetime warranty
Hidden Cross Tube for a Clean, Factory Look
The EcoHitch Hidden front-mount trailer hitch is designed to be as inconspicuous as possible. The hitch's cross tube bolts onto your vehicle's frame. No drilling or welding is required. Once the hitch is installed, only the receiver will be visible. This means that your vehicle can maintain its stylish, from-the-factory look, and you won't have to do any major modifications to its body or frame.
Rigorous Strength Testing Ensures Durability
This EcoHitch trailer hitch is tested for durability and sturdiness. Using Finite Elemental Analysis (FEA), individual points of stress on the hitch can be detected and remedied. Designers can accurately test the hitch to ensure that it will meet or exceed SAE J684 standards. The EcoHitch Hidden trailer hitch is carefully researched and strength tested for a durable, high-quality hitch that can resist damage while on the road.
etrailer.com Technical Support
At etrailer.com we're committed to the products we sell, and to our customers. Our experienced and knowledgeable staff are available via both phone and email to address your questions and concerns for the lifetime of your hitch. The technicians at etrailer perform hitch installations on a daily basis, making them a valuable resource for do-it-yourselfers. The one-on-one, personal service you'll receive comes straight from an expert in the towing and automotive field. We've installed it, we've wired it and we've towed with it, so whatever your question, we can answer it.
X7913S Tork Lift Central Eco Hitch Hidden Front Mount Trailer Hitch - 2" Receiver
This Product Fits The Following Vehicles
- 2015 - 2024 Ford F-150
Video of EcoHitch Hidden Front Mount Trailer Hitch Receiver - Custom Fit - 2"

Videos are provided as a guide only. Refer to manufacturer installation instructions and specs for complete information.

Video Transcript for EcoHitch Hidden Front Mount Trailer Hitch Receiver Installation - 2023 Ford F-150
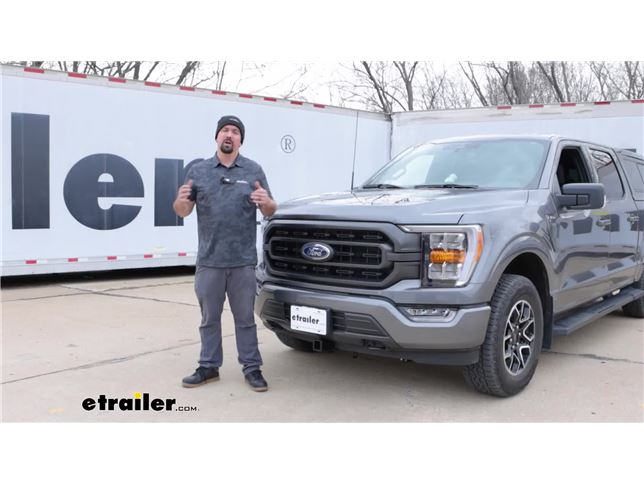
Hello, neighbors, it's Brad here at Etrailer, and today we're taking a look and installing the Torklift EcoHitch front trailer hitch receiver on a 2023 Ford F-150. Now this is what your front hitch is gonna look like when it's installed, and overall, it's a really clean look. We do have our safety chain loops that you can see hanging down here, but the way that the receiver sits right underneath the bumper, I think, is really clean. Some of the other front hitches out there, they really aren't the nicest-looking ones, or they hang down too much. This one, I think, pulls it off really well, and a lot of times people ask, "Why would you get a front hitch" Well, our neighbor today, he lives kind of out in the country, and he puts a snowplow to be able to clear his driveway off when he needs to go to town, or whatever it may be, when it snows. But more and more, we're seeing people utilizing these for things like cargo carriage or bike racks.
You can also put ball mounts on here to move your trailer. Really, any accessory that you would put on a rear trailer hitch, you can do on the front, and it really just adds a whole nother, basically, spot of real estate that you can add whatever you may need. Now this is a two-inch-by-two-inch front hitch receiver, which is gonna be great. It's kind of the standard size when it comes to picking accessories. You're gonna have tons of options available.
Now all of those accessories are gonna stay in place with a 5/8 pin and clip, which is not included with the front hitch, but a lot of times when you pick up accessories, they'll come with one. If you want to leave an accessory on the front for an extended period of time, you might wanna look at getting a locking pin and clip. That way, you can lock that in place and know that no one's gonna walk away with whatever accessory is loaded on. Now we do have some safety chain loops that hang down a decent amount, and in fact, from the bottom of them to the ground, it's coming in right at about eight and a half inches. So just kind of keep that in mind if you're going off-roading, or going up a large incline, those are pretty low.
Now, it's gonna allow you to put a standard S-hook, super easy on there, or even a larger Clevlok-style hook will go on. A lot of times, people will use a front hitch if they need to move a trailer into a tight spot. You can put a ball mount on here and it makes it super easy to get a trailer loaded up. You're not blind firing, you're kind of pushing it into the spot that it needs to go, so having these to be able to hook that up just for that added safety might be key. Now speaking of moving those trailers, you do want to adhere to weight capacities, just like you would a normal trailer hitch.
Now this one has some pretty solid numbers. Most of the torque lift stuff is pretty heavy duty, and this one is no exception. You have a line pole, so if you have your winch mounted up of 7,500 pounds, it's pretty solid, the vertical load is going to be 750 pounds, and then you also have your gross trailer weight rating of 10,000 pounds, which is gonna be the weight of the trailer plus the accessories loaded up. So if you're moving, you know, any trailer around, you're gonna have plenty of capacity, but any of your accessories with that 750 pound vertical load, I really don't worry too much that you're gonna go over that. So if you're putting a large bike rack or cargo carrier loaded up, you shouldn't have any problems with that. Now as far as the installation goes on this hitch, it's actually pretty easy. It's no drilling required, and you're gonna fish wire hardware into the frame rail that's gonna mount up our side plates, and that's gonna create a nice pocket for it to slide that cross member in, and it holds it up, which is really cool. And then you just simply bolt it all down, torque it down, and you'll be ready to go. It can definitely be done in your driveway or garage. I would say give yourself maybe an hour and you'll have it knocked out. The trimming portion, it kind of depends on your truck as far as maybe trim, our air dam was slightly different than the instruction manual, and I'll definitely allude to it in the installation portion, but I would always try to mock it up before doing any trimming. Some of these instructions, these we inchesre decent, but our air dam was different, so just making sure that you get the cleanest cut possible, and the best way to do that is mock it up before cutting. Other than that, super easy, so let's take a look at the installation so you can get your front hitch installed. Originally, our neighbor had a Draw-Tite hitch installed, and yours is gonna be a little bit different than what we have going on here. So this is already trimmed out on ours, so what you're gonna wanna do is refer to the instruction manual. Something also that I noticed was in that instruction manual, it's set up for an air dam that has active air. So if you do have that, you're gonna follow the instructions, make sure you get that separated. And also, theirs was a slightly different style, there was a few shapes that were kind of on the bottom that they used as a reference. Ours is different, I think it comes down to the trim level of the truck. So if yours is like this style here that doesn't have those shapes, then I'll be giving you the measurements to get a perfect fit once it's already on, and we're gonna see how it sits. So to begin the installation, for our purpose, we're gonna go ahead, we're gonna grab our hardware, and start fish wiring things in. So we're gonna take our fish wire, and the coiled end, we're gonna start by feeding this through this lower hole to create a mounting point for our hitch. So we'll take this and feed that through, and on the frame, there's gonna be a large hole on the outside as well as the inside. So whichever way you're wanting to use it, that's totally up to you. But feed the coil through, don't pull it all the way through, and what we'll do is we're going to feed a plate washer, the smaller one, and then the star washer over the coiled end. And you can just kind of drop these into the frame rail. And once you have those in place, we're gonna take our two-inch bolt, the larger of the ones in the hardware that comes with it, thread that onto that coiled section, and then you're gonna feed this through. Once you kind of jostle it around a little bit, you should be able to get this to pull through. Now save your fish wire, just uncoil it here because we're gonna be reusing it to get our other spots to have their hardware in place. Now next, we're going to to get our hardware passed into the hole that's kind of right underneath the body mount, and so what we'll do is we can feed this one down through these access holes here, and that should work. So it's gonna be same orientation of hardware, so we have our spacer washer there, our star washer, and then we can get our bolt fed on here. Now we're gonna leave this fish wire attached. The kit comes with two of the fish wires, and we're gonna focus on one side at a time, and leaving the fish wire basically just allows us to make sure that this doesn't drop into the frame while putting up our side plate. So just make sure that it passes through, but you can leave this kind of in place like this, and once we get that plate in, we can pull that through. So leave that there, grab your other fish wire, and then we're gonna get this larger hole fed in with the hardware as well, and we'll be leaving that fish wire on. (metal clattering) And we're gonna take our side plate, and this is gonna go on A and B, we'll be bolting those up to these. But before we get that in place, we're gonna wanna grab our larger spacers. These are the three-inch ones, and we're just gonna feed this on our coil, on the straight end here, and we're gonna keep these vertical. Ideally, the long edge should be vertical, so this should allow us still to pass this through. So at this point, what you can do is get that bolt kind of fed through here. (metal clattering) Now those plates may move, this one's kind of wedged here on the body mount, but that top one might move around, so as we start to get our hardware tightened down, just make sure those stay vertical. And what we'll do is we'll take our corresponding fish wires and feed them through. So this opening for the cross member should be towards the rear of the vehicle, so just have it in this orientation. (metal clattering) And then what we'll do, to make this easier, I pull down on this to keep pressure on our bolt so it doesn't slide back in. Undo your fish wire here, and we're gonna take a flat washer, slide it on here, a split washer, and then, finally, our nut. We're gonna do the same orientation on this side, and again, double check to make sure that these are staying vertical. Now when getting your hardware in place, you're gonna wanna just get it started. You don't wanna tighten it down because you want that wiggle room. That way, we can slide that crossmember in later on. So just make sure that it's gonna hold itself in place, and you'll be good. Now at this point, we're gonna just hop over to the passenger side and we're gonna repeat the same process with that side plate, so go ahead and get that installed. With both sides loosely installed, we're gonna take our fish wire and put it on the bolt that dropped down through the frame. And this is gonna make sure that when we raise the hitch up, it's not gonna push it back up, so go ahead, feed that on both sides. Now you might want an extra set of hands here to get this in place, but we're gonna take the fish wire, pull it through the top portion of our hitch on both sides. And this is why we left the side plates loose, because we're gonna get this to slide over here, and that should kind of support this, making it easier to get our hardware in. So just kinda guide this up. (metal clattering) Now, when raising it up, it is kind of tight, so I definitely recommend having an extra set of hands. I did it by myself. It's pretty tight, so just kind of push that up and open those up as necessary, and then once it kind of drops in place, it is gonna hold it up, and we have these bolts feeding through, so we're gonna get these started, just to make sure that it stays in place. So we'll pull off our fish wire, and then we're gonna put a flat washer, a split washer, and then a nut here. And we'll do that on both sides. Now, I got my hardware started, we're gonna leave it loose, we wanna make sure that everything's gonna align properly. So same thing, we're gonna leave our hardware loose where we attach our side plates to our cross member, and all of that's gonna take place by using our bolts, our split washer, and a nut. Now take the head of the bolt, and make sure that's facing towards the outside, and so we should have our nut on the inside here, and we may kind of have to move it around a little bit to get it to a line, or use a screwdriver to kind of pry this in to where it all gets in place, but there's gonna be four on each side, so we'll go ahead, we'll get these in place. So we officially have all of our hardware in. Now we're gonna be tightening it down in a certain sequence to make sure that it tightens up properly and everything's gonna be good. We're gonna start with the vertical bolts, which will start to draw it up. Now, we're gonna come back with a torque wrench after tightening these all down. So three-quarter inch will take care of it. On this section, it's pretty tight, you may need to swivel if you're using, you know, a ratchet or an impact, anything along those lines. I'm just gonna use my ratcheting wrench here to get this snug down. (wrench clicking) And we're gonna want to go ahead and get these ones torqued down before really heading to any of the other hardware. Again, it's just gonna draw everything up nice and tidy. Now, it's gonna be tight here. You may get a swivel on here, but with the torque wrench, you really don't wanna add that into the mix, it takes away from the true torque. So what I'm gonna do for this one is I have a crow's foot attachment, and this is gonna allow us to kind of get in there and get this torqued down properly. Torque settings are found in the instruction manual, so refer to those and we'll get these torqued down. (metal clattering) So now we're gonna focus on the two bolts that are horizontal in the frame, we're gonna get those tightened and torqued down. So I'll snug these down, it's a good chance to check to make sure that your washers are aligned properly before tightening down. (wrench clicking) And then, finally, we'll tackle the four on each side. Now you're gonna need a wrench here to hold that in place as you tighten it. (tool whirring) And then we'll come back, get these torqued down as well. (tool whirring) So with everything torqued down properly, you officially have your front hitch installed. Now, if you did follow the instructions, they have you take that air dam off and then trim it, and I mentioned that ours was already trimmed because there was a different front hitch here previous, and it works out really, really well as far as where it's trimmed here. Now, I'll give you those measurements. So widthwise, we're looking right at about three and a quarter, so get that centered up. And just measuring from this flat side out, we're looking right at about right at three inches. So if you follow that measurement, it's gonna work really well if you have this style of air dam. So at that point, you can go ahead, get your air dam put back in place, and then all that's left to do is load up any accessories that you want on your front hitch and hit the road. And that was a look at installation of the Torklift EcoHitch, front trailer hitch receiver on a 2023 Ford F-150.
0
0
See what our Experts say about this EcoHitch Front Receiver Hitch
- EcoHitch Trailer Hitch For 2015 Ford F-150Yes, we do! The X7913s hitch is our EcoHitch item # EH87SR. We just use a different part number. This front hitch is confirmed to fit the 2015 Ford F-150.
view full answer... - Where Does the Receiver Sit for the EcoHitch Front Hitch on a 2017 Ford F-150?The 2" receiver for the EcoHitch item # EH87SR sticks out right through the middle of the air dam. I have attached a picture below that will show you what this front hitch looks like once installed. The EcoHitch Hidden Front Mount Trailer Hitch item # EH87SR has been confirmed to fit all models of the 2017 Ford F-150 including the ones with the 3.5 EcoBoost engine. This hitch has a 10,000 lbs towing capacity and a 750 lbs vertical load limit/tongue weight.
view full answer...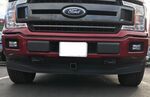
- Will Front Electronic Air Dam Still Work with Front Hitch Installed on a 2023 Ford F-150The front air dam on your 2023 Ford F-150 Platinum will actually need to be removed to be able to install any of the front hitches. So yes, the front air dam will no longer be operational once you have the EcoHitch Hidden Front Mount Trailer Hitch Receiver # EH87SR installed. Attached is an installation video as well as a photo of this hitch installed for you to check out.
view full answer...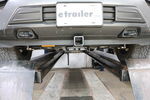
Do you have a question about this Front Receiver Hitch?
Info for this part was:

Written by:
Lindsey S

Written by:
Justice A

Video Edited:
Dustin K

Test Fit:
Bradley B

Video by:
Samuel H
At etrailer.com we provide the best information available about the products we sell. We take the quality of our information seriously so that you can get the right part the first time. Let us know if anything is missing or if you have any questions.
Product Experts Available Now!
Call 1-800-940-8924
Thank you! Your comment has been submitted successfully. You should be able to view your question/comment here within a few days.
Error submitting comment. Please try again momentarily.