
Summer Starts Here - Save up to 70%
To see if this custom-fit item will work for you please tell us what vehicle you'll use it with.
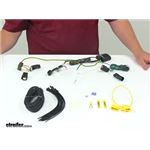
Quickly and easily install a 4-way trailer connector on your vehicle with this custom wiring harness. T-One connector plugs directly into existing wiring. Powered ModuLite reduces strain on wiring system.
Features:
Specs:
Installation
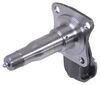
This custom-fit T-One connector plugs into your vehicle's wiring harness, which is located behind the driver's-side and passenger's-side tail lights. You will have to remove the tail light assemblies to access this harness.
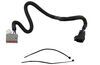
Once you've plugged in the T-connector, run the hot lead up to your car battery. Connect the lead to the included fuse holder, and then connect the fuse holder to the positive terminal on your battery and insert the provided fuse.
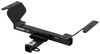
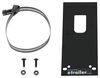
Once installation is complete, the 4-way flat connector will be stowed beneath your vehicle, near the trailer hitch. A mounting bracket (sold separately) is recommended to keep the connector secure.
It is recommended that you use a small amount of grease on all electrical connections - the plugs on your automobile and the 4-pole connector itself - to help prevent corrosion.
A ModuLite power module is built into this T-One connector. With a ModuLite, your trailer's lights will be powered without overloading your vehicle's electrical system. Because the module draws power directly from your car's battery and bypasses the electrical routes that are used by a basic wiring harness, there is virtually no draw on your tail light circuits.

California residents: click here
Videos are provided as a guide only. Refer to manufacturer installation instructions and specs for complete information.
Connor: Hey guys. Connor here@ at etrailer.com. Today, we're going to be taking a look at the Tekonsha T-One vehicle wiring harness for our 2020 GMC Terrain. Our Tekonsha T-One vehicle wiring harness is going to be an excellent option here for our Terrain. That's going to provide us with a 4-pole trailer connector, which is the most common and standard for the smaller to medium duty trailers.Now the 4-pole connection is going to have 10 for the ground, a pin for the running lights and then two other pins, one for the left side stop and turn, one for the right side stop and turn. And again this is going to be suitable for most small to medium duty trailers.
The larger trailers is where they get into the seven ways where there is a charge line for the battery. There's also a brake output circuit; however, since we have a smaller SUV here, this 4-pole is going to be a perfect option.So our Tekonsha T-One vehicle wiring harness is going to be a plug and play installation because it simply splices in behind the tail lights using the factory plugs. As you can see here, we have our connection on the outside of the vehicle. There's going to be two ways we can secure this. Number one, we can secure it to the safety chain loops with the included dust cap, just like so.
And then the other way is to get a no drill mounting bracket, which we sell at etrailer.com and secure it permanently to the trailer hitch.And keep in mind, we do have our extra wire right here, which could easily be zip tied behind the hitch tube depending on how much we need to connect to our trailer. So in regards to the installation process, this is going to be something you can do at home. I wouldn't say it's challenging by any means. It's just going to take time and some patience to do. We don't need any special tools or anything.
As I said, it's going to be a complete plug and play installation. So I don't think you should worry about having to do this yourself or making any permanent modifications to the vehicle.So now that we've gone over some of the benefits and features, let's show you how easy this is to install yourself. So to start our installation today, we need to remove the tail lights on both the driver and passenger side. Because we're going to be teeing into the circuits behind the tail lights for our trailer wiring harness.So the first step to remove the tail lights are we have these two covers here on the top and bottom, which need to come out because they're hiding these screws that can allow us to remove the tail lights. So I want to pry that away just like so.
And then we can reveal two T10 Torx bits. We're going to be using a T15 bit. The instructions say that's a T10, but we found it's a little bit larger. So we need to remove both of those.We can pull the tail light away from the vehicle. Keep in mind, we need to pull straight back towards us because they're just going to be some alignment tabs, which are holding the tail light into the body here that we need to be sure we don't break. I've always found it easiest to rock it back and forth to free up the pins a little bit. And then we have to have a little bit of force, take it out like so. Here are the alignment tabs I was referring to earlier, one on the top, one on the bottom. You can see the parts of the vehicle.Once we have the tail light removed, we need to remove one connection here/ in order to do this, we need to pull down on the locking tab. We can depress the center, pull out like so. Once we have our tail light off and our connection removed, we can go ahead and repeat this process on the other side.So our next step here, we're going to take part of our T-One wiring harness and we're going to have to route it up underneath through our bumper in between the body here, so we can attach it to the connector for our tail light. And in order to do this easiest method is going to be to take a pull wire, which you can see here. We're just shooting a piece of airline tube.Anything you have similar on hand will work as well. So what we're going to do is we're actually going to come through this hole here. So I've looked through here and I can see the ground from the top here. So I know we have an opening here. It's not a very big opening, but it's going to have to work. So we're going to take our pull wire and we're going to try to feed it down through that hole, see if we can get it to come out on the bottom where our opening is.We may have to guide it a little bit. So now we can come up underneath here and grab our pull wire. So now we're going to take our set of connectors here with our yellow wire. The yellow wire is going to be for the driver's side. And again, as we mentioned, we're going to tape this to our airline tubing, and we want to have as small as a footprint as possible. Because we are going to be sneaking this behind the rear bumper. So we may actually be better off separating any connectors like that.Just like that. And now I can begin to go up top, pull our wire through, and try to get the connector up behind the rear bumper where we need it. So you can see now we have one of our connectors, do our best to fish the other ones through. You may need to come underneath to make sure that's not catching on anything. So now we have the connector out here. You can go ahead and remove our pull wire.Once that's removed, we can go ahead and make our connectors from the vehicle to our T-One harness here. You can see here there's two tabs on the lock. Now we can just plug our two connectors in till we hear it click, press down on our locking tab. We need to make our connections for the passenger side, which is going to be through this green wire we see here. So essentially, we need to find a way to route this under back behind the rear bumper here over to the passenger side.So just going to reach back here and come around this exhaust hanger bracket up back behind the bumper here. We'll give you a better shot of this once we get everything secured. Just going to feed it through the best that I can for now. Making sure I am well clear of the exhaust piping. Now I'm going to bring it over here, I'm going to just have it rest on the exhaust for now, that's obviously not where it's going to be resting in its final position because we can come back on the passenger side with our pull wire technique we used earlier. So we can get the correct connector up to the passenger side tail light port.So we're just going to go ahead and reinstall these for now. Again, we're going to line up the matching connector from our T-One wiring harness with our tail light housing here. And now we can go ahead and reinstall the tail light back on the vehicle. So a little tech tip we have for you when you're reinstalling your tail lights on the vehicle.So we obviously have an extra connector here as well as this little block here, which is going to create some troubles when we're trying to push the tail lights back onto the vehicle. So what I've found is a way around this is we see the little factory connector here is attached to a plastic tab on our tail light housing with a little clip there. What we're going to do is we're going to go ahead and remove that and then we're going to stuff all these connectors back behind the bumper here.Push those down in there. That way we're going to have a lot more room when we go to reinstall our taillight housing. Just line everything up. Two alignment tabs, once that's in line just go ahead and push the tail light housing back on until it's seated in place. We're just going to reinstall our Torx bits here. We don't want those to be super tight. You can just put our cover back on.Just like that and we have one more at the top here. So the next thing we're going to want to do is we're going to mount our converter box, which you can see here. In order to mount this, we have this piece of two-sided tape, which is included with our kit. Peel the backing off of it. One side, place on the back of our converter box. Then we're going to hold it down, press firmly to make sure we get good adhesion.Once we have that, go ahead and take the other side off the backing. We can find a place to mount it, but I think a good location will be hard for you guys to see. But to directly to the side of this frame rail here, I'm going to hold it up against that. I'm going to hold it for a couple of seconds to make sure it adheres properly.So one of the number one fail points we have these tail light wiring harnesses is the converter box coming loose from the mounting surface dangling around, and then the wires pull out from the circuit boards or quits working. So what we're going to do is for our converter box here, we're going to use two points of attachment. Number one, the adhesive backing we showed you and number two the Tekonsha converter box, has a tab at the top that we can use an additional self-tapping screw. So we're going to go ahead and do that as well just for extra security. As you can see here, we have our converter box mounted to the side of the frame rail here, and then we have one self-tapping screw in the top as we mentioned earlier.The next thing we're going to do is we're going to secure our green wire, so we don't have to worry about it hanging down. Now the green wire was going to be used for the T connector on the passenger side. So we want to make sure to avoid any moving parts or hot parts, such as our exhaust. So we're just going to take some zip ties which come with the kit. We're going to try to secure the green wire, some existing wires, whatever we can really to ensure it doesn't droop down below the bumper while we're driving.So the next thing we're going to do is we're going to route our 4-pole, so the location we think we're going to want to secure it, just so we can get it out of the way for now. We don't have it mixed up to any of our other wires, so I'm simply going to come across the trailer hitch here. Yours is obviously going to look a little bit different if you don't already have your hitch installed. And then I'm going to come out right below our center panel here around the safety chain loops.Because generally, if we don't have a permanent bracket mounted, we use our dust cap to secure it to the safety chain loops. So just to give you a better view of how we routed our green wire, you see we have part of the factory wiring harness that I tied off to, then I just have it ran straight across. There is a hole in the brace here, which I put a zip tie through to secure the green wire. And then I went up and over this exhaust hanger bracket.So you can see here, I zip tied it to some wires on the bumper here to keep it away from our exhaust pipe, and then it goes straight up into the passenger side tail light housing. So you can see here we just ran a self-tapping screw on the other side of the body to ground our converter box here.Now depending on if you use an extra screw to secure the converter box, you may or may not have this extra self-tapping screw, but we do sell it here at etrailer if you need one. We have the power wire running from the converter box. We've already went ahead and ran the power wire up to the battery. We're going to show you the route we took.So here's the power wire that came with our kit. We went up and over the sub frame here and then the mount for our coil spring, there's going to be two holes on either side. We used a zip tie so we could route the power wire over the mount for our coil spring here so I don't have to worry about it getting in the actual coil and causing any damage. I know it's a black wire, so it's hard to see.So do my best to point it out. But here we have the power wire continuing up here up over our trailing arm, to back half of our sub frame and we have it tied off right here. And now we're just going to follow some lines that are going towards the front of the vehicle. It's going to be tucked in between the frame rail and our gas tank here you see it come out over here, have a zip tie about every six inches to a foot or so I'd say.And so you have the brake lines here, which I have it tied to. Now if you'll notice this section isn't normally open. There's a panel that you have to take off beforehand, which is going to be held on with some 10 millimeter screws. It's really easy to take off. So we went ahead and removed that, so we have access inside here to our brake lines. We can just continue following our power wire.It's kind of hard to see here because it's blended in with the brake line, but you can see you we're just following the brake lines back, putting a zip tie every six inches to a foot or so. Have a zip tie here. Have another one here and then I came over here on the front. We've gone over the power steering pump as well as the sway bar link. And I'll show you we haven't zip tied once more up here to a brake line running up to the brake booster.We fished our pull wire down from the top of the engine nay around where the coolant reservoir and brake booster are, down in between the opening we have here and then we went ahead and taped it to our power wire, so then when we come up top, we can grab the other end of our pull wire, pull it through and our power wire is going to come along with it. So before we pull our pull wire up or after it doesn't matter. We want to make sure we go ahead and make our power connection to the converter box here. So we're going to use our butt connector, which is included with the kit. We're going to crimp it on the pre-stripped power wire portion coming from the converter box just like so.We're going to give it a nice little tug to make sure it's held on there. Now we're going to take the other end of our power wire here. We're just sort of going to loosely see where we want to route it. Looks like we have some excess, so go ahead and trim that off about here. I'm going to strip the end of it, another quarter inch of this jacket off. I'm going to attach it to the other end of our butt connector there. And again, I'm going to give it a good little tug on the wire. Let's make sure our crimps held. So this is actually a heat shrink butt connector. Since it's under the vehicle, we want to go ahead and heat the cellophane around the wire here, so it has a nice watertight seal.So if you have a heat gun, you can use this or if you have a lighter, we could use that as well to seal this in. Now we can come to the front of the vehicle here and grab our pull wire. Pull our power wire up into the engine bay. We need to remove the cover from our positive terminal on the battery. We're going to remove this nut, so we can use a ring terminal to attach our power wire. So the first thing we're going to do is we're going to trim our excess wire here. That should be good. Pull this tight.And then we're going to take our wire stripper here. We're going to strip some jacket off the end of our wire here, about a quarter inch is all we need. Once that's done, we can go ahead and take one of our butt connectors, place the wire on, and we can crimp it down like so. Give it a good tug. I'll set that back here, so we don't lose it. We can take our fuse holder, which is going in the kit. So this needs to be about six inches from the positive battery post. So we're just going to cut this here like so. I'm going to take one end, strip it like we've been doing this far. So one end is going to go to our power wire. And the other end is going to get the ring terminal, which attaches to our positive battery post.Once that's on there nice and secure, go ahead and place that on the positive battery terminal. Take our 10 millimeter socket ratchet here, just tighten down that terminal, so it's nice and snug. We can go ahead and close our door and the final step here is we're going to insert our 15 amp fuse into the fuse holder.Now that we have everything hooked up and installed, we can go ahead and test our lights. We're using this 4-pole tester, which you can pick up here at etrailer or if you have your trailer nearby, that will work as well. We're first going to start out with our brakes. Our right hand turn signal, our left hand turn signal and finally our tail lights. So now that we've tested our wiring, we made sure everything's working correctly. That's going to do it today for the Tekonsha T-One vehicle wiring harness for our 2020 GMC Terrain.
Average Customer Rating: 4.9 out of 5 stars (50 Customer Reviews)
Quickly and easily install a 4-way trailer connector on your vehicle with this custom wiring harness. T-One connector plugs directly into existing wiring. Powered ModuLite reduces strain on wiring system.The trailer hitch and the custom wiring kit look and fit great.
Had it installed by a professional near us.
I ordered the wrong wiring harness. When I contacted etrailer customer service, they very courteously arranged to send me the correct one for my vehicle and for the return of the incorrect one.
Customer service as it should be!!!!
4 star review reason being the male and female ends on the harness didn’t exactly line up correctly so I had to break a fin off of each side for them to slide in smooth and click together. Watching the Video before hand on the install was super helpful I had it done it 2 hours. But the fact I had to break the female end fins off on my connectors didn’t make me too happy. I should of took a video of myself doing it to prove it
great customer support! will buy all my trailer products from you guys
I ordered this, but discovered that I didn't need it after all. The 2018 GMC Terrain that I bought actually had the factory wiring so I ordered the Curt C56375 instead - cheaper and easier to install. I only found out that I had the wiring when I took off the bumper fascia and saw the factory connector. There was no mention of this on any of the GMC paperwork or invoice from the car purchase.
Easy to install. Glad you had video instructions available.

Product was plug and play. Easy to install and works great.
Everything was great!, except one thing. I ordered on the 27th of July. And, yes it shipped that day, well maybe. However, it went to washington state instead of straight down to Alabama. That's my only gripe. The video was excellent. Had it installed within an hour. Excellent support!!!
Great kit simple installation. Actually did the installation while at at camp ground camping fast and easy excellent support and how to video
YOU DID A GREAT JOB IN GETTING MY ORDER ON TIME AND CORRECT!!
THANK YOU LAUREN A.!!!!!!!!!!!!!!
Worked exactly as shown in video! The hardest part of the installation is running the power cable under the Terrain to the battery, but the Q&A said that is the right way to do it and the video showed where and how to run the cable. Unfortunately, in February Michigan it is a bit cold on the floor of the garage, so it took twice as long to do. I wish there was a correct way to connect to the rear fuse box, that would make installation a snap for the Terrain!
Product as described. Easy installation.
If you have a good mechanical/electrical background the install is very easy and straightforward. The product works as it should and took just under 1 hour to install.
Exactly what is needed for 2019 and up electrical systems
Great service
Quick delivery. Pretty easy install. Videos are very accurate and helpful.
You did a great job. Hitch is on car and fits great. Would order from etrailer again.
Excellant fit and easy installation.
You folks really have a handle on your business practices. Keep rocking it !
Installation went smoothly. Had everything we needed!
Great product
I had it professionally installed ( $150.00 ) but it works great !
Spectacular company! They communicate well, and deliver the product they advertise. Class “A” vendor you should keep in your contacts!
Easy to install and works like a charm!
Great prices products and customer serv ice
Info for this part was:
At etrailer.com we provide the best information available about the products we sell. We take the quality of our information seriously so that you can get the right part the first time. Let us know if anything is missing or if you have any questions.


Thank you! Your comment has been submitted successfully. You should be able to view your question/comment here within a few days.
Error submitting comment. Please try again momentarily.