
Hopkins Plug-In Simple Vehicle Wiring Harness with 4-Pole Flat Trailer Connector
(61 reviews)
Price: $72.62
In Stock
Hopkins Plug-In Simple Vehicle Wiring Harness with 4-Pole Flat Trailer Connector
Item # HM11143274
Retail:$102.09
Our Price: $72.62
You Save: 29%
Will this fit?
To see if this custom-fit item will work for you please tell us what vehicle you'll use it with.
In Stock
Thank you! Your comment has been submitted successfully. You should be able to view your question/comment here within a few days.
Error submitting comment. Please try again momentarily.


- All Info
- Reviews (61)
- Q & A (0)
- Videos (4)
- Photos
Hopkins Custom Fit Vehicle Wiring - HM11143274
- Custom Fit
- Trailer Hitch Wiring
- 4 Flat
- Powered Converter
- Hopkins
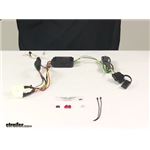
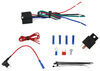
Quickly and easily install a 4-way trailer connector on your vehicle with this custom harness. T-connector plugs directly into existing wiring. Powered converter reduces strain on wiring system.
Features:
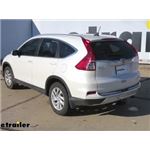
- Provides a 4-way flat trailer connector at the back of your vehicle to power your trailer's signal lights
- Compatible with 5-pole, 6-pole and 7-pole adapters (sold separately)
- Connects quickly and easily
- Locate connection points in rear cargo area
- Plug in connector
- Includes a tail light converter to ensure that your vehicle's wiring matches that of your trailer
- Powered module pulls power directly from battery to avoid overloading vehicle's electrical system
- Protective connection terminals resist corrosion
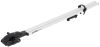
- Comes with dust cap for 4-way flat connector, cable ties, and terminal grease packet for electrical connections
Specs:
- Maximum amperage:
- Stop/turn lights: 3 amps per circuit
- Tail lights: 6 amps per circuit
- 90-Day limited warranty
Installation
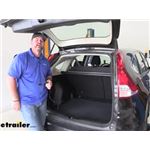
This custom-fit T-connector plugs into your vehicle's wiring harness, which is located in your rear cargo area on the driver's side. You will have to remove the rear threshold, cargo covers, and some interior paneling to access this harness. Once you've plugged in the connector, open your fuse compartment and locate the fuse positions indicated in the instructions. Then insert the included fuses.
Once installation is complete, the 4-way flat connector will be stowed in your spare tire area.
It is recommended that you use a small amount of grease on all electrical connections - the plugs on your automobile and the 4-pole connector itself - to help prevent corrosion.
Powered Tail Light Converter
A tail light converter is built into this T-connector. This converter is a battery-powered unit that bypasses the electrical routes that are used by a basic wiring harness. As a result, there is virtually no draw on your tail light circuits.
Because most trailers run on a two-wire system - wherein the brake and turn signals are carried on one wire - the separate brake and turn signals from your vehicle's three-wire system need to be combined so they are compatible with the wiring system of the trailer. This converter combines the brake and turn signal functions of your automobile so that they run on one wire to properly activate your trailer's tail lights. Note: This will not affect how the tail lights on your vehicle operate.
11143274 Plug-in Simple Hopkins T-Connector with 4-Pole Trailer Connector
Installation Details
This Product Fits The Following Vehicles
- 2012 - 2016 Honda CR-V
California residents: click here


Video of Hopkins Plug-In Simple Vehicle Wiring Harness with 4-Pole Flat Trailer Connector


Videos are provided as a guide only. Refer to manufacturer installation instructions and specs for complete information.


Video Transcript for Hopkins Plug-In Simple Vehicle Wiring Harness Installation - 2014 Honda CR-V
Shane: Okay guys, Shane here with etrailer.com. Today I have a 2014 Honda CRV, and I want to walk through how to install the Hopkins Simple Plug-In Wiring Harness. So this wiring harness is going to plug directly into factory plug behind the driver's side rear panel. It's going to have a converter box. The converter box is going to protect the factory wiring from any backfeed if there's a wiring issue with the trailer or anything else you may have this hooked up to. It's going to give you all of your proper lighting functions, brake lights, turn signals, and running lights.
It's also going to come with a nice dust cap. So when you're not using it, put the dust cap on. It's going to help protect your connections from dirt and debris. It's going to give you three amps per circuit for your stop and turn signals. Six amps per circuit for your tail lights.This is designed to live inside of the vehicle.
So when you're not using it, simply roll it up, put it right down with your spare tire until you're ready to use it next time. When you're ready to use it, simply pull it out, lay it over top the back here. You want to make sure it's going over the rubber piece. Stay away from where your hatch connects there and then close down your hatch, hookup, whatever you're hooking up to. This is going to be fuse protected.
You're going to have two fuses. You're going to have one fuse that is behind the panel with the converter box, and you're going to have one fuse that goes into the fuse panel up underneath the dash. Now that we've gone over some of the features, let's walk you through how to get it installed.Start of our installation. We're going to move our floor coverings and then we're going to remove this seal panel here. We're going to have a fastener here and a fastener here we need to remove.
What we're going to do is we're going to push the very center and that allows you to pop that fastener out. And we're going to take this, pop it up, and just work your way across. And we'll set that aside.Now we're going to start removing the hardware to loosen up the panels on the driver's side. We're going to start with this fastener here. Plastic trim panel tool. We need to get under it. We'll pop that out. We're going to take a 10 millimeter socket. Our tie down right here. Remove the bolt. This tie down, do the same thing as we did on this panel. We're going to push the center in, pull it out. Right here behind the handle there's a little tab right there at the top. Push that tab down. See that little tab there. It's pretty small. You may need a small screwdriver. We're going to have two Phillips set of screws in there we need to remove.We're going to take our weatherstripping, kind of pull it back like this. You need to get in behind the panel. It may be easier if you just pull it off. You pull it off up to about here. If you look in between the panel there, there's a fastener there. Take the trim panel tool, stick it in there, and we're going to pop that loose. We're going to work our way all the way up. We're going to have one here behind this lower panel. We'll just get in behind it. And then we can start working this panel off.What we're looking for is this blue plug. What we're going to do is we're going to disconnect that blue plug and push down here, slide it out, just like that. We're going to take our wiring harness. We're going to pull out the fuse in the fuse holder if it's in there and we're just going to match our plugs into those two plugs. Once we get that, you can install your fuse into the holder.We're going to take all of our wiring, we're going to feed it down and underneath our panel. This is going to be our four pole end that we need to pull up. Make sure where you're putting it. You're not going to be putting it to where your wires are going to get pinched on any of the fasteners when we put the panels back in place.Next thing we need to do is we need to secure our box. So what I did to secure my box. Couple zip ties will come in the kit. Zip tied on the back of this panel, because you got to make sure when we put this back in, the box isn't going to interfere with it attaching. Ground wire, used my self tapper and I just put it right there. You want to make sure it's on a metal surface, not on any plastic. Now we can go ahead and put our panels back in place.You're going to have a small micro fuse in your kit. It's going to be 7.5 amps. You're going to get inside the driver's side, underneath the dash. You're going to put it in location number 10. You can see it's marked right there. And that's a 7.5 fuse. If it's not in there, but the one that comes in your kit. Sometimes I have found that that fuse is already in.Now we'll test everything out using part number I26. Left turn. Right turn. Brake lights. Running lights. Once we've tested everything out, we can take our wire, kind of roll it up, put it down with our spare tire out of the way, and we're ready to go.That's going to do it for a look at and installation on the Hopkins Simple Vehicle Wiring Harness on our 2014 Honda CRV.
Customer Satisfaction Score:
93% were satisfied with this product
7% of customers were not satisfied
- Defective
- Wrong item was ordered
- Did not fit
Customer Reviews
Hopkins Plug-In Simple Vehicle Wiring Harness with 4-Pole Flat Trailer Connector - HM11143274
Average Customer Rating: 4.6 out of 5 stars (61 Customer Reviews)
Quickly and easily install a 4-way trailer connector on your vehicle with this custom harness. T-connector plugs directly into existing wiring. Powered converter reduces strain on wiring system.by: Robert07/14/2023
Do Not Purchase this item!! I purchased this for my 2016 Honda CRV. The first one I received had a short in it and killed my car which had to be towed to a garage and costs me almost $400 after the diagnostics, towing and labor. etrailer sent me a replacement which has killed two of my DieHard batteries - I am on my third battery now which cost me more that $500. I now keep the harness disconnected when I am not towing a trailer. When I need to use it, I have to tear the side panel off the vehicle. It is very discouraging. I would not recommend this product and would give it an even lower rating than one star if I could. Should have asked for another replacement from etrailer or a different brand.
by: Bart07/20/2023
The one I got from etrailer didn't work. Unfortunately I found this out on the day before my planned trip, so it was too late for me to return it to etrailer. I had to buy a new one from O'reilly's - luckily they had one in stock. I already had a trailer rented in another state - so I couldn't reschedule my trip. Here's a tip: if you buy one of these, test it immediately. You can test with a multimeter or yuo can go to a Uhaul and they will test it for free. This defective unit wasn't etrailer's fault - it was just a defective unit. It happens...
by: Roland 02/22/2024
Haven't installed product yet but delivery was grate. Can't wait to get it installed.
by: Jody07/03/2023
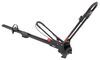
We drove to southern AZ carrying two hybrid bikes. The bikes traveled well and the rack was easy to use!
by: John 06/16/2023
Honda
The harness was easy to install on my Honda CRV. I wish Honda would have pre-wired the CRV for 7 pin connector.
by: Carmax02/20/2024
poor delivery time over a week
by: John 09/18/2023
2014 Honda CR-V
Product works perfect and the installation video extremely helpful.
by: Art03/25/2023
Received wrong cable harness twice! Box labeled correct but different harness was inside.

Jenny N.
4/4/2023
Oh no! Our Customer Service team will be in touch so that we can get this straightened out. As a heads up there is a number that will be on the converter box that is not the part number of the harness.

Art

4/10/2023
I want to update my first review on 32523. I did receive the correct harness and I realized that I was looking at the lower connector and should had looked at the larger bluewhite connector behind the upper panel. Thanks to Etrailer’s support team for their help over the weekend! It now deserves a 5 star rating.
by: Josh06/05/2023
Install was quick and easy with basic hand tools. Instructions are clear with pictures for reference.
by: Lars Z06/15/2023
Worked great. Very helpful tech support
by: George09/02/2023
Easy to install and works, what more can you ask for?
by: Jaclyn07/10/2022
My wiring harness has held up very well after one year. We originally got it to tow a pop up camper, but since then we have used it for other trailers and it has worked perfectly. Very happy with etrailer- the company helped me with my harness and hitch, fit perfectly to my car so it was easy to install.
by: Ben 09/14/2022
Easy to install. It took some finagling to get the box in the right place and not in the way of the trim. I tested my brakes to make sure that they are still lighting up the tail lights, which they are. Now I just need to tow something...
by: Andrew 08/26/2022
Installation was easy and the harness works as it should. I ended up using some double sided command tape to secure the box to the metal around the wiring, as the zip ties by themselves were a bit awkward and not the best design. But, all works well. :)
As always, e trailer was fast and accurate and significantly cheaper than local auto part stores.
by: Larry05/23/2023
Excellent hitch, easy to install.
by: BS07/30/2022
2016 Honda CR-V
Look carefully. Some connectors are not under the lower panel. Look up behind the upper panel that goes around the back window.
by: Pete06/16/2022
2016 Honda CR-V
The plug-in simplicity of the wiring harness eliminated the time and effort to locate and splice wires compared to my previous installation experiences. The harness fit our 2016 Honda CR-V EX-L like a glove.
The video was outstanding in providing a look at the location and guided the removal of all the pins and fasteners associated with the trim. Simple, to the point, and complete - an etrailer exclusive guide!
by: Christopher C08/04/2019
2016 Honda CR-V
Great video to assist me installing the wiring harness. Went exactly step by step and it took me approximately 1 hour to complete and zero issues once installed. Thanks again and I saved over $200 by doing the hitch and wiring myself as opposed to letting [local installer] do it.
by: Robert08/28/2022
It's fine but double sided tape for the box would have made the install quicker and easier.
by: Alfred 08/23/2020
Instructions were excellent and works well. No problems
Alfred
8/24/2021
Install was easier than I expected and have had no problems. At first, I was concerned about having it plug and wiring inside the vehicle, but it is actually easy to use, not exposed to the weather and ever have had a poor connection.
by: William06/28/2020
All components fit perfectly and the [installation] video provided detailed and accurate instructions.
My only suggestion would be to modify the cable assembly after the adapter and before the trailer 4 prong with a smaller round connector and bung to get the wiring outside the vehicle without running it out the hatch.
by: Bill A.10/16/2017
Have not used the product yet but if it is like everything else I have purchased from etrailer, I have sure I will be happy with it. I have confidence in Noah that he provided me with all the information I needed to make the correct choice as to what product would suit my needs.
by: Bruce 09/11/2022
This harness has been flawless!
by: William 09/09/2022
Very good instructions, and functions!
by: John 05/07/2021
2016 Honda CR-V
very straightforward DIY install in 2016 Honda CRV, thanks to the great video!
25
61
Show More Reviews
See what our Experts say about this Hopkins Custom Fit Vehicle Wiring
- Hopkins 4-Pole Flat Wiring Harness for Trailer with LED'sIt does not mater if the trailer you are towing has LED or Incandescent lights. The Hopkins Plug-In Simple Vehicle Wiring Harness with 4-Pole Flat Trailer Connector, # HM11143274 is confirmed to fit the 2016 Honda CR-V and includes a tail light converter to ensure that your vehicle's wiring matches that of your trailer. The powered module pulls power directly from battery to avoid overloading vehicle's electrical system.
view full answer... - Best Trailer Wiring Harness Recommendation for 2015 Honda CR-VFor trailer wiring the brand we have the best luck with is Tekonsha. They are the most reliable and overall give us the fewest problems. The majority of the time we have an issue with a wiring harness it's a Curt brand. And they've redesigned a few times with the same result. So for your 2015 Honda CR-V you'd want the # 118561 which is a confirmed fit and will work well. I attached an install video for you to check out as well.
view full answer...
Do you have a question about this Custom Fit Vehicle Wiring?
Info for this part was:

Edited by:
Lindsey S

Expert Research:
Jameson C

Video Edited:
Joshua S

Video Edited:
Jacob T

Video Edited:
Chris R

Video by:
Kathleen M

Video by:
Jonathan Y

Video by:
Michael B

Installed by:
Cole B

Written by:
Alexander C

Test Fit:
Shane H

Test Fit:
David F
At etrailer.com we provide the best information available about the products we sell. We take the quality of our information seriously so that you can get the right part the first time. Let us know if anything is missing or if you have any questions.
Product Experts Available Now!
Call 1-800-940-8924
Jenny N.
7/21/2023
To be honest we have not heard of the harness affecting the battery like this. I would make sure that all the fuses are entered into the right place and are the correct amperage.