
To see if this custom-fit item will work for you please tell us what vehicle you'll use it with.
Thank you! Your comment has been submitted successfully. You should be able to view your question/comment here within a few days.
Error submitting comment. Please try again momentarily.
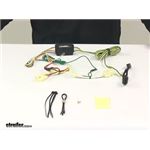
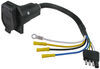
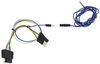
Quickly and easily install a 4-way trailer connector on your vehicle with this custom harness. T-connector plugs directly into existing wiring - no cutting, splicing or tapping required. Converter is made using SMT to ensure superior performance.
Features:
Specs:
Installation
This custom-fit T-connector plugs into your vehicle's wiring harness, which is located behind the driver's-side and passenger's-side tail lights. You will have to remove the tail light assemblies to access this harness.
Once installation is complete, the 4-way connector will be stowed in an out of the way location inside the trunk.
It is recommended that you use a small amount of grease on all electrical connections - the plugs on your automobile and the 4-pole connector itself - to help prevent corrosion.
A tail light converter is built into this T-connector. Because most trailers run on a two-wire system - wherein the brake and turn signals are carried on one wire - the separate brake and turn signals from your vehicle's three-wire system need to be combined so they are compatible with the wiring system of the trailer. This converter combines the brake and turn signal functions of your automobile so that they run on one wire to properly activate your trailer's tail lights. Note: This will not affect how the tail lights on your vehicle operate.
Curt builds each tail light converter using surface-mount technology (SMT). This method of construction involves soldering electronic components directly to the surface of a printed circuit board. SMT eliminates the need for leads, which are used in older through-hole technology. The result is a circuit board that is smaller yet provides more routing area and that offers superior performance, reliability and durability.
Circuit boards constructed using SMT have been shown to perform better under rough conditions with excessive vibration than those made using the through-hole method. And where would vibration be more likely to occur than in towing applications? Curt converters also produce less heat, leading to increased durability and longer life. In addition, lower levels of resistance ensure better performance, especially for parts that operate at higher frequencies.
Each Curt circuit board is made using high-quality components that are pieced together in the most technologically savvy fashion, leading to greater predictability and reliability in functioning.

California residents: click here
Videos are provided as a guide only. Refer to manufacturer installation instructions and specs for complete information.
Speaker 1: Today on our 2013 Hyundai Accent, we're going to be installing Curt's T-connector Vehicle Wiring Harness, part number C56254. This 4-pole flat trailer connector's going to provide your vehicle with all the necessary lighting. This includes your left turn signal, right turn signal, tail lamps, and brake lamps. It will be DOT compliant in all states. The module included with the harness plugs in line with both your driver's and passenger's side tail lights. It'll intercept the signals.
And once it perceives those, it'll then retransmit them back to your trailer.What's nice about this is the module sends the signals to your trailer, so if there's any faults on your trailer it won't cause any damage to your vehicle's wiring protected by the module. And now when you're ready to use your wiring, you just lift up your mat and your lower floor piece. And you can drape it over the back and just plug into your trailer. You want to make sure that when you close your lift gate you stay away from your center latch. And last thing we need to do is install our dust cap, and that'll ensure our connections stay dirt and dust free, ensuring a long-lasting connection.We'll begin our installation at the back of the vehicle with our lift gate open.
You're going to need to get access to where your spare tire is, so we're going to take our floor mat that we may have in the back. Then we'll remove the panel below that. And we're just going to take this out and set it aside. Next we'll be removing this panel here. If you have a net, you may need to just take that out of the way.
We're going pull outward first. Once you've got it pulled outward, we're then going to pull upward. Then we'll set this aside.We'll now need to remove the screws located underneath that panel on each side, and the screw located underneath our covering that we removed. There'll be one on each side. Next we'll pull our weather stripping back just a little bit, just to make it easier to remove our cover here.
Now we're going to pull out on our panel. You may need a trim panel removal tool. If you look behind the paneling, you'll see some locations where there's tabs. You may use this to just help get behind there and release those. Now we don't want to come all the way out with our paneling because it's still going to be attached up by our seats, and we're not going to take all that out.We just need to access the connector located behind the panel. So what we're looking for right here is a connector like this. You can see the wiring is going to go towards our tail light assembly, so that's how we know we have the right connector. We're going to press in on the release tab here and separate those two. We can now take our new harness, and we're going to plug this in line between this connector. We're going to use the yellow and white wire to do so. One end will plug into the end going towards our tail light assembly. And the other end will plug into the end that goes to the rest of our vehicle wiring.We'll now take the white wire coming off of our new harness. We're going to take the self-tapping screw that comes in our kit, we're going to slide it through the ring terminal on the end of that white wire. And we're just going to run this into our sheet metal here behind our panel. We're just going to be putting it in there. We'll be using a 1/4" socket to do so. And that's our ground wire. We'll now take our module, we're going to peel back the adhesive covering on our double sided tape that comes in our kit. We're going to put that on our module. And then we'll take the other end, we're going to peel this back. We're just going to put it about right there at the back of the vehicle.We'll now take our green wire, and our 4-pole connector wire, we're going to run that down here following our factory wiring. Then we can put our panel back into place. We'll route our wiring across. Now our 4-pole wiring, we can just leave that here in our compartment. But our green wire's going to need to go all the way across. We're going to need to remove this panel, just like we did the other side. And on the other side we're going to have a connector that looks just like it did on the driver's side. We'll disconnect those. We're going to take our green wire. We're going to route it up and plug it in line with those connections.Once you've got that plugged, you can just reinstall your panel. Now we're just going to zip tie our green wire and our 4-pole wire to our factory wiring here, just so that stays secure. Now we can reinstall our paneling there and the wiring's just going to hide behind it. Now it's just going to push down into place. And if you need to, you can take your weather stripping and just start working that back, and that'll fold back over the top of it. Now we can reinstall our floor covering and our mat.And now we'll test it out. You can either plug it into your trailer, or a tester like the one we have here. You can pick one of these up at etrailer.com with part number I26. You'll want to verify that you have your left turn signal, right turn signal, tail lamps, and brake lamps. And if everything's working properly, you're ready to hit the road. And that completes our installation of Curt's T-connector Vehicle Wiring Harness on our 2013 Hyundai Accent.
Average Customer Rating: 4.7 out of 5 stars (13 Customer Reviews)
Quickly and easily install a 4-way trailer connector on your vehicle with this custom harness. T-connector plugs directly into existing wiring - no cutting, splicing or tapping required. Converter is made using SMT to ensure superior performance.Hitch and wiring harness for trailer connection are both quality constructed. Installation videos are well done and easy to follow for quick painless installation. And the price paid was very affordable, online ordering painless.
almost three weeks for delivery from the neighboring country... Unacceptable in 2023
Went in easy enough. Looks like the 4 prong plug could be a little longer. I used some adhesive zip tie holders i had to clean up the wiring a little more. Just zip ties to hold the wires are not enough.
Good instructions, installation was straight forward, not too complicated. The custom plugs made it very easy.

Easy to install and work perfectly. Still working today in spite of being wash regul;arly and generally ignored. I love it.
Prompt delivery, Easy installation. Rec emmended
Great product best instructions ever
Worked great. If there was anything to take a picture of, then I installed it wrong..lol
Quick and easy install. Took about 5 mi nutes
Outstanding, easy to install with zero trouble.
Do you have a question about this Custom Fit Vehicle Wiring?
Info for this part was:
At etrailer.com we provide the best information available about the products we sell. We take the quality of our information seriously so that you can get the right part the first time. Let us know if anything is missing or if you have any questions.


Mike F.
5/8/2018
Both wiring harness that I purchased over the last 4 yearsone to a 2014 Tucson & one for a 2016 Accent continue to perform excellently with no issues. Maintenance has consisted of an inspection and sometimes application of WD-40 to minimize the tendency for corrosion of the contact pins. I am very satisfied with this product.