
To see if this custom-fit item will work for you please tell us what vehicle you'll use it with.
Thank you! Your comment has been submitted successfully. You should be able to view your question/comment here within a few days.
Error submitting comment. Please try again momentarily.
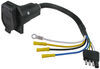
Quickly and easily install a 4-way trailer connector on your vehicle with this custom harness. T-connector plugs directly into existing wiring. Powered converter reduces strain on wiring system and is made using SMT to ensure superior performance.
Features:
Specs:
Installation
This custom-fit T-connector plugs into your vehicle's wiring harness, which is located behind the driver's-side and passenger's-side tail lights. You will have to remove the trunk floor coverings and rear scuff panel and pull back on the trunk liner to access these connection points. Once you've plugged in the T-connector, run the hot lead up to your car battery. Connect the lead to the included fuse holder, and then connect the fuse holder to the positive terminal on your battery.
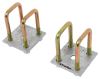
Once installation is complete, the 4-way connector will be stowed beneath your vehicle, near the trailer hitch. A mounting bracket (sold separately) is recommended to keep the connector secure.
It is recommended that you use a small amount of grease on all electrical connections - the plugs on your automobile and the 4-pole connector itself - to help prevent corrosion.
A tail light converter is built into this T-connector. This converter is a circuit-protected, battery-powered unit that bypasses the electrical routes that are used by a basic wiring harness. As a result, there is virtually no draw on your tail light circuits.
Because most trailers run on a two-wire system - wherein the brake and turn signals are carried on one wire - the separate brake and turn signals from your vehicle's three-wire system need to be combined so they are compatible with the wiring system of the trailer. This converter combines the brake and turn signal functions of your automobile so that they run on one wire to properly activate your trailer's tail lights. Note: This will not affect how the tail lights on your vehicle operate.
Curt builds each tail light converter using surface-mount technology (SMT). This method of construction involves soldering electronic components directly to the surface of a printed circuit board. SMT eliminates the need for leads, which are used in older through-hole technology. The result is a circuit board that is smaller yet provides more routing area and that offers superior performance, reliability and durability.
Circuit boards constructed using SMT have been shown to perform better under rough conditions with excessive vibration than those made using the through-hole method. And where would vibration be more likely to occur than in towing applications? Curt converters also produce less heat, leading to increased durability and longer life. In addition, lower levels of resistance ensure better performance, especially for parts that operate at higher frequencies.
Each Curt circuit board is made using high-quality components that are pieced together in the most technologically savvy fashion, leading to greater predictability and reliability in functioning.

California residents: click here
Videos are provided as a guide only. Refer to manufacturer installation instructions and specs for complete information.
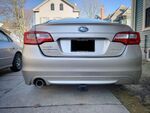
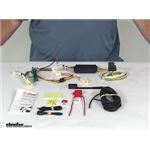
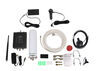
Today on our 2015 Subaru Legacy we're going to take a look at and show you how to install the Curt T-connector vehicle wiring harness with the 4 pole flat trailer connector. Part number is C56246. Here's what our wiring kit is going to look like when we pull it out of our box. Here's what we're after, that 4 pole trailer connector. That's going to give us stop, turn, brake signal to a cargo carrier or trailer, whatever we might have behind our vehicle. To do that it's going to use a converter box.
This box is going to take the signal from the vehicle itself and turn it into a usable signal for the trailer. Now this is a 12 volt box, so it will provide 12 volt power to the black wire from our battery. This is going to protect our vehicle's circuits. It's not drawing any power from the vehicle's system. We're not going to have to worry about overloading it.
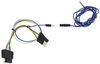
It gets it directly from our battery. We've got our black 12 volt wire that we'll connect to that with the included hardware, run it up to our battery through our fuse holder so we'll be able to protect that system. To get the brake signals, turn signals, and things like that, we're going to have in line connectors. Basically we'll just unplug from the back of our tail lights, plug this directly in line, our factory connector is going to go right back in. The red, yellow, and brown, that goes over to the driver's side. The green, that's going to run over to our passenger side.
We've got all the hardware and everything that we're going to need. We've got a provided dust cover, it's going to go over the end of the cap there and a full kit of detailed instructions to help us out with the job. Inside the box there's a lot going on here. This is going to use surface mount technology. That's going to yield higher results coming through our 4 pole connector.
This is going to give us brighter lights on our trailer, but really minimizes the heat that's built up. The surface mount technology is also going to give us optimal performance even in rough, harsh road conditions. The tail lights are going to draw about 5 amps as a maximum, and the stop, turn signals, those are going to draw about 3. The first thing we're going to do is take out our floor cover here in the back. That out of the way, we need to get our scuff panel out. We've got 3 push pin fasteners, 1 on each outside and 1 just offset here in the middle. We'll just use a trim removal tool or a screwdriver. We'll just pop those right out. Put that aside for just a second, and we'll just pop up on it. We've got 1, 2, 3, 4 alignment tabs that go into those 4 white spots. We'll set this aside. We're also going to take out our cargo net tie downs. To do that we just rotate them 90 degrees and then just wiggle them out. That will allow us to pull back the felt here on each side and access out connection points. We'll start right here in the driver's side. We'll separate that factory connector. There's going to be that little tab right there on top that you push down on. We can bring in our T-connector from our Curt. Slide that in until we hear it click and then we give it a push pull. Do the same thing for other side of the connector. Now we'll select a nice flat surface right here. Kind of just on the outside of that driver's side light housing is a good spot. We want to clean that off really well with some rubbing alcohol. Also clean off the back of our box. With that dry, we'll take one side of our cover off of our foam tape and really rub that on there good, make sure it sticks. Take the cover off the other side there and we can mount it right in position. It will be out of the way where we won't have to worry about any kind of interference. For our ground wire we'll want a nice flat surface, that should do really well. We'll go right into the steel. We'll take the provided self-tapping screw and quarter-inch nut driver. Let's get our hole preset. It's time to place our ring terminal over that self-tapping screw and get it nice and secure. All right. One last connection we need to make over here before we wrap this driver's side up is going to be our 12 volt power wire that we're going to eventually run up to the battery in the front of the car. You can see a grommet right here. We're going to use that grommet to get our wire from inside the car to outside. I'm just going to cut a small hole in it there. We'll use a little bit of black silicone sealant to seal this back up at the end when it's all said and done. What I'm going to use is a piece of air line tubing, but you could use a piece of coat hanger or thick wire. We're going to go through it. Just run it down and eventually it will come out underneath the vehicle there for us. I'm going to take my 12 volt wire, you can see here, this is where our pulled cables come down or our air lines come down. I just want to put a small bend in it. I'm going to go from the front of the hitch through the isolator pocket here, the rubber isolator that's up there, there's a cutout in the hitch. If you don't have a hitch, well then it's going to be a little bit easier for you. All right, that will come out there. We just need to use a little bit of electrical tape and we'll tape our wire off to whatever we decided to use to pull it through. Then we can just gently pull that right up through to the inside of the car. We'll get it right up here where we can work with it. We'll take the end of the wire we've just brought in and strip that back, add in one of our provided yellow butt connectors. Get that crimped down. Connected into that black wire coming from our box. Clamp that down. Now let's wrap that up with just a little bit of electrical tape. Just kind of put back what we don't need and take a little bit of sealant as we said and get that hole filled back in. That should work out well. Now, our 4 pole wire and also our green wire we're going to run out toward the middle of the vehicle here. The 4 pole wire, we'll run it along the floor. The green wire, which heads over to the passenger side, that's going to be run through right behind our threshold here where the scuff panel goes into place. I'm going to go around the striker area where we can tuck right back in here. Then all we have to do for this side is just separate our plug and plug in our new wire. All right. We'll start getting the back of the car put back together. Get our hook put back in there we're just going to insert it and rotate it. Now we'll take our scuff panel, we'll put it back in place. We're going to hide that wiring with it. Just want to get those alignment tabs lined up. Click it in all the way across. Then we'll grab our fasteners and push those back in. We'll move our tire tool stuff back into position. As you can see this is going to give us a great area to just allow our wiring to rest in there stored. Using the dust cap will allow us to kind of tidy everything up. I like to use it as almost like a zip tie. We'll just pull that right around there and secure it all. See how that will just keep it nice and compact. We'll be able to put our floor liner or our trunk liner right over top of it without any kind of interference. Now, when we're ready to use our wiring we can just open up our covering there, bring it right out here to the back of the car where we'll need it. You can see we've got a nice pad there that's going to be the weather seal. That's going to give us all the give we need. We'll actually be able to close our hatch right over the wiring. No damage will occur there as long as we avoid that striker. If it gets pinched in there, probably going to cut one of our wires and do some damage. There it is, ready for use. Whether it's our cargo carrier or our trailer that we'll be connecting it to. We're going to run our wire right up kind of behind the heat shield here on the exhaust. Then we're going to go up over top of this rear metal cross member. Just avoiding any pinch points, any sharp metal, sharp objects, and we'll go up over the rear axles. I brought it down right through here. At this point we're just going to go right above our panel, all the way up. See, it's going to come out here, up over our subframe, and then right up, right along that frame rail. Now I feel like this point right here is the pretty critical point. You want to go under the clip that's on that brake line. That way when we pull our wire up toward our battery, we won't have to worry about it coming up and making contact with the steering shaft here. Then just anywhere we've got a good spot there we use some zip ties to get it secured off. Now that we're at the front just pull our wire up to the top and get it connected to the battery. We'll pull our wire on through here. I'm just going to run it under this major wire loom 00:11:34 here. Bring it up just like that, that will keep it nice and neat. We use a zip tie to connect it down here. Just use that to keep any slack out of it. That way we won't have to worry about it going back under the vehicle. We'll keep ourselves a little extra and then just trim off any excess. Then we can strip the end of that back and take one of our provided butt connectors and crimp that on the end. Then we can grab our fuse holder. As you can see they are pre-stripped, so just pull the end off that. That will go on the other side of our fuse holder. With a good pull make sure it's secure. Then we can wrap it up with a little electrical tape. inaudible 00:13:00 the other end slide on our provided ring terminal. A little tape on there won't hurt anything. We'll pop the cover off our positive terminal on our battery. I just want to run that ring terminal right up underneath that cover. It will be connected right here to our positive battery terminal. With our slider cover back down into place, that's all there is to it. Just tidy up our excess. Now we'll take the provided 10 amp fuse, we'll slide that down in our fuse holder and then put the cap on it. All right, now we gather up our tools, get those put away, and we'll test out the wiring kit. To test out the system we're going to take a test light. We'll connect the ground to the ground side of our plug. That's going to make sure that we've got a good signal there. Then we'll start with the brown wire. That's going to be the first one over from the white wire. With the running lights on we should have a constant signal. All right. Now we'll go to the driver's side blinker. That should be the yellow wire, and that should be an intermittent signal. All right. Now the passenger side blinker. That should be our green wire with the same signal. Lastly we'll test our brakes. That should give us a constant signal from the last two, the green and the yellow. All right, it's doing what it's supposed to do. We can get it tucked away until we need it. With everything working properly that's going to complete today's installation of the Curt T-connector vehicle wiring harness with the 4 pole flat trailer connector. Part number C56246 on our 2015 Subaru Legacy.
Average Customer Rating: 4.8 out of 5 stars (22 Customer Reviews)
Quickly and easily install a 4-way trailer connector on your vehicle with this custom harness. T-connector plugs directly into existing wiring. Powered converter reduces strain on wiring system and is made using SMT to ensure superior performance.
Wiring harness fit and works perfectly. Directions well written and helpful. Online video was also a huge help. Nice to keep it in the trunk, out of the weather, and away from corrosion, when not in use.
The wiring harness was custom made to fit my Subaru Legacy. Routed the power from the battery into plastic tray under car and up through existing hole, behind left rear wheel and into trunk. Everything installs behind paneling inside the trunk, out of the way when not in use.
The wiring harness went on easily and the video was helpful.
Great hitch. etrailer sells only the best. Hard to beat…
Everything went together as shown on the video. I only watched it once and did the installation from memory. Great product at a good price.
Love your site. Easy to find what you need and pay for it.....great job....easy works for use old types.....Shipping was fast and the item got to Olympia, Washington very fast. Good job all around. Will use your site again for sure. darrel w

Eugene W.

8/14/2018
Worked right up to the point the car was totaled from the rear. Good product.
Went together just like on youtube. The battery supply cable was plenty long and all equipment was included. It was very easy.
Incredible!! I couldn’t believe how exact and easy this intimidating looking kit installed. It was so much fun to actually do something that went as it was supposed to GREAT PRODUCT!!
The website was easy to use, and we found the right product easily. Delivery time was very reasonable. The part is now installed and works great. We are very happy with the purchase and with the company in general.

Roberto
10/8/2022
Continues to work perfectly. Forgot it existed! Perfect.
Great product, was delivered about an hour ago and I installed it in about 30 mins without any issues.
Works great
Do you have a question about this Custom Fit Vehicle Wiring?
Info for this part was:
At etrailer.com we provide the best information available about the products we sell. We take the quality of our information seriously so that you can get the right part the first time. Let us know if anything is missing or if you have any questions.


Tom S.
3/16/2018
Still performing very well. No complaints.