
T-Connector Vehicle Wiring Harness
(36 reviews)
Price: $64.54
In Stock
T-Connector Vehicle Wiring Harness
Item # C56121
Retail:$106.95
Our Price: $64.54
You Save: 40%
Will this fit?
To see if this custom-fit item will work for you please tell us what vehicle you'll use it with.
In Stock
Thank you! Your comment has been submitted successfully. You should be able to view your question/comment here within a few days.
Error submitting comment. Please try again momentarily.


- All Info
- Reviews (36)
- Q & A (0)
- Videos (2)
- Photos
CURT Custom Fit Vehicle Wiring - C56121
- Custom Fit
- 4 Flat
- Trailer Hitch Wiring
- CURT
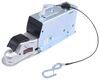
- Powered Converter
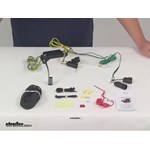
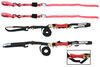
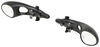
CURT Circuit Protected T-Connector Vehicle Wiring Harness
Features:
- Provides a 4-pole flat trailer connector for the vehicle
- Installs quickly and easily - simply plugs in to factory connectors
- Does not require cutting or splicing
- Includes installation instructions
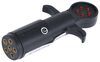
- Can be used with 5-pole, 6-pole or 7-pole adapters
Specs:
- Maximum amperage
- Stop/Turn lights: 3 amps
- Tail lights: 6 amps
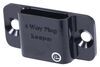
Installation: Connection point is located behind the driver side tail lights. The 4-pole trailer connector will be stowed in the rear cargo area when not in use.
Tech Tip: It is always a good idea to apply a small amount of grease to all electrical connections to help prevent corrosion.
56121 CURT Circuit Protected T-Connector Vehicle Wiring Harness
Installation Details
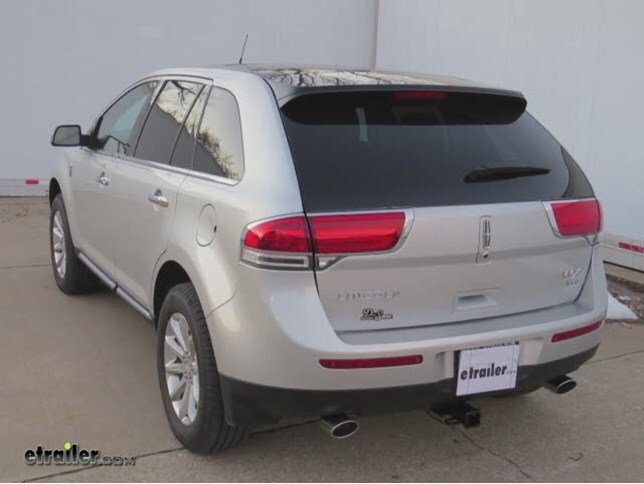
This Product Fits The Following Vehicles
- 2011 - 2015 Lincoln MKX
- 2011 - 2015 Lincoln MKX
California residents: click here


Video of T-Connector Vehicle Wiring Harness

Videos are provided as a guide only. Refer to manufacturer installation instructions and specs for complete information.


Video Transcript for Trailer Wiring Harness Installation - 2013 Lincoln MKX
Today on our 2013 Lincoln MKX, we'll be installing the Curt T-connector vehicle wiring harness, part number C56121. Now to begin our install, we'll open up the rear hatch. Then, we'll need to remove the fasteners to secure the rear tail light assembly. There are two fasteners on each side. Once we remove the screws and set them aside, we'll then pop the tail light assembly out of its position being careful not to break the alignment tabs underneath. Next, we'll go ahead and press on the wiring connector lock so that we can remove the wiring harness from the back of the tail light assembly. We will set the tail light assembly aside. Now, we'll go ahead and repeat the same process on the other side.
Now, with both tail light assemblies removed, we'll move to the inside of the vehicle where we'll the remove spare tire cover and then the rear threshold. The rear threshold has fasteners underneath, so we gently pull up until the fasteners released and then remove the threshold completely setting aside. Next, we'll remove plastic trays on either side of the spare tire. We'll set them aside for re-installation later. Next, we'll go ahead, we'll remove the grommet that secures the tail light wiring harness as it passes through the body of the vehicle. Once we pull it out, we can then take the new green wire connector from our new 4-pole harness, feed it up behind the interior panel and out through the open hole from where we removed the grommet.
Then, we'll take a pair of side cutters, cut a slice in the grommet where we can feed the green wire into and reinstall the grommet. Next, plug the green wire connector directly into the manufacturers wiring. The other end will go into the back of the tail light assembly. Next, we'll go ahead and take a zip tie and secure the green wire to the manufacturers wiring. We'll cut off the excess from zip tie to clean up the install look. Now, we're ready to re-install tail light assembly.
Next, we'll begin routing our wiring over to the driver side. This application, we can route it inside the body channel using a pull wire. We'll take the pull wire, route it through the channel first, pulling it over to the driver side. Next, we'll repeat the same process taking the yellow wire connector and feeding it up behind the driver side tail light assembly. We'll cut the slit in the grommet, feeding the wire in.
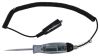
Then, we'll plug the yellow wire connector into the manufacturers wiring and the other end of T-connector into the tail light assembly. We'll secure the wiring with a zip tie, cut off the excess from zip tie, and then reinstall the driver side tail light assembly. Next, we'll start routing the power wire for our new converter box. This power wire will ultimately get run up to the vehicle battery. We'll go and take the power wire and route it around the second row seat post interior panel to the converter box. We'll strip back the power wire and add the butt connector provided with our install kit. The other end of the butt connector will get secured to the black wire coming from the converter box. Next, we'll go ahead and wrap up this connection point with some black electrical tape to help keep out any dust, dirt, debris, or moisture. Now, with the power wire secured, we'll go ahead and mount the converter box. To mount the converter box, we'll use the two-side adhesive supplied with our install kit. Peel back one side of the adhesive and adhere it to the converter box and then remove the other side of the adhesive and secure it back behind the paneling on the driver side. Note, when you're securing converter box, we're looking for a clean, flat surface, preferably sheet metal. Now, with our converter box mounted, we'll go ahead and take the white wire from the converter box with the pre-attached ring terminal and secure it to the body for the ground for our new converter box and 4-pole connection. Using a self-tapping screw, we'll go ahead and secure the ring terminal directly to the body of the vehicle. Quick check tip: I recommend a final location where the sheet metal doubles up for a more secure ground. Below the tail light assembly near the threshold will be a great location. Now, with our power wire secured to the converter box, we'll go back to the manufacturers grommet and use our utility knife to cut a small slice in the grommet. Then, we can take the other end of our power wire, feed it down through the manufacturers grommet underneath the vehicle. We'll go ahead and pull the excess wire down underneath the vehicle and then secure the power wire to the manufacturers wiring with a zip tie. Now, with our wire fit underneath the vehicle, we can go ahead and route it up through the front of the vehicle at the bottom of the engine compartment. We'll then route up through the engine bay and ultimately to our battery. Keep in mind when routing your wire, stay away from any moving components such as steering or suspension, or excessive heat such as exhaust. Now, we've reached the bottom of the engine bay. We'll go ahead and take our pull wire, feed it up through the engine compartment, and then secure the power wire to the pull wire and pull it up to the top of the engine bay. We'll go ahead and secure it with the black zip ties provided with our install kit. Now, with our power wire pulled into position, we'll go ahead and cut off the excess from the zip ties and clean up our install look and move to the top of the engine compartment. Here, we'll secure the wiring as necessary and route it towards to the positive battery post. We'll go ahead and cut off any excess wire from the power wire so that we can install our inline fuse holder. To do this, we'll strip back the power wire and add a butt connector. We'll take the fuse holder and attach it to the butt connector and a ring terminal to the other end of the fuse holder. We'll go ahead and wrap up this connection point with some black electrical tape and then route the ring terminal to the positive battery post. We'll remove the cover from the positive battery post revealing a positive battery post. We can remove the nut, install the ring terminal, and then re-secure the nut. We'll go ahead and install the fuse into the fuse holder and then secure our fuse holder here to the manufacturers wiring. We'll go ahead and reinstall the positive battery post cover and secure our wiring as necessary with the zip ties. We'll cut off the excess from the zip ties, clean up our install look. We're now ready to test our new 4-pole connector. To test the 4-pole connector, we'll use our test light, taking the ground clamp and putting it on the white wire terminal, which also be the open or bare terminal. Then, testing the brown wire terminal will be our running light circuit, yellow wire terminal will be the left turn signal/left brake, and green wire terminal will be the right turn signal right braking. Now, we know our new 4-pole connector works. Let's go ahead and show you how to use it. We'll simply take the 4-pole connector out of the lower storage compartment and route it out and over the threshold and down to our hitch or accessory. Be careful to stay away from the rear cargo door latch as pinching off in the latch can harm the wire, however, the weather stripping is thick enough having simply close the rear cargo door on it, pull out any wire necessary to run to our hitch or accessory, and then once we're finished, we'll simply open up the rear cargo door and store it down with the spare tire cargo area, and that's it, we're ready to hit the road. That does it for the install of the Curt T-connector vehicle wiring harness with 4-pole flat connection, part number C56121 on our 2013 Lincoln MKX. .
Customer Satisfaction Score:
96% were satisfied with this product
4% of customers were not satisfied
- Alternate product found
- Wrong item was ordered
- Product did not meet expectations
Customer Reviews
T-Connector Vehicle Wiring Harness - C56121
Average Customer Rating: 4.8 out of 5 stars (36 Customer Reviews)
CURT Circuit Protected T-Connector Vehicle Wiring Harnessby: Marty 02/22/2024
2015 Lincoln MKX
The item was perfect. Very easy to install with a great fit.
by: Jeff S09/09/2013
2011 Lincoln MKX
This product is everything it says it is and the installation was very easy.
It was helpful to have an extra person help me feed the electrical wire from the back of the vehicle up to the battery terminal if you don't have a hoist.
It came with everything you need to secure the wires and power module including zip ties and wire connectors.
by: Wolfgang06/20/2018
2012 Lincoln MKX
Hi,
the installation was very easy.
But I connected the 12V line (fuse 10A) directly to the 12V power line at the liftgate (WH-RD cable, 30A fuse F7 in the battery junction Box).
A lot less work. Works fine.

Rachael H.
6/20/2018
It is recommended to route the power all the way to the vehicle battery fpr proper fuse and circuit protection. I have included a link to one of our help articles for your reference.
Helpful Links

Wolfgang

6/20/2019
Hi, with my connection I never had a problem. Still works fine.
by: Casper05/17/2015
Lincoln MKX
Whew!! After recouping from the MKX hitch installation, I tackled the wiring harness. All was straight forward with great instructions and video. The tail light assembly was a tough removal with fears of breaking the guide pins from the light to the body. But with a little patience and finesse they came out as instructed. The toughest part was running the hot wire from the rear to the battery,only because I did not have the availability of a lift. Ramps and a creeper did the trick taking my time to stay away from the heat producing items. Hooked up the trailer and all was a GO! Great product thus far.
by: Ken Westerfield07/24/2019
Wiring kit was of excellent quality and directions provided easy installation to the vehicals existing system. Your company provides quality products and fits exactly to the vehicle it was ordered for.This is true for the hitch and wiring kit.
by: Tod T. 03/29/2017
Late dark night we ran over a blown tire. It went under motorhome & tore up the lights and wires on the tow dolly. etrailer had all the parts I needed, great price & fast shipping. Great group to work with.
by: Pete B06/08/2016
2012 Lincoln MKX
I would give 5 stars as the product itself is excellent. However, if you have the premium stereo with the big rear speaker, you cannot easily fish the passenger side cable to the taillight....the small "tunnel" is slightly narrower at the top than the plugs you are trying to fish up. I finally figured that I had to find a suitable crowbar to bend the inner hole sheet metal to allow the plug to pass. After that, no problems with driver side or with anything else.
by: Don 08/16/2022
The Tconnector works well and fits into the existing wiring without a cutting an splicing. I really like the factory like connections.
by: Shawn03/01/2022
Very good product. Installation was relatively easy. Have had no problems with any trailer lights since installed and eliminated corrosion by storing inside the car
by: Larry S09/22/2019
2011 Lincoln MKX
Like other reviewers, it took a little bit more time installing without a hoist. Great product, easy to install, but my installation kit did not include the fuse holder as shone in photos, but it did include the 10 amp fuse. So, only 4 stars. Fortunately, I had an extra fuse holder in my tool box.
As for etrailer, excellent company to order from with great products.
by: Mike R.04/15/2019
Easy to install and worked correctly. Certainly beat the old fashion way of figuring out which wires to splice into. Well worth the cost to do a plug in factory style installation.
by: Rolf S.08/16/2016
2011 Lincoln MKX
Excellent product. Installation was easy with the instructions and watching the video.
by: Ian06/24/2017
2012 Lincoln MKX
Great quality product, item exactly as described. Quick shipping, prices are good. Easy to follow instruction videos on the website. I highly recommend etrailer.com for any trailer related needs!
Ian, a very satisfied customer
by: Stephen05/03/2019
Came in two days and were able to get it installed before unexpected trip across country . Only issue with install was passenger side light socket, just could not get it to wiggle in, butt spiced wire and it worked fine. Will definitely order again when the need arises.
by: Dwayne 08/06/2018
Running the wire from the battery to the back was the hardest part. The rest of the wiring was just unplug and replug. I did it quickly with no problem.
by: Keith 11/06/2020
I never write positive reviews, I just don't.
"Do your job, it's what you're getting paid for".
Robert, however, took customer service to an amazing level. I knew it was possible given today's technology, and he nailed it.
Kudos Robert
etrailer.com has immediately earned my business as well as my loyalty.
by: Richard H07/03/2015
2013 Lincoln MKX
I have installed 3 Hidden Hitches over the past few years, and have been very well satisfied with the product.
by: Michael12/05/2017
Great product. Youtube video was invaluable. Highly recommended.
by: John05/30/2015
2012 Lincoln MKX
Great product. Video helped a lot. Easy installation.
by: Chris Y.10/22/2014
2012 Lincoln MKX
Great product! Super fast FREE shipping. Exactly what I ordered and it fits exactly how it is supposed too.
by: Dean B.05/31/2017
2013 Lincoln MKX
Looks great, works great!
by: Nick02/06/2019
2014 Lincoln MKX
Extremely easy and quick to install. Product works great as advertised!
by: Gregory06/01/2016
2013 Lincoln MKX
Product was shipped promptly and price was fair.
by: Sergey06/03/2013
2011 Lincoln MKX
Great product. Easy to install.
by: Edwin 07/10/2022
Very prompt service!
25
36
Show More Reviews
See what our Experts say about this CURT Custom Fit Vehicle Wiring
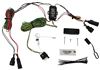
- Installing Brake Controller and 7-Way On 2013 Lincoln MKXThe Universal Installation Kit for Trailer Brake Controller part # ETBC7 is just what you need to install a 7-way on a 2013 Lincoln MKX with existing 4-way like the T-Connector Vehicle Wiring Harness part # C56121. There would not be any issues with the Tekonsha Prodigy P2 Trailer Brake Controller part # 90885 either. It should have come with a hardwire harness but if you no longer have this the Pigtail Wiring Harness for Tekonsha and Draw-Tite Brake Controllers part # 7894 will work. In...
view full answer... - Does Wiring Harness for 2011 Lincoln MKX Work With Trailer That has LED and Incandescent LightsYes, the T-Connector Vehicle Wiring Harness # C56121 that fits your 2011 Lincoln MKX will work if your trailer has LED lights and incandescent lights so long as your lights do not exceed the maximum of 3 amps for the stop and turn signals and 6 amps for the tail lights. It is also highly recommended you use Dielectric Grease # 11755 when using your 4-way to help prevent corrosion. I have added a link to a video review of this part as well as a link to a video install of this harness...
view full answer... - Recommended 4-Way and 7-Way Wiring Harness for a 2014 Lincoln MKXTo add a 4-Way and 7-Way connector for a 2014 Lincoln MKX you will need two separate wiring harnesses because they don't make just one that will add a 7-way connector. The first harness you will need is the T-Connector Vehicle Wiring Harness item # C56121. This custom fit harness plugs in behind the driver side tail lights. It will provide you with a 4-way connector. The second harness you will need is the Universal Installation Kit for Trailer Brake Controller item # ETBC7. The kit...
view full answer... - Trailer Wiring Harness Options for a 2011 Lincoln MKXCurt trailer wiring harness # C56121 does indeed fit your 2011 Lincoln MKX. Installation will be the same as the video I have linked which features a 2013 MKX. We also have Tekonsha harness # 118519 or Hopkins harness # HM11140314 which also fit your MKX. They all install and function in the same manner but we do hear about fewer issues with the Tekonsha harness.
view full answer...
Do you have a question about this Custom Fit Vehicle Wiring?
Info for this part was:

Expert Research:
Michael H

Video Edited:
Joshua S

Test Fit:
Nicholas E

Installed by:
Cole B

Updated by:
Wilson B

Updated by:
Kristina F

Updated by:
Isabelle B
At etrailer.com we provide the best information available about the products we sell. We take the quality of our information seriously so that you can get the right part the first time. Let us know if anything is missing or if you have any questions.
Product Experts Available Now!
Call 1-800-940-8924
Jeff S.
9/15/2014
The wiring harness has not given me a bit of problems after a year of use.