
To see if this custom-fit item will work for you please tell us what vehicle you'll use it with.
Thank you! Your comment has been submitted successfully. You should be able to view your question/comment here within a few days.
Error submitting comment. Please try again momentarily.
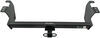
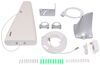
Quickly and easily install a 4-way trailer connector on your vehicle with this custom harness. T-connector plugs directly into existing wiring. Powered converter reduces strain on wiring system and is made using SMT to ensure superior performance.
Features:
Specs:
Installation
This custom-fit T-connector plugs into your vehicle's wiring harness, which is located behind the driver's-side and passenger's-side interior trim panels in your rear cargo area. Once you've plugged in the T-connector, run the hot lead up to your car battery. Connect the lead to the included fuse holder, and then connect the fuse holder to the positive terminal on your battery.
Once installation is complete, the 4-way connector will be stowed in an out-of-the-way location within your cargo area.
It is recommended that you use a small amount of grease on all electrical connections - the plugs on your automobile and the 4-pole connector itself - to help prevent corrosion.
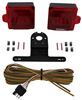
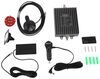
A tail light converter is built into this T-connector. This converter is a circuit-protected, battery-powered unit that bypasses the electrical routes that are used by a basic wiring harness. As a result, there is virtually no draw on your tail light circuits.
Because most trailers run on a two-wire system - wherein the brake and turn signals are carried on one wire - the separate brake and turn signals from your vehicle's three-wire system need to be combined so they are compatible with the wiring system of the trailer. This converter combines the brake and turn signal functions of your automobile so that they run on one wire to properly activate your trailer's tail lights. Note: This will not affect how the tail lights on your vehicle operate.
Curt builds each tail light converter using surface-mount technology (SMT). This method of construction involves soldering electronic components directly to the surface of a printed circuit board. SMT eliminates the need for leads, which are used in older through-hole technology. The result is a circuit board that is smaller yet provides more routing area and that offers superior performance, reliability and durability.
Circuit boards constructed using SMT have been shown to perform better under rough conditions with excessive vibration than those made using the through-hole method. And where would vibration be more likely to occur than in towing applications? Curt converters also produce less heat, leading to increased durability and longer life. In addition, lower levels of resistance ensure better performance, especially for parts that operate at higher frequencies.
Each Curt circuit board is made using high-quality components that are pieced together in the most technologically savvy fashion, leading to greater predictability and reliability in functioning.

California residents: click here
Videos are provided as a guide only. Refer to manufacturer installation instructions and specs for complete information.
Speaker 1: Today on our 2009 Scion XP, you're going to be taking a look at and I'm going to be showing you how to install the Curt T connector vehicle wiring harness with four pole flat trailer connector, part number 56062.This is what our wiring looks like when it's installed. Now this is going to live inside of the vehicle. This is going to give you all the proper functions for your trailer or whatever you maybe hauling on your hitch. It's going to give you your brake lights, both turn signals, your running lights, your ground wire and your power wire. It's also going to come with a removable dust cap. It's going to help protect your connections from getting any dirt, grime, anything like that help keep them from corroding.When not in use, you simply roll it, tuck it right back in a compartment area and then close your hatch.
So when we're ready to use it, simply pull it out. You can see we have plenty extra. You want to run your wire over top this rubber seal, make sure you stay away from any connection points between your door and the inside of the vehicle. It is going to have a protective coating on it. So it's not going to harm the wire when you close your hatch on it.
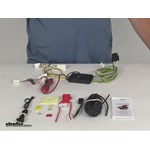
Now that we've gone over some of the features, let's show you how to get it installed.First I want to go over what comes in your kit. This is going to be your wiring harness. You got your four pole connection, it's going to give you your lights to whatever you have on your hitch. This is going to connect into your factory wiring. This is going to go to your passenger side and the brown and yellow's going to go to your driver's side.
You're going to have your ground wire and your power wire. What's most important about this is this box right here. This box is your converter box and what this is going to do, it is going to protect your vehicle's wiring from any back feed from anything that maybe going on with whatever you have on your hitch or whatever you have this connected to. And vice versa, it's going to protect the wiring on whatever you're hauling with from your vehicle wiring if there's a problem with that.And you're going to have your power wire, which is going to run to the front of your vehicle. On your battery, you're going to get a small kit like this that's going to come with some butt connectors, your fuse and a ring terminal.
You're also going to get a fuse holder for your battery and some black silicone. A couple things you're going to need, 10 millimeter socket. I recommend some electrical tape and one heat shrink butt connector and I'll explain this later.Let me talk a little bit about your power wire. Now this wiring kit is going to live inside the vehicle. So this can stay inside, it's not going to be out unless you need it. Power wire can run a couple ways. There's been a few comments that the instructions say that this has to be run inside of the vehicle. It's not necessary, it can be run outside. There is protective coating on this, so your wiring's not going to get damaged. If you decide you want to run it inside, there's a few ways to do it. You'd have to take out your panels and run it along the body on the inside through a grommet under your dash. I'm going to run it outside because it's a lot easier and a lot quicker. Run it through the inside is very time consuming.To start our installation, we're going to remove this floor covering right here and all we're going to do is pul lout on it. We're going to set it aside for now. And on each side of this, you have two plastic panels. Down inside we're going to have two 10 millimeter nuts that we need to remove. Do the same thing on the passenger side.So as you can see I was having a little bit of trouble getting this one out. There's a clip right here, a little plastic holder. If you reach underneath and push this out, it'll release it. And you can use a screwdriver, I'm going to use a plastic trim panel tool because all of our panels are plastic. There's a little panel right here on the side. There's a notch right at the top. Take that, put it in there going to pop that panel out. You're going to have one of these on both sides of the vehicle you need to remove.Next we need to locate our plug that's going to our taillight, which is going to be this white one right here. What we're going to do is right here on the top you're going to push in and pull out. So we're going to take our yellow wire and we're going to feed it up behind this panel. Then we're just going to connect our ends, plug back into the taillight. Now we can reinstall our panel. One thing I suggest is if you pull your white wire, your ground wire out gives you a little bit more room to work with.Next thing we're going to do is we have a couple grommets we can use. There's one right back here, which is a little hard to get to. We have another one right up here on the floor. I'm going to go ahead and remove this center section, makes it a little bit easier for you to see. So you can see this grommet here, we're just going to cut a little bitty slice in it because alls we're doing is putting one wire through. That's going to be our black wire. And you want to make sure you don't cut those wires. So we're going to go up a little bit to the side of it here.Once you get your hole, you can either feed the whole bundle of wire down through there or you can reach down underneath and feed the wire up. Whichever way you want to do it, it comes right down underneath the whole pan. The whole pan's should be open. So just feed that down through there.Next I'm going to take one of my butt connectors, I'm going to put it on my black wire, crimp it down. We can strip our power wire that we just fed through the grommet. Put that in the other end of our butt connector, crimp it down. Make sure it's got a good hold. I'm going to go ahead and this is completely up to you, I like to wrap all of my connections, any of my butt connections with electrical tape.Next thing we need to do is we need to mount our converter box. We need to find a good flat spot off, so it's not interfering with the panels we got to put back in. So right here on this back side, underneath this panel, there's a flat spot. We need to clean off all of the stuff that's on there. So we have a good stick on it. So we'll take some rubbing alcohol, paper towel or rag, I'm going to wipe off the box. Also going to wipe off this panel. We'll take our two sided sticky tape that comes in our kit, make sure you press it firmly into place. Make sure you push on that. Make sure it sticks good. We can just route our other wires to clean it up a little bit. Now we need to mount our ground wire.The kit's going to come with a small self tapping screw. You're going to need a quarter inch socket. Now if you don't have one that has a magnet, a trick because you're going to be going at an angle. To keep that nut or that screw inside of there, you take a little piece of paper towel, put it in like that, that will hold it. Then we want to make sure when we put this screw in, it's going into metal. Make sure it's not going in any plastic. I think I'm going to go right back underneath here. It's going to keep it out of the way of everything. You just want that tight enough so that ring terminal doesn't spin. You want to make sure you don't tighten it so tight that it breaks it off or strips the hole.Next we're going to route our green and red wire over to our passenger's side. If you look right here, there's a wire a factory wire that runs over there. What we're going to do is you need your zip ties that come in your kit. We're just going to zip tie it right to that wire. Now we're going to do the same thing we did on our driver's side, we're going to feed this up behind the panel, connect our plugs together. Get this tucked in here. We can reinstall our panel here.Then we'll come back and trim our zip ties. Clean up our install a little bit. Next we're going to take our silicone. We're just going to put a little bit of silicone around our wire there just to keep out any unnecessary smells or anything like that, any moisture. Then we can reinstall our panels in reverse order from the way we took them out. And remember when you put your driver's side panel back in, your four pole wire kind of route it underneath a little bit. What we'll do, take it just like this.Next thing we need to is run our power wire up to our battery. Now we're going to be using a lift to make it a little bit easier for you to see, so you know exactly how we're doing it. Doing it at home in your garage, to make it easier for yourself. If you don't have ramps, I recommend finding some that you can borrow or something and getting the back end on some lifts. Make sure you chock the front wheels, so the vehicle doesn't roll and set your emergency brake.So you can see right here, this is the grommet where our power wire came out. I'm going to run this to the front of the vehicle real quick. Let me get it done and I'll show you how I did it. So right here's where we came out and went over top this box. I found some existing piping, zip tied it here. Went over top of this brace, went on the outside of this tank here. You can see right here zip tied to this existing wiring or existing hose. And did the same thing all the way up, you might put another one right there. Went over top of this brace, and what I did from the top is I took an air line tube and made me path from my battery down, trying to stay away from anything hot or moving.So if you look right up here, you have your steering that comes down here. And you can see it, but right back in here you've also have a CD axle. That's going to move, so what I did is I took my air line tube and I went behind all of these. So when I pull my wire back up, it's going to pull it up against the body of the car. Then we'll pull up our air line tube with our wire connected. You want to make sure you pull that up, where you get all that slack out.Now before you do any cutting of this wire, I recommend checking underneath to make sure your wire's not snagged on anything. So what I did is I routed my black wire around underneath of this and on this side, so I can zip tie it right to this bundle of wires we I run it over. The reason is, is I have no where to attach it, so a lot of that wire's going to be sitting against the engine or just hanging there. I prefer not to have it like that and I would suggest not to because you want to stay away from heat.Cut my wire about here, strip it back. This is where we're going to use our heat shrink butt connector. Now you can use the ones that come in your kit, but I recommend this. The reason is, is because this is going to be living outside of the vehicle and this heat shrink butt connector is going to connect or it's going to protect the connection from any moisture and corroding over time. So now we'll take our fuse holder. We'll put one end in our butt connector. Then we'll take a heat source, heat up our butt connector, make sure you're not aiming it at anything that can melt other than the butt connector itself.So now even though it's a heat shrink butt connector, totally up to you. I am going to wrap it with some electrical tape. We're going to take our other end and we're going to add our ring terminal that comes in our kit. Then we're going to take a 12 millimeter socket and move this top but here. Make sure this is getting installed on the positive side of the battery. Now before you make that connection, you want to make sure that you don't have the fuse in. The reason is, is you want a direct connection between everything that you just connected and your taillights. Tighten that nut back down.And now we can install our fuse. I'm going to take a small zip tie, I'm going to go through this hole right in the bottom of my holder. I'm going to zip tie this lid closed or the cap, whatever you want to call it. You don't have to make it real tight, just enough you're not going to have to worry about that lid coming off or that fuse maybe coming loose.Now with all of our wiring installed, we're going to test it out and make sure it's all working properly. Left turn, right turn, brake lights, running lights. That'll do it for a look at and installation on the Curt T connector vehicle wiring harness with four pole flat trailer connector, part number 56062 on our 2009 Scion XP.
Average Customer Rating: 4.9 out of 5 stars (16 Customer Reviews)
Quickly and easily install a 4-way trailer connector on your vehicle with this custom harness. T-connector plugs directly into existing wiring. Powered converter reduces strain on wiring system and is made using SMT to ensure superior performance.perfect fit for my 08 scion took 10 mins to install plug and play longest part was tying into battery rest was 2 mins
This order was received really fast despite the Labour Day Holiday. When I installed the wiring I took my time and routed every wire carefully. This is an excellent kit for wiring up the brake lights for a trailer. The ball mount and hitch ball works like a charm. Although I will probably not use the Master Trailer Hitch Ball Wrench much, it is one of my favourite tools to have. I sure like the 1 1/4" rubber tube cover. It looks great on my car.

It is not working. There is no power from the car to the trailer. There has been in the past but not now. Not sure what to do.
I followed along with the video while doing the install and it was pretty straight forward. The written directions are not that helpful but pausing the video as you go through each step takes the guess work out. Hardest part is fishing the wire under the car as the Scion is very low to the ground. You really need to get the car on a jack or lifts.
It's working well so far, coincidentally my battery died right after I installed it but had nothing to do with the install but took some convincing my wife!
This harness was very easy to install. The directions/instructions are very accurate. The hardest part of this install is fishing a wire up to the battery and cutting all the tails off the zip ties. Total install was about 1 hour. Thanks
found your video very helpful in the set up of this harness THANKS
The directions were easy to follow. Installation was actually easy.
Instructions were straight forward and was able to install myself. Would highly recommend.
Good stuff! I would not hesitate to recommend etrailer products to my friends!
Just as advertised, with lightning-fast delivery!
received call from Rick, letting me know ordered wrong item. fixed on spot and received order on time.
Great product.
Super
Do you have a question about this Custom Fit Vehicle Wiring?
Info for this part was:
At etrailer.com we provide the best information available about the products we sell. We take the quality of our information seriously so that you can get the right part the first time. Let us know if anything is missing or if you have any questions.


Sierra K.
6/1/2021
Thank you for your review. It sounds like you are having a ground problem. I would find the ground and make sure that there is no debris around the eye. Here are some other suggestions in this article:
Helpful Links
faq-4-5-way-troubleshooting.aspx