
To see if this custom-fit item will work for you please tell us what vehicle you'll use it with.


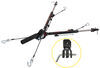
Designed for use with motor-home-mounted tow bars, the direct-connect brackets are virtually invisible, easy to mount and remove, and they eliminate the need for a quick-disconnect crossbar on your tow bar. Installs on your vehicle's frame.
Features:
Note: Roadmaster direct-connect base plates will only work with Roadmaster tow bars that slide into a trailer hitch, such as the Nighthawk, Sterling, Blackhawk, Blackhawk 2, Falcon, or Falcon 2. These base plates will not work with tow bars that require a hitch ball.
The drawbars, or front arms, on this base plate kit are supremely easy to mount and remove. Just insert them into the brackets and twist to lock them in place. To remove each arm, simply tug the built-in pull pin to disengage the lock, twist the arm back and pull it out of the bracket. Once the drawbars have been removed, the remaining brackets are virtually invisible. On most automobiles, the brackets are mounted within the grille, where they remain not only unseen, but protected from scrapes and scuffs as well.

Videos are provided as a guide only. Refer to manufacturer installation instructions and specs for complete information.
Hey, guys, this is Jake here with etrailer. Today, we're gonna be taking a look at, and I'm gonna show you how to install, the Roadmaster Direct-Connect Base Plate on our 2022 Jeep Wagoneer. This base plate is gonna have a nice, clean look on the front of your vehicle in order for you to safely tow your vehicle behind your motor home. When the arms are removed, as you can see, it's a very, very factory look. The furthest thing that's gonna stick out is going to be your safety chain loops. The whole construction is going to be a sturdy steel construction with a nice, black powder coat finish to resist rust and corrosion.
When you're ready to tow, all you have to do is stick your removable arms in, twist, and they lock into place. With that being said, the removable arms are replaceable. The opening here is for your standard Roadmaster tow bars. If you don't have a Roadmaster Tow Bar, if you already have an adapter, it should work great in here, but there are going to be adapters available. This base plate does feature safety chain loops that are going to allow you to attach your safety cables to your motor home, and then connect it directly to your base plate.
The base plate will also have two prongs in order to attach your six-pole wiring. And as you see on the other side, you see that same safety cable loop to attach the safety cable. As far as the breakaway switch, we ended up using a short bracket, which you can find on our website, in order to attach it to your base plate so you have a nice, clean look, like we have here. Another important note to make is that when flat towing a vehicle, you want your tow bar to be within three inches of level from your towed vehicle to your motor home. So you can take a measurement, once you get your base plate and all that installed, from the center of your pin, which will be here, to the ground.
And then, from the ground to the top inside edge of your motor home's hitch, you want that to be within three inches. If it's more than that, you're gonna need a high-low adapter in order to get that tow bar leveled out. Before we get into the installation, let's take the vehicle inside and go over all the other components that you're gonna need in order to flat to your Wagoneer. The five main components of a flat-tow system is going to be your base plate, which is gonna mount to the front of your vehicle and allow you to tow the vehicle behind your motor home. The tow bar, which is going to be the link to attach the vehicle to the motor home to safely pull it down the road.
You'll need a braking system to help the vehicle stop behind the RV so that the RV doesn't have to stop itself and the vehicle, they will stop proportionally together. That's gonna save the brakes on the RV, and help to have a more controlled stop. You also need safety cables, which is in case of an unlikely disconnect. The safety cables are gonna keep your vehicle safely behind the motor home until you can get pulled over and get it taken care of. And then, finally, you're gonna have wiring. This is going to allow the vehicle's signals to match that of the motor home, much like on a trailer, so that people on the highway can see what your intentions are with your motor home. To begin our installation, we need to start by removing our fascia. And to do that, there's gonna be four screws that are in our wheel well holding our liner to the fascia. This will be an eight-millimeter socket to get these removed. (drill whirring) With those four bolts removed, we can take, we'll just wanna take this trim piece and peel it back. Now there is gonna be a plug behind this signal here, so we will have to hopefully get it far enough, we'll have to remove that, so we can pull it out a little bit further, you can see it there. We'll push this back in, because we're eventually gonna need to pull the fascia off anyway. We'll just keep working this up until we get it high enough to be able to remove our 10-millimeter bolt, that's gonna be behind, holding these two pieces together. Now a little tech tip, I like to take a little piece of paper towel and fold it up a couple times, push it back here in this joint. in order to keep this away from the side of our vehicle while we work. I'll take a 10-millimeter wrench or socket and remove this bolt. (socket clicking) This will be a really good time to say anything we do on one side of the vehicle, we're gonna be doing on the other. Now we can take a 10-millimeter socket and remove the three bolts holding our fascia to the frame. (drill whirring) And we're gonna take some blue painter's tape before we pull this fascia off, and tape up our seam. We're gonna put a piece of tape on both sides. This is just so that any of these clips that you see come out of the back won't scratch either side of this. And we'll run a piece down here too. To remove your fascia, we just need to pull outward. And you can get your hands behind in the wheel well, pull straight out at you, and you should be able to pop those clips loose. And with an extra set of hands, we can pull the rest of our fascia off. And you wanna watch for some wiring to be back here, 'cause we know we have lights, we know we have our parking sensors, and there may be one more sensor here in the middle. So we've got a clip over here. Once we get this white tab pulled back, we'll push down on it, and pull our wiring apart. We'll have that same connector on the driver's side of the vehicle. Next thing is we need to remove the three nuts on each side of the vehicle on the back side of our bumper core. This is what our base plate is gonna be replacing. So this will not be reinstalled. And once they're removed, we'll just pull this off. Now if you have this lower air dam, we are gonna temporarily remove it so that we can get our other base plate components in place, and then we'll put it back on. But we'll start by removing this plug. Pull that out. And then, there's gonna be two 13-millimeter nuts, two on each side, right back here. (drill whirring) We'll leave this nut loosely on so we can get the other ones removed. We'll take this off and set it aside. On each side, our air dam is gonna need to be trimmed. And in your instructions, it'll show the exact picture, but we can show you here too. We're gonna mark it down here, go across, come straight down and over. So, essentially, you wanna start at the top of this dam, go up, over, follow that line, and go straight up. We found that trying to cut it with a pair of tin snips, this plastic on the inner part is a lot harder than the edge. So we are gonna use a rotary tool to cut it out. (rotary tool buzzing) We'll just take either of your fingers or we can take a knife or a file to smooth out these pieces of plastic. We can take our 1/2-inch bolts and our base plate, put one of the smaller flat washers on, lift our base plate up into place. It's definitely helpful to have a friend help you out with this. Then we'll take a large flat washer, slide it on. A lock washer, and thread on a nut. And we'll do the same process for the remaining hardware on the base plate. Now be sure any hardware that you use to attach the base plate to the vehicle is getting a little bit of Red Loctite. Now we need to torque all of these bolts to the specifications in the back of your instructions. (torque wrench beeps) (torque wrench beeps) Now you'll notice here on the base plate, we'll have two additional holes that'll match up with our side brackets. We'll put this bracket on the rear, then we'll take a 3/8-inch diameter bolt, thread it through, we'll put a little bit of Loctite on the end of it. Then we'll take a flat washer, a lock washer, and a nut, and we'll do this for the top and bottom bolts. Now with our hardware still hand tight, we wanna make sure that this bracket is flat up against the frame, and we're gonna walk up through drill bits to be able to eventually step up to a 17/32 drill bit to drill a hole through our frame. (drill whirring) Now you'll wanna take some clear coat, once you get your hole drilled out, and clear coat that bare metal so that it doesn't have the chance of rusting. Now with that hole drilled out, we're gonna take our shorter 1/2-inch bolts and our nut plates, and run 'em back into our frame, and then thread our 1/2-inch bolts into those nut plates. When torquing down this hardware, you wanna start with the 1/2-inch hardware first, then move to the 3/8 hardware. (torque wrench beeps) (torque wrench beeps) Now you could just take your extra wire from your weld plate and shove it up inside the frame. At this point in the installation, this is when we would trim our fascia, and then reinstall it. But, for us, we're gonna be installing the rest of our flat tow components. So we'll get those installed, and then we'll come back and show you how to trim the fascia. Now turning back to our fascia getting it ready to go back on the vehicle, we have five of these star washers that we need to remove, because we're gonna be removing this vibration panel and it will not be put back on the vehicle. You'll have one here, here, one at the end, one in the middle, and one on the other end. You kinda just bend those tabs up with a screwdriver to get it pulled off. Now with an extra set of hands, we're gonna gonna loosely put our fascia back up in place, and we're gonna take a chalk marker so that we can wipe it off if we decide that we made a mark we don't want. But we're gonna see where all of these components are on our lower fascia so that we can get 'em cut out. So we'll mark here, we'll take that one out. We've got, right here. Just gonna outline where our tow bar ends are gonna have to go in. With our fascia still mocked up, we're going to take a pair of tin snips, start trimming everything that's hitting the fascia first, and that way we can get a little bit better idea, get it a little closer to the base plate to make our final cuts. And then, we'll take it off, sand everything down, and make it look nice. Now that we've got our fascia all trimmed up and ready to reinstall, we need to take off this support off our bumper core. We'll use a 10-millimeter socket, remove two screws, and then we'll take a 1/2 inch, or excuse me, a 1/4-inch drill bit and drill out these aluminum rivets. (drill whirring) Now when putting the fascia stiffener back on, you'll wanna reuse the factory hardware that you removed, which is gonna be the three bolts on the bottom of the fascia. To get your lower air dam back in place, we're going to slide it up and slide the studs through the holes that they came out of. Your instructions are not gonna specifically say when to reinstall this, but they just wanted it out of the way so that you could get all the rest of our hardware installed. So we're gonna reinstall it now before we get some brackets in place, then we can put our fascia back on. Don't forget to reinstall your plug for your lower air dam. And with an extra set of hands, we can get our fascia reinstalled. Just make sure you get all your components to slide through your holes that you've cut out in your grill. And just reattach those fasteners as you took them out before. The last thing we have to install to complete our base plate install is the stiffening brackets. They are going to install to a weld nut on the end of your frame rail, which you can see here, with a bolt that comes in your kit with a flat washer and a split lock washer. And the other end of it is going to match up to the plastic stiffener that's on the bottom of our fascia. This is essentially going to help stiffen the bottom of this fascia, whereas the bumper beam did it before. The more aggressive angle is going to attach to the weld nut, and the other side is going to attach to the plastic stiffener. We'll just thread that in place. Now we can take a bolt with a flat washer, and another flat washer, and a lock nut, and install this side on the front. It's gonna be easier if you put the bolt through the back side, or I guess the front side, of the fascia support. And then, put on your flat washer and your lock nut. We'll do that same for the passenger side of the vehicle. (drill whirring) And we'll snug those down. And to finish up our install, we need to check to make sure that our tow bar ends fit in properly. With everything buttoned up and all our components working properly, that's gonna do it for our installation of the Roadmaster Base Plate on our 2022 Jeep Wagoneer.
Info for this part was:
At etrailer.com we provide the best information available about the products we sell. We take the quality of our information seriously so that you can get the right part the first time. Let us know if anything is missing or if you have any questions.


Thank you! Your comment has been submitted successfully. You should be able to view your question/comment here within a few days.
Error submitting comment. Please try again momentarily.